ELRO DV477IP Series Manual de usuario

jK
DV477IP-Series Manual EN Version 2
MANUAL
IP VIDEO DOOR INTERCOM
WITH 7"(18cm) MONITOR
Home is not a place, it’s a feeling
DV477IP-Series
DV477IP
DV477IP3
DV477IP2

- 1 -
Content
1. Introduction ................................................................................................- 2 -
2. Package contents ........................................................................................- 3 -
3. Mounting outdoor unit ...............................................................................- 4 -
4. Mounting the monitor ................................................................................- 5 -
4.1 Control Regulators ......................................................................................- 6 -
4.2 Functions of the monitor ............................................................................- 6 -
5. Wiring diagrams..........................................................................................- 7 -
6. ELRO Intercom app .....................................................................................- 8 -
7. Pairing the app............................................................................................- 9 -
7.1 Choose "Smart Config"................................................................................- 9 -
7.2 Or choose "QR Code way". .........................................................................- 9 -
8. Explanation app icons ...............................................................................- 11 -
9. Sharing the app with equal rights.............................................................- 11 -
9.2 Restricted rights........................................................................................- 12 -
10. Removing device.......................................................................................- 13 -
11. Reset .........................................................................................................- 13 -
12. Specificaties ..............................................................................................- 14 -
13. Safety instructions ....................................................................................- 14 -
14. Declaration of Conformity DoC.................................................................- 15 -
15. Symbols.....................................................................................................- 15 -

- 2 -
1. Introduction
Please read this manual before you start mounting and installing the IP VIDEO DOOR INTERCOM.
The set has an outdoor unit with brushed aluminum finish and a protective heavy metal rain cover
for mounting on the wall. For indoor use a nicely designed monitor in brushed aluminum is
included.
•The camera has a viewing angle of 60° horizontally/45° vertically and has 6 white LEDs for
optimal night viewing up to at least two meters away from the camera.
•The outdoor unit has a nameplate that lights up when the call button is pressed.
•A twilight switch activates the 6 white LEDs in the dark.
•The monitor has an 18 cm LCD screen.
•There are 16 ringtones available from which you can choose.
•You can adjust the volume, brightness and color intensity to your preference.
•The system provides a 12V DC voltage for an electric door opener.
•There is a potential-free contact for switching, for example, a gate or fence with its own power
supply.
•For the connection of an electric door opener use a 2 core cable with a thickness of 0.2 mm²
per wire. See the wiring diagram in this manual on page 7/8.
•There is a 2-core cable with a plug supplied for the connection of an electric door opener
through the outdoor unit. Please note that in this case, the outside door only gives access to a
common room / staircase and not directly the access to your home.
•With the free ELRO Intercom application on your smartphone, you can talk to a visitor, take a
picture/video and you can even remotely control the electric door opener.
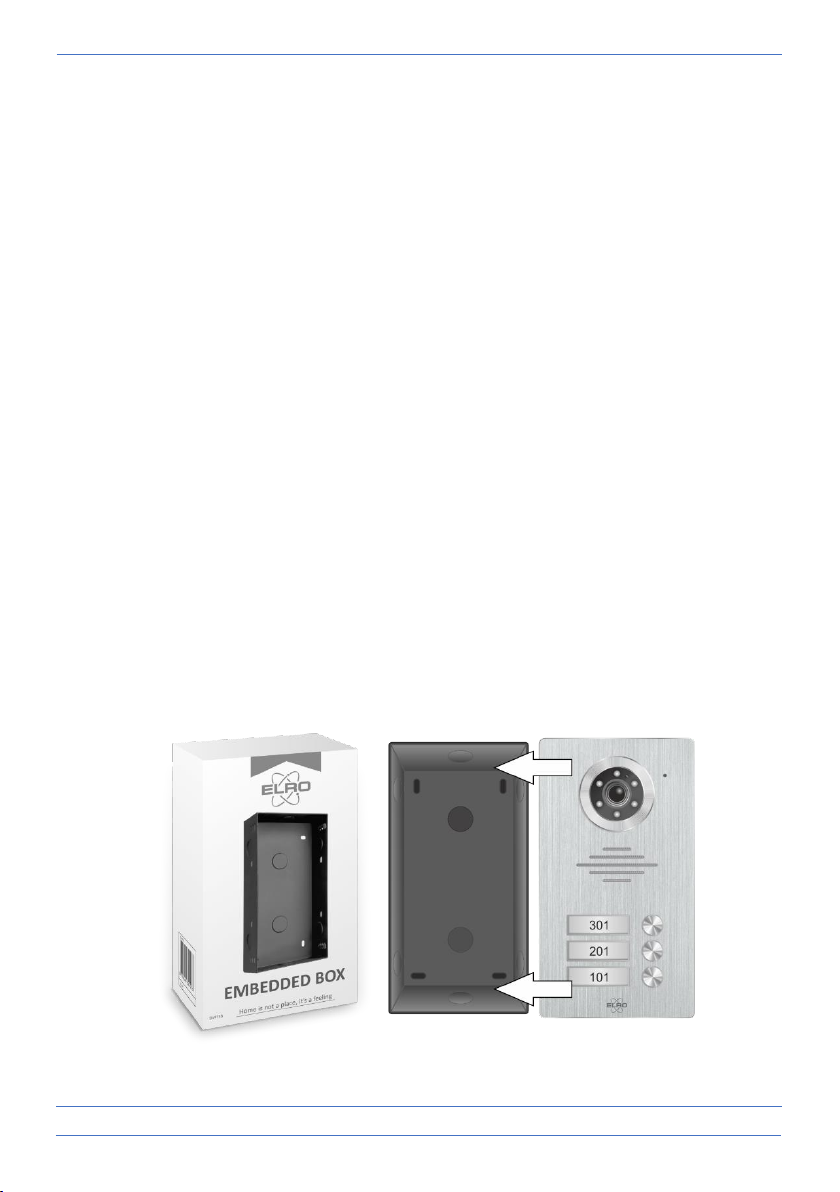
•A built-in box (ELRO DV47EB) is available as an accessory via www.elro.eu or via the retailer
where you purchased this set.

- 3 -
2. Package contents
1. Outdoor unit with bell pushers and camera
2. Rain shelter
3. Monitor
4. Connection cable length 15 m
5. Connection cable
6. Adapter with 1.75 m cord
7. Mounting bracket
8. Connection cable for electric door opener
9. Screws, plugs and Allen wrench
DV477IP
DV477IP2
DV477IP3

- 4 -
3. Mounting outdoor unit
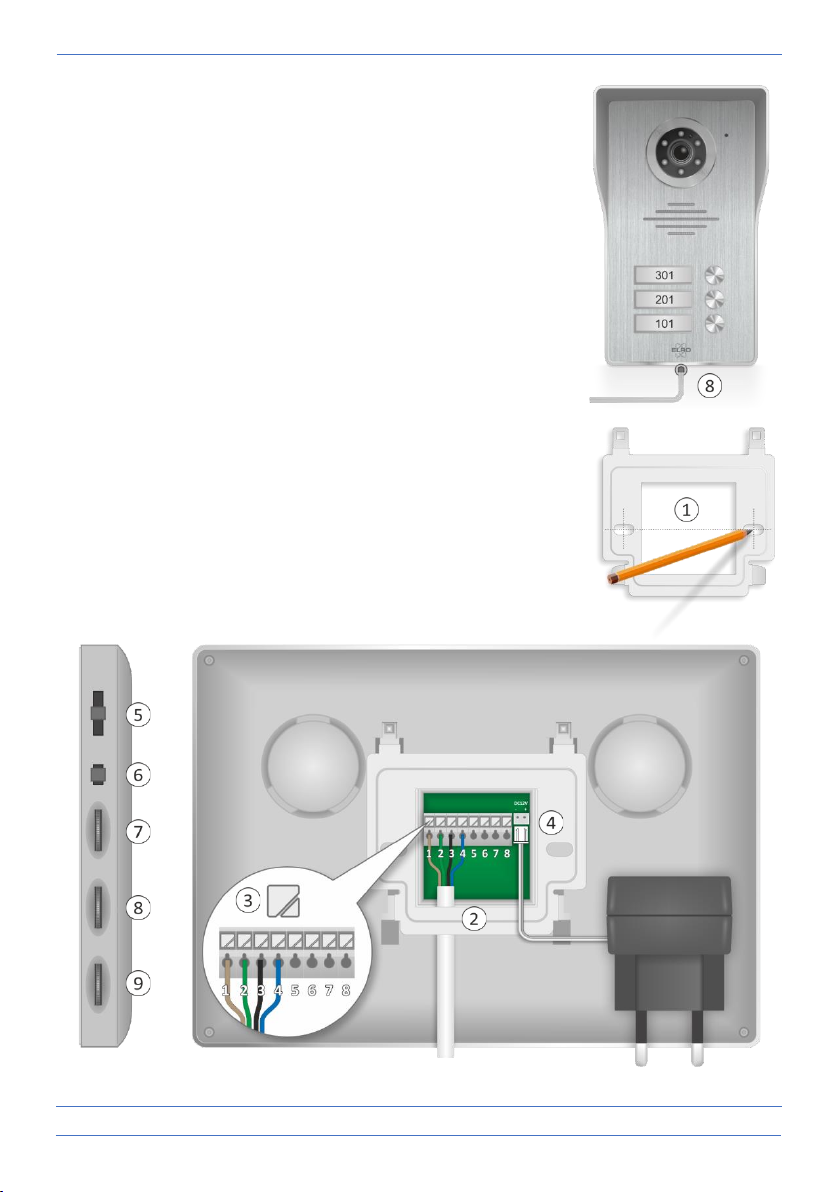
•Remove the outdoor unit (1) from the rain-sun shade and use it to mark drill holes for
mounting on the wall (2).
•The shade must be mounted flush with the entire rear side of the wall/wall.
•Drill one or more holes (3) to connect the connection cables through the wall/wall to the
outdoor unit.

- 5 -
•We recommend a mounting height (4) between 1,35 and 1,70
meters.
•Try to avoid direct exposure to sunlight.
•Plug the connection cables into the respective slots (5).
•After mounting, the angle of view of the camera can be corrected
if necessary. Use a screwdriver (6) to loosen the screw a little and
point (7) the camera to correct the image.
•On the underside of the outdoor unit is an Allen screw (8) which
you can unscrew with the supplied Allen key. Carefully remove
the aluminum front plate, rock the transparent plastic cover with
a flat screwdriver. You can now put your house number(s) on a
piece of paper.
•Use the Allen key to screw the outdoor unit into the rainshade.
4. Mounting the monitor
•The monitor should be mounted within range of your WiFi.
The supplied cable is 15 meters, take this into account the location
of the monitor.
•Mount the mounting bracket (1) on the wall and take into account
that the connections of the outdoor unit, the 12V DC adapter and
possibly the electric door lock have to be made on the back of the
monitor.

- 6 -
•The mounting bracket provides exactly the space to connect the 4 core connection cable (2)
between the monitor and bracket. Press (3) to open the clamp contact:
- 1 brown = Audio
- 2 green = Ground
- 3 black = Video
- 4 blue = Power
•Plug the adapter plug (4) into the DC12V connection.
•Now you can place the monitor on the mounting bracket and carefully slide it down, think of
the cabling.
4.1 Control Regulators
The following controls are located on the side of the monitor:
•Ringer volume (5), adjustable in 3 steps.
•Ringtone selection (6), choice of 16 ringtones.
•Brightness (7), controls the image from bright to dark.
•Chroma (8), which controls the intensity from color to black and white.
•Speech volume (9).
4.2 Functions of the monitor
With this button you can look "outward" at any time. After 40 seconds, the monitor
automatically switches off again. If you want to stop prematurely, press the button with
the receiver twice.
This allows you to switch an electric door opener. After pressing this button, a 12V DC
voltage is released. The connection is via terminal contacts 5 and 6 of the monitor or by
means of the 2 wire cord via the outdoor unit.
With this button you switch the potential free terminals 7 and 8. Here you connect a
port/ gate opener with its own power supply.
When a visitor logs on, the monitor switches on automatically. Press this key to start a
call. Press again to end the call, the monitor automatically turns off.

- 7 -
5. Wiring diagrams
DV477IP
DV477IP2

- 8 -
6. ELRO Intercom app
•Convince yourself that the smartphone on which you install the app uses the same WiFi signal
as the one on which you want to install the intercom.
•The intercom system only works on 2.4 Ghz.
•Download the ELRO Intercom app, go to:
- Google Play Store for Android
- Apple App Store for iOS.
•You will be asked for permission to access your smartphone (1).
DV477IP3

- 9 -
•You will then be presented with a "Privacy Statement Agreement", click on it (2) to view the
"Privacy Policy". Press "Go to use" (3) to continue.
7. Pairing the app
•Open the app and press the plus (4) to add a new device.
•Select your device (5) from this screen.
•Plug the adapter of the monitor into an electrical outlet to connect the device and wait for the
monitor to say "Please setup network by your mobile application". Check "Agree" and press
next (6).
•Now the name of the WiFi signal will be displayed, you need to enter the WiFi password (7)
yourself. Click on the eye to check, pay attention to upper and lower case letters. Press next.
7.1 Choose "Smart Config".
•A device is now being searched for. When the device is found, tick it (8) and press add.
•The device has been added and is coming "Online". Press (9), change and repeat to confirm the
password to a personal password. Caution, case sensitive, min. 8 / max. 16 letters and
numbers, attention NO special characters (10)
•In the configuration (11) you can change the name to your personal preference (12).
7.2 Or choose "QR Code way".
•Now scan with the camera of the outdoor unit the QR Code that is visible on your smartphone.
•When the device is found, tick it (8) and press add.
•The device has been added and is coming "Online". Press (9), change and repeat to confirm the
password to a personal password. Caution, case sensitive, min. 8 / max. 16 letters and
numbers, attention NO special characters (10)
•In the configuration (11) you can change the name to your personal preference (12).
Otros manuales para DV477IP Series
1
Este manual sirve para los siguientes modelos
3
Tabla de contenidos
Otros manuales de Sistema de intercomunicación de ELRO