Eickemeyer EICKSONIC PLUS Manual de usuario
USER MANUAL
EICKSONIC PLUS
LED DENTAL UNIT
Item no. 176880
TELEPHONE +49 7461 96 580 0
www.eickemeyer.com

2
USER MANUAL EICKSONIC PLUS LED DENTAL UNIT
T +49 7461 96 580 0 | F +49 7461 96 580 90 | export@eickemeyer.com | www.eickemeyer.com

3
USER MANUAL EICKSONIC PLUS LED DENTAL UNIT
T +49 7461 96 580 0 | F +49 7461 96 580 90 | export@eickemeyer.com | www.eickemeyer.com
CONTENT
1. Scope of Delivery...................................................................................................................... 4
2. Views of the Device and Connections .................................................................................... 4
3. Unit into Operation.................................................................................................................. 6
Commissioning Scaler with LED Lighting .....................................................................................6
Commissioning Drill / Polisher ...........................................................................................................6
4. Safety......................................................................................................................................... 7
5. Operating Conditions............................................................................................................... 7
6. Maintenance ............................................................................................................................. 7
7. Cleaning and Care .................................................................................................................... 8
Micromotor and Handpieces ..............................................................................................................8
Push Button Chuck Maintenance ......................................................................................................9
Scaler with LED Lighting.....................................................................................................................9
8. Troubleshooting .....................................................................................................................10
9. Recommended Accessories ...................................................................................................10
Important Note!
Please read the operating instructions carefully before starting. The operation must be performed by trained and
qualifi ed personnel. Intervention in the appliance must be carried out only by authorized specialist companies.
The appliance must not come into contact with liquids and may be operated only with the specifi ed rated voltage
(220–230 V).
4
USER MANUAL EICKSONIC PLUS LED DENTAL UNIT
T +49 7461 96 580 0 | F +49 7461 96 580 90 | export@eickemeyer.com | www.eickemeyer.com
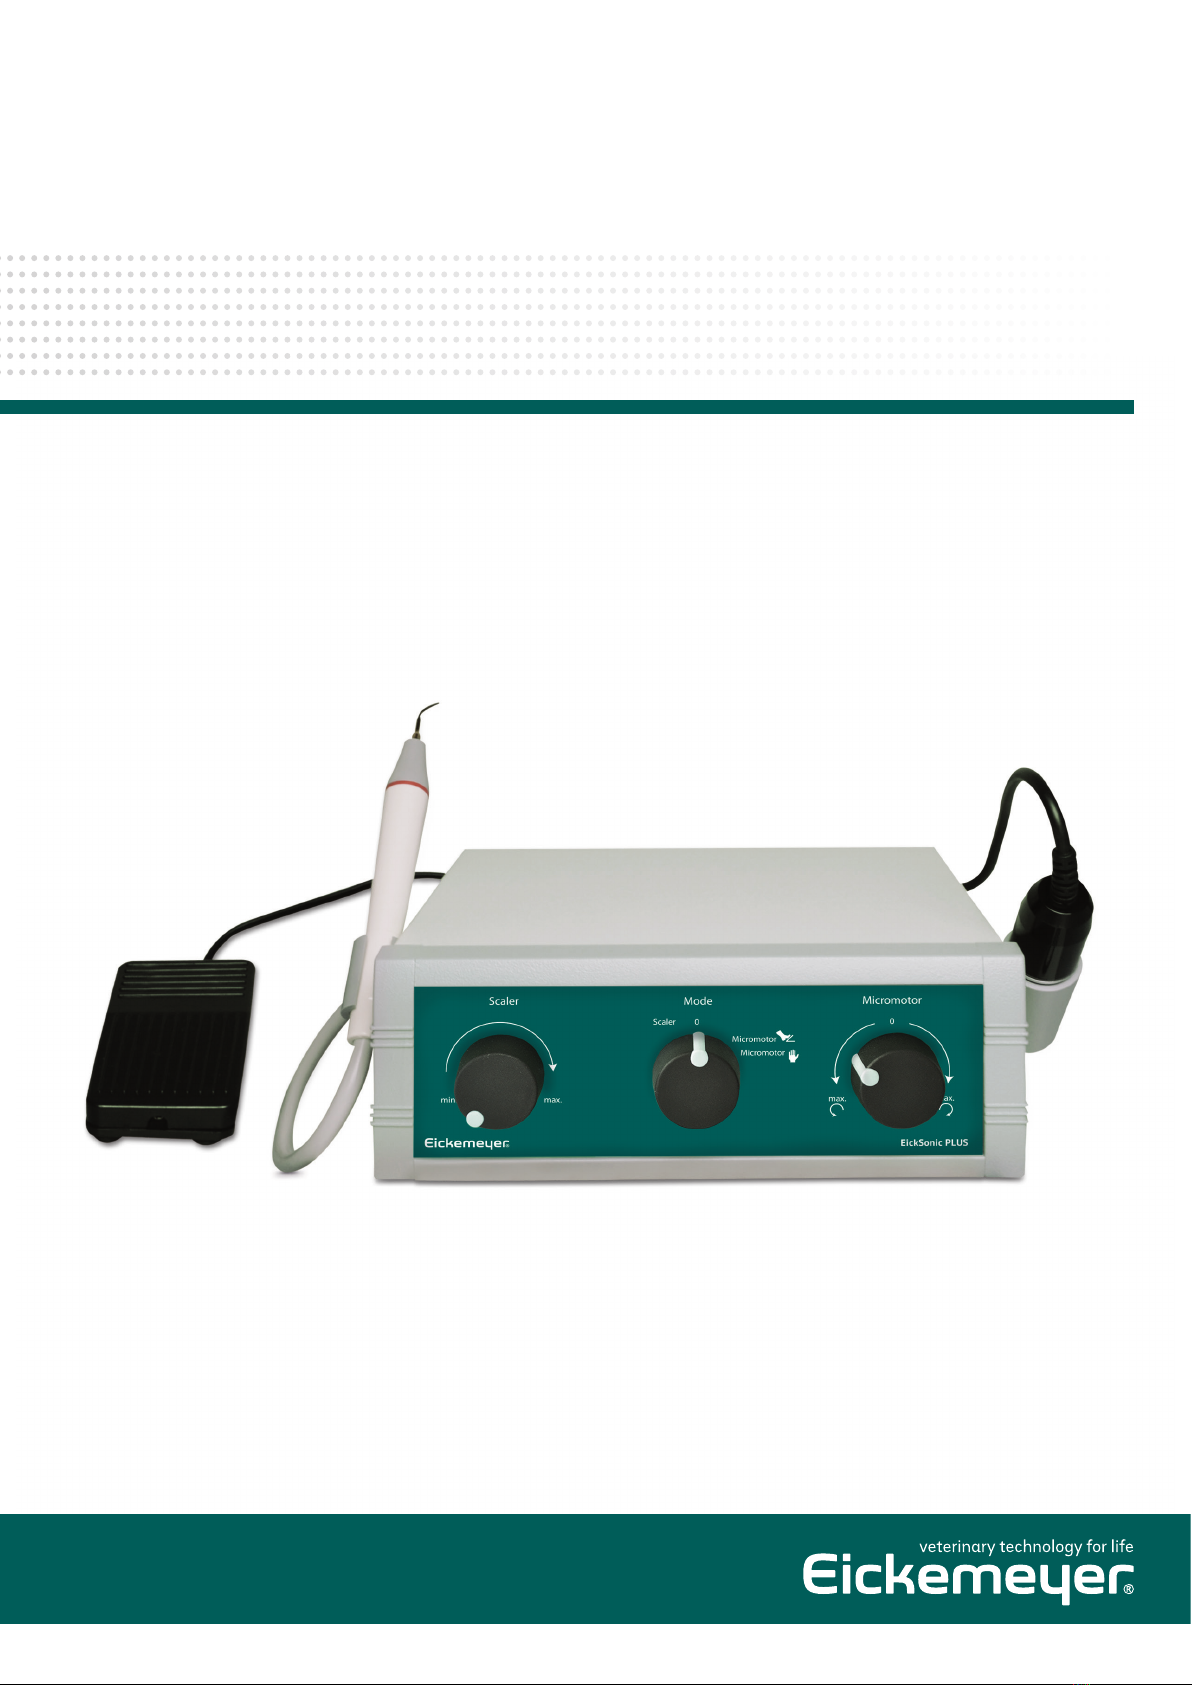
1. SCOPE OF DELIVERY
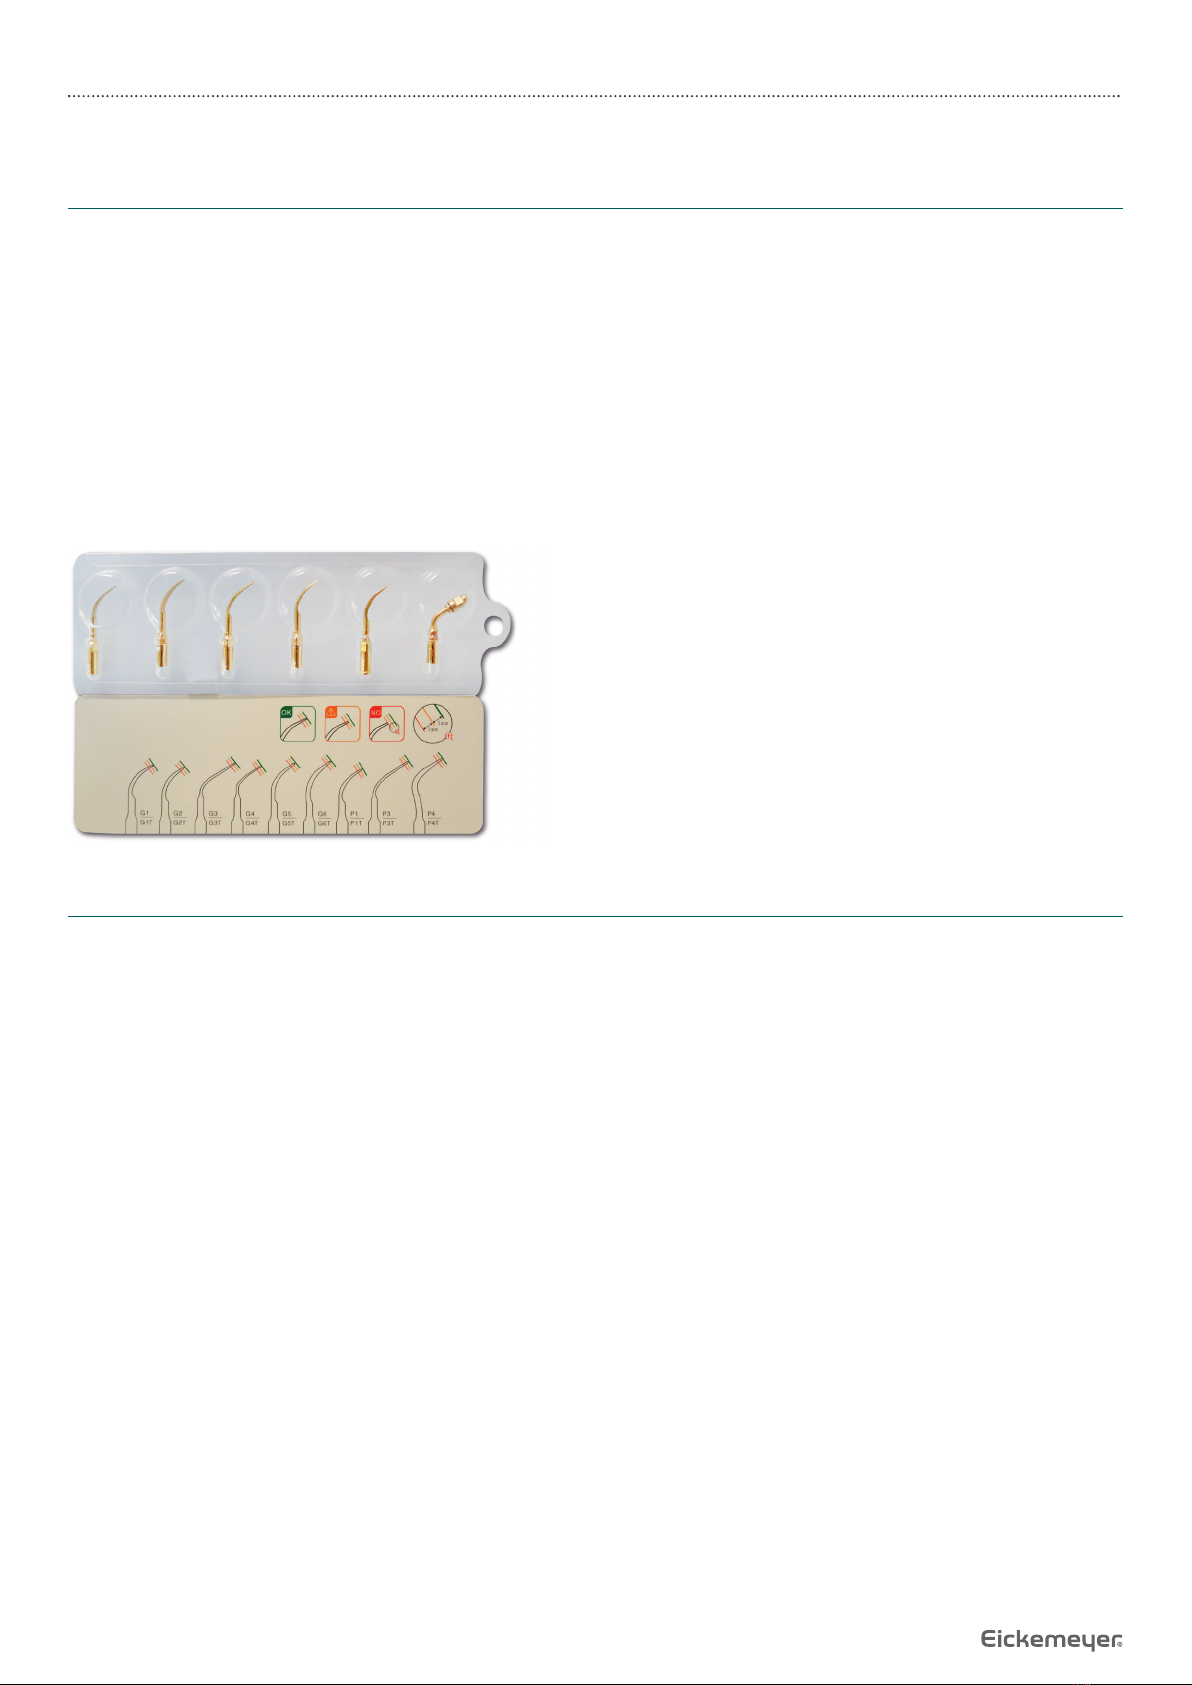
• 1 EickSonic PLUS basic unit (electric component) with a permanently fi tted Scaler
• 1 Tartar removal Lace Set (2x fl at, wide; 2x fl at, pointed; 1x point-like)
• 1 Key to attach the tips on Scaler
• 1 Micromotor with connection cable and 3-pin DIN connector
• 1 External power supply 230 V/ 24 V AC (alternating current) 1.3 A with connection cable
• 1 Water connection hose with connector for 3 / 8" water line and T-distribution
• 1 Footswitch
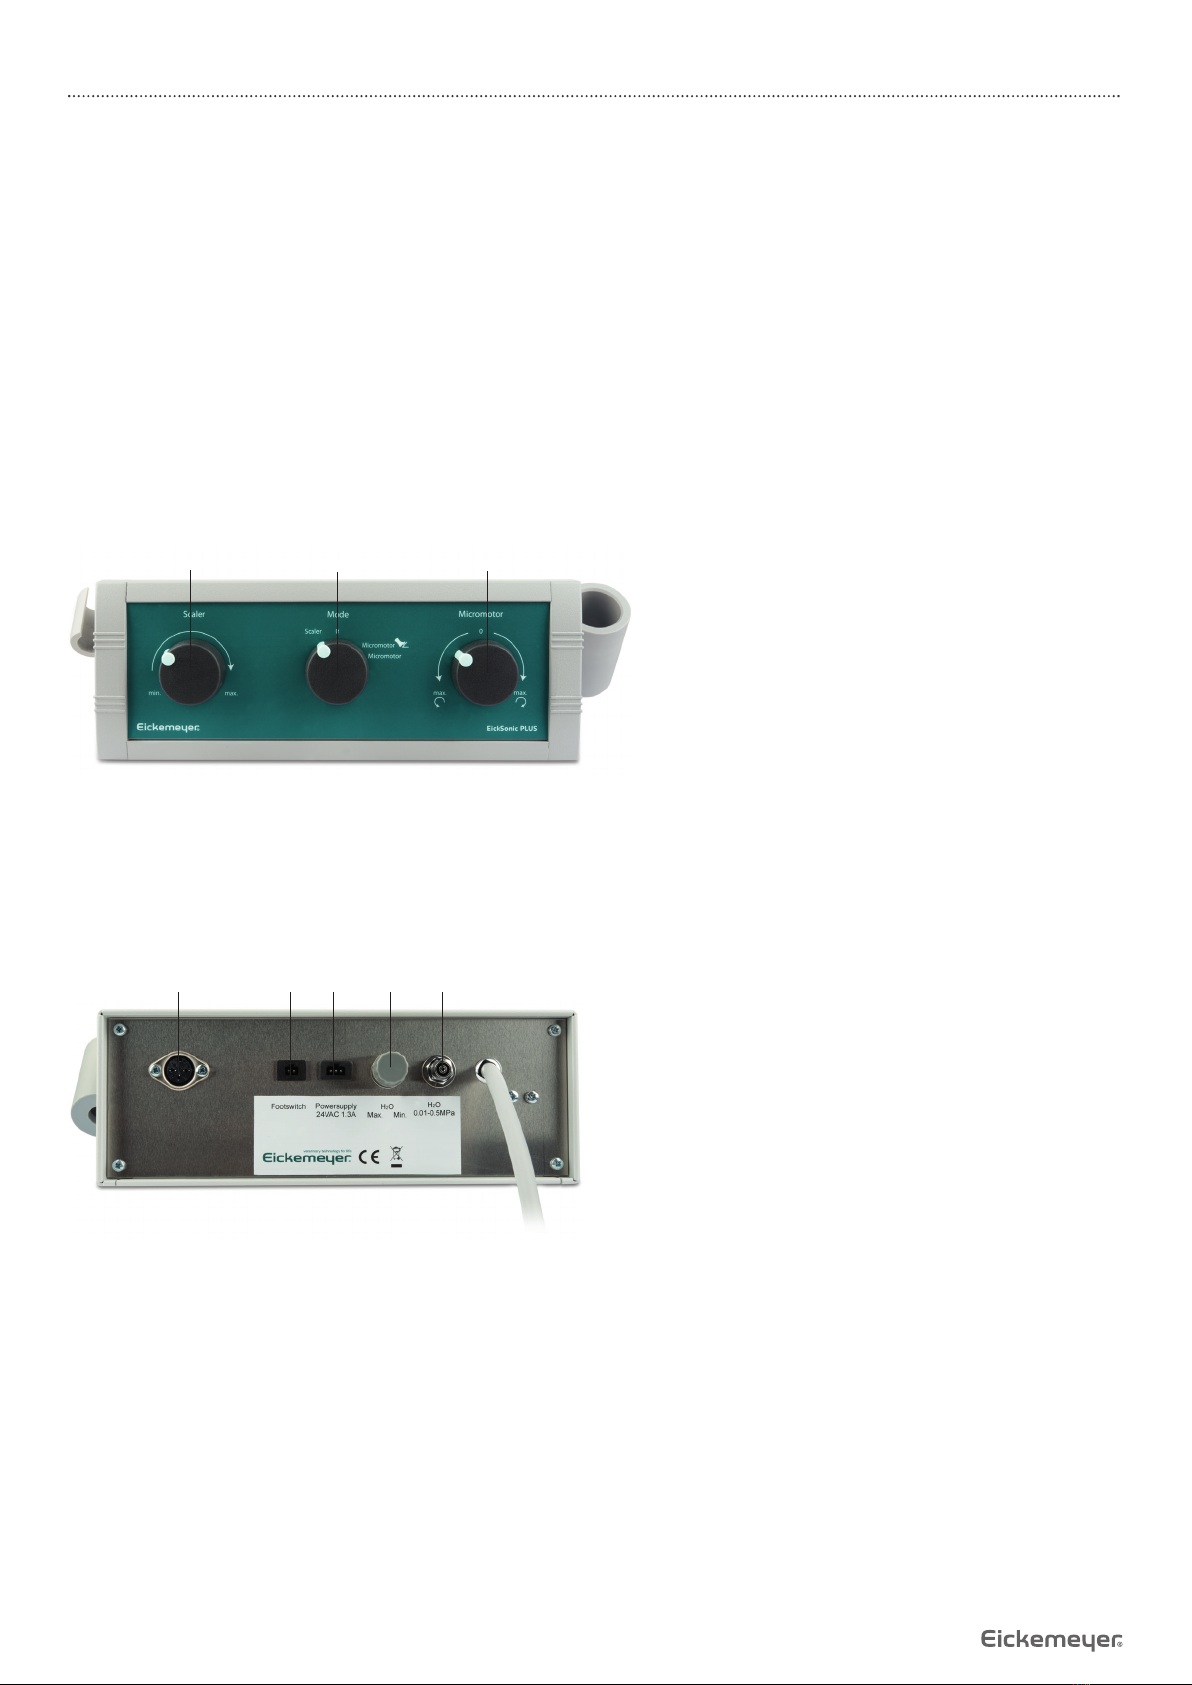
2. VIEWS OF THE DEVICE AND CONNECTIONS
Front
1 2 3
1. Scaler adjuster (intensity level) for Ultrasonic Scaler
2. Function switch for scaler (ultrasound) or Micromotor operation (drill unit) with foot / hand control
3. Controls for the left/ right directions and speed for the drill unit
Back
4 5 6 7 8
4. Socket for Micromotor (drill unit)
5. Connection socket for footswitch
6. Socket for power supply 24V AC (alternating current) 1.3 A
7. Amounts of water adjuster for the scaler
8. Connection for water supply. Caution: 0.01 – 0.5 MPa (0.1 – 5.0 bar); use only clean, fi ltered or distilled water
.

5
USER MANUAL EICKSONIC PLUS LED DENTAL UNIT
T +49 7461 96 580 0 | F +49 7461 96 580 90 | export@eickemeyer.com | www.eickemeyer.com
Left
9
9. Holder for the Scaler (Ultrasonic dental scaler handpiece)
Right
10
10.Holder for the Micromotor without drill attachment
11.Footswitch
6
USER MANUAL EICKSONIC PLUS LED DENTAL UNIT
T +49 7461 96 580 0 | F +49 7461 96 580 90 | export@eickemeyer.com | www.eickemeyer.com
3. UNIT INTO OPERATION
Commissioning Scaler with LED Lighting
1. Turn the water control knob (7) counterclockwise to maximum and the scaler knob (1) counterclockwise to the position (min.).
2. Connect the footswitch (11) with the socket (5) of the control unit.
3. Connect the water supply hose to the water input (8) and the other end using the supplied connector to a water source
(line, angle valve or water pressure tank) to.
4. Turn a scaler tip in the scaler handpiece and pull the top with the supplied key fi rmly
.
5. Connect the device-side power cable to the unit to the jack (6) and the power adapter to the power grid.
6. Set the desired intensity level using the adjuster (1) and start or stop the function with the footswitch.
7. Correct the desired amount of water with the adjusters (7) on the back.
Regularly check your scaler tips using the supplied picture for wear. In case of heavy wear urgently replace the tips.
Commissioning Drill/Polisher
1. Check if the power is off (the adjuster (2) and (3) to “0”).
2. Connect the Micromotor with the socket (4) of the control unit.
3. Unscrew the dust cap from the micro engine and plug the Handpiece (not included) on.
• Low Speed Dental Handpiece – Contra Angle (RA) (Item no. 174026)
• Low Speed Dental Handpiece – Straight (HP) (Item no. 174027)
4. Insert the drill bit (not included in scope of supply) in the appropriate handpiece. To lock the drills please refer to the
operating instructions of the handpieces. Check the correct position by turning the hand piece or gently pulling on the
drill.
5. Turn the mode selector switch (2) to micromotor foot operation or manual operation.
6. Use the adjuster (3) the desired direction of rotation and adjust the desired rotational speed “min. – max.” one.
7. With the footswitch (11) to start the engine or turn it off.

7
USER MANUAL EICKSONIC PLUS LED DENTAL UNIT
T +49 7461 96 580 0 | F +49 7461 96 580 90 | export@eickemeyer.com | www.eickemeyer.com
Hold the straight handpiece down during operation so that no water and dirt runs in the Micromotor. The Micromotor is not
internally waterproof.
Important!
Before you replace the drill, turn off the power.
Prefs (2) to “0” and the speed control “Micromotor” (3) to “0” provide.
4. SAFETY
1. Keep the unit away from children.
2. The device may only be used in accordance with its intended purpose.
3. In case of a defective cable, the device must not be operated.
4. Please follow the care instructions in the user manual of the handpieces.
5. If you want to change the drill bit, turn the power off.
6. The scaler tip has to vibrate / the drill has to rotate before it can be placed on a tooth.
7. Wear eye protection during work and provide for an adequate suction.
8. Do not clean or oil the handpiece during operation.
9. Leave after operation a drill or the supplied dummy pin in handpiece clamped.
5. OPERATING CONDITIONS
Temperature: +10 °C ~ +40 °C
Humidity: 30 % ~ 75 %
Air pressure: 700 ~ 1,060 hPa (0.7 – 1.06 bar)
• Operate handpiece only with the supplied foot pedal.
• Defect drills cause imbalance and lead to premature wear of the bearings.
6. MAINTENANCE
The drill / polisher is maintenance-free. Only the carbon brushes in the Micromotor should be replaced annually. Please send
your Micromotor to us for maintenance.

8
USER MANUAL EICKSONIC PLUS LED DENTAL UNIT
T +49 7461 96 580 0 | F +49 7461 96 580 90 | export@eickemeyer.com | www.eickemeyer.com
7. CLEANING AND CARE
Micromotor and Handpieces
It is imperative the handpieces be thoroughly cleaned and oiled after each!
• Suggested spray: Dental Handpiece Lubricant Oil (Item no. 174010)
• Suggested adapter: Dental Handpiece Air Motor /Turbine Adaptor (Item no. 17401150)
Oil the Micromotor Micromotor after the oil with the head hanging down in the
holder (10).
Oil the straight handpiece Demo days before and after the installation oiling the angle
handpiece inside.
Oiling the angle handpiece outside Oiling the angle handpiece inside
Store the handpieces separately after oiling! Do not Fit!

9
USER MANUAL EICKSONIC PLUS LED DENTAL UNIT
T +49 7461 96 580 0 | F +49 7461 96 580 90 | export@eickemeyer.com | www.eickemeyer.com
Push Button Chuck Maintenance
At least once a week, the push-button chuck should be maintained with the oil spray recommended in order to remove
deposits and to ensure functionality.
Proceed as follows:
1. Remove the drill.
2. Place the chuck opening fi rmly on the special nozzle of the spray can.
3. Holding the spray can upright, spray the chuck for 1 – 2 seconds.
4. Wipe off the escaping care oil with a lint-free cloth.
Scaler with LED Lighting
1. Remove the scaler tip with the including key ring.
2. Remove the screw and clean the shaft with alcohol.
3. Remove the trim ring on the handle of the scaler handpiece and clean with alcohol.
4. Disconnect the main handpiece from the scaler and autoclave under high temperature and pressure disinfection
(135 °C, 0.22 Mpa).
10
USER MANUAL EICKSONIC PLUS LED DENTAL UNIT
T +49 7461 96 580 0 | F +49 7461 96 580 90 | export@eickemeyer.com | www.eickemeyer.com
8. TROUBLESHOOTING
1. Check the fi t of the power plug.
2. Check the power cable of the handpiece.
3. Check the fuse.
4. Check whether the device is switched on.
5. Check the carbon brushes are worn and if they need to be replaced (see Maintenance).
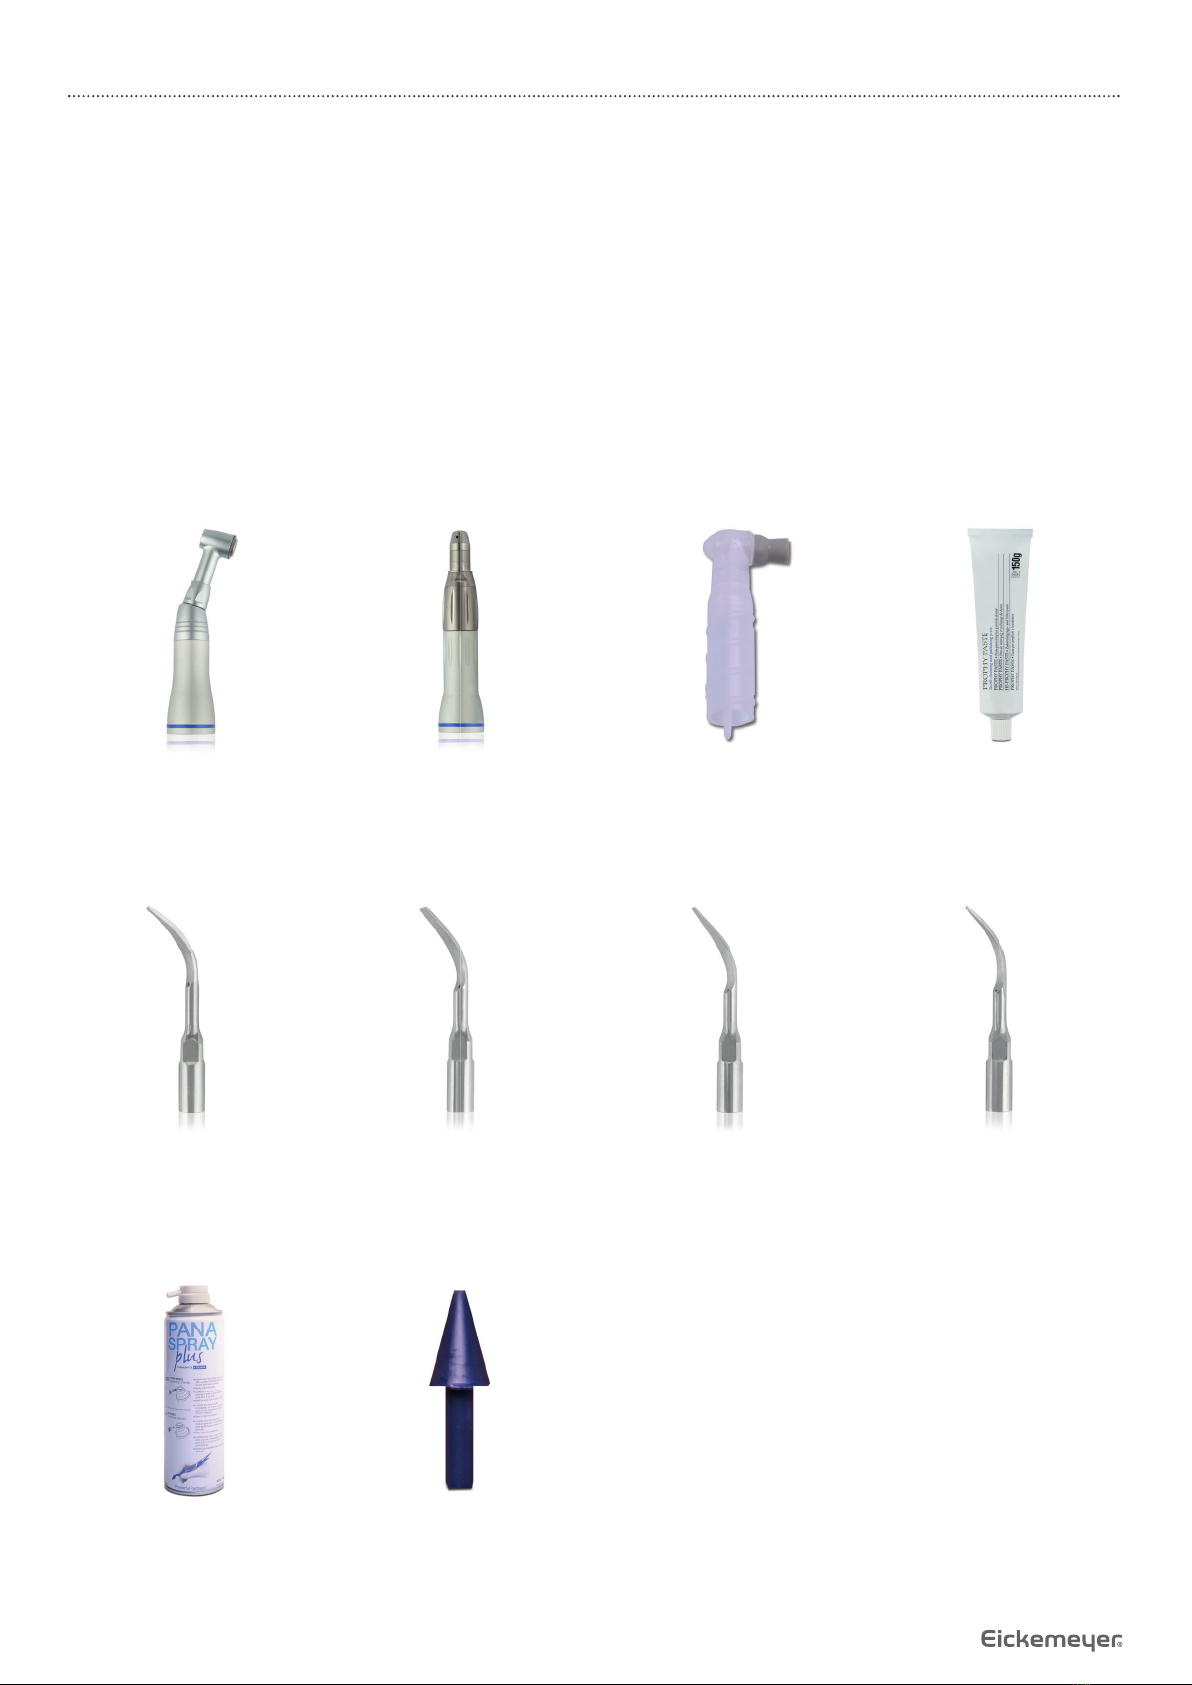
9. RECOMMENDED ACCESSORIES
Low Speed Dental Handpiece–
Contra Angle (RA)
(Item no. 174026)
Dental Scaling Tip G4T,
fl at pointed
(Item no. 176871)
Dental Handpiece Air Motor/
Turbine Adaptor
(Item no. 17401150)
Dental Scaling Tip G2T,
fl at wide
(Item no. 176872)
Dental Scaling Tip G1T,
fl at pointed
(Item no. 176873)
Dental Scaling Tip P1T,
tapered
(Item no. 176874)
Dental Handpiece
Lubricant Oil
(Item no. 174010)
Low Speed Dental Handpiece–
Straight (HP)
(Item no. 174027)
Disposable Polishing
Heads (HP)
(Item no. 174064)
Prophylaxis Paste
(Item no. 176781)
Tabla de contenidos
Otros manuales de Equipo dental de Eickemeyer


Manuales populares de Equipo dental de otras marcas

Vatech
Vatech EzRay Air VEX-P300 Manual de usuario

KaVo
KaVo GENTLEpower LUX Contra-angle 25 LP Manual de usuario

DENTSPLY
DENTSPLY SmartLite Focus Manual de usuario

LM
LM ProPower CombiLED Manual de usuario

Owandy Radiology
Owandy Radiology RX-AC Manual de usuario

mectron
mectron Piezosurgery Manual de usuario


