Ednet 86260 Manual de usuario

Benutzerhandbuch
User’s Guide
Mode d’emploi
Handleiding
Istruzioni per l’uso
Manual de instrucciones
RF Keyboard & Optical Mo se
Art.-No.: 86260
86260manual umschlag.qxd:83123manual.qxd 19.08.09 10:05 eite 1

Sehr geehrter Kunde, sehr geehrte Kundin,
ca. 95% aller Rekla ationen sind leider auf Bedienungsfehler zurück zu führen und könnten ohne
Proble e behoben werden, wenn Sie sich telefonisch oder über E ail it unserer Service Hotline
in Verbindung setzen, die wir für Sie eingerichtet haben. Wir öchten Sie daher gerne bitten, diese
Service Hotline zu nutzen, bevor Sie Ihr Gerät an Ihren Händler zurückgeben.
Unter der folgenden Telefonnu er bzw. E ail-Adresse wird Ihnen schnell geholfen.
Telefon Hotline: 06196/8838-234
86260manual umschlag.qxd:83123manual.qxd 19.08.09 10:05 eite 2

D
Hinweise zum Umweltschutz.
Alt-Elektrogeräte sind Wertstoffe, sie gehören daher nicht in den Hausmüll!
Wir möchten Sie daher bitten, uns mit Ihrem aktiven Beitrag bei
der Ressourcenschonung und beim Umweltschutz zu unterstützen
und dieses Gerät bei den -falls vorhandeneingerichteten
Rücknahmestellen abzugeben.
UK
Environmental Protection.
Discarded electric appliances are recyclable and should not be
discarded in the domestic waste! Please actively support us in
conserving resources and protecting the environment by
returning this appliance to the collection centres (if available).
F
Informations sur la protection de l'environnement.
Tout appareil électrique usé est une matière recyclable et ne fait
pas pas partie des ordures ménagères! Nous vous demandons
de bien vouloir nous soutenir en contribuant activement au
ménagement des ressources et à la protection de l'environnement
en déposant cet appareil dans sites de collecte(si existants).
NL
Richtlijnen voor milieubescherming.
Gebruikte elektronische apparaten horen niet thuis in het
huisafval!
Wij vragen u daarom een bijdrage aan de bescherming van ons
milieu te leveren en dit apparaat op de voorziene
verzamelplaatsen af te geven.
E
Advertencia para la protección del medio ambiente.
¡Los aparatos eléctricos desechables son materiales que no son
parte de la basura doméstica! Por ello pedimos para que nos
ayude a contribuir activamente en el ahorro de recursos y en la
protección del medio ambiente entregando este aparato en los
puntos de recogida existentes.
86260manual umschlag.qxd:83123manual.qxd 19.08.09 10:05 eite 3
D
BEDIENUNGSANLEITUNG
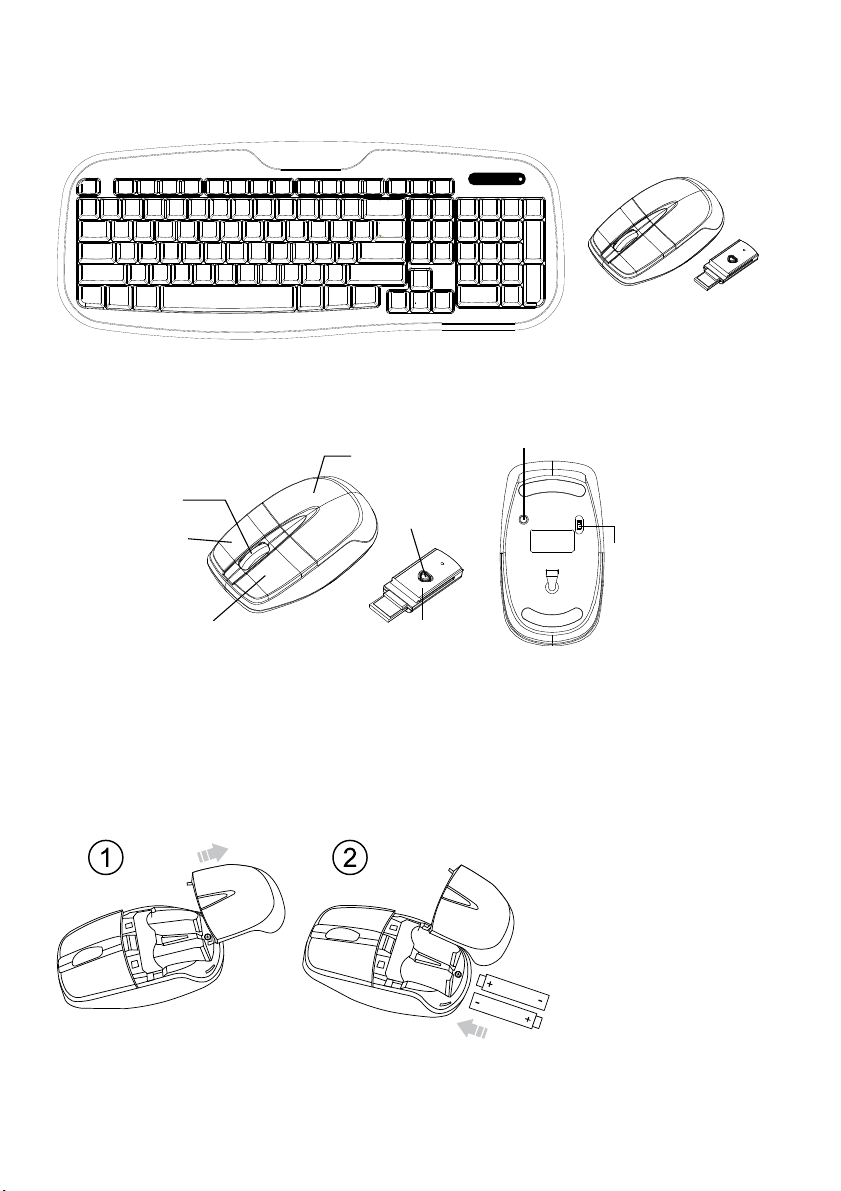
Funktionseinleitung
Batterie- und Powermanagement:
Die Batterien installieren
Schritt 1: Ziehen Sie die Batterieabdeckung zurück.
Schritt 2: Legen Sie die Batterien wie abgebildet in das Batteriefach ein.
Schritt 3: Setzen Sie die Abdeckung wieder ein.
Scrolling Rad &
Power An /
Paarungsanzeige
Linke Taste
Rechte Taste
Batterie-
abdeckung
LED Anzeige
RF Empfänger
Verbindungs- taste
Power AN/AUS
Schalter
Drücken

Tastatur
1. LED Anzeige Niedriger Batteriestand- & Paarungsanzeige
2. 103 Standardtasten
3. Verbindungstaste
4 Batterieabdeckung
Einrichtung der Verbindung zwischen dem Empfänger und der Maus, Tastatur.
1. Stecken Sie den RF Empfänger in den USB Anschluss Ihres Computers.
2. Legen Sie die Batterien in die Maus und die Tastatur ein, dann folgen Sie den Schritten unten.
3. Wenn die Maus oder die Tastatur nicht gehen, schalten Sie sie bitte in den Paarmodus.
4. Paarung: Stecken Sie den Empfänger nochmal in den USB Anschluss Ihres Computers, dann drücken Sie die
Verbinden-Taste der Maus und der Tastatur. Wenn die Maus oder die Tastatur nach 10 Sekunden nicht gehen,
paaren Sie sie nochmal. (Der Empfänger hat eine Autopaarungsfunktion).
5. Die LED Anzeige des Empfängers leuchtet wenn sich die Maus bewegt oder wenn die Tastatur in Benutzung ist.
6. Wenn der Batteriestand der Tastatur oder der Maus niedrig ist, blinkt die Low Power Anzeige.
AAA Batterien X2

Beim Verbinden
Niedriger
Batteriestand &
Paarungsanzeige
Scrolling Rad &
Niedriger
Batteriestand /
Paarungsanzeige
LED Anzeige
Angeschaltet
*Tastaturanzeige
Rote LED Leuchte AN 10 sec.
Rote LED Leuchte blinkt
Paarung (LED Leuchte AUS wenn
gepaart oder nach 10 Sek.
fehl
g
eschla
g
en
)
Rote LED Leuchte blinkt 10 Sek.
Warunung niedriger
Batteriestand
Power AN
*Empfängeranzeige
Grüne LED Leuchte 3 sec. AN
Grüne LED Leuchte blinkt
(Bei Aktivität)
Warunung niedriger
Batteriestand
Angeschaltet
Rote LED Leuchte blinkt 10 Sek.
Rote LED Leuchte AN 10 sec.
Rote LED Leuchte blinkt
Paarung (LED Leuchte AUS wenn
gepaart oder nach 10 Sek.
fehl
g
eschla
g
en
)

UK
USER'S GUIDE
CAUTION: To use this product properly, please read the user's guide before installation
Federal Communication Commission Interference Statement
This equipment has been tested and found to comply with the limits for a Class B digital device, pursuant to Part 15 of
the FCC Rules. These limits are designed to provide reasonable protection against harmful interference in a
residential installation. This equipment generates, uses and can radiate radio frequency energy and, if not installed
and used in accordance with the instructions, may cause harmful interference to radio communications. However,
there is no guarantee that interference will not occur in a particular installation. If this equipment does cause harmful
interference to radio or television reception, which can be determined by turning the equipment off and on, the user is
encouraged to try to correct the interference by one of the following measures:
- Reorient or relocate the receiving antenna.
- Increase the separation between the equipment and receiver.
- Connect the equipment into an outlet on a circuit different from
that to which the receiver is connected.
- Consult the dealer or an experienced radio/TV technician for help.
FCC Caution: Any changes or modifications not expressly approved by the party responsible for compliance could
void the user's authority to operate this equipment.
This device complies with Part 15 of the FCC Rules. Operation is subject to the following two conditions: (1) This
device may not cause harmful interference, and (2) this device must accept any interference received, including
interference that may cause undesired operation.
Functional Introduction
Scrolling Wheel &
Power ON /
Pairing indicator
Left button
Right button
Battery
Cover
LED Indicator
RF Receiver
Connect Button
Power ON/OFF
Switch

Battery and Power Management:
Installing the batteries
Step 1: Pull the battery cover backward.
Step 2: Insert the batteries as shown inside the battery compartment.
Step 3: Replace the cover.
Keyboard Buttons
1. LED Indicator Low Battery & Pairing Indicator
2. 103 standard-Keys
3. Connect Button
4 Battery Cover
AAA battery X2
Push

Setup the Connection between the Receiver and the Mouse, Keyboard.
1. Plug the RF receiver into the USB port of your computer.
2. Insert the batteries into the mouse and keyboard, then follow the steps below.
3. If the mouse or the keyboard is not working, please put them into pair mode.
4. Pairing: Re-plug the receiver into the USB port of your computer, then press connect button of the moue and
keyboard. If the mouse or keyboard does not work after 10 seconds, pair them again. (The receiver has auto pairing
function).
5. The LED indicator on receiver flashes when the mouse is moving or when the keyboard is in use.
6. When the battery of the keyboard or the mouse is low, the Low Power indicator would blink.
Low Batter
y
&
Pairing indicator
Scrolling Wheel &
Low Battery /
Pairing indicator
LED Indicator
When connecting
Power ON
*Keyboard Indicator
Red LED ON 10 sec.
Red LED Blinking
Pairing (LED OFF when paired or
failed after 10 sec.)
Red LED Blinking 10 sec.
Low Battery Warning
Power ON
*Receiver Indicator
Green LED ON 3 sec.
Green LED Blinking
(If any action)
Red LED Blinking 10 sec.
Low Battery Warning
Red LED ON 10 sec.
Power ON
Red LED Blinking
Pairing (LED OFF when paired or
failed after 10 sec.)

F
GUIDE DE L’UTILISATEUR
Introduction fonctionnelle
Gestion de la batterie et de l’alimentation :
Installation des batteries
Etape 1 : Faites glisser le couvercle de batterie vers l’arrière.
Etape 2 : Insérez les batteries comme indiqué dans le compartiment des batteries.
Etape 3 : Remettez le couvercle en place.
Voyant d’appariement /
Voyant d’appariement
Bouton
Bouton droit
Batterie
Cover
Voyant DEL
Récepteur
Commutateur
d’alimentation
MARCHE/ARRET
Faire
glisser
Bouton de
connexion
Tabla de contenidos
Idiomas:
Otros manuales de Accesorios de computadora de Ednet


