E-flight Blade SR RTF Airframe Manual de usuario

®
RTFRTF
© 2010 Horizon Hobby, Inc.
4105 Fieldstone Road
Champaign, IL 61822
USA
Horizon Hobby UK
Units 1-4 Ployters Rd
Staple Tye
Harlow, Essex
CM18 7NS
United Kingdom
Horizon Hobby Deutschland GmbH
Hamburger Strasse 10
25335 Elmshorn
Germany
E-flite®products are distributed exclusively by Horizon Hobby, Inc.
US Patent 7,391,320. Other Patents Pending
DSM and DSM2 are trademarks or registered trademarks of Horizon Hobby, Inc.
The Spektrum trademark is used with permission of Bachmann Industries, Inc.
Spektrum radios and accessories are exclusively available from Horizon Hobby, Inc.
Printed 11/09 www.E-fliteRC.com 16165
Specifications
Length . . . . . . . . . . . . . . . . . . . . . 19.10 in (485mm)
Height . . . . . . . . . . . . . . . . . . . . . 6.90 in (176mm)
Main Rotor Diameter . . . . . . . . . . . 21.80 in (552mm)
Tail Rotor Diameter . . . . . . . . . . . . 3.20 in (82mm)
Weight with Battery ............ 120 oz (340 g)
Main Motor .................. Brushless 3900Kv (installed)
Tail Motor ................... Direct-Drive N60 (installed)
Battery ..................... 3S 11.1V 1000mAh Li-Po (included)
Charger . . . . . . . . . . . . . . . . . . . . 3-Cell 11.1V Li-Po
Power Supply . . . . . . . . . . . . . . . . AC to 12V DC, 1.5A (included)
Transmitter .................. HP6DSM 2.4GHz DSM 6-channel (included)*
Receiver .................... Spektrum AR6110e 2.4GHz DSM Microlite (installed)
On-Board Electronics ........... 2-in-1 Mixer/ESCs (installed)
Servos . . . . . . . . . . . . . . . . . . . . . DS75 Digital Sub-Micro (3 installed)
Gyro....................... G110 Micro Heading Lock (installed)
*CCPM Helicopter programming is specific to Blade SR. Please do not attempt to use transmitter with
any other CCPM helicopter

2
3
Introduction
Your Blade®SR is the absolute best way to transition from flying a coaxial heli to a single-rotor CCPM machine with
confidence and, most importantly, success. It comes out of the box programmed to provide softer climb, pitch and roll
response around the center of stick movement. This, combined with the tough, two-piece main frame and lower head
speed, makes the Blade SR more forgiving and easier to master than most conventional CP helis. Plus, it’s big enough
to fly outdoors even if there’s a little wind.
But before you take that first flight, read through this manual thoroughly. It includes vital information on safely charging
the battery, proper pre-flight control checks and adjustments, and many other tips that will help make your first flight a
successful one.
Warning
An RC helicopter is not a toy! If misused, it can cause serious bodily harm and damage to property. Fly only in open
areas, preferably at AMA (Academy of Model Aeronautics) approved flying sites, following all instructions.
Keep items that can get entangled in the rotor blades away from the main and tail blades, including loose clothing,
pencils and screwdrivers. Especially keep your hands away from the rotor blades.
Note on Lithium Polymer Batteries
Lithium Polymer batteries are significantly more volatile than alkaline or Ni-Cd/Ni-MH batteries used in RC applications.
All manufacturer’s instructions and warnings must be followed closely. Mishandling of Li-Po batteries can result in fire.
Always follow the manufacturer’s instructions when disposing of Lithium Polymer batteries.
Using the Manual
This manual is divided into sections to help make final assembly and flight preparation easier to understand and to
provide breaks between each major section. Remember to take your time and follow all directions.
Safety Precautions and Warnings
As the user of this product, you are solely responsible for operating it in a manner that does not endanger yourself and
others or result in damage to the product or the property of others.
This model is controlled by a radio signal that is subject to interference from many sources outside your control. This
interference can cause momentary loss of control so it is advisable to always keep a safe distance in all directions
around your model, as this margin will help to avoid collisions or injury.
• Neveroperateyourmodelwithlowtransmitterbatteries.
• Alwaysoperateyourmodelinanopenareaawayfromcars,traffic,orpeople.
• Avoidoperatingyourmodelinthestreetwhereinjuryordamagecanoccur.
• Neveroperatethemodeloutintothestreetorpopulatedareasforanyreason.
• Carefullyfollowthedirectionsandwarningsforthisandanyoptionalsupportequipment(chargers,
rechargeable battery packs, etc.) that you use.
• Keepallchemicals,smallpartsandanythingelectricaloutofthereachofchildren.
• Moisturecausesdamagetoelectronics.Avoidwaterexposuretoallequipmentnotspecificallydesignedand
protected for this purpose.
• Neverlickorplaceanyportionofyourmodelinyourmouthasitcouldcauseseriousinjuryorevendeath.
Table of Contents
Specifications ...................................................................................................................................1
Introduction.......................................................................................................................................3
Warning ............................................................................................................................................3
Note on Lithium Polymer Batteries......................................................................................................3
Using the Manual...............................................................................................................................3
Safety Precautions and Warnings........................................................................................................3
Blade SR RTF Contents......................................................................................................................4
Needed to Complete .........................................................................................................................4
Preparing for the First Flight...............................................................................................................5
Flying Checklist .................................................................................................................................5
Battery Warnings and Guidelines.........................................................................................................6
Battery Charging ...............................................................................................................................8
Charge Errors and Indications ..........................................................................................................10
Installing the Transmitter Batteries....................................................................................................10
Installing the Flight Battery ...............................................................................................................11
Center of Gravity.............................................................................................................................12
Transmitter Control Identification ......................................................................................................13
Control Test ....................................................................................................................................14
2-in-1 Control Unit Description, Arming and Motor Control Test ...........................................................25
Gyro Initialization, Response Test and Adjustment..............................................................................27
Initialization and Response Test ........................................................................................................28
Gain Adjustments ............................................................................................................................29
Trim Adjustments ............................................................................................................................30
Servo Mode Setting.........................................................................................................................30
Installing the Optional Training Gear ..................................................................................................31
Understanding the Primary Flight Controls.........................................................................................34
Dual Rates .....................................................................................................................................42
Normal and Stunt Flight Modes .......................................................................................................44
Throttle Hold ..................................................................................................................................47
Before the First Flight .....................................................................................................................49
Choosing a Flying Area ....................................................................................................................49
Flying the Blade SR .........................................................................................................................50
Tail Rotor Proportional Mix Trimmer Pot Adjustment ..........................................................................52
Main Rotor Blade Tracking Adjustment ..............................................................................................53
Flybar Paddle Tracking Adjustment ...................................................................................................55
Flybar Weights, Head Dampening Shims and Fine-Tuning Cyclic Response...........................................56
Channel 5 Knob...............................................................................................................................58
Transmitter, Receiver Binding and Fail-Safe .......................................................................................59
Transmitter and Receiver Range Testing............................................................................................61
2009 Official AMA Safety Code ........................................................................................................62
Replacement Parts List....................................................................................................................64
Optional Parts List...........................................................................................................................65
Exploded View Parts Listing .............................................................................................................68
Exploded View.................................................................................................................................69
Warranty Information .......................................................................................................................70
Compliance Information for the European Union.................................................................................73

4
5
Blade SR RTF Contents
Item Description
Not Available Separately . . . . . . . . . . . . . . Blade SR RTF Airframe
EFLH1057 . . . . . . . . . . . . . . . . . . . . . . . . HP6DSM 6-Channel Transmitter, 2.4GHz DSM2: BSR
EFLB0997 . . . . . . . . . . . . . . . . . . . . . . . . 1000mAh 3S 11.1V 15C Li-Po, 20AWG JST/Balance
EFLC3105 . . . . . . . . . . . . . . . . . . . . . . . . 3S 11.1V Li-Po Balancing Charger, 0.8A
EFLC4000 . . . . . . . . . . . . . . . . . . . . . . . . AC to 12V DC, 1.5- Amp Power Supply
EFLH1519 . . . . . . . . . . . . . . . . . . . . . . . . Micro Helicopter Main Blade Holder: BSR
EFLH1129 . . . . . . . . . . . . . . . . . . . . . . . . Mounting Accessories & Wrench
EFLH1528 . . . . . . . . . . . . . . . . . . . . . . . . Hook and Loop Material
EFLH1444 . . . . . . . . . . . . . . . . . . . . . . . . Hook and Loop Strap
FUG4............................4AABatteries
Needed to Complete
NoadditionalequipmentisrequiredtocompleteyourBladeSR.
Preparing for the First Flight
Please note this checklist is not intended to be a replacement for the content of this instruction manual. Although it can
beusedasaquickstartguide,westronglysuggestreadingthroughthismanualcompletelybeforeproceeding.
• Removeandinspectcontents
• Beginchargingtheflightbattery(seechargingproceduresonfollowingpages)
• Installthe4includedAAbatteriesinthetransmitter
• Installtheflightbatteryinthehelicopter(onceithasbeenfullycharged)
• ChecktheCenterofGravityofthehelicopter(seepage12)
• Testthecontrols(seepage14)
• InstalltheoptionalTrainingGearSet(EFLH1527;stronglyrecommendedifthisisyourfirstcollective-pitch
equippedhelicoptermodel)
• Familiarizeyourselfwiththecontrols
• Findasuitableareaforflying
Flying Checklist
Please note this checklist is not intended to be a replacement for the content of this instruction manual. Although it can
beusedasaquickstartguide,westronglysuggestreadingthroughthismanualcompletelybeforeproceeding.
qAlways turn the transmitter on first
qPlug the flight battery into the 2-in-1 control unit
qAllow the 2-in-1 control unit and gyro to arm and initialize properly
qFly the model
qLand the model
qUnplug the flight battery from the 2-in-1 control unit
qAlways turn the transmitter off last

6
7
Battery Warnings and Guidelines
The 3S 11.1V 1000mAh Lithium Polymer Battery Pack (EFLB0997) included with your Blade SR features
Charge Protection Circuitry and Balance Charging via the included 3S 11.1V Lithium Polymer Balancing
Charger (EFLC3105). However, to help ensure a safe charge every time, you MUST read the following
safety instructions and warnings before handling, charging or using the Li-Po battery pack.
Note: Lithium Polymer batteries are significantly more volatile than the alkaline, Ni-Cd or
Ni-MH batteries used in RC applications. All instructions and warnings must be followed
exactly. Mishandling of Li-Po batteries can result in fire.
By handling, charging or using the included Li-Po battery you assume all risks associated with lithium
batteries. If you do not agree with these conditions, return your complete Blade SR model in new, unused
condition to the place of purchase immediately.
• Youmustchargetheincluded3S11.1V1000mAhLi-Pobatterypackinasafeareaawayfromflammable
materials.
• Donotchargethebatterywheninstalledinthehelicopter.
• Neverchargethebatteryunattended.Whenchargingthebatteryyoushouldmonitorthechargingprocess
and react to potential problems that may occur.
• Afterflight,thebatterymustbecooledtoambienttemperaturebeforecharging.
• You MUST use the included 3S 11.1V Li-Po Balancing Charger ONLY. Failure to do so may result in a
fire causing personal injury and/or property damage. DO NOT use an Ni-Cd or Ni-MH charger.
• Ifatanytimeduringthechargeordischargeprocessthebatterybeginstoballoonorswell,discontinue
charging or discharging immediately. Quickly and safely disconnect the battery, then place it in a safe, open
area away from flammable materials to observe it for at least 15 minutes. Continuing to charge or discharge
a battery that has begun to balloon or swell can result in a fire. A battery that has ballooned or swollen even
a small amount must be removed from service completely.
• Intheeventofacrash,youmustquicklyandsafelydisconnectandremovethebatteryfromthemodel,then
place it in a safe, open area away from flammable materials to observe it for at least 15 minutes.
• Storethebatteryatroomtemperatureatapproximately½charge(3.8Vpercell;11.4Vfora3Sbattery
pack) for best results.
• Whentransportingortemporarilystoringthebattery,thetemperaturerangeshouldbefrom40–120degrees
Fahrenheit. Do not store the battery or model in a car or direct sunlight whenever possible. If stored in a hot
car, the battery can be damaged or even catch fire.
• Donotover-dischargethebattery.Dischargingthebatterytoolowcancausedamagetothepack
resulting in reduced performance and duration.
Li-Po cells should not be discharged to below 3V each under load. In the case of the 3S Li-Po
packs used for the Blade SR, you will not want to allow the battery to fall to below 9V during flight.
The Blade SR’s 2-in-1 control unit does not feature a voltage cutoff of any type, so we suggest
that you be extremely aware of the power level of the Li-Po battery pack during flight. If at any
time the helicopter begins to require more throttle than typical to maintain hover or flight, or has
lost significant power, you must land the helicopter and power the motors down IMMEDIATELY to
prevent over-discharge of the Li-Po battery pack. If you continue to run the motors after noticing
a loss in power, it is possible to discharge the Li-Po battery pack too far, causing permanent
damage to the pack.
Over-discharge of the Li-Po battery pack can result in shortened flight times, loss of power output
or failure of the pack entirely.
Ifyouhaveanyfurtherquestionsorconcernsregardingthehandling,chargingand/oruseoftheincludedLi-Pobattery
pack, please contact Horizon Hobby’s Product Support Team at 877-504-0233, Horizon Hobby UK at
+44 (0) 1279 641 097 or Horizon Technischer Service, Germany at +49 4121 46199 66.

8
9
Battery Charging
It is important that you only charge the included 3S 11.1V 1000mAh Li-Po Battery Pack (EFLB0997) with the included
3S11.1VLi-PoBalancingCharger(EFLC3105).YourbatterypackisequippedwithspecialChargeProtectionCircuitry
and a Balance Charge Lead with connector that is only compatible with this charger. Attempting to charge the pack
using another Li-Po charger or non Li-Po compatible charger could result in serious damage. Please familiarize yourself
thoroughly with the Battery Warnings and Guidelines section before continuing.
The included 3S 11.1V Li-Po Balancing Charger will charge a near fully discharged (not over-discharged) 3S 11.1V
1000mAhLi-PoBatteryPackinapproximately1.2–1.5hours.Insomecasesthechargetimemaybeshorter
depending on the actual amount of capacity left in the pack after a flight. NEVER charge the battery unattended.
Note: The Li-Po battery pack included with your Blade SR will arrive partially charged. For this reason the initial
chargemayonlytakeapproximately30–50minutes.
Thechargerrequiresupto1.5ampsof11.5–15-voltDCinputpowerthatcanbesuppliedbytheincludedACto12V
DC, 1.5-amp Power Supply (EFLC4000) for convenient charging anywhere an AC outlet is available. NEVER attempt to
power the charger from an AC outlet without the use of a proper AC to DC adapter/power supply.
Note: When using the AC to DC adapter/power supply, the charger is protected to prevent damage if the
alligator clips touch. However, please take care to ensure that the alligator clips do not cause shorting of
the battery, adapter/power supply, etc. by keeping them clear.
Input power for the charger can also be supplied from a small 12-volt gel cell or car battery.
ThechargerisequippedwithtwoLEDindicatorsmarkedREDandGREENonthelabel.TheseLEDsindicatethe
following (also found on the label of the charger):
• Red Flashing LED Only: Input power with no battery connected
• Red and Green Solid LED: Battery connected and charging
• Red Solid LED Only: Charge complete
• Red and Green Flashing LED: Charge error
Once you have connected the charger to a power source (use care to ensuring proper polarity when connecting the
charger to the power source), its red LED flashes to indicate the charger has power and is ready to begin charging.
Connect the Li-Po battery pack to the charger using the specially marked Balance Charge Lead exiting the battery pack
and the connector labeled with 11.1V on the charger. The connector is keyed to prevent reverse polarity connection.
When the battery is properly connected and charging normally, the red and green LED indicators will glow solid. Once
the battery has been fully charged, the green LED will go out, leaving just the red LED glowing solid. The battery can
now be removed from the charger and installed into the Blade SR for flight.

10
11
Charge Errors and Indications
In the event that both the red and green LEDs flash, a charge error has occurred. Some examples of charge errors and
their indications include:
• AlternatingflashingoftheredandgreenLEDsindicatesthatthechargeprocesshasbeeninterrupted.Ifinput
power to the charger has been interrupted due to disconnection from the power source or a drop in voltage/
current output from the power source, unplug the battery from the charger. Next, check to make sure that
the input power plug from the AC to 12V DC adapter/power supply is connected or that the alligator clips are
firmly and properly attached to the power source. Also be sure that the power source is providing the proper
amountofvoltageandcurrentrequiredtothecharger.
After confirming the connections and that the power source is delivering the necessary voltage and current,
restart the charging process by connecting the battery pack. Continue to monitor the charging process to
ensure that no further charge errors occur.
• SimultaneousflashingoftheredandgreenLEDsindicatethatthevoltageoftheLi-Pobatterypackistoo
low to allow the charging process to begin. In this case the battery may have been over-discharged due to
flying the model too long, or a single cell or even all cells in the battery pack may be damaged. (For more
information on preventing over-discharge of the Li-Po battery pack, see the Battery Warnings and Guidelines
section.)
If after several charging attempts you continue to see this charge error indication, you should remove the
battery pack from service and replace it with a new one.
Ifyouhaveanyfurtherquestionsorconcernsregardingchargeerrorindications,pleasecontactHorizonHobby’s
Product Support Team at 877-504-0233, Horizon Hobby UK at +44 (0) 1279 641 097 or Horizon Technischer Service,
Germany at +49 4121 46199 66.
Installing the Transmitter Batteries
Install the 4 included AA batteries in the transmitter. Check the power level of the batteries and operation of the
transmitter by switching the power switch on (upward). The LCD screen at the top of the transmitter will indicate the
power level of the batteries. If at any time the voltage indicated on the LCD screen falls to 4.5V or less, an alarm will
sound, and it will be necessary to replace the batteries with new ones.
Note:BecausetheHP6DSMtransmitterincludedwiththeBladeSRisequippedwithSpektrum2.4GHzDSM2
technology,itdoesnotrequirethesameinputvoltageorcurrentconsumptionasatypical72MHz
transmitter for proper operation and optimum performance.
Installing the Flight Battery
Use the included hook and loop material for mounting the Li-Po battery pack. We suggest installing the loop (fuzzy)
material on the battery pack and the hook material on the battery support. You should also use the included hook and
loop battery strap for the most secure attachment of the battery to the helicopter.

12
13
Center of Gravity
Once you have properly installed and secured the battery, check the helicopter’s center of gravity. With the canopy
installed, lift the helicopter by the flybar with the flybar positioned perpendicular to the tail boom. Move the battery
forwardorrearwardasrequiredtoachieveaslightlynosedownorperfectlylevelhelicopterposition.Youshouldalways
check the CG of your Blade SR before flying, especially if you are switching between different sizes and types of battery
packs.
Support by Flybar
Level or Slightly
Downward Angle
Transmitter Control Identification
Note: Before each flight ALWAYS turn the transmitter on before connecting the flight battery to the 2-in-1 unit.
After each flight, you should always disconnect the flight battery from the 2-in-1 unit before powering the
transmitter off.
Throttle Trim
Aileron Trim
Elevator Trim
Rudder Trim
Elevator Trim
Aileron Trim
Throttle Trim
Rudder Trim
Rudder/Throttle
Functions
Rudder/Elevator
Functions
Aileron/Elevator
Functions
Aileron/Throttle
Functions
Mode 1
Mode 2
14
15
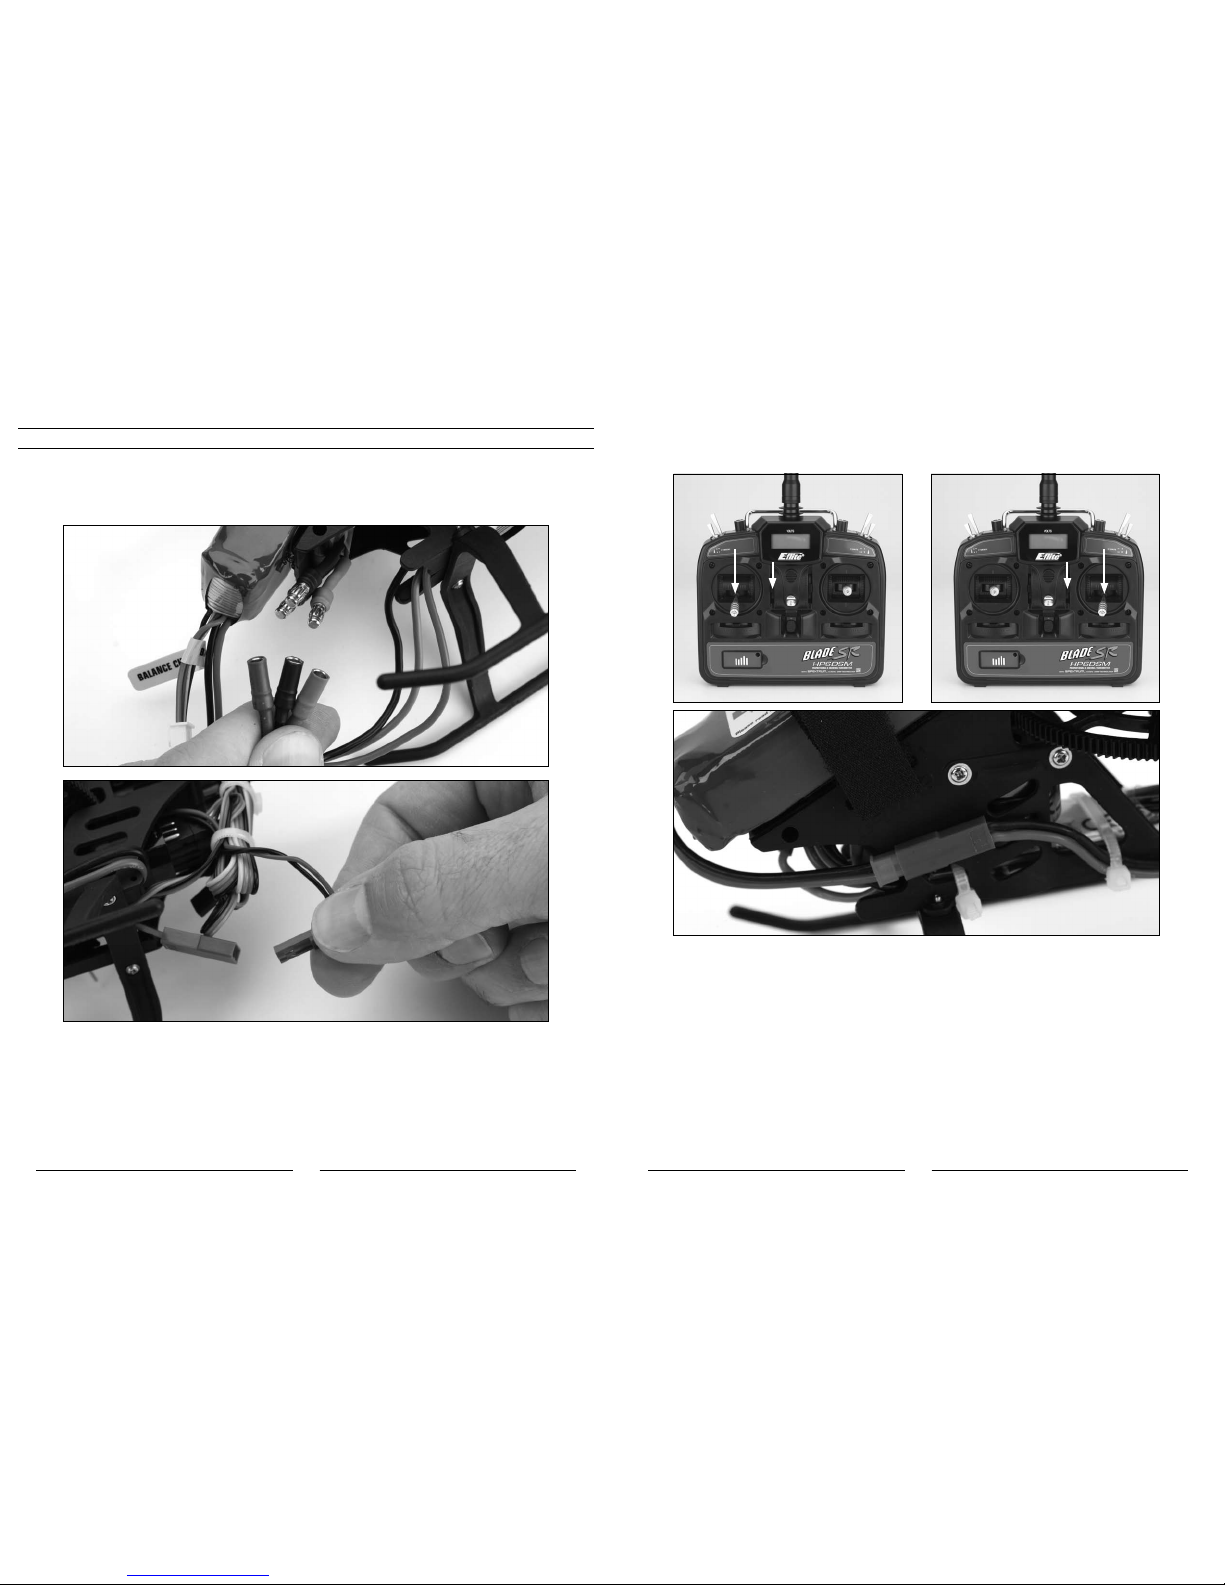
Control Test
Although each Blade SR model is test flown at the factory, you should test the controls prior to the first flight to ensure
none of the servos, linkages or parts were damaged during shipping and handling. Before proceeding, unplug the three
bullet connectors between the main motor and ESC and tail motor from the 2-in-1 control unit. It is not safe to perform
the control test with the main or tail motor plugs connected to the 2-in-1 control unit after power up.
Turn the transmitter on first and lower the throttle stick and trim completely. Then, plug the battery into the battery lead
of the 2-in-1 unit.
Mode 2 Mode 1

16
17
Position the helicopter to view it from the left or right side. Move the left-hand stick up and down to check the collective
pitch control. When the stick is pushed up, the swashplate should lower, increasing the pitch of the main blades.
Mode 2 Mode 1
With the stick pulled back down, the swashplate should raise, decreasing the pitch of the main blades.
Mode 2 Mode 1

18
19
Again viewing the helicopter from the left or right side, move the right-hand stick forward and aft to check elevator pitch
control. When the stick is pushed forward, the swashplate should also tilt forward.
Mode 2 Mode 1
With the stick pulled back, the swashplate will tilt toward the rear.
Mode 2 Mode 1
Tabla de contenidos
Otros manuales de Coche de juguete motorizado de E-flight


