Dynex DX-DTCAM - Web Camera Manual de usuario

USER GUIDE
GUIDE DE L’UTILISATEUR • GUÍA DEL USUARIO
Desktop Web Camera
Caméra Web de bureau
Cámara Web para Escritorio
DX-DTCAM

2Contents
Dynex DX-DTCAM Web Camera
Contents
Important safety instructions............................................................2
Web camera components..................................................................3
Setting up the Web camera...............................................................4
Using the Web camera ......................................................................5
Legal notices ...................................................................................14
Français ...................................................16
Español....................................................30
Important safety instructions
Do not attempt to open the Web camera. Doing so voids your warranty.
Do not allow moisture of any kind to come in contact with the Web camera. Keep away from
humidity and never immerse in water.
Do not drop the Web camera. A severe jolt may cause permanent damage and is not covered
by your warranty.
Place the Web camera on a flat, stable surface before setting it up.
Follow this User Guide carefully and keep it for future reference. Follow the correct procedures
when setting up the Web camera.
Have the Web camera checked by a service technician if any the following conditions are
true:
• The Web camera has been exposed to moisture
• The Web camera has been dropped and damaged.
• The Web camera has obvious signs of breakage.
• The Web camera is not working correctly or you can’t get it to work according to this
User Manual.

Web camera components 3
Web camera components
Item Description Function
1 Lens Provides the image to the Web camera. Adjust the focus
by turning the lens.
2 LED indicator Turns on when the Web camera is connected.
3 Microphone Provides sound reception for the Web camera.
4 Adjustable base Adjusts to provide the view you want.
1
2
3
4

4Setting up the Web camera
Setting up the Web camera
Installing the drivers
Note: Install the driver first, then connect the Web camera to a USB port on your computer.
Windows Environment
To install the Windows driver:
1Insert the Dynex Installation CD into the CD drive of your computer. The installation
program automatically starts.
If the installation program does not start automatically, click Start, Run, type
D:\Setup.exe (where “D” is your CD drive), then press Enter. The Install screen
opens.
2Click Driver, then follow the on-screen instructions.
3Install “DirectX” from the CD, if necessary.
Note: To remove the Windows driver, click Start, All Programs, Dynex WebCam, then click
Uninstall. Follow the on-screen instructions to remove the driver.
Mac Environment
To install the Mac driver:
1Insert the Dynex Installation CD into the CD-ROM drive of your computer, then double
click on the CD-ROM drive.
2Click the Dynex Driver OSX 1.0 file folder.
3Click Dynex Driver Install, then follow the on-screen instructions.
Note: This Dynex Web camera is not compatible with iChat, because iChat only supports Apple’s Web
cameras or IEEE 1394 Web cameras.

Using the Web camera 5
To remove the Mac driver:
1Insert the Dynex Installation CD into the CD-ROM drive, then double click on the
CD-ROM drive.
2Click the Dynex Driver OSX 1.0 file folder.
3Click Dynex Driver Uninstall, then follow the on-screen instructions.
Installing the hardware
To install the hardware:
1Insert the Web camera’s USB cable into your computer’s USB port.
2Place the Web camera on your desk with the lens facing you.
Third-party software
You can install your choice of software for video conferencing or video chat. For more
information on video chat software, see “Video chat” on page14.
Using the Web camera
The Dynex Web camera interface (Windows only)
You can use the Dynex Web camera interface (provided) to capture real-time images, record
images, or execute the security function.
To run the program, click Start, All Programs, Dynex WebCam, then clickDynex
WebCam. You can also start the program by clicking the Dynex shortcut on your computer’s
desktop.
Note: After installing the Dynex Windows driver, the system automatically creates a folder
(C:\My Documents\WebCam Center)to save the images you take using the Dynex
application.

6Using the Web camera
The main interface screen
The following interface screen (in Preview mode) opens when you start the application:
Interface screen icons
The following icons appear on the interface screen. Click the icon to enter the mode you
want:
Icon Description
Preview mode
Snapshot mode
Video Clip mode
Security Monitoring
mode
Exit
Camera control

Using the Web camera 7
Preview mode
The following Preview mode screen opens when you first open the program, or when you
click the Preview mode icon :
Preview mode control buttons
The following buttons are available when you are in Preview mode:
Button Description
Zoom in on the subject.
Zoom out from the subject.
Move the image up.
Move the image down.
Move the image to the left.
Move the image to the right.
Select the resolution. Choose between
RGB24 and I420, then select one of
five resolutions.
Note: The file sizes of I420 images are
smaller, so it may be a better choice
for image transmission.

8Using the Web camera
SnapShot mode
The following SnapShot mode screen opens when you click the SnapShot mode icon
:
Use the SnapShot mode to take one or more pictures.
SnapShot mode control buttons
The following buttons are available when you are in SnapShot mode:
Button Description
Send the photo by e-mail.
Shoot continuously.
Shows the choiceyou made inPreview
mode.
Note: To change the resolution, go
back to Preview mode and make the
change there.

Using the Web camera 9
Video Clip mode
The following Video Clip mode screen opens when you click the Video Clip mode icon
:
Video Clip mode control buttons
The following buttons are available when you are in Video Clip mode:
To create animation:
1Press to start animation.
2Press to stop animation.
3Press to return to the Video Clip mode.
Note: In order for the animation to work, the resolution must be lower than 320 × 240 (in
either RGB24 or I420). Make sure that the resolution is correct before using this function.
Button Description
Send a video clip by e-mail
Convert AVI files to MPEG-1 format
Start recording
Stop recording
Exit the Video Clip mode
Shows the choiceyou made in Preview
mode.
Note: To change the resolution, go
back to Preview mode and make the
change there.
10 Using the Web camera
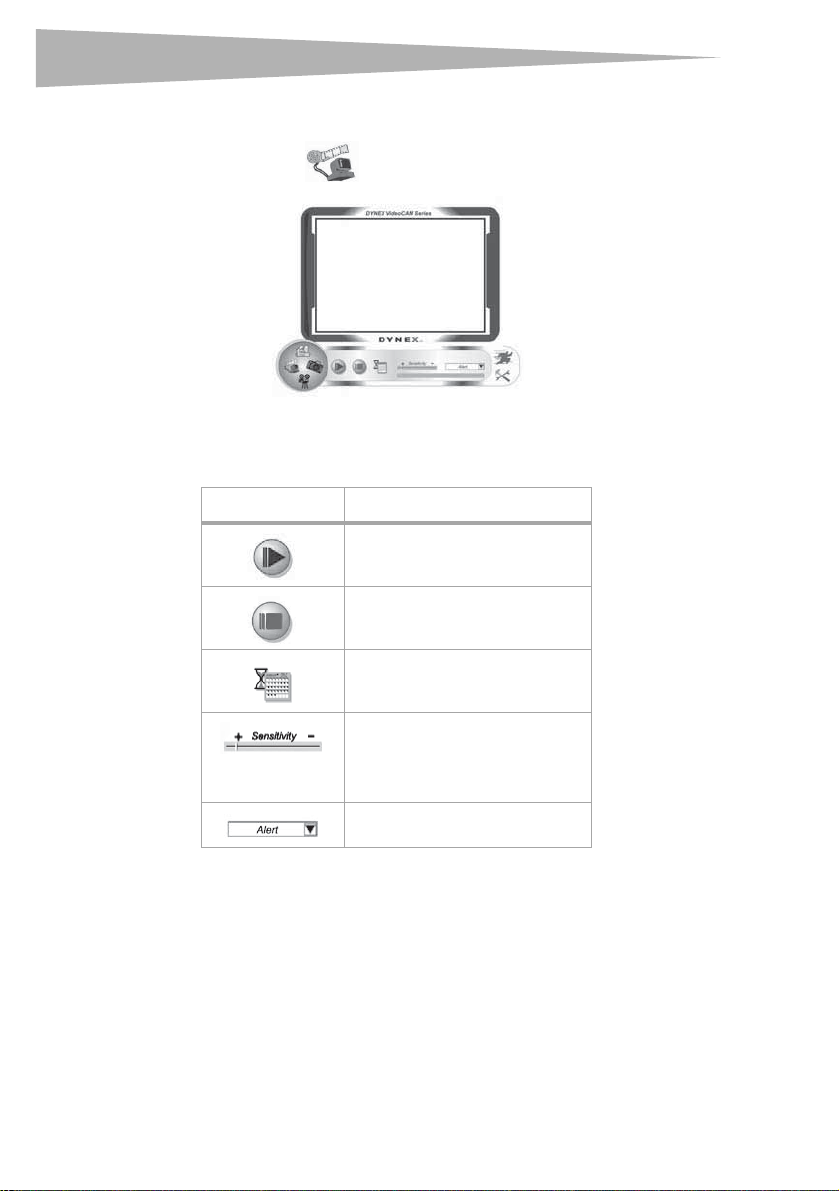
Security Monitoring mode
The following Security Monitoring mode screen opens when you click the Security
Monitoring mode icon :
Security Monitoring mode control buttons
The following buttons are available when you are in Security Monitoring mode:
Note: You can use any image resolution in the Security Monitoring mode. To change the
resolution, go back to Preview mode and make the change there.
Button Description
Start recording.
Stop recording.
Set up time parameters of the security
monitoring system.
Set the degree of variance for every
second of image recording. When the
variance is over a set threshold, the
system alerts you.
Set up alert sound effects.
Tabla de contenidos
Idiomas:
Otros manuales de Cámara web de Dynex


