Duux Mistral Manual de usuario

1
user manual
Mistral
dehumidier

2
Thank you for
choosing Duux.
We’re so glad you decided to read the instructions to your new Duux dehumidier! Many users casually
dismiss instructions and seek to gure it out on their own. But studies show that people who read
instructions will get up to speed more quickly and eciently than those who poke around with trial and
error.
At Duux we believes in the importance of a comfortable and healthy living environment. Enhancing your
well-being by designing appealing, functional and eective products is the passion that drives us every day.
With our range of innovative air treatment products we aim to provide you the best possible indoor air
quality.
Mistral is the perfect tool to extract high levels of moisture from the air in rooms up to 40m². With its
whisper quiet operation, it can remove up to 15L of moisture per day. The device is equipped with a LED
hygrostat display to set the desired humidity level at 5% accuracy. Mistral’s elegant simplicity is reected
by its sleek black & white casing with a footprint no bigger than a piece of A4 paper. Out of sight features
such as caster wheels, a 2.5L water tank, continuous draining hose and pop-up handle allow ease and
convenience for everyday use.
Read this manual carefully to get the most out of your Mistral dehumidier.

3
1. Product overview 4
2. Installation & use 5
3. Functions 9
4. Maintenance 12
5. Technical specications 13
6. FAQ 14
Table of
contents
4
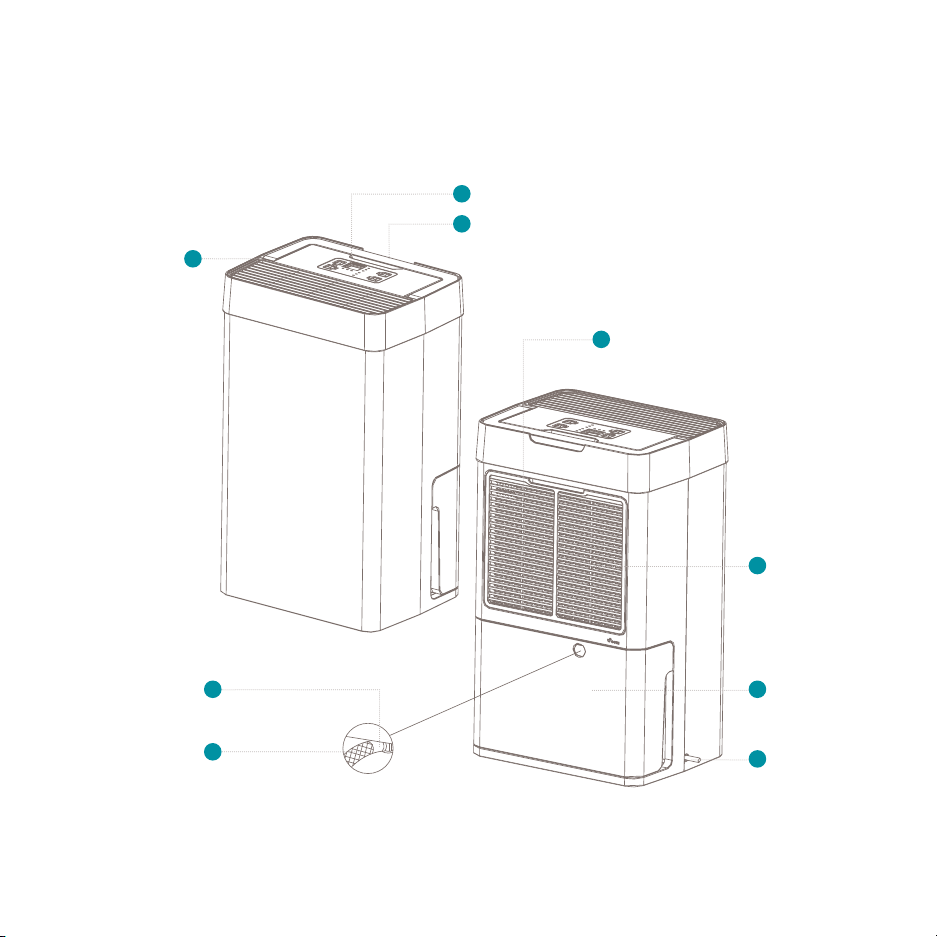
1. Product overview
Air outlet
Control panel
Draining hose
3
1
8
Pop-up handle
2
Air inlet
6
PET Filter
9
Power cable
4
Removable
water tank
5
Water outlet 7

5
2. Installation and use
Front:
at least 30cm
Back:
at least 30cm
Side:
at least 30cm
Side:
at least 30cm
Top:
at least 30cm
Note: Please take notice of below instructions
before using the product.
Installation
• The machine must be put upright 2 hours
before using.
• Please do not set up in a place where the
mist output directly hits curtains, furniture,
indoor plants or doors. It can cause stains and
deformation.
• Please place in a horizontal and stable location,
else there might be risk of water spilling.
• Please do not set up in a place where only
children are present such as children’s rooms. It
can lead to injury or breakdown if the device is
knocked over or climbed on.
• Please do not set up near devices that are
not compatible with water such as PCs
or smartphones. It may cause ignition or
breakdown.
• Never cover the air in- and outlet and keep the
lter clean at all times to ensure best eciency.
• Wait for 3 – 5 minutes after switching the
dehumidier o before you switch it back on
Placement
Please place away from walls, windows and
furniture.
• The dehumidier’s working ability depends on the
temperature and indoor humidity. In areas with
low temperature, the dehumidifying capacity is
lower.
• For best performance and eciency, please close
all windows and doors.
• Please avoid places with direct sunlight. There is a
risk that the device discolors.
• When moving the device please move it by
using the pop-up handle and keep it upright at
all times. Always empty the water tank before
moving.
• For indoor use only, do not store outdoors.
PET Filter
Power cable
Removable
water tank

6
Control panel
Change hygrostat setting
1
Hygrostat display
2
Activate / change timer mode
3
Timer indicator LEDs
4
Power button
5
Status indicator LEDs
6
Change operation mode
7
Operation mode indicator LEDs
8

7
Connecting the product
1 Connect the power cable to a power socket
Caution:
• Do not plug in the device or pull plug out of the
power supply with wet hands or use the product.
• Thoroughly dry your hands before you use the
device.
• Avoid connecting the device using other plugs,
multi-outlet and extension cords.
• Do not use when the adapter cord is bundled
together.
2 Press the power button to switch on the device.
Once the power is connected, the RUNNING
indicator LED will light up.
3 Press the power button to switch OFF after use
and remove the power plug.
Attention: When removing the power cable,
please always do so while holding the power plug.
If you remove the power cable by pulling the power
cable, it can cause the power cable to break.
1
2
3

8
Using the drainage hose
Note: Please check that the power is o before
removing the water tank from the device.
Attention: Never connect the draining hose
during operation.
1Remove the water tank and remove remaining
water;
2Connect the draining hose to the water outlet
pipe;
3 Place back water tank while guiding the
draining hose through the slot opening;
4 Place the end of the drainage hose in a water
outlet or large container.
Attention: Please make sure the end of the hose
is lower than the water outlet pipe, otherwise the
water will not drain and ooding may occur.
1
2
3
4

9
3. Functions
Note: see product overview (chapter 1) for
reference.
1Control panel
Use the control panel to adjust the settings.
Hygrostat button
Press to increase the desired humidity with
intervals of 5% for each press. The hygrostat
can be set from 40- tot 80% RH (relative
humidity). When the set humidity dissapears, the
display shows the ambient humidity in the room.
Note: when disconnecting the power cable, the
hygrostat setting will automatically reset to factory
pre-set.
Power button
Switch the device on and o by pressing this
button.
Status indicator LEDs
• Running – indicates the device is extracting
moisture. When the ambient humidity reaches
below the set humidity, the running status
indicator will turn o to save power.
Attention: If the running status indicator is
blinking, it means that the ambient temperature is
below 0⁰C or above 40⁰C. Please adjust temperature.
• Full – this indicator will light up when the water
tank is full or removed from the device. Please
empty the water tank or place it in proper
position.
.
• Defrost – indicates the device is defrosting.
Note: If the defrost indicator is blinking, it means
the humidity and/or temperature sensor(s) are cut
o or made short circuit.
Timer button
Use this button to activate timer modes.
1 Press once – activate 2 hour time-out (2hr timer
indicator LED will light up);
2 Press twice – activate 4 hour time-out (4hr timer
indicator LED will light up);
3 Press three time – activate 8 hour time-out (8hr
timer indicator LED will light up);
4 Press four times – deactivate timer.

10
Operation mode button
1 Dry clothes – use this mode to speed up wet
clothes drying in a humid environment.
Note: In dry clothes operation mode, the
hygrostat button is disabled.
2Auto – this setting will maintain the humidity on
the set humidity level with the hygrostat button
3 Quiet – Switch to quiet mode for convenience
during nighttime. This setting is most energy
ecient and extremely silent (<38dBA).
Note: The dehumidier optimally functions at
a room temperature of between 13⁰C and 35⁰C.
The specied dehumidifying performance is only
achievable in a higher temperate range (from 22⁰C)
with a high ambient humidity (>70%). The lowest
recommended operating temperate is 10⁰C. Defrost
mode will automatically activate in case of low
temperatures. The highest operating temperate is
40⁰C with a RH of 90%.
Attention: When operating in dry clothes mode,
keep the clothing at least 50 cm away from the unit
and do not allow water to drip onto the unit.
Note: Operating in quiet mode may decrease
dehumidifying performance.
2Pop-up handle
Use this handle to carry and move the device.
Fold it back to hide.
Note: Always empty the water tank before
moving the device and keep it in upright position at
all times.
3Air outlet
Dry air is released through this outlet.
Attention: Do not cover or let anything block
the air outlet.
4Power cable
Please directly connect the power cable to a
power socket or wall outlet.
5Removable water tank
Moisture from the air is collected inside the
water tank. Empty regularly.
6Air inlet
The air intake ensures constant air ow
throughout the device.
Tabla de contenidos
Otros manuales de Deshumidificador de Duux


