Duplo DF-520 Manual de usuario

Duplo Folder
Please let our service people install the machine.
Instruction Manual
[230V]

1. Easy to Use
• Automatic detection of paper size (A3 to B6).
• A one touch function automatically returns the folding
stopper and stacker to their proper positions.
2. Enhanced Basic Performance
• Folding speed of 45 to 120 sheets/min.(B4, 64g/m2,
single fold).
• Loading capacity of the paper feed table: 500 sheets (B4
64g/m2)
• Paper thickness: 52.3 to 157g/m2
3. Various Memory Functions (Standard)
• Correction memory function for fixed folding (36
types).
• Registration of custom folding methods (MAX 2
memories).
4. Standard Folding of Non-standard
size Paper Can be Carried Out Easily
by Inputting Their Size on the
Keypad.
(Paper length folding mode)
5. Various Types of Paper (Art/Coated
Paper) Can be Folded by Easy
Operation.
6. Various Functions (Standard)
Ensuring Folding Accuracy and
Usability
• Test folding can be carried out.
• The counter display can be used for additions and
subtractions.
• A slant correction device is installed to straighteng
paper.
• Cross folding can be carried out.
FEATURES OF DUPLO FOLDER

1
INTRODUCTION
Thank you for your purchase. To ensure correct usage, please read this instruction manual
thoroughly,especiallythesectionSafetyPrecautions.Afterreading,pleasestorethisinstruction
manual in a safe place for future reference.
CONTENTS
1. SAFETY PRECAUTIONS...................... 2
2. USAGE PRECAUTIONS ....................... 4
2-1. POWER SUPPLY .......................................4
2-2. OPERATING ENVIRONMENT ...................4
2-3. STORAGE CONDITIONS...........................4
2-4. MAINTENANCE..........................................4
3. INSTALLING THE UNIT ........................ 5
3-1. BEFORE INSTALLATION ..........................5
3-2. INSTALLATION LOCATION.......................5
3-3. POWER SUPPLY .......................................5
3-4. COMPONENT PARTS ...............................6
3-5. REMOVING THE PRESS RELEASE
LEVER ........................................................7
3-6. ATTACHING THE PARTS..........................8
4. NAMES OF THE PARTS..................... 10
5. NAMES AND FUNCTIONS OF THE
CONTROL PANEL PARTS................. 11
6. PRECAUTIONS BEFORE USE........... 13
6-1. PAPER TO BE USED...............................13
6-2. PRECAUTIONS FOR STACKING
PAPER......................................................13
7. OPERATION PROCEDURES.............. 15
7-1. STANDARD FOLDING OF STANDARD
SIZE PAPER.............................................15
7-2. SINGLE FOLDING THICK PAPER...........21
7-3. DOUBLE FOLDING THICK PAPER .........22
7-4. CUSTOM FOLDING OF STANDARD
SIZE PAPER.............................................25
7-5. CALLING THE MEMORY .........................30
7-6. SWITCHING THE MODE USED. .............30
8. FOLDING ADJUSTMENTS AND
MEMORIZE CORRECTIONS .............. 32
8-1. ADJUSTMENT THE FOLDING SLIPPAGE
IN THE VERTICAL DIRECTION...............32
8-2. MEMORIZE THE FOLDING STOPPER
CORRECTION..........................................34
8-3. ADJUSTMENT THE FOLDING SLIPPAGE
IN THE HORIZONTAL DIRECTION .............36
9. USING ART/COATED PAPER............ 37
9-1. PRECAUTIONS FOR STACKING
PAPER......................................................37
9-2. OPERATING PRECAUTIONS..................38
10.USING NON-STANDARD PAPER
SIZE ..................................................... 40
10-1. STANDARD FOLDING PROCEDURE ..... 40
10-2. CUSTOM FOLDING PROCEDURES.......42
11.CROSS FOLDING ............................... 47
11-1. PRECAUTIONS UPON USE ....................47
11-2. CROSS FOLDING STANDARD
SIZE PAPER.............................................48
11-3. CROSS FOLDING NON-STANDARD
PAPER SIZE.............................................50
12.TROUBLESHOOTING......................... 53
12-1. PAPER IS JAMMED NEAR THE PAPER
FEED RING .............................................. 53
12-2. PAPER IS SLIPPED NEAR THE PAPER
FEED SECTION ....................................... 54
12-3. PAPER IS COILED AROUND THE
RUBBER ROLL INSIDE THE UNIT..........54
12-4. PAPER IS JAMMED AT THE FIRST
FOLDING PLATE .....................................55
12-5. PAPER IS JAMMED AT THE SECOND
FOLDING PLATE .....................................56
12-6. PAPER IS JAMMED NEAR THE
STACKER.................................................58
13.EMERGENCY STOPS......................... 59
14.ERROR MESSAGES........................... 60
15.TROUBLE SHOOTING GUIDE ........... 62
16.CLEANING THE UNIT......................... 65
16-1. CLEANING THE RUBBER ROLL.............65
16-2. CLEANING THE PAPER FEED RING .....66
17.SPECIFICATIONS............................... 67

2
WARNINGS:
Do not place metal objects or vessels containing liquids on top of the unit. The entry of
any metal object or liquid could result in fire or electrical shock.
Do not insert any metal or easily combustible object inside this unit. This could result in
fire or electrical shock.
Do not touch or insert foreign objects into any rotating part during operation. This could
result in injury.
Do not remove the cover or back panel. This unit contains high-voltage components that
could cause electrical shock.
Do not disassemble, modify or repair this unit. There is danger of fire, electrical shock or
injury. Contact your dealer when repairs are necessary.
Use only the power supply voltage specified on the main nameplate. Using other voltages
could result in fire or electrical shock.
Keep this unit and the power cord away from heaters and heater vents. Excessive heat
could melt the cover or power cord covering and result in fire or electrical shock.
Always observe the cautions and warnings explained below to prevent personal injury or
property damage.
The degree of danger and damage that could occur is indicated in two levels by the
following marks.
WARNING: Ignoring this mark could result in the possibility of serious injury
or even death.
CAUTION: Ignoring this mark could result in the possibility of injury or
physical damage.
The following graphic symbols indicate the various types of actions to be
performed or avoided.
This graphic symbol indicates a forbidden action.
means “Do not disassemble.”
means “Do not touch.”
This graphic symbol indicates actions that must be performed.
means “Disconnect the power plug.”
This graphic symbol indicates a “Caution” that must be observed.
means “Caution: high temperature.”
1. SAFETY PRECAUTIONS
3
Do not use flammable sprays inside or near the unit (e.g. when cleaning the unit).
Such flammable gas can be ignited and cause a fire or combustion.
Make sure that the current consumption listed on the main nameplate does not exceed
capacity rating of the power outlet and do not connect other equipment to this same
power outlet. Connecting other equipment could cause the power outlet to overheat and
catch fire.
Remove any dust that accumulates on the power plug prongs and the surface from
which the prongs extend. Accumulated dust can result in fire.
If any foreign object such as metal or liquid should enter this unit, immediately turn off
the power switch and disconnect the power plug from the power outlet. Failure to do so
could result in fire or electrical shock. Contact your dealer immediately.
Do not damage the power cord or power plug. (Do not scratch, alter, bend, twist, pull or
place heavy objects on the power cord or power plug.)
This could result in damage, fire or electrical shock.
Always grip the plug when disconnecting the power plug from the power outlet. Pulling
on the power cord could cause damage, resulting in fire or electrical shock.
Do not handle the power plug with wet hands. This could result in electrical shock.
Before cleaning this unit, turn off the power switch and disconnect the power plug from
the power outlet. Accidental operation of the unit during cleaning could result in injury.
CAUTIONS:
Always disconnect the power plug from the power outlet when this unit is not to be used
for an extended period. Failure to do so could result in fire due to leakage current if the
insulation should deteriorate.
Install this unit on a level, stable stand or floor, with sufficient space around it. Failure to
do so could result in the unit overturning and injury.
Do not install this unit in a location where there is excessive humidity or where contact
with water is possible. Failure to do so could result in deterioration of the insulation, fire
or electrical shock.
Disconnect the power plug from the power outlet before attempting to move this unit.
Failure to do so could result in power cord damage, fire or electrical shock.

4
2. USAGE PRECAUTIONS
+6%
2-1. POWER SUPPLY
Make sure the power supply used is always within the following range.
230V AC -10%, 50Hz
Plug the power cord plug directly into a wall power outlet.
2-2. OPERATING ENVIRONMENT
Operate this unit in the following environment.
• Temperature range: 5 to 35 °C
• Humidity range: 20 to 80% RH (no condensation)
• Avoid locations with direct sunlight
• Avoid dusty locations
• Avoid locations with vibration
• Avoid locations that are salty
• Avoid locations with special chemicals
2-3. STORAGE CONDITIONS
Store this unit in the following environment.
• Temperature range: -5 to +45 °C
• Humidity range: 20 to 90% RH (no condensation)
• Avoid locations with direct sunlight
• Avoid dusty locations
• Avoid locations with vibration
• Avoid locations that are salty
• Avoid locations with special chemicals
2-4. MAINTENANCE
To protect the characteristics of this unit, the customer should never supply oil or grease
to the parts (except when the customer is specifically requested in this instruction
manual).
Please contact your dealer in case of any problem.

5
3. INSTALLING THE UNIT
The customer should never install the machine. Please be sure to ask your dealer for
installation.
3-1. BEFORE INSTALLATION
• Turn the power of this unit off, and disconnect the power cord from the power outlet.
• Make sure that the voltage and frequency in the area to be used correspond with the unit’s
specifications.
3-2. INSTALLATION LOCATION
• Install on a base which can bear the machine’s weight.
The weight is 33 kg.
• Install on a horizontal and flat ground.
• Avoid the side of any heating such as a heater.
• Place this unit in the following environment.
• Temperature range: 5 to 35°C • Humidity range: 20 to 80%RH (no condensation)
• Avoid locations with direct sunlight • Avoid dusty locations
• Avoid locations with vibration • Avoid locations that are salty
• Avoid locations with special chemicals • Avoid locations that splash
3-3. POWER SUPPLY
• Make sure the power supply used is always within the following range.
• 230V AC -10%, 50Hz
• Plug the power cord plug directly into a wall power outlet.
• When using the same power outlet together with other elctrical products, make sure not to
over the capacity of power supply.
The fixed current is 0.5 A.
+ 6%

6
After checking that you have following parts, attach them to the unit.
12
3
3. INSTALLING THE UNIT
3-4. COMPONENT PARTS
No. Name Qty.
1
2
1
1
3
4
1
1
No. Name Qty.
First folding plate
Second folding plate
Cross folding lever
Instruction Manual
4
DUPLO CORPORATION
Duplo Folder
Please let our service people install the machine.
Instruction Manual

7
3-5. REMOVING THE PRESS RELEASE LEVER
This press release level is attached to the unit at shipment to prevent the rubber roll from
becoming distorted.
Be sure to remove it when installing the unit.
Take note that the unit will be damaged if it is used without removing the lever.
Remember to remove it in the following order when installing the unit.
1Two press release levers are inserted
in the left and right shaft edges of the
rubber roll.
2First, remove press release lever(A).
• To remove, push inwards and pull out the press
release lever, as shown in the figure.
Next, pull out press release lever(B)
as shown in the figure.
Also remove that of the operating side in the
same way.
<Operating side>
Press release lever(B)
Press release lever(A)
Press release lever(B) <Non-operating side>
Press release lever(A)
Press release lever(A)
Press release lever(B)
3. INSTALLING THE UNIT
8
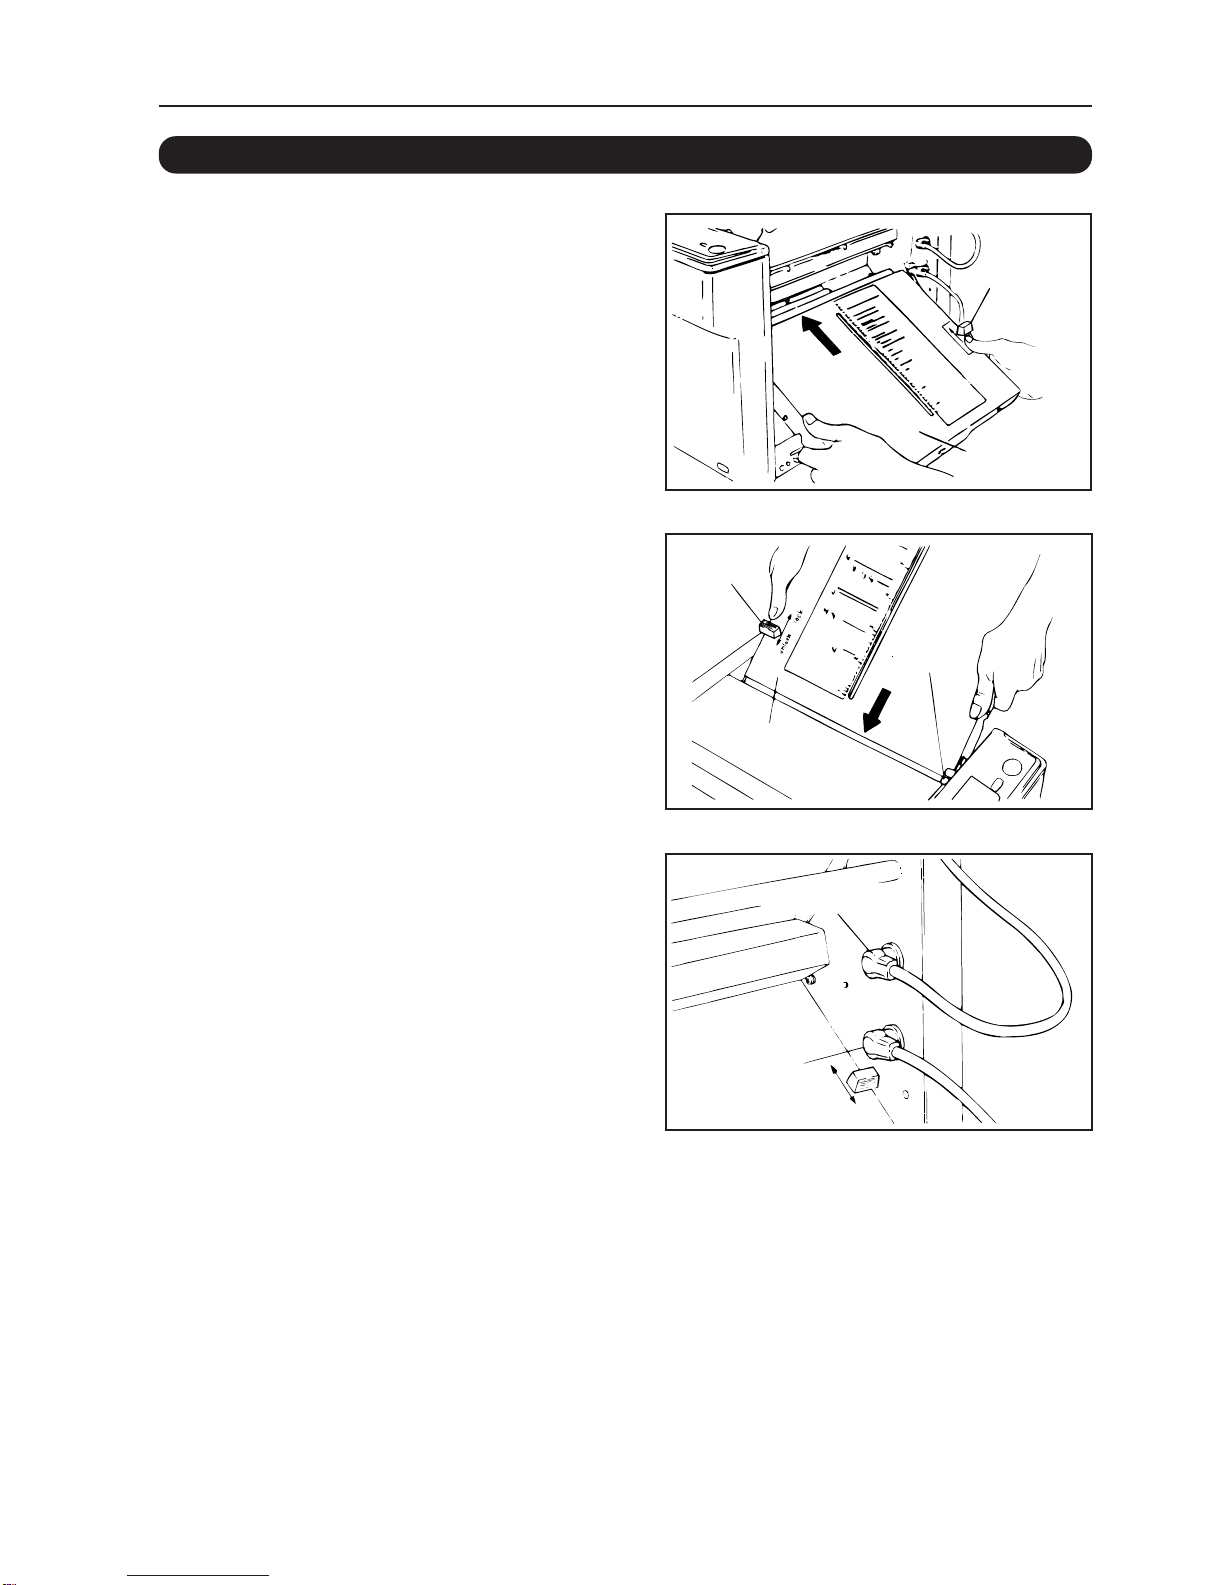
1First, attach the second folding plate.
• Before starting, push the lock lever at the side of
the folding plate to “UNLOCK”.
• Next, insert the folding plate into the unit.
• After inserting it properly, push the lock lever to
“LOCK”.
2Secondly, attach the first folding
plate in the same way.
* If the paper jams inside the folding plate, turn off
the power supply, pull out the control cord of the
folding plate, push the lock lever to ''UNLOCK",
and remove the folding plate.
3After attaching the folding plates,
connect the control cord of the first
folding plate to connector No. 1 and
that for the second folding plate to
connector No. 2.
Note 1: Be sure to insert the control cords
correctly.
Note 2: Be sure to turn off the power before
connecting/disconnecting the control
cords.
3. INSTALLING THE UNIT
3-6. ATTACHING THE PARTS
Second
folding plate
Lock lever
Lock lever
First
folding plate
Stopper
Control cord 1
Control cord 2
Otros manuales para DF-520
1
Tabla de contenidos
Otros manuales de Máquina plegadora de papel de Duplo

Manuales populares de Máquina plegadora de papel de otras marcas

KRUG+PRIESTER
KRUG+PRIESTER IDEAL 8570 Manual de usuario

Pressure Seal Systems
Pressure Seal Systems PS300 Manual de usuario

Olympia
Olympia FM 4420 Manual de usuario

Horizon Fitness
Horizon Fitness QC-S30 Manual de funcionamiento

Cyklos
Cyklos CFM 600 Manual de usuario

Dynafold
Dynafold Paper Folder PF-330 Manual de usuario

Cyklos
Cyklos GPM 450 Manual de usuario

Challenge
Challenge MEDALIST 820 Manual de referencia técnica

Martin Yale
Martin Yale 1611 Manual de usuario

Martin Yale
Martin Yale 1701 Manual de usuario

MyBinding
MyBinding Formax FD-346 Manual de usuario

FP Mailing Solutions
FP Mailing Solutions FPi 2300 Manual de usuario


