DigiSpec VMD-1001 Manual de usuario

VMD-1001
Digital Video
Motion Detector
Version G
Operation Manual

Introduction ..................................................................... 3
Features ........................................................................... 4
Connecting the Video .................................................... 6
Types of Cameras .............................................. 6
Cable .................................................................... 6
Lighting ................................................................ 7
Video Input & Output ........................................ 7
Connecting the Alarms ................................................. 8
Alarm Output ....................................................... 8
Connecting the Power .................................................. 9
Normal Operating Mode ................................................ 10
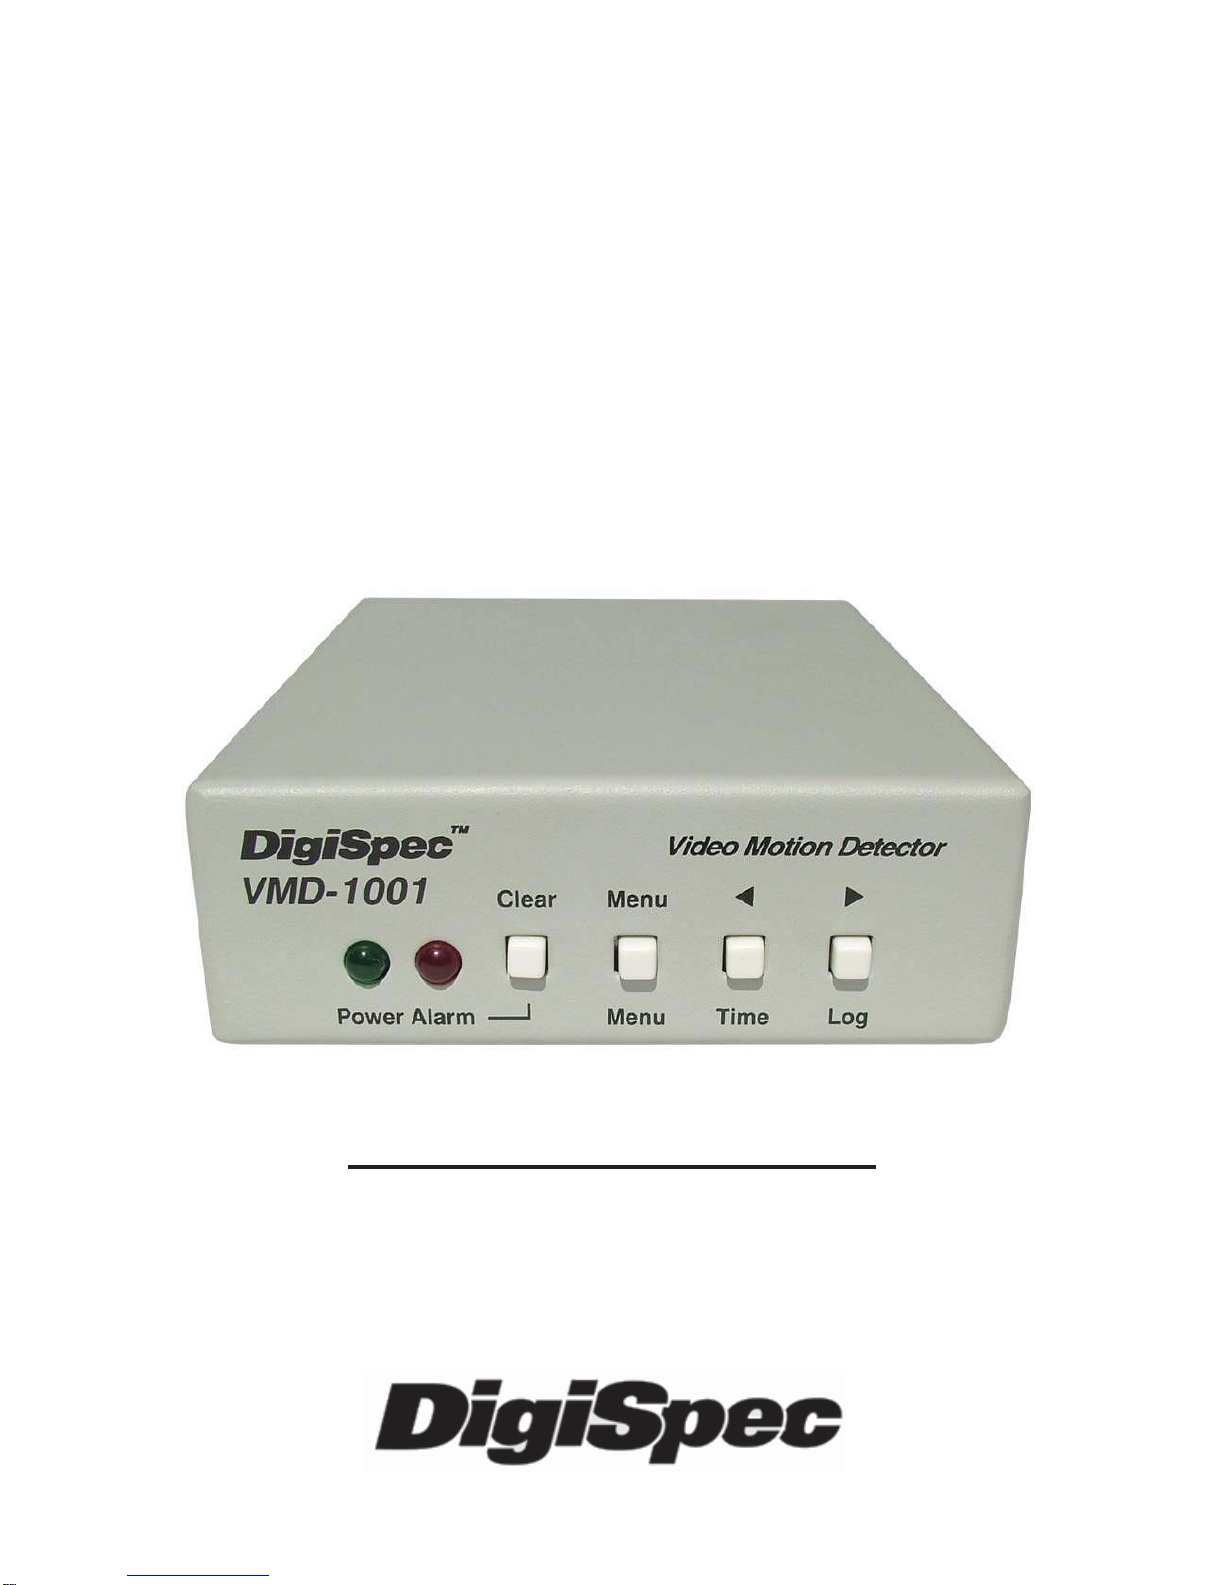
Front Panel .......................................................... 10
Button Operation ................................................ 10
On-Screen Displays ....................................................... 12
Present Time Display ........................................ 12
Log Display ......................................................... 13
Video Loss .......................................................... 13
Programming the VMD1001
Main Menu .............................................................................. 14
Security Code .........................................................................15
Alarm Setup .......................................................... 17
Sensitivity Level ................................................ 17
Tracking Level .................................................... 18
Relay Hold ........................................................... 19
Relay Contact ..................................................... 19
Buzzer .................................................................. 19
Alarm Zones ........................................................ 20
Clock Format ...................................................... 20
Clock Set ............................................................. 21
Alarm Log / Clearing ......................................... 22
Warranty ........................................................................... 24
Specifications ..................................................................... 26
Emergency Security Code Tear Out Page ........................................... 27
2
TABLE OF CONTENTS

INTRODUCTION
Congratulations on your purchase of the VMD-1001 Digital Video Mo-
tionDetector.You are now the owner of one of the most innovative, low
cost video motion detectors available today. We would like to person-
ally thank you for your purchase and would like to provide you with
additionalinformationonthisremarkableproduct.TheVMD-1001analy-
ses the video image 30 times per second to assure instantaneous
motiondetection.ByutilizingRISC processing, the VMD-1001 handles
millions of calculations per second, which greatly decreases the deci-
sion time and increases reliability.
Traditionally, motion detection has been used for surveillance and se-
curity applications. This unit is perfect for indoor or outdoor, low light
and difficult applications. Regardless of the job, the VMD-1001 can
handleit.
This ground breaking technology is representative of our commitment
toincorporateQuality,Valueand Innovationineveryproductwemanu-
facture. We are and will continue to be the leader in Digital Video Mo-
tion Detection Technology.
3

FEATURES
- Compact Size
- Simple Installation and Easy Set up
- 198 Independently Selectable Zones
- 99 Levels of Sensitivity
- Duration Settings from 0-99 seconds
- On-Screen Programming
- 100-Entry Event Log
- User Access Security Code
- No external synchronization required
- Low Power 7-15VDC @ 50mA
4

CONNECTING THE VIDEO
Type of Cameras
Precautions: The VMD-1001 functions best with high quality video
cameras.Camerasmustbesecurelylockeddownsothepictureisstable
andjitterfree.IfthepicturejittersortheVideoMotionDetector’s (VMD)
character display jitters, the VMD may false trigger. If the camera has
any sync or phase adjustments, try adjusting these first.
To select the right camera for your application (i.e. indoor, outdoor, low
light,nolight),youshouldconsidertheadvantagesanddisadvantages
of each type.
CCD: High quality CCD cameras will work well with the VMD-1001.
The higher the resolution, the more precise the motion detection. CCD
camerasworkequallywellin both indoor and outdoor enviroments.Itis
recommednded that B&W CCD cameras be used in outdoor applica-
tions due to their increased resolution. B&W low light level CCD cam-
eras should be used in low light conditions. CCD cameras are sensi-
tive to Infrared (IR) light and can be used for night vision with the aid of
anInfraredIlluminator.
IR: Infrared cameras should be used for no light applications or very
sensitive night vision applications. IR cameras are better equipped for
night vision than CCD cameras.
Cable
Itisimportantthatyouusethepropercabletype and installation proce-
dures when installing the cameras and your VMD. Make sure you use
standard RG-59U coaxial cable with at least 95% braided shield for
videotransmission. Wheninstalling,makesurethatyoudonotrunthe
cablenearanypower lines for they maycauseinterferenceinthevideo
transmission. If you are cabling between floors or long distances, use
conduit to protect the cable from interference. Proper protection of the
video cable from external power interference, weather, and water is
5

important to ensure a clear transmission of video signal and reliable
motiondetection.
Grounding problems between the various components of a video sys-
tem may cause noise or hum bars to appear in the video image. This
must be eliminated by properly grounding all equipment to an earth
groundandmaking sure allshieldsareintactinall videocoaxialcables.
Grounding problems will effect the reliability of motion detection.
Lighting & Enviromental Conditions
Unless a camera is in a controlled enviroment, fluctuations in condi-
tions will occur. The VMD-1001 provides the flexibility to configure the
Video Motion Detector for two separate sets of conditions.
Florescent Lighting: Gradualor suddenlightingchanges,video noise,
intermittenceorglitchesinvideo lines, or power surges can be ignored
bytheVMD-1001.Tocompensateforsuch occurrencesabalancemust
bereachedintheconfigurationofthemotioncriteria(seeMotionCrite-
ria). Fluorescent light may result in high speed flickering when a CCD
cameraisused. Variouscamerashaveshutter selectionsforflickerless
option or you may have to disable the Auto White balance feature on
DC versions. Another solution is to change the lighting ballast to an
electronic one that operates at a higher frequency than the video sync
signal.
Video Input / Output
The video input and output are located on the rear of the unit. (see
Figure1).Thevideoinput connects to the videosourceviatheleftBNC
connector. The video output connects to a display, recording device,
switcher, or other equipment via the right BNC connector. Both the
input and output are 1 V P-P into 75 ohms unbalanced EIA standard
RS-170A/ NTSC or CCIR / PALvideo format. Improper input termina-
tion or looping will cause the video level to be too low and effect the
motion detection. Improper output termination will make the image or
the video recording poor.
6

Alarm Output
The VMD-1001 has one Form-C alarm output with a normally open (N/
O) and normally closed (N/C) configuration. When power is lost, the
contacts are as follows.
The contacts change state (open to closed N/O, or closed to open N/
C) whenever an alarm occurs. An alarm occurs when the VMD-1001
detectsmotion andthealarmhasbeenenabledbypressing theALARM
ON-OFF button (red LED on or slow flashing). The contacts remain
closed or open for the duration programmed in the Relay Hold time.
The location of the alarm output connector is seen in Figure 1. The
state of the relay when there is no alarm can be selected as N/C or N/
Oso that power losswill indicateeither analarm orno alarm.For more
information, consult the Relay Contact Section of this manual under
Alarm Setup.
Some equipment may require a dry contact closure (normally open).
Connect such equipment to the N/O and common leads. For a nor-
mallyclosedalarm,connectbetweentheN/Candcommonleads.There
Input Output Alarm
Form-C
NO
NC
Com Power
7-15VDC
Common NO NC Figure 2 - Alarm Plug
Connecting the Alarms
Figure 1 - Back Panel Diagram
7

is no polarity; these leads may be swapped around. Other equipment
may require a closure to ground. In this case, a ground connection will
be provided on such equipment. Connect the common lead to ground
and N/O lead to the input of the equipment. There is no voltage on the
alarm connectors of the VMD-1001. No damage can be done by incor-
rectwiring.
For installation guidelines, consult the Relay Contact Section of this
manual under Alarm Setup.
Connecting the Power
The VMD-1001 operates from a DC supply range from 8V to 15VDC.
The power input connector, a standard 2.1mm power jack, must have
positive(+)onthe center and negative (-) or ground, on theouter shell.
The unit is reverse protected and correct polarity is indicated by the
green Power LED being lit on the front panel.
Formobileoperation,anegativegroundsystemisrequired,unlessthe
video ground is isolated from the automobile chassis ground. If oper-
ated in a vehicle, make sure the power supplied to the VMD-1001 is
properlyfilteredsoalternator,radioorotherequipmentdoesnotgener-
ated noise that might effect the motion detection performance. The
unitmaybeoperatedoff of a regular 110or220VAChouseholdsupply
using a transformer to supply the required 8-15VDC power.
8

NORMAL OPERATING MODE
Front Panel
Four buttons on the front panel give full control of the unit.
The two LEDs indicate the general state of the unit. The green Power
LED indicates appropriate power is applied. The red Alarm LED indi-
cates the unit is armed when solid and alarmed when flashing rapidly.
Note: Motion detection is inhibited during setup and during the time or
logdisplay.
Figure 3 - Front Panel
In the normal operating mode, the VMD is processing alarms (if en-
abled) and displaying the date and time (if enabled). The 4 buttons
provide all the necessary functions.
Alarm Button
This button toggles between alarm enabled and disabled. When en-
abled,theVMD-1001 will generate alarmswheneverthemotiondetec-
torqualifiesvalidmotion.Whenthealarmisdisabled, no alarms will be
generated. However, the red LED will still flash whenever motion is
detected. This feature is useful when setting the Sensitivity Level. The
red LED will light solid or slow flashing when the alarm is enabled.
Ifanalarm isactive(i.e.theVMD-1001isgeneratinganalarm)pressing
the Alarm button will clear the alarm. After that, the alarms will toggle
between enabled and disabled.
9
Clear Menu Z [
Menu Time Log
PowerAlarm

Menu Button
Thisbuttonbrings uptheProgrammingMenu as whitelettersoverlayed
on the video and starts the Programming Mode.
Time Button
Momentarily displays the current data and time on the screen.
Log Button
Displays Log Page #1 and starts the Log Display Mode. The most re-
cent alarm events, and their date, time, and alarm number are dis-
played. Pressing the Left or Right button scrolls forward or backward
through the log. Pressing the Clear button clears the Log Page and
reverts back to normal running operation. Normal operation also re-
sumes when no buttons have been pressed for 10 seconds.
Remember, motion detection is inhibited when the log is being dis-
played.
10
Otros manuales para VMD-1001
1
Tabla de contenidos
Otros manuales de Sensor de seguridad de DigiSpec


