Devine VersaKey Series Manual de usuario
VersaKey Series
MIDI Keyboards
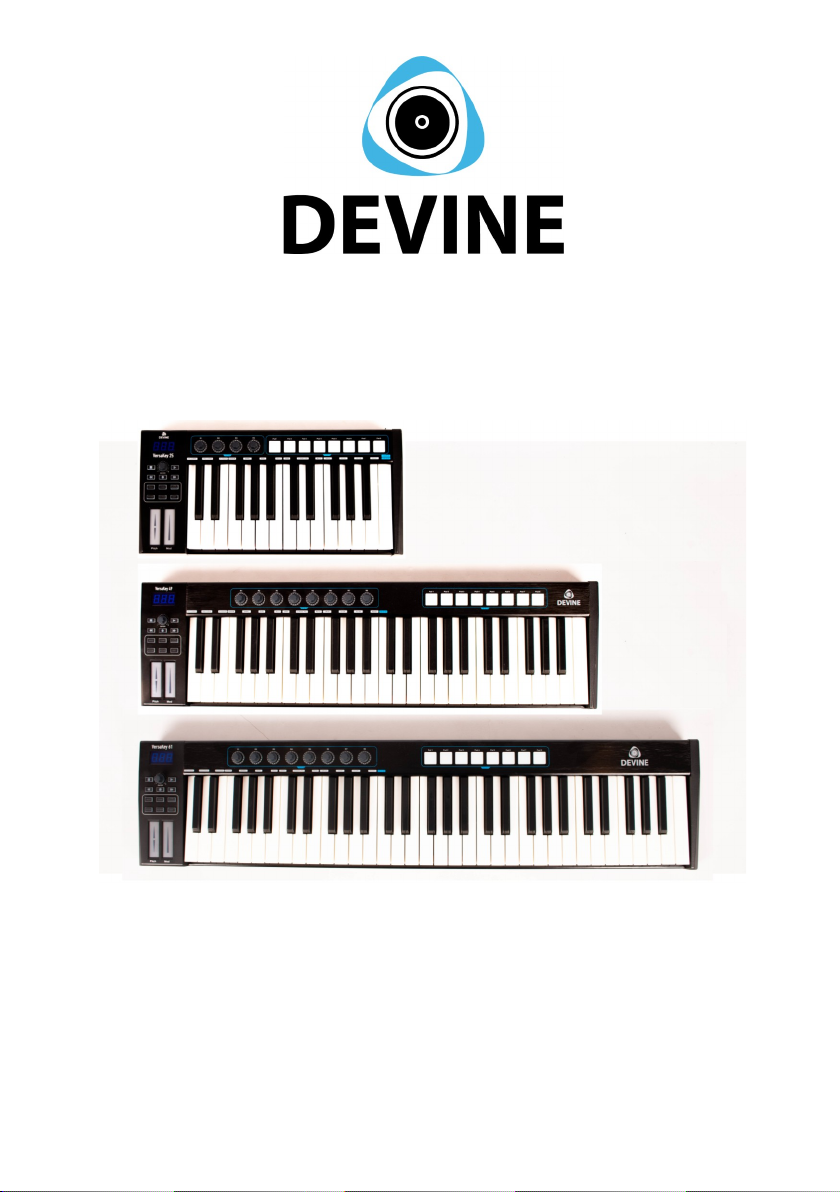
VersaKey 25, 49, 61, 88
User Manual
The information included in this user manual is subject to change at any time and without notification:
Version:
1.0
Date and author initials: 02-11-2020 RV Revision date and author initials: -

Introduction
Thank you for purchasing one of the Devine VersaKey MIDI keyboards. This practical yet
compact and focussed MIDI keyboard offers ideal, hands-on control over the parameters of
a D W or other software programmes where using a mouse and computer keyboard can be
restricting. The small size and USB-bus powered design combined with the practical control
features and smooth software integration gives you everything you need to support
streamlined audio production.
This user manual will not only provide set-up instructions, but will also explain how to get the
very best out of the functions this keyboard has to offer and how to solve any problems you
may encounter while setting up or using it. We strongly recommend reading these
instructions in detail before using your MIDI keyboard.
Bo contents:
1x MIDI keyboard (VersaKey 25, 49, 61 or 88)
1x USB connecting cable
1x Bitwig 8-Track D W software voucher
Bitwig 8-Track DAW
Specially for this series, Devine has collaborated with one of the most
accessible and user friendly D W developers: Bitwig.
The Bitwig 8-Track D W (Digital udio Workstation) provides any
beginner or advanced music producer everything they need, and by
purchasing a Devine MIDI controller, you’re granted free access to this
excellent software.
While the 8-Track edition of Bitwig is not limited in terms of functionality,
only a certain number of audio tracks can be used at the same time. s such, this entry-level
version of the programme offers the opportunity to understand and get to grips with all of the
available functions before upgrading to the full version (Bitwig Studio) at a later date. With
the included voucher, you are entitled to a reduced rate when upgrading Bitwig Studio.
To use Bitwig 8-Track, simply register at www.bitwig.com/8-track and follow the steps to
install Bitwig 8-Track on your computer.
special function has been included in Bitwig for the Devine VersaKey Series, ensuring that
your model is included in the list of compatible MIDI devices. This way, when you connect
your device up to a computer running Bitwig, the device will immediately switch to the
correct operating mode for Bitwig.
If you don’t need to use Bitwig 8-Track, then you can give the voucher to someone else
since the software can also be used without a Devine MIDI keyboard.
The information included in this user manual is subject to change at any time and without notification:
Version:
1.0
Date and author initials: 02-11-2020 RV Revision date and author initials: -

Safety Instructions
Every person involved with the installation, operation and maintenance of this device must:
- Be qualified.
- Be skilled.
- Have read the instructions included in this user manual.
- Be sure that neither the device nor any included accessories are damaged. Should the
device or the included accessories be damaged, please contact your retailer for further
advice.
- Ensure that the device is in good working condition and is safe to operate. Please follow
the advice and instructions as they are described in this user manual.
Damage caused by misuse and/or modifications made to the device are not covered by the
warranty.
This device does not contain any parts that can be repaired or replaced by the user. Should
maintenance or repairs be necessary, they must be carried out by a qualified technician.
Important information regarding health and safety:
- Do not remove any labels or stickers from this device.
- Do not leave any cables lying around where they are in danger of causing a tripping
hazard.
- The housing of this device should not be opened and any hardware or software that may
be present should not be modified.
- To achieve optimal performance, any inputs on the device should not be fed with a signal
higher than necessary.
- The device must only be used indoors; contact with water, rain and moisture must always
be avoided. Do not place any objects containing liquid on top of the device.
- Remove the device from any nearby flames or heat sources; do not place it near
flammable fluids, gasses or objects.
- Disconnect this device from a power source if it is not being used for a long period of time,
if maintenance is necessary, or if it needs to be cleaned.
– Do not pull or tug on the cable to remove a plug as this may cause damage.
- Do not use any cables other than those specified in this manual. Do not use defective
cables. Please contact your retailer if the included or necessary cables do not function
properly with this device.
The information included in this user manual is subject to change at any time and without notification:
Version:
1.0
Date and author initials: 02-11-2020 RV Revision date and author initials: -
WARNING!
Keep this device away from moisture, water and rain
to prevent risk of electric shocks!

- In the event that the device is exposed to extreme temperature changes (e.g. transported
from a cold outdoor environment into a warm indoor environment), it should not be turned on
until it has reached room temperature. This is necessary to prevent moisture (condensation)
from forming inside the device, which could lead to electric shocks.
Use & Operation Guidelines:
- This device is intended for indoor use and must only be operated by an adult.
- This device is not suitable for use by children and must always be operated by an adult.
- This device can only be used in appropriate environments where no damage to the device
can occur. Do not use the device in moist or dusty environments such as:
- indoor swimming pools where chlorine is used
- beaches or any location where sand and/or salt is present
- outdoors
- indoors in spaces where intense heat sources are present, or where it can reach
temperature levels that would be considered uncomfortable for a person.
- void impact and collisions during use and transport. Do not move or transport the device
while it is in use. - void using excessive force when installing and operating the device.
- ny user must become familiar with the functions of this device before using it.
- Should the device not be used in the manner described in this user manual, damages or
even injuries could occur. Devine cannot be held responsible for any injuries or damages
that occur as a result of improper use of this product.
Storage & Transport:
- This device is not designed for mobile use. This device must always be transported in its
original packaging, or in an appropriate padded bag/cover that is able to provide adequate
protection.
– This device has not been designed for continuous (24/7) use. Regularly switching off the
device will not affect its lifespan. lways switch off and disconnect the device whenever it is
not in active use.
- When the device is not in use for long periods of time, always disconnect the device and
store it in a dust free environment.
– Do not expose the device to extreme temperature shifts.
Housing:
- Frequently inspect the housing of the device and always just before use. void operating
the device if any large dents or cracks are found in the housing, or if screws are missing. Do
not use the device if the housing is not in good condition. Contact your dealer or a qualified
technician if you are unsure about the state of the device.
- Check the device and screws for any corrosion. If any corrosion is found, do not use the
device. Contact your dealer or a qualified technician if the screws or housing show any signs
of corrosion.
- Ensure that every power and signal socket is securely fitted. Do not use the device if any
of the sockets are not secure.
- void the build up of any dust and dirt. Clean the device once a month by disconnecting it
from the power supply and wiping it down with a dry or slightly moist cloth. If the device is
used frequently, the device should also be cleaned more frequently.
The information included in this user manual is subject to change at any time and without notification:
Version:
1.0
Date and author initials: 02-11-2020 RV Revision date and author initials: -

Symbol E planation:
Ensure that this device is disposed of properly. This product falls under the
WEEE (Waste Electrical and Electronic Equipment) directive. The
requirements of this directive apply to all manufacturers and producers of
electronic devices in the EU. Do not throw this product away with regular
rubbish. Please contact your local authority for more information about how
to recycle and dispose of these products in your region. By recycling this
product in the proper manner, we can work together to ensure that we can
continue to enjoy these kinds of products and still protect the environment
as much as possible.
CE: The CE logo indicates that this product meets the European norms and
requirements to which it must legally conform.
Suitable for indoor use only: This product was designed for indoor use
only. The maximum environmental temperature must not exceed 40
degrees Celsius (104 degrees Fahrenheit).
Contact:
Devine Pro udio Products
Verrijn Stuartweg 18
4462 GE Goes
The Netherlands
Please do not send any physical products to this correspondence address.
Should you wish to send a product for repairs or for a refund, please contact your retailer for
an RMA re uest (Return Merchandise Authorisation)
The information included in this user manual is subject to change at any time and without notification:
Version:
1.0
Date and author initials: 02-11-2020 RV Revision date and author initials: -

Using the VersaKey with Bitwig 8-Track
Every Devine VersaKey model has been scripted into the Bitwig 8-Track software, adding
them to a list of compatible hardware controllers. Simply select your EZ-Creator model
within the software and the device will immediately switch to the correct Bitwig operating
mode. This is so that you can control functions within the software using the controller, so
that you don’t need to map the controls manually, or learn anything about the more complex
features of MIDI.
P lease note that Bitwig does not support 32-bit systems.
The minimum system requirements are specified on the following web page:
www.bitwig.com/en/support/faq.html
Bitwig 8-Track and Bitwig Studio are products developed by Bitwig GmbH.
Bitwig 8-Track does not come with a physical installation CD or USB stick and can only be
installed via the Bitwig website. This guarantees that you only get the most recent version of
the software and that any subsequent updates can be freely downloaded following initial
installation.
The included Bitwig voucher can only be used to install Bitwig 8-Track and is registered by
name in the account that you will need to create when you register via the Bitwig website.
If you would prefer to use the VersaKey controller without Bitwig 8-Track, then the voucher
can be passed on to someone else. The Bitwig 8-Track voucher cannot be exchanged for
money, other Bitwig products, or other forms of credit.
If you do use the Bitwig 8-Track software and want to upgrade to the full version (Bitwig
Studio) at a later date, your copy of Bitwig 8-Track entitles you to a reduced upgrade tariff.
Bitwig Studio will offer all of the same functionality when used in combination with any of the
Devine VersaKey MIDI controllers.
Using the VersaKey Without Bitwig 8-Track
ny of the Devine VersaKey USB MIDI controllers can be used with software other than
Bitwig. Since MIDI devices are universal, it is possible to use almost any software that
supports MIDI over USB in combination with any of the VersaKey controller models.
Some software examples include:
- lighting software / DMX software
- laser software
- general production software from other developers
- podcasting and broadcasting software
The information included in this user manual is subject to change at any time and without notification:
Version:
1.0
Date and author initials: 02-11-2020 RV Revision date and author initials: -

- tablature software
- and more
Please note that, when using third-party software, settings may need to be changed to
ensure compatibility. lways read the applicable software instructions to be certain of this.
Compatibility with third-party software cannot be guaranteed.
lways check the system requirements of the software to be certain that your computer
meets the minimum recommended system requirements.
Using the VersaKey Series With and Without Bitwig
It is also possible to use the VersaKey Series controllers with Bitwig 8-Track before
changing to a different D W programme, other software, or another computer.
The information included in this user manual is subject to change at any time and without notification:
Version:
1.0
Date and author initials: 02-11-2020 RV Revision date and author initials: -

Product Features & Specifications
ll Devine VersaKey MIDI keyboards have a similar construction and functionality. The
difference between each model lies in the number of keys and the number of fitted
parameter buttons.
Below, an overview of the 61-key model has been included. Each of the other models
included in the VersaKey Series all offer similar features.
1. The Keyboard Section
The keyboard section of every VersaKey model is the same, whether fitted with 25, 49, 61,
or 88 keys. Simple or complex chords and melodies can be played on this MIDI keyboard,
just as you would with any normal piano or keyboard. These keys are velocity sensitive and
have an after-touch function that registers the pressure with which the key is held after it has
been initially struck.
2. Pitch Bend & Modulation
Every VersaKey model comes fitted with two touch strips on the left of the keyboard that can
be used to control Pitch Bend and Modulation.
By sliding a fingertip up or down the Pitch Bend touch strip, the pitch of a note or chord can
be smoothly ‘bent’ up or down to create a distinct effect.
The Modulation touch strip can be used to increase or reduce the intensity of an effect.
Unlike the Pitch Bend touch strip, there is no need to hold your fingertip against the strip.
The effect will stay at the same set intensity until the strip is touched again.
3. Transport Buttons
The transport button section provides all of the functions needed to quickly control a channel
or trigger recording controls within software, including ‘record start’ and ‘stop’, ‘playback’ and
‘stop’, ‘track rewind’, and so on.
Beneath the initial transport section is a separate set of buttons that offer quick access to
functions like MIDI channel selection, pitch per octave adjustment, and key touch sensitivity
The information included in this user manual is subject to change at any time and without notification:
Version:
1.0
Date and author initials: 02-11-2020 RV Revision date and author initials: -
1
2
3
4
56

adjustment depending on the selected preset.
4. LED Display
The LED display provides continuous information regarding the status of the last selected
function. For example, when adjusting a rotary encoder, the MIDI value will be displayed;
when selecting the MIDI channel, the channel number is displayed. Whenever a parameter
is being adjusted, the LED display will show any relevant information.
5. Endless Rotary Encoders
The endless rotary encoders are control knobs that adjust specific functions. Since these
encoders can be endlessly rotated, these controls are excellent for adjusting and fine-tuning
the most extensive functions. By rotating an encoder left or right, the signal is adjusted by +1
or -1, and the minimum or maximum possible values are determined by the specific
parameter being adjusted.
6. Drum & Performance Pads
The drum and performance pads are used to trigger and control drum machine samples or
effects, but since they are velocity sensitive, they can also be used for other functions. The
performance pads are LED backlit and the colour of the backlight can be customised.
7. E ternal Power Input
When any VersaKey MIDI keyboard is not
connected to a computer and USB powered
(for example, when using it as a secondary
‘analogue’ keyboard for gear like a
workstation, synth, or keyboard), an external
power supply can be connected.
The VersaKey can be powered by a universal
5V DC power supply with a centre-positive
pin connection.
8. USB-B Port
Using the USB-B port (and included USB
cable), the VersaKey can be connected to a
computer or laptop. It’s also possible
(providing that this is supported by the host) to connect the VersaKey to a smartphone or
tablet. If using the VersaKey as analogue hardware using the 5-pin MIDI port to send MIDI
signals to other MIDI-supporting hardware, then the USB-B port can also be used to power
the VersaKey by connecting the included USB cable to a USB charger or powerbank.
9. Pedal A & B Sockets
sustain or switch pedal can be connected to the VersaKey using the Pedal and B
sockets, so that something like a virtual acoustic piano in a D W plug-in can be played
much like a real piano. lmost any pedal fitted with a standard 6.35mm TS (mono) jack plug
can be connected.
The information included in this user manual is subject to change at any time and without notification:
Version:
1.0
Date and author initials: 02-11-2020 RV Revision date and author initials: -
7 8 9 9 10

The default setting for the Pedal socket is set up for a sustain pedal. The default setting for
the Pedal B socket is set up for an expression pedal.
10. 5-pin DIN MIDI Output
This output can be used to connect and control older, more standard MIDI hardware fitted
with a 5-pin DIN port. Synthesizers are often fitted with this kind of MIDI port. When setting
up the VersaKey in this way, make sure that it is USB powered (either with a USB charger or
USB powerbank) or powered by a 5V DC power supply.
System Requirements
So that your VersaKey model functions properly when connected to your computer or
laptop, the computer or laptop must meet the minimum system requirements. If your laptop
or computer does not meet the minimum system requirements, this may cause the
VersaKey to function incorrectly.
Windows Mac OS
Pentium 3 800 MHz or better
(laptop CPUs may require higher)
256 MB R M
DirectX 9.0b or better
Windows XP (Service Pack 2) or better
Windows 98, ME, NT and 2000 not
supported
Macintosh G3* 800/G4 733 MHz or better
(laptop CPUs may require higher)
OS X 10.3.9 with 256 MB R M,
OS X 10.4.2 or better with 512 MB R M
G3/G4 accelerator cards are not supported
lways check if any software and/or external equipment that you intend to use in
combination with the VersaKey specifies any minimum system requirements.
When powering the VersaKey via USB, it is recommended to connect it directly to the USB
port of your computer or laptop and avoid using any external USB hubs.
Basic Functionality
The information included in this user manual is subject to change at any time and without notification:
Version:
1.0
Date and author initials: 02-11-2020 RV Revision date and author initials: -
Este manual sirve para los siguientes modelos
4
Tabla de contenidos
Otros manuales de Teclado electrónico de Devine


