Denver MET-110 Manual de usuario

MET-110
denver-electronics.com
June 2021

Safety information
Please read the safety instructions carefully before using the
product for the first time and keep the instructions for future
reference.
1. This product is not a toy. Keep it out of the reach of children.
2. Keep product out of the reach of children and pets to avoid
chewing and swallowing.
3. Never use old and new batteries or different types of
batteries together. Remove the batteries when not using the
system for long periods of time. Check the polarity (+/-) of
the batteries when inserting them in the product. Incorrect
positioning may cause the risk of an explosion. Batteries
are not included.
4. Product operating and storage temperature is from 0
degrees Celsius to 40 degrees Celsius. Environments
under and above this temperature might affect functionality.
5. Never open the product. Repair or service is only to be
performed by qualified personnel.
6. Do not expose to heat, water, moisture, direct sunlight!
7. The unit is not waterproof. If water or foreign objects enter
the unit stops use immediately.
8. Do not use non original accessories together with the
product as this can make the product functionality
abnormal.
FEATURES

With your metal detector, you can hunt for coins, relics, jewelry,
gold, and silver just about anywhere. This metal detector is
versatile and easy to use. Features include:
Two operating modes: All Metal and Disc.
ALL METAL – Lets you search for different types of metals with
automatic ground balance and high sensitivity. This is the best
operating mode.
DISC – Discriminates among different types of metals being
detected.
Volume – Adjusts volume levels for speakers and headphones.
Headphones Jack – Connects headphones (not supplied) to the
metal detector.
View Meter and Pointer – The meter pointer swings to the right if
metal is found.
Waterproof Search Coil – Lets you search for metal objects under
shallow water.
Note: The search coil is waterproof, but the control housing is not.
Adjustable Shaft – Adjusts the metal detector’s length.
Operates on two 9V alkaline batteries (not supplied).

COMPONENTS
ASSEMBLING THE METAL DETECTOR
Assembly is easy and requires no special tools. Just follow the
steps below.
1. Unscrew the knobs on the search coil and remove the knobs
and the connector. Insert the smaller shaft and align the holes
on the search coil bracket and the shaft. Push the connector
through the holes, then replace and tighten the knobs.
2. Loosen the shaft’s lock nut (attached to the handle) in the
direction of the arrow. Then insert the smaller shaft into the
larger shaft connected to the handle. Turn the shaft’s lock nut in
the direction opposite to the direction of the arrow to lock it in
place.
Search coil
Adjustable shaft
with cable
Arm rest
Control box

3. Insert the latch on top of the handle into the assembly hole at
the bottom of the control box. Slightly push the control box in
the direction of the “IN” marking on the handle to fix the latch in
place.
4. Tighten the fixing screw.
5. Insert the search coil cable plug into
the five pin jack on the back of the
control box housing.
6. Lengthen or shorten the shaft, so when you stand upright with
the metal detector in your hand, the search coil is level with and
about 0.5 to 2 inches (1 to 5 cm) above the ground. Then
tighten the lock nut.
Caution:
Lock nut
Fixing screw
Control box
Latch
Assembly hole

The search coil cable plug fits into the connector only one way.
DO NOT insert the plug forcefully to avoid damaging it.
DO NOT remove the shaft lock nut. Should you remove it,
place the washer on top of the shaft connected to the handle
with the small head of the washer pointing up. Then place the
shaft lock nut on the washer and tighten it to lock it in place.
ADJUSTING THE SEARCH COIL
Loosen the knobs at the end of the search coil and adjust the search
coil to the desired angle (the search coil should be parallel with the
ground). Tighten the knobs just enough to keep the search coil from
rotating or wobbling.
INSTALLING THE BATTERIES
You need two 9 V alkaline batteries to power your metal detector.
Small head

1. If the detector is switched on, turn the power switch (on the
control box) to POWER OFF.
2. Press down the battery compartment cover and slide the cover
off in the direction of the arrow.
3. Connect the batteries to the battery connectors observing the
correct polarity. Then insert the batteries into the compartment.
4. Replace the cover.
Caution:
•Use only fresh batteries of the required size and recommended
type.
•Always remove old or weak batteries; batteries can leak
chemicals that can destroy electronic parts.
•If you do not plan to use the metal detector for a long time,
remove the batteries.
•Dispose of old batteries promptly and according to regulations.
You can extend the battery life by using headphones, which require
less power than the built-in speakers.
USING EARPHONES
Connect a pair of headphones (not supplied) to the metal detector so
you can listen to it privately. Using earphones also saves battery
power and makes it easier to identify subtle changes in the sounds
you hear, for better detection results.
To connect headphones to the metal detector, insert the 3.5 mm plug
into the EAR jack on the control box.
Note: The internal speaker is disconnected when you connect
headphones.
LISTENING SAFELY
To protect your hearing, follow the guidelines below when using
headphones.
•Set the volume to the lowest setting before you begin listening.
•After you begin listening, adjust the volume to a comfortable
level.
Headphones jack

•Do not listen at extremely high volume levels. Extended
high-volume listening can lead to permanent hearing loss.
•Once you set the volume, do not increase it. Over time, your ears
adapt to the volume level, so a volume level that does not cause
discomfort might still damage your hearing.
Traffic safety
DO NOT wear headphones while operating your metal detector near
high-traffic areas.
Even though some headphones are designed to let you hear some
outside sounds when listening at normal volume levels, they still can
present a traffic hazard.
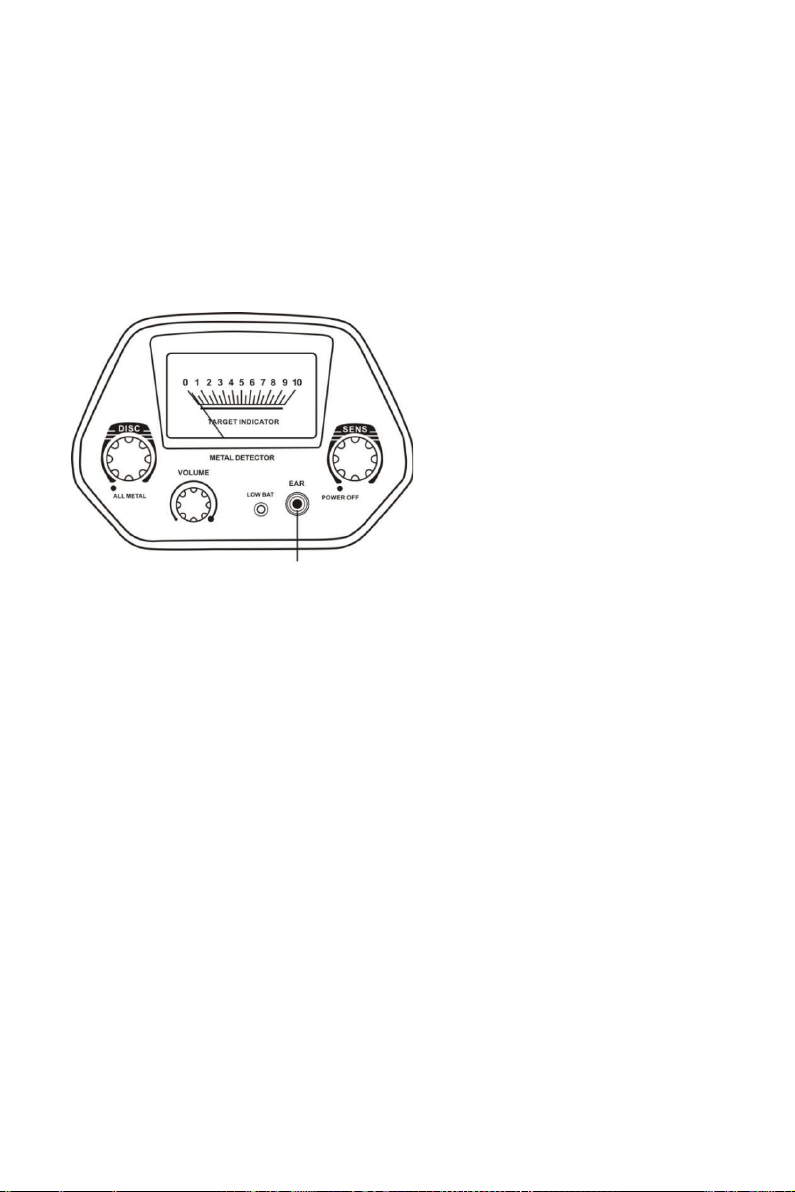
FUNCTIONS AND INDICATORS
1. Parts of the control box
a. DISC – Rotate the control knob clockwise away from ALL
METAL to get to DISC mode. The DISC mode comes with
Meter
Sens
Headphones jack
Low Bat
Volume
Disc

automatic ground balance. Rotate the control knob slowly
clockwise to eliminate different trash objects. Rotate the control
knob counter-clockwise towards the end to get to ALL METAL
mode. The ALL METAL mode also comes with automatic ground
balance. This mode used to find not only ferrous metals, but also
non-ferrous metals (see more details below).
b. SENS – Rotate the control knob counter-clockwise towards the
end to power the metal detector off. Rotate the control knob
clockwise to power the metal detector on. Continue rotating it
clockwise to get higher sensitivity.
c. VOLUME – Rotate the control knob clockwise to increase the
volume or rotate it counter clockwise to decrease the volume.
d. LOW BAT – Low battery indicator. When the LOW BAT indicator
lights up, replace the batteries at once.
e. EAR – 3.5 mm headphones jack.
f. METER – When the metal detector finds any metal target, the
meter pointer swings to the right.
TESTING AND USING THE METAL DETECTOR
This metal detector has two operating modes: ALL METAL AND
DISC.
ALL METAL – Use this mode to find all types of metals.
DISC – Use this mode to discriminate the metal type.
Set the operating mode to ALL METAL, DISC all the way
counter-clockwise, and SENS to the high position. Hold the search
coil parallel above the ground, about 0.5 to 2 inches (1 to 5 cm)
Otros manuales para MET-110
1
Tabla de contenidos
Otros manuales de Detector de metales de Denver


Manuales populares de Detector de metales de otras marcas


Steinberg Systems
Steinberg Systems SBS-MD-12 Manual de usuario

GOLDEN MASK
GOLDEN MASK 5 Manual de usuario

Grizzly
Grizzly YM 203 Manual de usuario

Fisher Research Labs
Fisher Research Labs 1280-X Aquanaut Manual de usuario

Treasure Cove
Treasure Cove Vibra-Probe 560 Manual de usuario

Accurate Locators
Accurate Locators XL16 IMAGER Manual de usuario