Demco SP7 Manual de usuario

0
User’s
Installation Guide
Demco corp.
Always pay right !
Stylish, Powerful & Trusted Pay-Way
- V1 EFT-POS Terminal

1
CONTENTS
1Introduction ……………………………... …………………………………………………………………………………2
2Getting started
2.1 Unpacking the shipping carton .......................................................................................................... 3
2.2 SP7 at a glance …………………………………………………………………………………………………4
2.3 Keypad and functionality ………………………..................................................................................4
3Card Reading & Paper loading
3.1 Card reading ...............................................................................................................................5
3.2 Cutting the paper .....................................................................................................................5
3.3 Installing paper roll …………………...................................................................................................6
4Installation, Maintenance and Trouble-shooting
4.1 Location of the terminal ........................................................................................................................7
4.2 Terminal Interface .............................................................................................................................7~9
4.3 Installing a SAM card ...........................................................................................................10
4.4 Maintenance …………………………………………………………………………………………………….10
5Trouble-shooting …………………………….……………………………………………………………………....11
6Safety &Information …..............................................................................................................................12

2
1. Introduction
Thank you for choosing Demco’s SP7 EFT-POS terminal!
This manual will guide you from basic setup to operation of SP7. It will help you to
familiarize yourself with SP7 terminal and will be useful for anyone installing and using SP7
terminal.
SP7 terminal represents a new generation of electronic payment solution equipped with the
following features;
z Powerful & Fast transaction
-. MIPS 32 bit RISC processor
-. Multiple range of communication interface
z True multi-application capability
-. Large memory capacity of 16 MB Flash, 16MB SDRAM
z User-friendly & Ergonomic design
-. Large graphic display
-. Compact & handy design
-. Neat & tidy cable management to avoid messy tangles
z Easily customizable and highly flexible
-. Easy Linux open platform
-. Customizable color and logo
z Environment friendly
-. Minimal packaging material
-. ROHS compliant
-. Constructed entirely from recyclable plastics

3
2. Getting Started
2.1 Unpacking the shipping carton
In the original shipping carton of SP7 EFT-POS terminal, there are 4 contents, a SP7
EFT-POS terminal, a power supply unit, and a user’s manual.
Inspect carefully if there is any damaged or missing components.
①SP7 EFT-POS terminal ② Power supply unit
③ User’s installation manual
The model of the power supply unit vary by country.
This power adaptor is specially designed for
SP7 EFT-POS terminal. Do not use it for any
other usage.
Remove the protection film from LCD screen.

4
2.2 SP7 at a glance
2.3 Keypad and functionality
This chapter describes the key functions for a terminal with no specific application.
Function of keys can vary depending on application.
The navigation keys navigate in
the terminal menus
The function key accesses the
different application menus
The red key cancels the
procedure in progress. It turns
of/off the power by pressing
and holding for 3 seconds
Digital keyboard
The yellow key cancels the
last character
The green key validates the input
selections and information
18 key backlit keyboard
Large graphic LCD Display
Magnetic Card Reader
Smart card reader
Internal thermal printer

5
3. Card reading & Paper loading
Before any card reading or any use of the terminal, make sure that a paper roll
is installed in the printer.
3.1 Card reading
Magnetic stripe card
①Place a magnetic card with the stripe down and
facing toward LCD& keypad.
②Swipe the card through the magnetic card reader
Smoothly.
Smart Card
Insert a smart card with IC chip side upwards
into the smart card reader slot
Leave the smart card in the card reader
until the transaction is complete.
3.2 Cutting the paper
Pull the paper to the front for paper cutting.

6
3.3 Installing the paper roll
SP7 features an "easy loading" printer, for easy paper roll replacement.
Don’t touch the printer mechanism. Take care the paper cutter is very sharp and
the printer could be very hot!
Prepare for a roll of thermal sensitive paper with 57mm wide
To avoid overheating of the printer, wait a few seconds between two printings.
①Open the printer cover by pulling
the release tap toward the front
(
LCD
)
with
y
our fin
g
er.
② Remove the remaining role of
the paper in the paper tray.
③ Drop the new paper roll into the
paper tray and pull the paper.
④ Close the printer cover by
gently pressing down the cover.

7
4. Installation & Maintenance
4.1 Location of the terminal
It is highly recommended to place SP7 terminal on flat table or surface near an power outlet.
zDo not use the terminal in excessive heat, humidity, moisture area.
zAvoid areas with direct sunlight or electromagnetic radiation
zThe terminal is not waterproof or dustproof so any mal-function from the exposure
may void warranty.
zOperating temperatures
-20°C to +80°C.
zHumidity
5% to 90% without condensation.
zStorage temperature
0°C to +60°C.
4.2 Terminal Interface
SP7 connection port are located on the back of the terminal.
USB
RS232C-2 Ethernet RS232C-1

8
Do not connect the power supply until any peripherals are connected.
Maximum length of cable : 2.50 m
4.2.1 Connection to the Ethernet LAN
Connect SP7 terminal to an Ethernet LAN, using a standard
direct Ethernet cable and make sure the connector is fully
seated into ports.
4.2.2 Connecting to a peripheral
Turn off the terminal and connect the peripheral cable
to the terminal on RS232C(-1 or -2) or USB
USB
RS232C-2 RS232C-1
Ethernet
LAN port
9
4.2.3 Connection to power supply
When the terminal is power-on, the green LED indicator is on.
Power disconnection during a transaction may cause the transaction data to be
lost.
Power supply
Input 100 to 240 VAC, 50/60Hz, 0.8A
Output 9.0Vdc, 2.5A
RS232C Interface
RS232-2 (RJ45-10P)
1 CTS 6 UART2_TX
2 DTR 7 +5V
3 RTR 8 UART3_TX
4 CD 9 UART3_RX
5 UART2_RX 10 GND
RS232-1 (Mini USB A type)
1 NC & 5V
2 UART0_TX
3 UART0_RX
4 GND
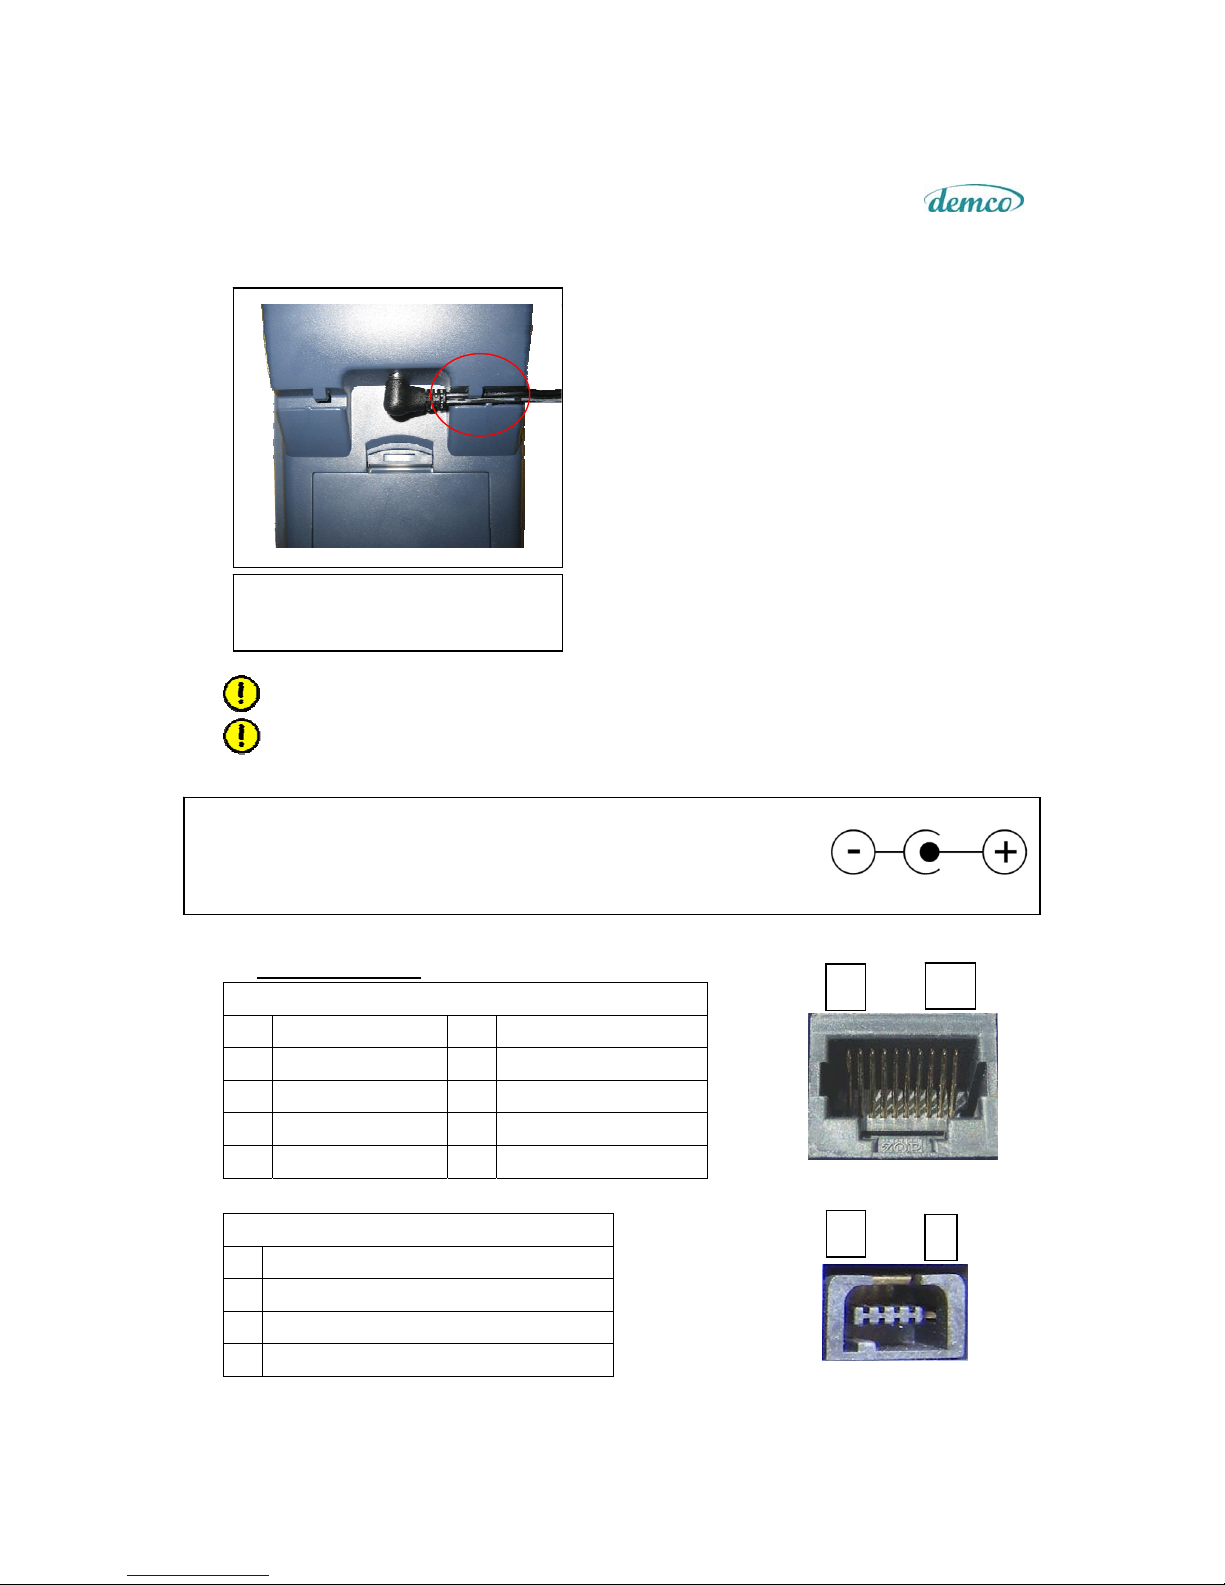
Make sure that the power cable should
be firmly fit inside cable holder.
1. Insert the round barrel connector into
the power port on the terminal.
2. Place the terminal upside down on a
clean and flat surface for unwanted
scratch or damages.
3. Guide the cable through the cable
holder to secure the power cord from
unwanted disconnection.
4. Plug the AC power cord into a wall
power outlet.
1 10
1
1 4
Tabla de contenidos
Manuales populares de Terminal táctil de otras marcas

Wincor Nixdorf
Wincor Nixdorf iPOS plus Advanced Manual de usuario

Ingenico
Ingenico AXIUM EX4000 Manual de usuario

Heisei Electronics
Heisei Electronics Q-POS 815 Manual de usuario

Amano
Amano MTX-15 Manual de usuario

FLOWBIRD
FLOWBIRD CWT Compact Touch Manual de usuario

Lathem
Lathem PC600 Series Manual de usuario


