Dedicated Micros Eco9 Instrucciones de instalación y mantenimiento

1.0001
Eco Range
Network Guide

Dedicated Micros ©2006
2
Eco
Contents
Network Configuration ................................................................................................................3
Simple Configuration ..................................................................................................................5
Advanced Configuration ...........................................................................................................13
Tools ...........� 26
Reviewing the Unit Logs ...........................................................................................................27
Appendix A .� 31
Appendix B – .ini Files ..............................................................................................................32
Appendix D –Unit Serial and Network Cables ........................................................................36
Appendix E – IP Address Range and Subnets .......................................................................38
Index ...........� 42

Dedicated Micros ©2006 3
Eco
Network Configuration
This manual is designed to help with the advanced configuration of the unit using the on-board web
pages.
To assist with the configuration of the unit, sections are constructed as tutorials and will illustrate how
to perform common requirements. Use the tutorials that will provide the required functionality and
follow the step by step instructions.
In some of the sections the web interface and the OSD menus will be displayed. These are the more
advanced network settings where configuration via the web pages is more appropriate.
This manual will be divided into:
Simple Configuration –required to get the unit up and running
Advanced Configuration –project specific requirements
Note: The unit should be configured in line with the main configuration steps detailed in the Setup
Guide and therefore the cameras inputs have been enabled and the standard record rate
has been set.
1.1001
Web Page Icons
Each of the unit configuration web pages has the following buttons:
1.1002
Reset to Defaults –This will return the associated page to factory defaults.
1.1003
Display Help –This will display the Help pages for the associated configuration page. This is a good
starting point if you are having problems or do not understand the configuration parameters.
1.1004
Save Settings –This will save a changes that has been made to the configuration page - remember
to save the changes.
NOTE: Selecting a new page before saving the changes will result in any changes being lost!
1.1005
Reset –This is displayed on configuration pages that require a unit reset to initiate a function.
Note: Always save the settings before resetting the unit.
1.1006
Each ‘How to.. Section’ will show the Tab and Function name to allow easy location of the correct
configuration page.
1.2001
Accessing the Configuration Web Pages
The unit is configured using on the on-board web pages. To access these:

Dedicated Micros ©2006
4
Eco
Note: The unit should already have been configured with an IP address (via the serial port or the
OSD menus) and connected to an Ethernet network.
1. Launch Internet Explorer (or Netscape Navigator).
1.2002
2. Type the IP address of the unit into the address bar.
3. The Main Menu page will be displayed.
4. Select Configuration Options. The unit will prompt for a username and password. The
default settings are dm and web respectively.
Note: The user name and password are case sensitive; they should be changed from the default
username and password and kept safe. Mislaid usernames and passwords could result in
the unit being returned to Dedicated Micros for resetting.
1.3001
Main Menu
The unit Main Menu allows the Operator access to:
Live viewing of any of the connected cameras.
Configuration web pages for the unit.
Downloads which include the software applications and the product documentation.
Demo pages that demonstrate how viewing applications can be designed for varying system
requirements.
1.3003
2.0001

Dedicated Micros ©2006 5
Eco
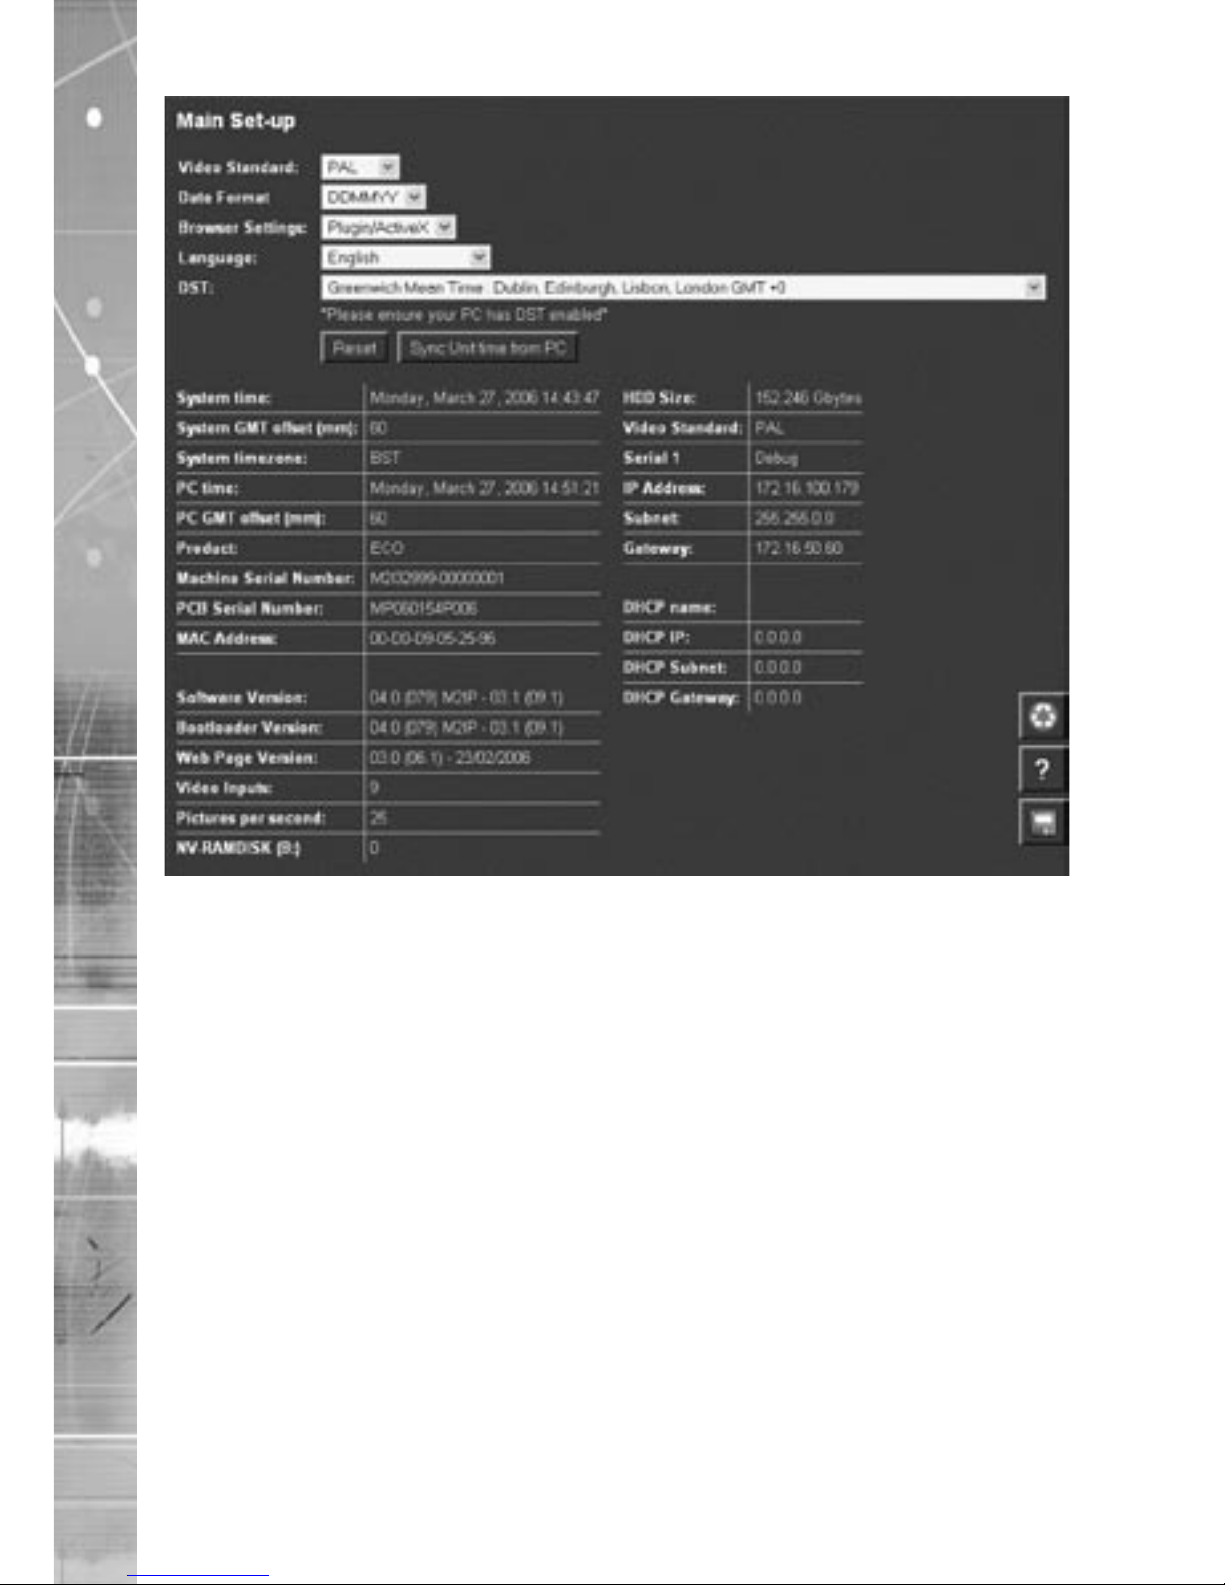
Simple Configuration
How to Configure Global Parameters
There are some parameters that can be set that will affect the overall system; video standard for the
video inputs, browser format for the web interface, language that the menus will be displayed in and
the DST (daylight saving time) settings.
To configure these parameters:
1. Select Home -> Main Set-up.
2. Select the video standard from the drop down list; this will be the standard for all the video
inputs on the unit.
Note: It is necessary to carry out a system reset if the video format is changed before saving the
settings. This allows the unit to activate the change.
3. Select the date format from the drop down list.
4. The unit web pages can be viewed in two formats; Active X (default) or Java, select the
relevant option from the drop down list.
5. The web configuration pages for the unit can be displayed in a selection of languages,
select the language which is most appropriate to your installation from the drop down list.
Note: Ensure the PC being used for the configuration is set to the correct time zone and that DST
is enabled before continuing.
6. Select the DST for region where the unit is installed from the drop down list.
7. If the settings are incorrect reset the unit by selecting the reset button.
8. If the unit time is to be synchronised to the PC that is being used to configure the system
then select sync unit time from PC. Note this only synchronizes the time when the button is
selected this will not maintain synchronisation permanently.
9. Remember to save the configuration by selecting Save Settings!
2.0003
Dedicated Micros ©2006
6
Eco
Function Description
Video Standard This displays the standard used by the video inputs on the unit.
Date Format It is possible to identify the format in which the date will be
displayed in the browser; the default setting is Day Day, Month
Month, Year Year.
Browser Settings The browser interface supports ActiveX or Java. Select the most
appropriate for your application from the drop down box. This
is a global setting so any user connecting to the system will be
presented by the same interface.
Language The unit configuration pages can be displayed on the local
browser in the most appropriate language.The currently
languages supported are; English, Spanish, French, Czech,
Italian, Russian, Dutch, Portuguese, German, Turkish, Croatian,
Danish, Finnish, Norwegian, Hungarian, Swedish, Polish, Arabic
and Chinese
DST Daylight Saving Time. This is the time zone local to the unit, select from the list for the
most appropriate time
Reset This will reset the unit
Sync unit time The unit can be synchronised with the PC that is being used to
configure the unit. If the PC is synchronised with the network clock
then this time will be reflected in the unit. The synchronisation is
not persistent and will only synchronise the unit and the PC at the
time the button is pressed
2.20011

Dedicated Micros ©2006 7
Eco
How to Configure Video Inputs and Standard Record Settings
Each of the video inputs on the unit can be individually configured.
This section will describe the full configuration process including resolution and file size, camera
titles, setting a camera to mono, camera fail notification and standard recording settings.
1. Select Cameras -> Camera Set-up
2. It is possible to identify the global camera resolution (common to all video input) the current
option sets the resolution to 704 x 256.
3. Select the required image resolution, enter a file size of between 2K & 45K.
Note: See the Setup Guide for the recommended settings.
4. All connected cameras will be automatically enabled, use this screen to check the enabled
inputs are correct.
5 In the corresponding title box enter the camera name for the video source connected to that
input.
6. Use the drop down box to select whether alarm input polarity is Normally Open, Normally
Closed or Off for each camera alarm.
7. By default the unit presumes all enabled inputs are colour video sources. If you are
connecting a monochrome signal to the unit, it is recommended that the input be set for
mono. Place a tick in the corresponding video input.
8. To enable the unit to send notification that the video input does not detect a 1V peak to
peak signal place a tick in the box below Cam-Fail Reporting. This can send a camera fail
email.
9. Save the configuration by clicking the Save icon.

Dedicated Micros ©2006
8
Eco
Function Description
Pictures/Second / milliseconds This allows the record settings to be configured as either Pictures
Per Second or Milliseconds
Live/Record Resolution
This is the resolution of the live and recorded images (MPEG only)
that will be transmitted from the unit and recorded to hard disk.
Image Size This is the file size for the image to be recorded, between 2KB &
45KB.
Video Expiry Period This indicates the maximum time any images can be stored on the
hard disk, if the record duration is greater than the video expiry
period the images will automatically be overwritten
Connected The unit can automatically detect if a camera source is present,
the corresponding input will be enabled in this menu for connected
cameras.
Title It is possible to allocate an ASCII camera title to each of the
cameras, which will be displayed onscreen along with the camera
number.
Alarm Input Polarity
This can be set to Off, Normally Open (NO) or Normally Closed (NC).
Mono If the video input on the unit has a black and white (monochrome)
source connected then enable the corresponding camera.
The unit will try and compress the colour contents of the image if
this box is not enabled, ticking this box will remove unnecessary
overhead on the compression process.
Camera Fail Reporting If the video input on the unit does not identify a 1V peak-to-peak
signal then the unit can transmit an alarm notification email for
camera failure on the corresponding video input.

Dedicated Micros ©2006 9
Eco
Click here to see thumbnail images
This will display a thumbnail view of video connected to the unit.
Place the cursor in the camera title box to view the corresponding
video input.
2.20021
To configure the standard record settings
10. The record duration and standard record rate are inter-connected; changing one of these
settings will automatically update the other.
11. Enter the information in either the record duration or standard record rate. These are global
settings across all cameras for the schedule period being edited.
Either
Enter the Record Duration for when the unit in the selected schedule period
Or
Enter the Standard Record Rate for the selected schedule period.
12. Select the alarm recording mode to reflect the recording requirement on receipt of an alarm.
13. Select the Event Active option from the drop down list
Note: Running the unit at maximum Record Rate (25pps or 40ms in Standard Record Settings)
will affect viewing and network transmission, as the video codecs will be operating close
to capacity - the unit’s priority is to record the footage to the internal HDD, so transmission
performance will be reduced. This is exhibited by slow connection to the html pages and
reduced viewing frame rates. Multi-user viewing will also be affected. It is not recommended
to set the Standard Record rate to 20ms for everyday usage, but rather only for specific
situations where this rate is necessary.
Record Duration The total record time available in (DD) Days and (HH) Hours. This
indicates the storage capacity of the system without any alarm
recording. It is estimated from size of video storage, the standard
record rate and the requested target size of the recorded images.
Note: Changing the Record Duration will automatically update the
Standard Record Rate. Changing the Standard Record Rate will
likewise update the Record Rate. This should be configured for
day, night and weekend operation modes.
Standard Record Rate This is global setting and identifies the ‘common pictures per
second’ for all enabled video inputs in non alarm mode. This can
be set in milliseconds or the number of pictures per second.
The delay between consecutive images from any one camera is
the Standard Record Rate multiplied by the number of cameras
being recorded. Changing the Standard Record Rate will
automatically update the Record Duration. Changing the Record
Duration will likewise change the Standard Record Rate.
Example Record Rates 40ms = 25 pictures per second
50ms = 20pps
100ms =10 pps
125ms = 8pps
200ms = 5 pps
500ms = 2pps
1000ms = 1pps
Alarm Record Rate This identifies the alarm recording rate, for the mode of operation
being configured (i.e. Day, Night and Weekend mode), which will
be activated if an alarm is triggered on the unit. For example, the
unit may be configured to increase the recording rate when a door
contact is triggered.
Event Active This identifies what kind of alarm will trigger the alarm record
rate to activate. It is selectable between None, Alarms, Activity, or
Alarms and Activity (both).
2.20022

Dedicated Micros ©2006
10
Eco
The unit supports day, night and weekend operation, if this has been enabled then it is possible to
schedule changeover times between Day, Night and Weekend operation.
The different settings for Day, Night and Weekend operation allows the system to be set to not
record during the one period (e.g. Night = 0pps) until an event triggers Alarm recording.
12. Enter the record rate for the Day, Night and Weekend modes, these settings will then be
applied to all cameras enabled within these modes.
13. Save the settings by clicking on the Disc icon.
2.3003
Otros manuales para Eco9
1
Este manual sirve para los siguientes modelos
1
Tabla de contenidos
Otros manuales de Hardware de red de Dedicated Micros

Manuales populares de Hardware de red de otras marcas

Matrix Switch Corporation
Matrix Switch Corporation MSC-HD161DEL Manual de usuario

B&B Electronics
B&B Electronics ZXT9-IO-222R2 Manual de usuario

Yudor
Yudor YDS-16 Manual de usuario

D-Link
D-Link ShareCenter DNS-320L Manual de usuario

Samsung
Samsung ES1642dc Instrucciones de uso

Honeywell Home
Honeywell Home LTEM-PV Instrucciones de montaje


