Dataton WIRETAG Manual de usuario

DATATON WIRETAG
USER GUIDE

2| WIRETAG – USER GUIDE
CONTENTS
1. INTRODUCTION................................................................................................................. 3
2. SYSTEM REQUIREMENTS..................................................................................................... 4
3. WIRETAG AS A POWERED TRANSPONDER.......................................................................... 5
3.1 CONFIGURING TRANSPONDER ID WITH A PICKUP.......................................................... 5
3.2 CONFIGURING TRANSPONDER ID WITH CONFIGURATION APP...................................... 5
3.3 USING AUTOMATIC TRIGGERING .................................................................................. 5
4. WIRETAG AND SYNCHRONIZED AUDIO WITH WATCHOUT................................................. 7
4.1 INSTALLING THE WIRETAG DRIVER .................................................................................. 7
4.2 PREPARING THE START SCRIPT........................................................................................ 11
4.3 PREPARING MEDIA AND WIRETAG.................................................................................12
4.4 ADDITIONAL CONFIGURATION OPTIONS ....................................................................14
4.5 FIRMWARE UPGRADE ...................................................................................................20
4.6 HUBS AND EXTENSION CABLES ................................................................................... 20

3| INTRODUCTION
1… INTRODUCTION
Dataton WIRETAG is the link between a WATCHOUT multi-display show and PICKUP audio
guide, making it possible to listen to the audio content of a WATCHOUT show on a PICKUP.
WIRETAG collects syncronization data from WATCHOUT and sends it to PICKUP via infra-
red, ensuring that the audio is in perfect sync with the WATCHOUT show.
WIRETAG may also be used as a powered transponder, which could be helpful in situations
where replacing the battery in a regular, battery-powered MICROTAG transponder would
be difcult.
WIRETAG (left) and the Dataton
WATCHPAX media player with
built-in WATCHOUT.

4| WIRETAG – USER GUIDE
2… SYSTEM REQUIREMENTS
This user guide applies to WIRETAG rmware version 1.3.0.
PICKUP rmware 1.9 or later is recommended for the audio guides.
PICKUP Set ID version 1.7 or later is recommended for changing the identity number of the
WIRETAG.
WATCHOUT version 5.5or later is recommended. Earlier verisons may work, but are not
recommended for best performance.
PICKUP rmware, PICKUP Set ID and WATCHOUT software are all available from
www.dataton.com.

5| WIRETAG AS A POWERED TRANSPONDER
3… WIRETAG AS A POWERED TRANSPONDER
WIRETAG may replace MICROTAG transponders in your audio tour if you require a tran-
sponder that is externally powered. Just connect the WIRETAG to a power source, such as a
USB charger or port able to deliver 100mA current, using the supplied USB cable.
3.1 CONFIGURING THE TRANSPONDER ID WITH A PICKUP
To set the transponder number, use a PICKUP with Set ID app version 1.7 or later. The Set
ID app is avaliable for download from www.dataton.com. Instructions are included in the
download.
Note > Earlier versions may work, but with limited functionality.
3.2 CONFIGURING THE TRANSPONDER ID WITH THE CONFIGURATION APPLICATION
You can also set the transponder number with the WIRETAG conguration application,
which is a Windows application downloaded from Dataton. Connect the WIRETAG to
a computer. Install the driver, as described in paragraph 4.1.2, if necessary. Open the
conguration application, select the WIRETAG to congure in the list on the left, click the
‘Get settings’ button. Enter the new transponder number at ‘Hot spot ID’, and then conrm by
clicking the ‘Write settings’ button.
3.3 USING AUTOMATIC TRIGGERING
WIRETAG can automatically trigger PICKUP to play audio, without the user pressing the
button. As PICKUP communicates with an infrared (IR) signal, there has to be a free line of
sight between PICKUP and WIRETAG for this to work. The PICKUP unit also needs to be
pointing towards the WIRETAG. Read more in paragraph 4.4.6.

6| WIRETAG – USER GUIDE
Visitors to the experience center at Herkenrode Abbey
in Belgium enjoy an immersive, chronological tour that
combines Dataton WATCHOUT visuals with audio from
PICKUP guides.

7| WIRETAG AND SYNCHRONIZED AUDIO WITH WATCHOUT
4… WIRETAG AND SYNCHRONIZED AUDIO WITH WATCHOUT
The WIRETAG communicates with WATCHOUT and delivers time code, via infrared, to
a PICKUP audio guide to ensure audio content is synchronized to the WATCHOUT show.
When a user points a PICKUP towards a WIRETAG and pushes the button, WIRETAG will
transmit its identity number, so that PICKUP can start playing the correct audio track, as well
as time code to jump to the correct time point in the audio le. In addition to this, WIRETAG
emits the time code approximately once every second. If a PICKUP does not receive any
additional time code after for the rst transmission, it will still be in lip sync for at least 10
minutes. Any additional time codes seen by PICKUP will adjust the internal clock, providing
lip sync for any amount of time.
4.1 INSTALLING THE WIRETAG DRIVER
When the driver is installed, WIRETAG will appear as a serial port in Windows.
4.1.1. WATCH PA X
In WATCHPAX, the driver is already installed and the WIRETAG will appear as ‘COM3’.
Additional WIRETAG connected to a WATCHPAX will be named ‘COM4’, ‘COM5’ etc.
4.1.2. OTHER COMPUTERS RUNNING WINDOWS 7 OR EARLIER
If you want to use WIRETAG with computers other than WATCHPAX, rst install the WIRE-
TAG driver. This should be done without having the WIRETAG connected. To install the
driver, download the WIRETAG software package from www.dataton.com. Unzip the le
onto a local hard drive and open the Drivers folder. If running 32-bit Windows, run dpinst-
x86.exe. If using 64-bit Windows, run dpinst-x64.exe. In both cases, simply double-click the
le to run it.

8| WIRETAG – USER GUIDE
The Device Driver Installation Wizard will start. There might be a warning from User
Account Control, just click ‘Yes’ to allow the driver to be installed. In the wizard, click ’Next.’
A new warning will appear; click ‘Install this driver software anyway’. After a few moments,
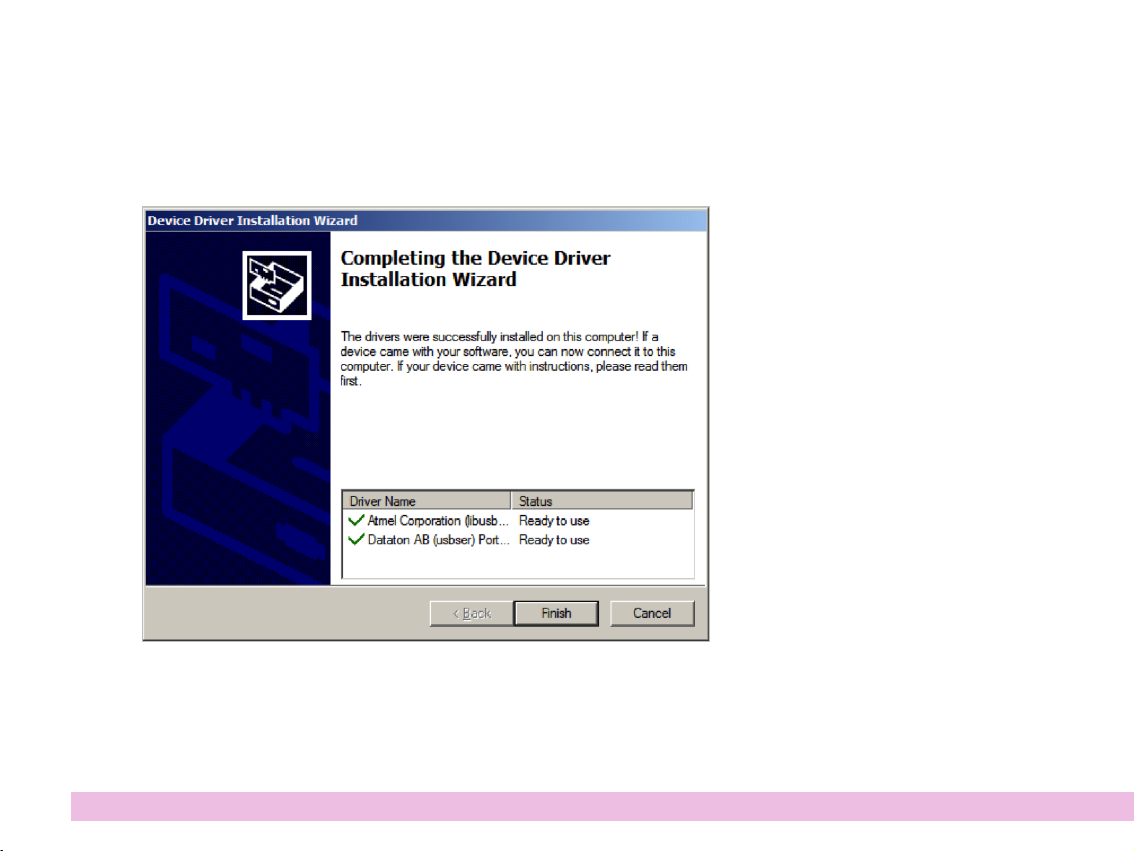
the window in Figure 1 will appear. Click ‘Finish’ and the installation is done.
4.1.3. OTHER COMPUTERS RUNNING WINDOWS 8
The driver for WIRETAG is not digitally signed, and by default Windows 8 does not allow
installation of unsigned drivers. To temporarily enable installation of unsigned drivers,
proceed as follows:
Figure 1: The WIRETAG driver
has been installed successfully.

9| WIRETAG AND SYNCHRONIZED AUDIO WITH WATCHOUT
Open the charms bar, either by pushing Win-C or moving the mouse to the bottom right
corner, and click ‘Settings’.
Click ‘Change PC settings’ and ‘General’.
Click ‘Restart now’ under ‘Advanced startup’.
Next click ‘Troubleshoot’, ‘Advanced options’ and ‘Startup settings’.
Click ‘Restart’, and the computer will reboot.
Upon startup, a menu will appear. Select ‘Disable driver signature enforcement’.
You will now be able to install unsigned drivers until your next reboot. To install the driver,
proceed as in the previous section ‘Other computers running Windows 7 or earlier’.
4.1.4 CHECKING AND CONFIGURING THE COM-PORT NUMBER
Now connect the WIRETAG to the computer. It should appear as a COM-port in the Device
Manager. To start the Device Manager, open the Control Panel from the start menu, and
then click Device Manager. Expand ‘Ports’ to see the WIRETAG. Depending on other serial
ports, serial adapters or other devices connected to the computer, the WIRETAG may be
assigned any COM-port number. To make sure it gets the same number when the computer
is restarted and/or other devices are conneced or disconnected, the port number should be
locked to the WIRETAG.
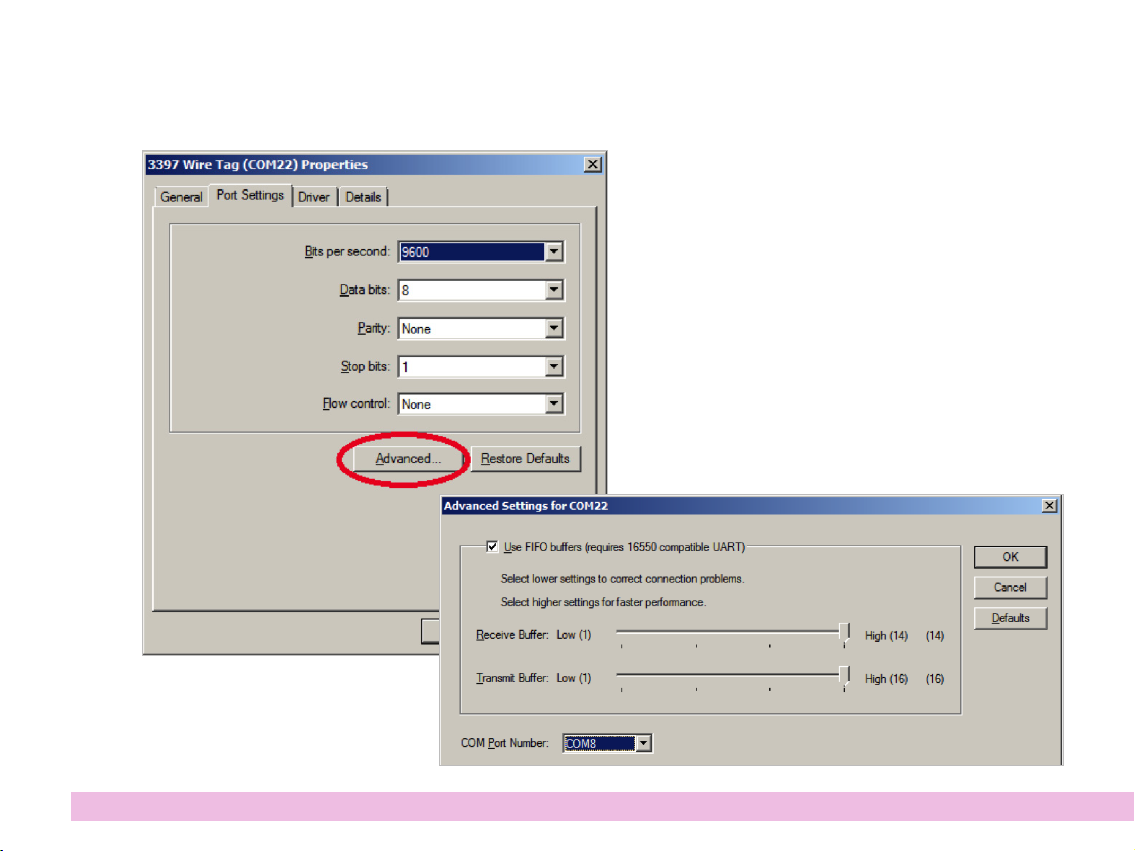
Double-click the WIRETAG in the Device Manager and select ‘Port Settings’, then click the
‘Advanced...’ button. In the dialog box, select a COM-port number preferably between
1 and 9. Some of the port numbers in the list may have ‘(in use)’ appended to them. This

10| WIRETAG – USER GUIDE
means that this number has been locked to another device, so avoid these, if possible. Now
the WIRETAG will always appear at the same COM-port.
Figure 2: Configuring the COM-port number.
Figure 3, below: Selecting the COM-port
number for WIRETAG.
Tabla de contenidos