DataTale Guardian Manual de usuario

1
User’s Manual
Copyright @ 2010 ONNTO Corporation. All rights reserved.
www.onnto.com.tw
USB 2.0
AES256‐bit
2.5-inch Encrypted HDD Enclosure
dataTale

2
TableofContents
GENERALINFORMATION ............................................................................................................... 3
COPYRIGHT.................................................................................................................................................... 3
NOTICESANDCLASSIFICATIONS ......................................................................................................... 3
CONTACTUS.................................................................................................................................................. 3
PRECAUTIONSFORTHEENCLOSURE ........................................................................................ 4
GENERALPRECAUTIONS......................................................................................................................... 4
ENCRYPTEDHDDENCLOSUREPRECAUTIONS .............................................................................. 4
INTRODUCTION................................................................................................................................. 5
FEATURES .......................................................................................................................................................... 5
SYSTEMREQUIREMENT ................................................................................................................. 6
PC ........................................................................................................................................................................... 6
MAC ....................................................................................................................................................................... 6
PACKAGECONTENTS ....................................................................................................................................... 6
SYSTEMUNITVIEW.......................................................................................................................... 7
FRONTVIEW ..................................................................................................................................................... 7
ASSEMBLINGTHEHDDENCLOSURE .......................................................................................... 8
CONNECTINGTHEENCLOSURETOACOMPUTER ...............................................................11
SAFEREMOVALOFTHEUNIT.....................................................................................................13
LEDSTATUS ......................................................................................................................................13
Q&AS ...................................................................................................................................................13
HDDSTATUS ................................................................................................................................................. 13
SECUREKEYFEATURE ................................................................................................................................. 13
FILESYSTEMFORMAT.................................................................................................................................. 14
DISCREPANCYINREPORTED&ACTUALSIZECAPACITY........................................................................ 14
APPENDIX:SPECIFICATIONS ......................................................................................................15

3
GENERAL INFORMATION
COPYRIGHT
Copyright @ 2010 ONNTO Corporation. All rights reserved. No part of this
publication may be reproduced, stored in a retrieval system, or transmitted in
any form or by any means, electronic, mechanical, photocopying, recording or
otherwise, without the prior written consent of ONNTO Corporation.
The product information provided in this manual is subject to change
without prior notice and does not represent a commitment on behalf of the
vendor. The vendor assumes no liability or responsibility for any errors that
may appear in this manual.
NOTICES AND CLASSIFICATIONS
FCC-B Radio Frequency Interference Statement
This device complies with Part 15 of the FCC rules. Operation is subject to
the following two conditions:
This device may not cause harmful interference.
This device must accept any interference received, including interference that
may cause undesired operation.
This equipment has been tested and found to comply with the limits for
a Class B digital device, pursuant to Part 15 of the FCC rules. These limits
are designed to provide reasonable protection against harmful interference
when the equipment is operated in a commercial environment. This
equipment generates uses and can radiate radio frequency energy and, if not
installed and used in accordance with the instruction manual, may cause
harmful interference to radio communications.
CONTACT US
We are committed to offer economical, high-quality connectivity and storage
enclosure solutions to the market. Your questions, inquiries or comments are
welcomed. For Technical Support, software or User Manual updates, please
go to our website at www.onnto.com.tw
ONNTO Corporation
3F, No. 60, Lane 321, Yang Guang St.,
Nei Hu, Taipei 114 Taiwan
Tel: +886-2-8797-8868
Fax: +886-2-8797-4801
Email: [email protected]

4
PRECAUTIONS FOR THE ENCLOSURE
GENERAL PRECAUTIONS
♦The main circuit board of the Enclosure is susceptible to static
electricity. Proper grounding is required to prevent electrical damage
to the Enclosure or other connected devices, including the host
computer. Always place the Enclosure on a smooth surface and avoid
all dramatic movement, vibration and percussion.
♦Do NOT allow water to enter the Enclosure.
♦Do NOT place the Enclosure close to magnetic devices (such as a
mobile phone), high-voltage devices (such as a hair dryer), or near a
heat source (such as on the dashboard of a car or any place where the
Enclosure will be exposed to direct sunlight).
♦Use only the bus-powered USB cable provided with the Enclosure.
♦Use only a 9.5mm high 2.5” HDD inside the Enclosure. The Enclosure
may not function properly if a HDD with a different thickness is used.
In addition, the Enclosure and HDD may be damaged.
ENCRYPTED HDD ENCLOSURE PRECAUTIONS
♦Required to partition and format the hard drive after installing it inside
the Enclosure. Always perform partition and format of a new disk drive
with one of the provided Secure Keys inserted in the Enclosure.
♦After the Enclosure is properly connected to the host computer,
insert the Secure Key to allow proper disk enumeration. The Secure
Key may be removed after the host computer has detected the
Enclosure.
♦Keep the Secure Key with you at all times, as it is required for
authenticating the Encrypted HDD Enclosure when connected.
Without the Secure Key’s presence, the host computer will not be able
to detect the Encrypted HDD.

5
INTRODUCTION
Thank you for purchasing the DataTale Guardian (EU-S10-Y). This
Encrypted 2.5-inch SATA HDD Enclosure provides secure data access and
convenient travel for your slim 2.5-inch hard drive. Guardian is a secure-data
storage device that has adopted Enova real-time hardware AES (Advanced
Encryption Standard) cryptographic processor, making Guardian one of the
finest secure-data mobile HDD Enclosure in the world with privacy protection
on data. The hardware (AES-256) is NIST (National Institute of Standard &
Technology of USA) and CSE (Communication Security Establishment of
Canada) certified. It is utilized to encrypt all sensitive and confidential data
inside the HDD (including boot sector, temporary files, and the operating
system). Proper installation, care, and usage of the Enclosure Kit as
described in the User’s Manual will ensure trouble-free utility and prolong life
of the DataTale Guardian.
Please thoroughly read and follow the instructions provided in this
manual. Failure to do so may result in damage to the Enclosure Kit, and any
or all of the connected devices.
Features
Supports current SATA II compliant HDDs, fully backward compatible
with SATA 1.0 and SATA 1.0a compliant HDDs
Provides real-time cryptographic strength with encryption length up to
256-bit
Supports Hi-Speed USB (USB2.0 connection)
Connects to host by plug-n-play, not requiring any IT expertise or
software installation
Powers HDD via USB bus power
Indicates most-updated statuses easily via hidden LED
Supports hot-plug
Comes with Secure Keys for encrypted security function, no need to
memorize any passwords
Protects casing & HDD via copper-pillar reinforced screw guides for
constant swapping
Data Loss may occur if the Enclosure is reformatted or utilize for
regular usage without the Secure Key inserted. Please review Connecting
The Enclosure To A Computer and Q&A sections for more information.
Any loss, corruption, or destruction of data is the sole responsibility of
the user. Under no circumstances will the manufacturer be held liable for the
recovery or restoration of any data.
6
System Requirement
To use the Enclosure Kit, the minimum system configuration in the host
computer require the following:
PC 266MHz or faster CPU (800MHz or faster CPU is required for Windows
Vista)
64MB of RAM (512MB or more of RAM is required for Windows Vista)
Microsoft Windows 2000, XP, 2003, Vista, 2007 or higher
One available USB 2.0 port
MAC
Macintosh PowerPC or Intel processor
64MB of RAM (256MB or more of RAM is required for Mac OS X 10.4)
Mac OS X 10.1 or higher
One available USB 2.0 port
2.5-inch SATA compatible hard drive is required for the Enclosure. Once
the HDD is formatted, the actual available storage capacity can vary
depending on the selected operating environment (normally 5-10 % less).
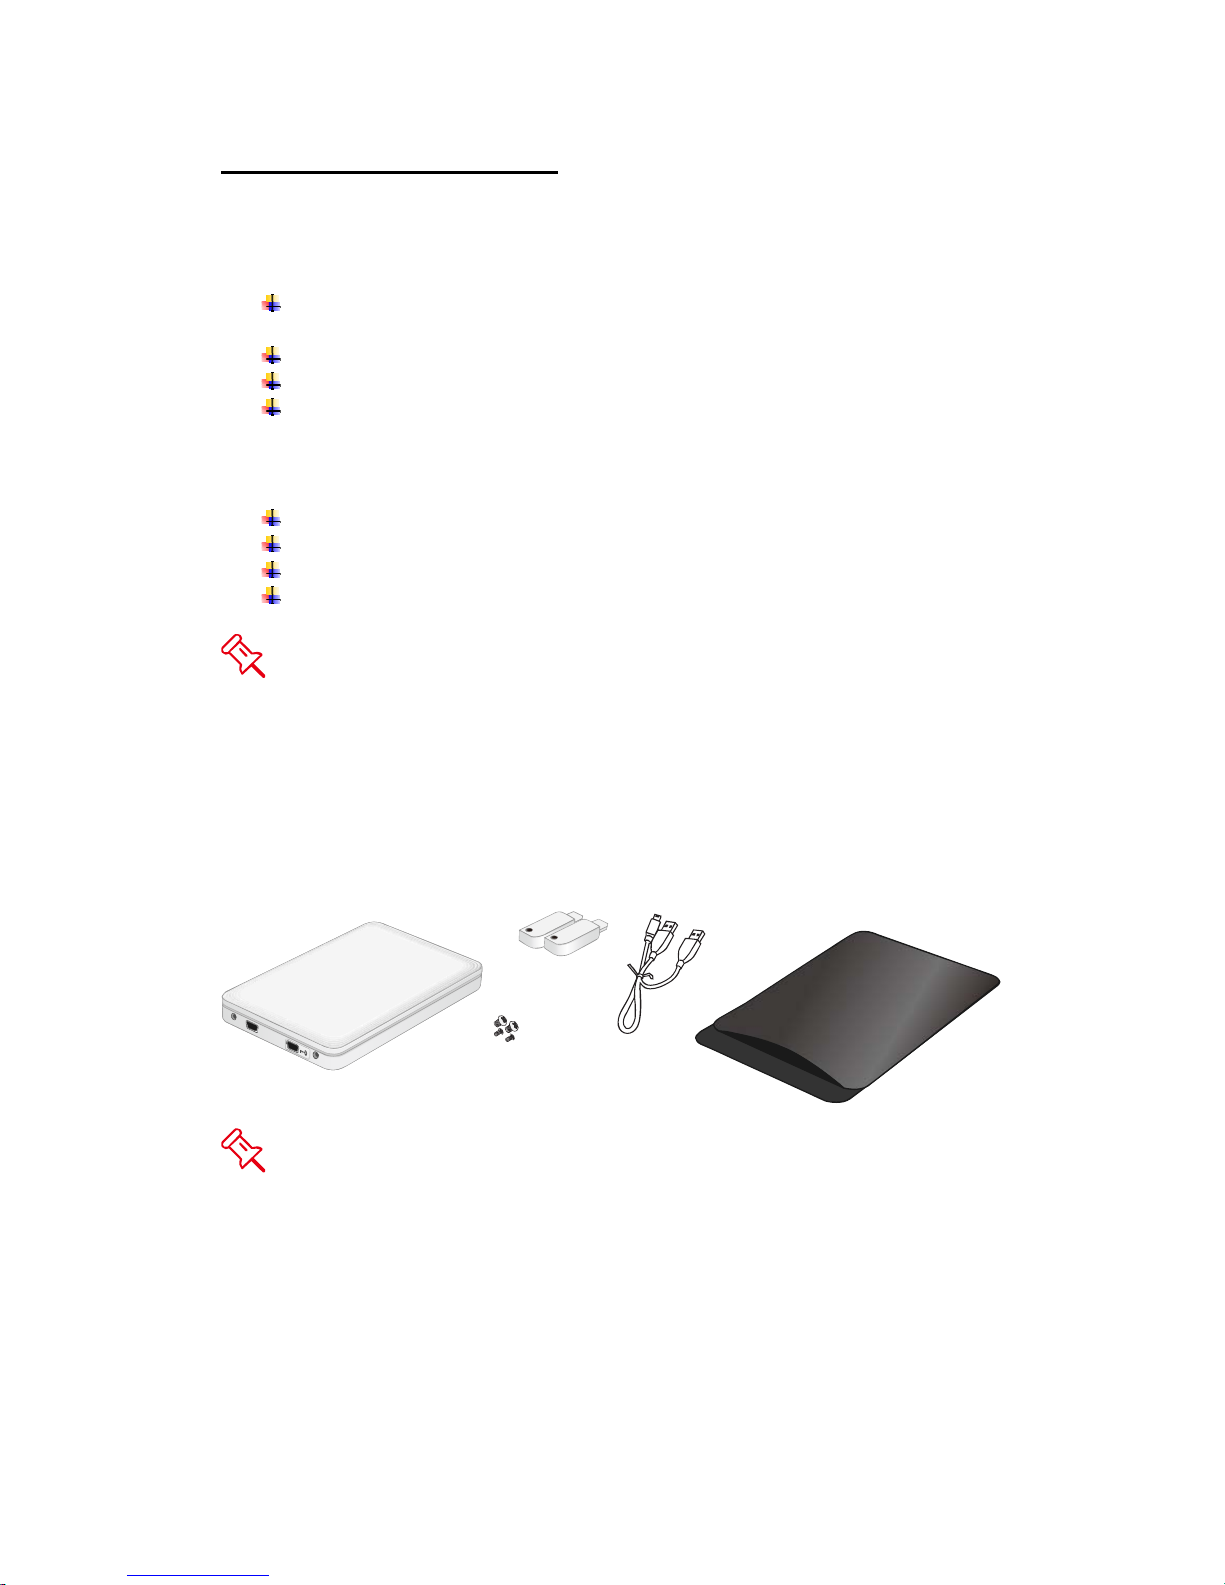
Package Contents
USB Type A to
mini-B Y Cable
Guardian
Secure Keys
Soft case
Screws
Please keep all package contents and packaging material in the event
that the product must be returned.

7
SYSTEM UNIT VIEW
Front View
USBMini‐Bport Secure Keyport
CaseScrews
The hidden LED on its top cover will indicate statuses for Power, Data
Access and Secure Key authentication.

8
ASSEMBLING THE HDD ENCLOSURE
To begin using the Enclosure Kit, simply install a 2.5” SATA hard drive in the
Enclosure and complete the assembly steps outlined below:
1. Firmly push the lid down from front to back and open the Enclosure. After
the lid is opened, the PCBA board (Printed Circuit Board) should be
securely in place inside the Enclosure. One package containing the two
HDD Screws and two Case Screws should be attached.
2. Carefully take out the PCBA board from the Enclosure. Align the SATA
connector of the hard drive with the PCBA board. Carefully insert the SATA
connector into the slot on the PCBA board until it’s firmly connected.

9
3. Turn the hard drive connected to the PCBA board to its backside. Locate
two larger (HDD) screws enclosed inside the package. Tighten the screws
in its appropriate holes, ensuring that the hard drive and PCBA alignment is
properly maintained.
The smaller (Case) screws are for fastening the Enclosure’s housing
and lid together.
4. Carefully align the PCBA board, with the hard drive attached, to the
Enclosure port opening(s) inside the Enclosure. The two holes of the HDD
end, where it is not attached to the PCBA, will match up to the ribs inside
the housing.

10
5. Place the lid on top of the Enclosure. Make sure the two copper screw
holes are aligned with Front View. Firmly push the lid down from back to
front and lock the lid on the Enclosure. Make sure the lid is securely in
place.
6. Find the two smaller (Case) screws enclosed inside the package and
fasten them to attach the lid onto the Enclosure (Front View).
Tabla de contenidos
Otros manuales de Recinto de DataTale


 Manual de usuario")


