
Custom Dynamics DCS777 Manual de usuario

DCS777
Final Page Size: 172 x 240mm

1
14 11
13
12
10
7
3
2
1
4
5
6
19
17
9
16
8
32
15
22
21
22
20
31
26
2324183528
57
25
30
22
32
Figure A
Figure B
00–00-0000
34
27
2
Figure C Figure D
Figure E
Figure G
Figure F
Figure H
36
8
33
6
57
5
14
26
48
29
37
39 38
28
27

3
Figure K Figure L
Figure M Figure N
916
8
4116
42 14
40
12
13
15
46
43
31
20
8
41
44
47
45
45
21
Figure I Figure J

4
Figure Q
Figure S
Figure R
XPS
35
Figure O Figure P
5
1
2
3
17
Figure T

27
ENGLISH
English (original instructions)
CORDLESS COMPACT MITRE SAW
DCS777
Congratulations!
You have chosen a
DeWALT
tool. Years of experience, thorough product
development and innovation make
DeWALT
one of the most reliable
partners for professional power toolusers.
Technical Data
DCS777
Voltage V54
Type 1
XPS Yes
Power output W1750
Blade diameter mm 216
Blade bore mm 30
Max. blade speed min-1 6300
Mitre (max. positions) left and right 50°
Bevel (max. positions) left 48°
Compound mitre bevel 45°
mitre 45°
Capacities
cross-cut 90° mm 60 x 270
mitre 45° mm 60 x 190
mitre 48° mm 60 x 180
bevel 45° mm 48 x 270
bevel 48° mm 45 x 270
Overall dimensions mm 460 x 560 x 430
Weight kg 15.0
Noise values and vibration values (triax vector sum) according to EN61029:
LPA (sound pressure) dB(A) 93
LWA (acoustic power) dB(A) 103
K (acoustic power uncertainty) dB(A) 3.0
The noise emission level given in this information sheet has been measured
in accordance with a standardised test given in EN61029 and may be
used to compare one tool with another. It may be used for a preliminary
assessment of exposure.
WARNING: The declarednoise emission level represents the main
applications of the tool. However if the tool is used for different
applications, with different accessories or poorly maintained, the noise
emission may differ. This may significantly increase the exposure level
over the total working period.
An estimation of the level of exposure to vibration should also take into
account the times when the tool is switched off or when it is running
but not actually doing the job.
This may significantly reduce the exposure level over the total working
period. Identify additional safety measures to protect the operator
from the effects of vibration such as: maintain the tool and the
accessories, keep the hands warm, organisation of work patterns.
Battery pack DCB546
Battery type Li-Ion
Voltage VDC 18/54
Capacity Ah 6.0/2.0
Weight kg 1.05
Charger DCB118
Mains voltage VAC 230
Battery type 18/54 Li-Ion
Approx. charging time of
battery packs
min 22 (1.3 Ah) 22 (1.5 Ah) 30 (2.0 Ah)
45 (3.0 Ah) 60 (4.0 Ah) 75 (5.0 Ah)
60 (6.0 Ah)
Weight kg 0,66
The DCB118 charger accepts 18V Li-Ion XR and XRFLEXVOLTTM battery
packs (DCB181, DCB182, DCB183, DCB183B, DCB184, DCB184B, DCB185
and DCB546).
Fuses:
Europe 230V tools 10 Amperes. mains
U.K. & Ireland 230V tools 3 Amperes. in plugs
EC-Declaration of Conformity
Machinery Directive
Cordless Compact Mitre Saw
DCS777
DeWALT
declares that these products described under Technical Data are
in compliance with:
2006/42/EC, EN61029-1:2009 + A11:2010, EN61029-2-9:2012 + A11:2013.
These products also comply with Directive, 2014/30/EU and 2011/65/EU.
For more information, please contact
DeWALT
at the following address or
refer to the back of themanual.
The undersigned is responsible for compilation of the technical file and
makes this declaration on behalf of
DeWALT
.
Markus Rompel
Director Engineering
DeWALT
, Richard-Klinger-Straße 11,
D-65510, Idstein, Germany
20.07.2016
WARNING: To reduce the risk of injury, read the instructionmanual.
Safety Instructions
WARNING: Read all safety warnings and all instructions. Failure
to follow the warnings and instructions may result in electric shock,
fire and/or seriousinjury.
SAVE ALL WARNINGS AND INSTRUCTIONS
FOR FUTURE REFERENCE
General Safety Rules
1. Keep work areaclear.
Cluttered areas and benches inviteinjuries.
2. Consider work areaenvironment.
Do not expose the tool to rain. Do not use the tool in damp or wet
conditions. Keep the work area well lit (250–300 Lux). Do not use the tool
where there is a risk of causing fire or explosion, e.g., in the presence of
flammable liquids andgases. Work area should be wellventilated.

28
ENGLISH
3. Guard against electricshock.
Avoid body contact with earthed surfaces (e.g., pipes, radiators, cookers
and refrigerators). When using the tool under extreme conditions (e.g.,
high humidity, when metal swarf is being produced, etc.), electric safety
can be improved by inserting an isolating transformer or a (FI) earth-
leakage circuit-breaker.
4. Keep other personsaway.
Do not let persons, especially children, not involved in the work, touch the
tool or the battery and keep them away from the workarea.
5. Store idletools.
When not in use, tools must be stored in a dry place and locked
up securely, out of reach ofchildren.
6. Do not force thetool.
It will do the job better and safer at the rate to which it wasintended.
7. Use the righttool.
Do not force small tools to do the job of a heavy duty tool. Do not use tools
for purposes not intended; for example do not use circular saws to cut tree
limbs orlogs.
8. Dressproperly.
Do not wear loose clothing or jewellery, as these can be caught in moving
parts. Non-skid footwear is recommended when working outdoors. Wear
protective hair covering to contain longhair.
9. Use protectiveequipment.
Always use safety glasses. Use a face or dust mask if working operations
create dust or flying particles. If these particles might be considerably hot,
also wear a heat-resistant apron. Wear ear protection at all times. Wear a
safety helmet at alltimes.
10. Connect dust extractionequipment.
If devices are provided for the connection of dust extraction and collecting
equipment, ensure these are connected and properlyused.
11. Securework.
Where possible use clamps or a vice to hold the work. It is safer than using
your hand and it frees both hands to operate thetool.
12. Do notoverreach.
Keep proper footing and balance at alltimes.
13. Maintain tools withcare.
Keep cutting tools sharp and clean for better and safer performance.
Follow instructions for lubricating and changing accessories. Inspect tools
periodically and if damaged have
them repaired by an authorized service facility. Keep handles
and switches dry, clean and free from oil andgrease.
14. Disconnecttools.
When not in use, before servicing and when changing accessories such as
blades, bits and cutters, disconnect tools from the powersupply.
15. Remove adjusting keys andwrenches.
Form the habit of checking to see that adjusting keys and wrenches are
removed from the tool before operating thetool.
16. Avoid unintentionalstarting.
Do not carry the tool with a finger on the switch. Be sure that the tool is in
the “off” position before pluggingin.
17. Stayalert.
Watch what you are doing. Use common sense. Do not operate the tool
when you are tired or under the influence of drugs oralcohol.
18. Check for damagedparts.
Before use, carefully check the machine to determine that it will operate
properly and perform its intended function. Check for alignment of moving
parts, binding of moving parts, breakage of parts, mounting and any
other conditions that may affect its operation. A guard or other part that
is damaged should be properly repaired or replaced by an authorized
service centre unless otherwise indicated in this instruction manual. Have
defective switches replaced by an authorized service centre.
Do not use the tool if the switch does not turn it on and off.
Never attempt any repairsyourself.
WARNING! The use of any accessory or attachment or performance
of any operation with this tool other than those recommended in this
instruction manual may present a risk of personalinjury.
19. Have your tool repaired by a qualifiedperson.
This electric tool complies relevant safety rules. Repairs should only be
carried out by qualified persons using original spare parts; otherwise this
may result in considerable danger to theuser.
Additional Safety Rules for Mitre Saws
• Do not use the saw to cut other materials than those recommended by
themanufacturer.
• Do not operate the machine without guards in position, or if guards do not
function or are not maintainedproperly.
• Ensure that the arm is securely fixed when performing bevelcuts.
• Keep the floor area around the machine level, well-maintained and free of
loose materials, e.g., chips and cut-offs.
• Select the correct blade for the material to becut.
• Use correctly sharpened saw blades. Observe the maximum speed mark on
the sawblade.
• Make sure all locking knobs and clamp handles are tight before starting
anyoperation.
• Never place either hand in the blade area when the saw is connected to
the electrical powersource.
• Never attempt to stop a machine in motion rapidly by jamming a tool or
other means against the blade; serious accidents canoccur.
• Before using any accessory consult the instruction manual.
The improper use of an accessory can causedamage.
• Use a holder or wear gloves when handling a saw blade or roughmaterial.
• Ensure that the saw blade is mounted correctly beforeuse.
• Make sure that the blade rotates in the correctdirection.
• Do not use blades of larger or smaller diameter than recommended. For
the proper blade rating refer to the technical data. Use only the blades
specified in this manual, complying with EN847-1.
• Consider applying specially designed noise-reductionblades.
• Do not use HIGH SPEED STEELblades.
• Do not use cracked or damaged sawblades.
• Do not use any abrasive or diamonddiscs.
• Use only saw blades where the marked speed is at least equal to the speed
marked on thesaw.
• Never use your saw without the kerfplate.
• Raise the blade from the kerf in the workpiece prior to releasing theswitch.
• Before each cut ensure that the machine isstable.
• Do not wedge anything against the fan to hold the motorshaft.
• The blade guard on your saw will open when the guard release lever2
ispushed.
• Never raise the blade guard manually unless the saw is switched off. The
guard can be raised by hand when installing or removing saw blades or
for inspection of thesaw.
• Check periodically that the motor air slots are clean and free ofchips.
• Replace the kerf plate whenworn.
• Remove the battery from the machine before carrying out any
maintenance work or when changing theblade.
• Never perform any cleaning or maintenance work when the machine is
still running and the head is not in the restposition.
• When fitted with LED, no exchange with different type of LED permitted.
Repairs shall only be carried out by the manufacturer or an authorized
agent.
• Connect the saw to a dust collection device when sawing wood. Always
consider factors which influence exposure of dust suchas:
ʵ type of material to be machined (chip board produces more dust
than wood);

29
ENGLISH
ʵ sharpness of the saw blade;
ʵ correct adjustment of the saw blade,
ʵ dust extractor with air velocity not less than 20 m/s.
Ensure that the local extraction as well as hoods, baffles and chutes are
properlyadjusted.
• Please be aware of the following factors influencing exposure
tonoise:
ʵ use saw blades designed to reduce the emitted noise;
ʵ use only well sharpened saw blades;
• Machine maintenance shall be conducted periodically;
• Provide adequate general or localized lighting;
• Ensure the operator is adequately trained in the use, adjustment and
operation of the machine;
• Ensure that any spacers and spindle rings are suitable for the purpose as
stated in thismanual.
• Refrain from removing any cut-offs or other parts of the workpiece from
the cutting area while the machine is running and the saw head is not in
the rest position
• Never cut workpieces shorter than 150mm.
• Without additional support the machine is designed to accept the
maximum workpiece sizeof:
ʵ Height 60mm by width 216mm by length 500mm
ʵ Longer workpieces need to be supported by suitable additional table,
e.g. DE7023. Always clamp the workpiecesafely.
• In case of an accident or machine failure, immediately turn the machine
off and disconnect machine from the powersource.
• Report the failure and mark the machine in suitable form to prevent other
people from using the defectivemachine.
• When the saw blade is blocked due to abnormal feed force during cutting,
turn the machine off and disconnect it from power supply. Remove the
workpiece and ensure that the saw blade runs free. Turn the machine on
and start new cutting operation with reduced feedforce.
• Never cut light alloy, especiallymagnesium.
• Whenever the situation allows, mount the machine to a bench using bolts
with a diameter of 8mm and 80mm inlength.
Residual Risks
The following risks are inherent to the use ofsaws:
• injuries caused by touching the rotating parts
In spite of the application of the relevant safety regulations and the
implementation of safety devices, certain residual risks cannot be avoided.
Theseare:
• Impairment ofhearing.
• Risk of accidents caused by the uncovered parts of the rotating sawblade.
• Risk of injury when changing the unprotected sawblade.
• Risk of squeezing fingers when opening theguards.
• Health hazards caused by breathing dust developed when sawing wood,
especially oak, beech andMDF.
The following factors increases the risk of breathingproblems:
• No dust extractor connected when sawing wood
• Insufficient dust extraction caused by uncleaned exhaust filters
Electrical Safety
The electric motor has been designed for one voltage only. Always check
that the battery pack voltage corresponds to the voltage on the rating
plate. Also make sure that the voltage of your charger corresponds to that
of yourmains.
Your
DeWALT
charger is double insulated in accordance with
EN60335; therefore no earth wire isrequired.
WARNING: 115 V units have to be operated via a fail-safe
isolating transformer with an earth screen between the primary and
secondary winding.
If the supply cord is damaged, it must be replaced by a specially prepared
cord available through the
DeWALT
serviceorganisation.
Mains Plug Replacement
(U.K. & Ireland Only)
If a new mains plug needs to be fitted:
• Safely dispose of the oldplug.
• Connect the brown lead to the live terminal in theplug.
• Connect the blue lead to the neutralterminal.
WARNING: No connection is to be made to the earthterminal.
Follow the fitting instructions supplied with good quality plugs.
Recommended fuse: 3A.
Using an Extension Cable
An extension cord should not be used unless absolutely necessary. Use an
approved extension cable suitable for the power input of your charger (see
Technical Data). The minimum conductor size is 1mm2; the maximum
length is30m.
When using a cable reel, always unwind the cablecompletely.
SAVE THESE INSTRUCTIONS
Chargers
DeWALT
chargers require no adjustment and are designed to be as easy as
possible tooperate.
Important Safety Instructions for All Battery
Chargers
SAVE THESE INSTRUCTIONS: This manual contains important safety
and operating instructions for compatible battery chargers (refer to
TechnicalData).
• Before using charger, read all instructions and cautionary markings on
charger, battery pack, and product using batterypack.
WARNING: Shock hazard. Do not allow any liquid to get inside
charger. Electric shock mayresult.
WARNING: We recommend the use of a residual current device with a
residual current rating of 30mA orless.
CAUTION: Burn hazard. To reduce the risk of injury, charge only
DeWALT
rechargeable batteries. Other types of batteries may burst
causing personal injury anddamage.
CAUTION: Children should be supervised to ensure that they do not
play with theappliance.
NOTICE: Under certain conditions, with the charger plugged into the
power supply, the exposed charging contacts inside the charger can be
shorted by foreign material. Foreign materials of a conductive nature
such as, but not limited to, steel wool, aluminum foil or any buildup of
metallic particles should be kept away from charger cavities. Always
unplug the charger from the power supply when there is no battery
pack in the cavity. Unplug charger before attempting to clean
• DO NOT attempt to charge the battery pack with any chargers
other than the ones in this manual. The charger and battery pack are
specifically designed to worktogether.
• These chargers are not intended for any uses other than charging
DeWALT
rechargeable batteries. Any other uses may result in risk of fire,
electric shock orelectrocution.
• Do not expose charger to rain orsnow.
• Pull by plug rather than cord when disconnecting charger. This will
reduce risk ofdamage to electric plug andcord.
• Make sure that cord is located so that it will not be stepped on,
tripped over, or otherwise subjected to damage orstress.

30
ENGLISH
• Do not use an extension cord unless it is absolutely necessary.
Use of improper extension cord could result in risk of fire,electric shock,
orelectrocution.
• Do not place any object on top of charger or place the charger on
a soft surface that might block the ventilation slots and result in
excessive internal heat. Place the charger in a position away from any
heat source. The charger is ventilated through slots in the top and the
bottom of thehousing.
• Do not operate charger with damaged cord or plug—have them
replacedimmediately.
• Do not operate charger if it has received a sharp blow, been
dropped, or otherwise damaged in any way. Take it to an authorised
servicecentre.
• Do not disassemble charger; take it to an authorised service centre
when service or repair is required. Incorrect reassembly may result in a
risk of electric shock, electrocution orfire.
• In case of damaged power supply cord the supply cord must be replaced
immediately by the manufacturer, its service agent or similar qualified
person to prevent anyhazard.
• Disconnect the charger from the outlet before attempting any
cleaning. This will reduce the risk of electric shock. Removing the
battery pack will not reduce thisrisk.
• NEVER attempt to connect two chargerstogether.
• The charger is designed to operate on standard 230V household
electrical power. Do not attempt to use it on any other voltage. This
does not apply to the vehicularcharger.
Charging a Battery (Fig. C)
1. Plug the charger into an appropriate outlet before inserting
batterypack.
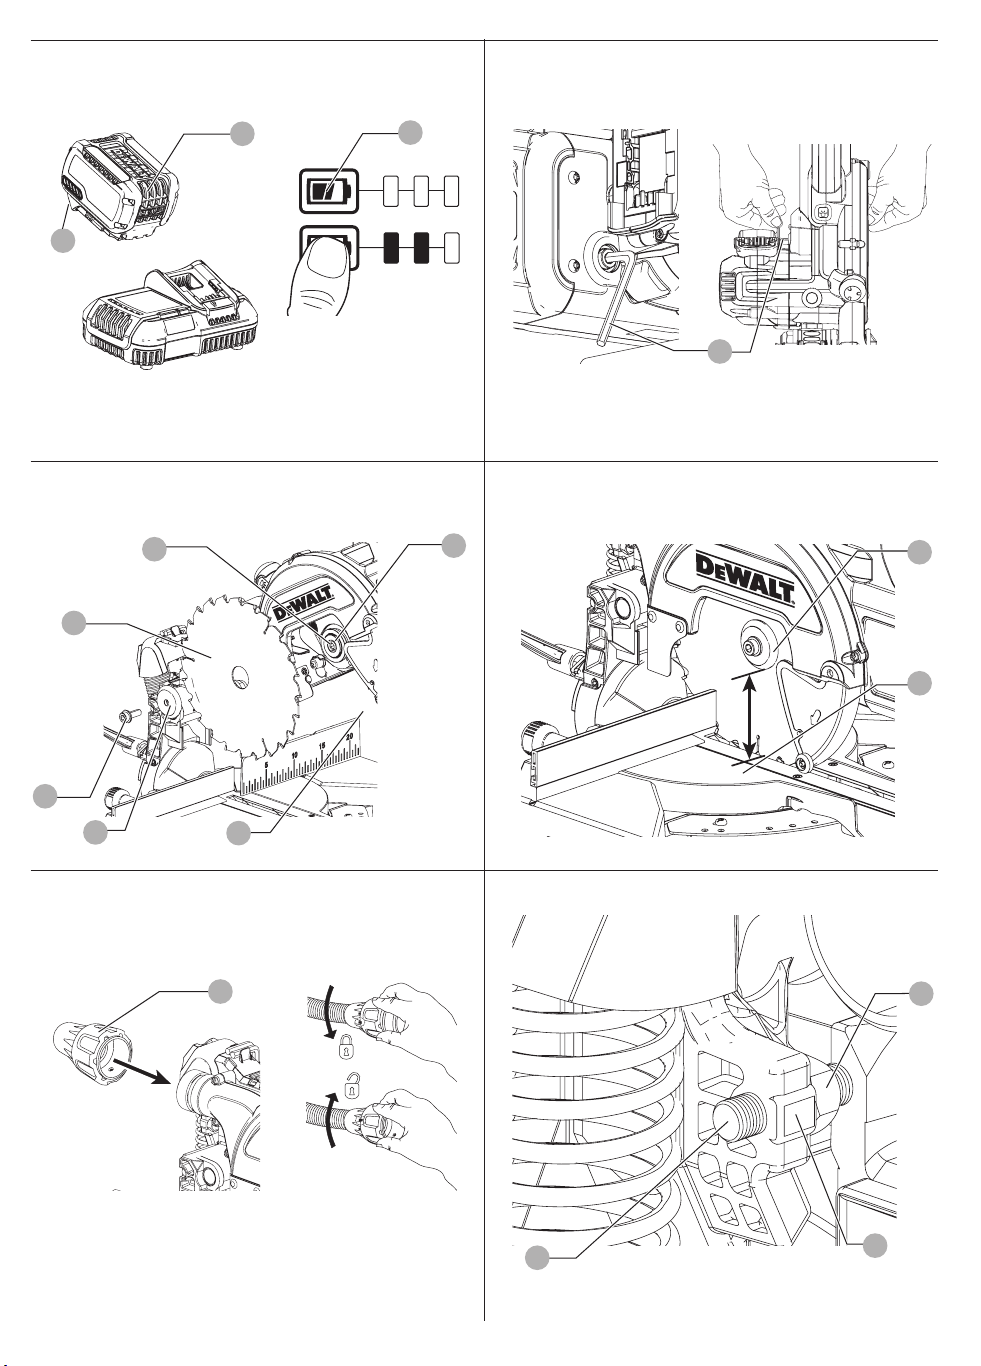
2. Insert the battery pack 27 into the charger, making sure the battery
pack is fully seated in the charger. The red (charging) light will blink
repeatedly indicating that the charging process hasstarted.
3. The completion of charge will be indicated by the red light remaining
ON continuously. The battery pack is fully charged and may be used
at this time or left in the charger. To remove the battery pack from the
charger, push the battery release button 28 on the batterypack.
NOTE: To ensure maximum performance and life of lithium-ion battery
packs, charge the battery pack fully before firstuse.
Charger Operation
Refer to the indicators below for the charge status of the batterypack.
Charge Indicators
Charging
Fully Charged
Hot/Cold Pack Delay*
*The red light will continue to blink, but a yellow indicator light will be
illuminated during this operation. Once the battery pack has reached an
appropriate temperature, the yellow light will turn off and the charger will
resume the chargingprocedure.
The compatible charger(S) will not charge a faulty battery pack. The charger
will indicate faulty battery by refusing to light or by displaying problem
pack or charger blinkpattern.
NOTE: This could also mean a problem with acharger.
If the charger indicates a problem, take the charger and battery pack to be
tested at an authorised servicecentre.
Hot/Cold Pack Delay
When the charger detects a battery pack that is too hot or too cold, it
automatically starts a Hot/Cold Pack Delay, suspending charging until the
battery pack has reached an appropriate temperature. The charger then
automatically switches to the pack charging mode. This feature ensures
maximum battery packlife.
A cold battery pack will charge at a slower rate than a warm battery pack.
The battery pack will charge at that slower rate throughout the entire
charging cycle and will not return to maximum charge rate even if the
battery packwarms.
The DCB118 charger is equipped with an internal fan designed to cool
the battery pack. The fan will turn on automatically when the battery pack
needs to be cooled. Never operate the charger if the fan does not operate
properly or if ventilation slots are blocked. Do not permit foreign objects to
enter the interior of thecharger.
Electronic Protection System
XR Li-Ion tools are designed with an Electronic Protection System
that will protect the battery pack against overloading, overheating or
deepdischarge.
The tool will automatically turn off if the Electronic Protection System
engages. If this occurs, place the lithium-ion battery pack on the charger
until it is fullycharged.
Wall Mounting
These chargers are designed to be wall mountable or to sit upright on a
table or work surface. If wall mounting, locate the charger within reach of an
electrical outlet, and away from a corner or other obstructions which may
impede air flow. Use the back of the charger as a template for the location
of the mounting screws on the wall. Mount the charger securely using
drywall screws (purchased separately) at least 25.4mm long with a screw
head diameter of 7–9mm, screwed into wood to an optimal depth leaving
approximately 5.5mm of the screw exposed. Align the slots on the back of
the charger with the exposed screws and fully engage them in theslots.
Charger Cleaning Instructions
WARNING: Shock hazard. Disconnect the charger from the AC
outlet before cleaning. Dirt and grease may be removed from the
exterior of the charger using a cloth or soft non-metallic brush. Do not
use water or any cleaning solutions. Never let any liquid get inside the
tool; never immerse any part of the tool into aliquid.
Battery Packs
Important Safety Instructions for All Battery Packs
When ordering replacement battery packs, be sure to include catalog
number andvoltage.
The battery pack is not fully charged out of the carton. Before using the
battery pack and charger, read the safety instructions below. Then follow
charging proceduresoutlined.
READ ALL INSTRUCTIONS
• Do not charge or use battery in explosive atmospheres, such as
in the presence of flammable liquids, gases or dust. Inserting or
removing the battery from the charger may ignite the dust orfumes.
• Never force battery pack into charger. Do not modify battery pack
in any way to fit into a non-compatible charger as battery pack
may rupture causing serious personalinjury.
• Charge the battery packs only in
DeWALT
chargers.
• DO NOT splash or immerse in water or otherliquids.
• Do not store or use the tool and battery pack in locations where the
temperature may reach or exceed 40 ˚C (104 ˚F) (such as outside
sheds or metal buildings in summer).
• Do not incinerate the battery pack even if it is severely damaged
or is completely worn out. The battery pack can explode in a fire.
Toxic fumes and materials are created when lithium-ion battery packs
areburned.
• If battery contents come into contact with the skin, immediately
wash area with mild soap and water. If battery liquid gets into the
eye, rinse water over the open eye for 15 minutes or until irritation ceases.
Este manual sirve para los siguientes modelos
1
Tabla de contenidos


