Coffee Queen SL 2000 Manual de usuario

U/EN
12345678901234567890123456789012123456789012345678901234567890121234567890123456789012345678901212345678901234567890123456789012123456789012345678901
1
234567890123456789012345678901212345678901234567890123456789012123456789012345678901234567890121234567890123456789012345678901212345678901234567890
1
1
234567890123456789012345678901212345678901234567890123456789012123456789012345678901234567890121234567890123456789012345678901212345678901234567890
1
1
234567890123456789012345678901212345678901234567890123456789012123456789012345678901234567890121234567890123456789012345678901212345678901234567890
1
1
234567890123456789012345678901212345678901234567890123456789012123456789012345678901234567890121234567890123456789012345678901212345678901234567890
1
1
234567890123456789012345678901212345678901234567890123456789012123456789012345678901234567890121234567890123456789012345678901212345678901234567890
1
1
234567890123456789012345678901212345678901234567890123456789012123456789012345678901234567890121234567890123456789012345678901212345678901234567890
1
1
234567890123456789012345678901212345678901234567890123456789012123456789012345678901234567890121234567890123456789012345678901212345678901234567890
1
1
234567890123456789012345678901212345678901234567890123456789012123456789012345678901234567890121234567890123456789012345678901212345678901234567890
1
1
234567890123456789012345678901212345678901234567890123456789012123456789012345678901234567890121234567890123456789012345678901212345678901234567890
1
12345678901234567890123456789012123456789012345678901234567890121234567890123456789012345678901212345678901234567890123456789012123456789012345678901
User manual
Juice machine
SL 2000
Your retail dealer
...............................................................................
...............................................................................
Rev. 090914

2.
List of contents
List of contents page. 2
Dispenser description page. 3-7
Installation and users instruction page. 8-10
Maintenance page. 11-12
Trouble shooting page. 11-12
Handling & cleaning instructions page. 13.
Trouble shooting page. 14-15
Electrical connections page. 16
Technical data page. 17.
Notes page. 17.
Portion control page. 18.

12345678901234567890123456789012123456789012345678901234567890121234567890123456789012345678901212345678901234567890123456789012123456789012345678901
1
234567890123456789012345678901212345678901234567890123456789012123456789012345678901234567890121234567890123456789012345678901212345678901234567890
1
1
234567890123456789012345678901212345678901234567890123456789012123456789012345678901234567890121234567890123456789012345678901212345678901234567890
1
1
234567890123456789012345678901212345678901234567890123456789012123456789012345678901234567890121234567890123456789012345678901212345678901234567890
1
1
234567890123456789012345678901212345678901234567890123456789012123456789012345678901234567890121234567890123456789012345678901212345678901234567890
1
1
234567890123456789012345678901212345678901234567890123456789012123456789012345678901234567890121234567890123456789012345678901212345678901234567890
1
1
234567890123456789012345678901212345678901234567890123456789012123456789012345678901234567890121234567890123456789012345678901212345678901234567890
1
12345678901234567890123456789012123456789012345678901234567890121234567890123456789012345678901212345678901234567890123456789012123456789012345678901
3.
Generally!
Read the instructions carefully before you start working with
this equipment.
The equipment should be installed and serviced by trained staff
Dispenser
Dispenser description for Slim Line 2000
Slim Line 2000 is a dispenser for cooling water and mixing
juiceconcentrate to a ready drink product.
SL2000 has a chilled cabinet for the concentrate.
The dispenser is for two non-carbonated drinks and chilled water.
The dispenser is connected to the water mains by a pressurised tube
and to an electric wall socket by a power plug.
The water-pressure is adjusted with the water-regulator
and the pressure is displayed on the manometer.
The water is chilled by the cooling-block, which in its turn is chilled by
the air cooled compressor.
The water-temperature is adjustable by one of the thermostats the
cabinet by the other.
The mixing ratio product/water is adjusted with the ejectors.
Pushing one of the three buttons on the front panel dispenses
the mixed product or water.

12345678901234567890123456789012123456789012345678901234567890121234567890123456789012345678901212345678901234567890123456789012123456789012345678901
1
234567890123456789012345678901212345678901234567890123456789012123456789012345678901234567890121234567890123456789012345678901212345678901234567890
1
1
234567890123456789012345678901212345678901234567890123456789012123456789012345678901234567890121234567890123456789012345678901212345678901234567890
1
1
234567890123456789012345678901212345678901234567890123456789012123456789012345678901234567890121234567890123456789012345678901212345678901234567890
1
1
234567890123456789012345678901212345678901234567890123456789012123456789012345678901234567890121234567890123456789012345678901212345678901234567890
1
1
234567890123456789012345678901212345678901234567890123456789012123456789012345678901234567890121234567890123456789012345678901212345678901234567890
1
1
234567890123456789012345678901212345678901234567890123456789012123456789012345678901234567890121234567890123456789012345678901212345678901234567890
1
12345678901234567890123456789012123456789012345678901234567890121234567890123456789012345678901212345678901234567890123456789012123456789012345678901
4.
Dispenser description
Picture description
Water-regulator with manometer
Thewater-regulatorcanbeadjustedupto6bar.
The minimum pressure is 2,2 bar.
Note!Whenadjustingthepressure,dispenseproduct.
Venturi ejector
Themixingratio is adjusted on the ejectors.
Whenwaterflowsthroughtheejector,theconcentrate
mixeswiththe water.
Themixingratioisregulatedontheejector.
Turnthe adjustment screwsaccordingtothelabelon the
ejector in order to increase or decrease the amount of
concentrate.

12345678901234567890123456789012123456789012345678901234567890121234567890123456789012345678901212345678901234567890123456789012123456789012345678901
1
234567890123456789012345678901212345678901234567890123456789012123456789012345678901234567890121234567890123456789012345678901212345678901234567890
1
1
234567890123456789012345678901212345678901234567890123456789012123456789012345678901234567890121234567890123456789012345678901212345678901234567890
1
1
234567890123456789012345678901212345678901234567890123456789012123456789012345678901234567890121234567890123456789012345678901212345678901234567890
1
1
234567890123456789012345678901212345678901234567890123456789012123456789012345678901234567890121234567890123456789012345678901212345678901234567890
1
1
234567890123456789012345678901212345678901234567890123456789012123456789012345678901234567890121234567890123456789012345678901212345678901234567890
1
1
234567890123456789012345678901212345678901234567890123456789012123456789012345678901234567890121234567890123456789012345678901212345678901234567890
1
1
234567890123456789012345678901212345678901234567890123456789012123456789012345678901234567890121234567890123456789012345678901212345678901234567890
1
12345678901234567890123456789012123456789012345678901234567890121234567890123456789012345678901212345678901234567890123456789012123456789012345678901
5.
Dispenser description
Picture description
Water valve
TheWatervalve is located behind this plate and
connected tothe ejector and opens the water-flow
Push-button
Thepush buttonsonthefront panel controlthewater
valvesand pinch-solenoid.
Useonlyone button at time.
Cooling-block
Thecooling-blockisaflow through block with three
built-instainlesssteelcoils.
Thecoilsareforwater, refrigerantR134Aandthermostat.

12345678901234567890123456789012123456789012345678901234567890121234567890123456789012345678901212345678901234567890123456789012123456789012345678901
1
234567890123456789012345678901212345678901234567890123456789012123456789012345678901234567890121234567890123456789012345678901212345678901234567890
1
1
234567890123456789012345678901212345678901234567890123456789012123456789012345678901234567890121234567890123456789012345678901212345678901234567890
1
1
234567890123456789012345678901212345678901234567890123456789012123456789012345678901234567890121234567890123456789012345678901212345678901234567890
1
1
234567890123456789012345678901212345678901234567890123456789012123456789012345678901234567890121234567890123456789012345678901212345678901234567890
1
1
234567890123456789012345678901212345678901234567890123456789012123456789012345678901234567890121234567890123456789012345678901212345678901234567890
1
1
234567890123456789012345678901212345678901234567890123456789012123456789012345678901234567890121234567890123456789012345678901212345678901234567890
1
1
234567890123456789012345678901212345678901234567890123456789012123456789012345678901234567890121234567890123456789012345678901212345678901234567890
1
12345678901234567890123456789012123456789012345678901234567890121234567890123456789012345678901212345678901234567890123456789012123456789012345678901
6.
Dispenser description
Picture description
Transformer
The transformer is a 230 / 24 V (55 VA).
Thetransformersupplies24V to the magnetic-valves.
Thermostat
Thetwothermostatskeep the temperature within correct
rangeforthe cold water and thecabinet.
Factoryadjusted do not adjust,this may cause damage
and water leakage in the dispenser.
Illumination
Behindthefront panel there is a low-energy 18W
fluorescentlamp.
ThefluorescentlampisaPL-lamp.
12345678901234567890123456789012123456789012345678901234567890121234567890123456789012345678901212345678901234567890123456789012123456789012345678901
1
234567890123456789012345678901212345678901234567890123456789012123456789012345678901234567890121234567890123456789012345678901212345678901234567890
1
1
234567890123456789012345678901212345678901234567890123456789012123456789012345678901234567890121234567890123456789012345678901212345678901234567890
1
1
234567890123456789012345678901212345678901234567890123456789012123456789012345678901234567890121234567890123456789012345678901212345678901234567890
1
1
234567890123456789012345678901212345678901234567890123456789012123456789012345678901234567890121234567890123456789012345678901212345678901234567890
1
1
234567890123456789012345678901212345678901234567890123456789012123456789012345678901234567890121234567890123456789012345678901212345678901234567890
1
1
234567890123456789012345678901212345678901234567890123456789012123456789012345678901234567890121234567890123456789012345678901212345678901234567890
1
1
234567890123456789012345678901212345678901234567890123456789012123456789012345678901234567890121234567890123456789012345678901212345678901234567890
1
12345678901234567890123456789012123456789012345678901234567890121234567890123456789012345678901212345678901234567890123456789012123456789012345678901
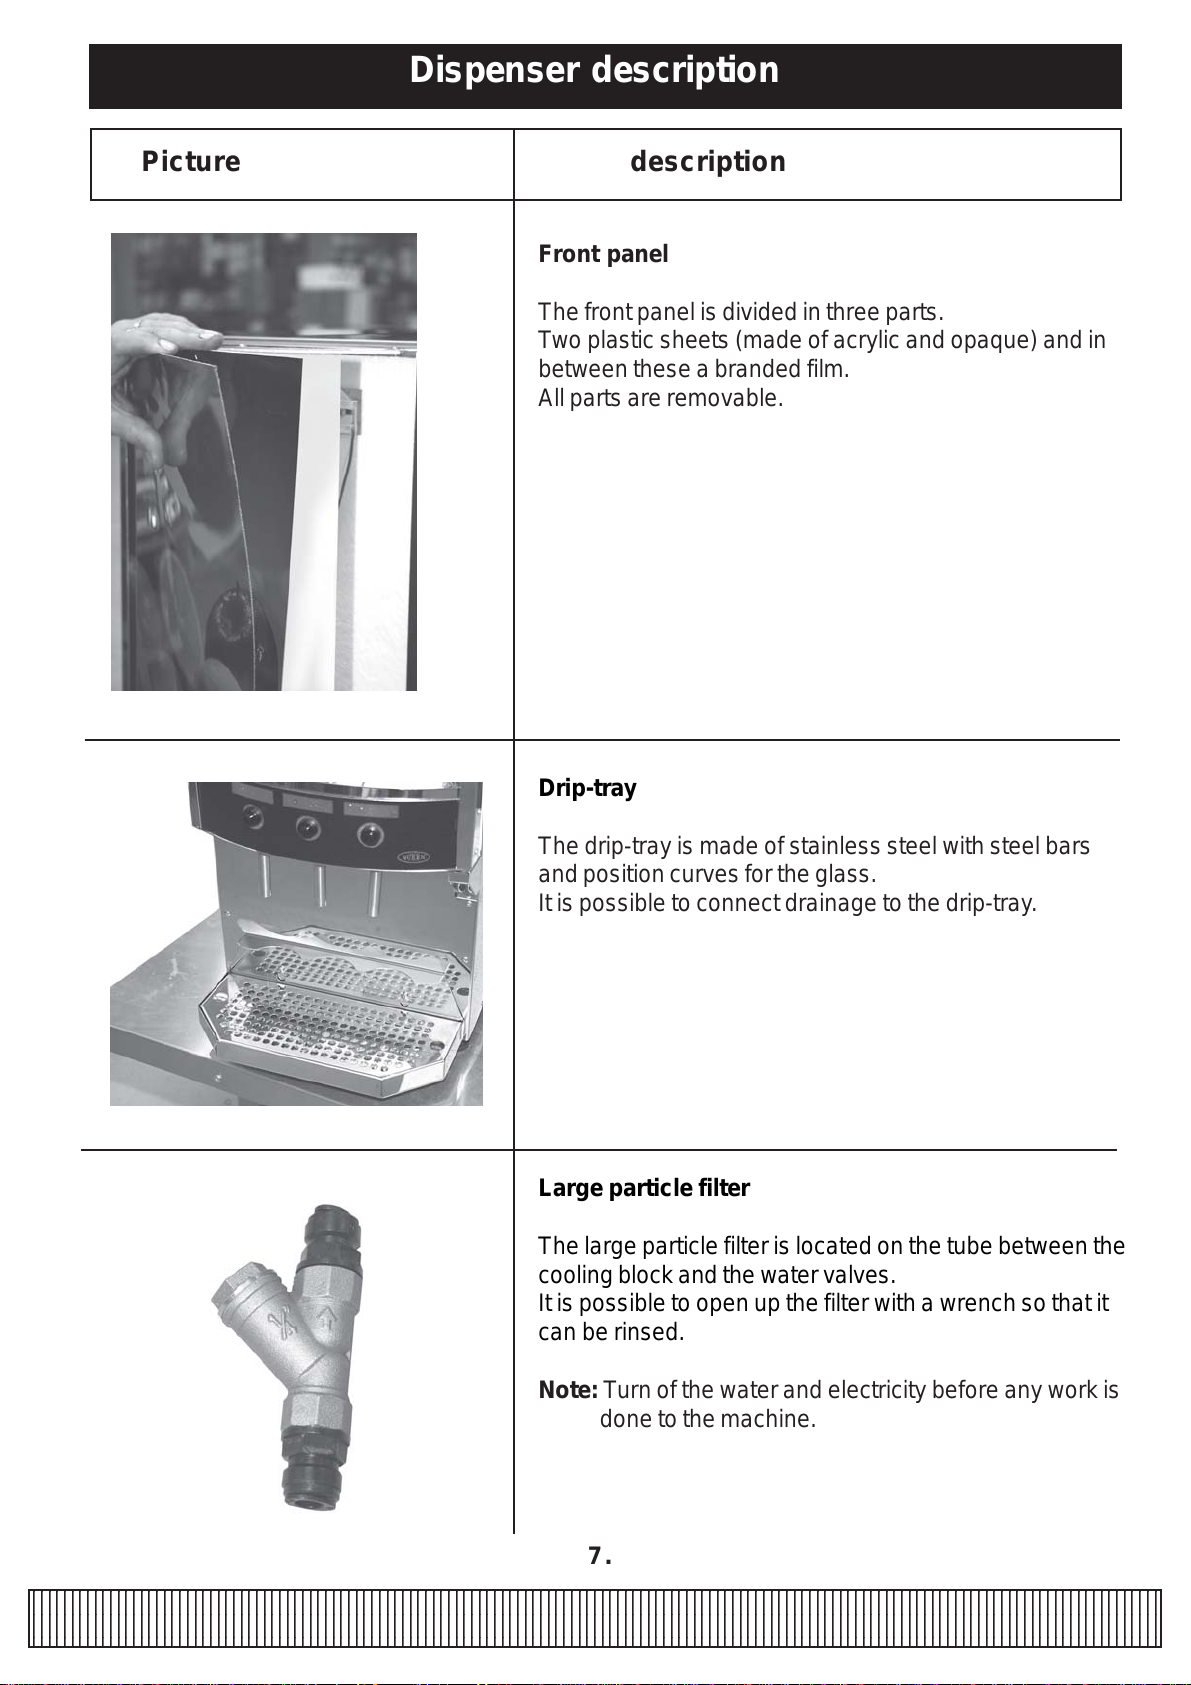
7.
Dispenser description
Picture description
Front panel
Thefront panel is dividedin three parts.
Two plastic sheets (made of acrylic and opaque) and in
betweenthese a branded film.
Allpartsare removable.
Drip-tray
The drip-tray is made of stainless steel with steel bars
andpositioncurvesfortheglass.
It is possible to connect drainage to the drip-tray.
Large particle filter
Thelarge particle filter islocated on the tubebetween the
coolingblockandthewater valves.
It is possible to open up the filter with a wrench so that it
can be rinsed.
Note: Turn of the water and electricity before any work is
doneto the machine.

12345678901234567890123456789012123456789012345678901234567890121234567890123456789012345678901212345678901234567890123456789012123456789012345678901
1
234567890123456789012345678901212345678901234567890123456789012123456789012345678901234567890121234567890123456789012345678901212345678901234567890
1
1
234567890123456789012345678901212345678901234567890123456789012123456789012345678901234567890121234567890123456789012345678901212345678901234567890
1
1
234567890123456789012345678901212345678901234567890123456789012123456789012345678901234567890121234567890123456789012345678901212345678901234567890
1
1
234567890123456789012345678901212345678901234567890123456789012123456789012345678901234567890121234567890123456789012345678901212345678901234567890
1
1
234567890123456789012345678901212345678901234567890123456789012123456789012345678901234567890121234567890123456789012345678901212345678901234567890
1
1
234567890123456789012345678901212345678901234567890123456789012123456789012345678901234567890121234567890123456789012345678901212345678901234567890
1
12345678901234567890123456789012123456789012345678901234567890121234567890123456789012345678901212345678901234567890123456789012123456789012345678901
8.
Installation and users instruction
Picture description
Unpack dispenser from the packaging and ensure
that nothing is damaged.
Place the dispenser to it´s position. Note:
The dispenser weights about 51 kg.
Don’t lift by door/front panel.
Allow a space of min. 40mm around the
frame for air circulation.
Makesurethatthedispenser level.
Adjustment can be made with the adjustable feet .

12345678901234567890123456789012123456789012345678901234567890121234567890123456789012345678901212345678901234567890123456789012123456789012345678901
1
234567890123456789012345678901212345678901234567890123456789012123456789012345678901234567890121234567890123456789012345678901212345678901234567890
1
1
234567890123456789012345678901212345678901234567890123456789012123456789012345678901234567890121234567890123456789012345678901212345678901234567890
1
1
234567890123456789012345678901212345678901234567890123456789012123456789012345678901234567890121234567890123456789012345678901212345678901234567890
1
1
234567890123456789012345678901212345678901234567890123456789012123456789012345678901234567890121234567890123456789012345678901212345678901234567890
1
1
234567890123456789012345678901212345678901234567890123456789012123456789012345678901234567890121234567890123456789012345678901212345678901234567890
1
1
234567890123456789012345678901212345678901234567890123456789012123456789012345678901234567890121234567890123456789012345678901212345678901234567890
1
1
234567890123456789012345678901212345678901234567890123456789012123456789012345678901234567890121234567890123456789012345678901212345678901234567890
1
12345678901234567890123456789012123456789012345678901234567890121234567890123456789012345678901212345678901234567890123456789012123456789012345678901
9.
Installation and users instruction
Picture description
Connectthewater-hosefromthedispenserto the
cold water mains (do not forget seals).
Turnon the water andcheckforleaks.
Note!
Itis strongly recommended to usesomeform of water
isolator in the water line in case of an emergency leakage.
Connectthepower-plug to the wall socket.
Thecompressorwill now start, and thefrontpanel
willlight up.
Thewaterpressureisfactoryadjustedto
2.2bar,whichis the correct working pressure.
Checkbypressingandholdingoneproductbuttonand
readthemanometer. If there is a variation, adjust by
pullingdownknoband turn it until you get a reading
of 2.2 bar.

12345678901234567890123456789012123456789012345678901234567890121234567890123456789012345678901212345678901234567890123456789012123456789012345678901
1
234567890123456789012345678901212345678901234567890123456789012123456789012345678901234567890121234567890123456789012345678901212345678901234567890
1
1
234567890123456789012345678901212345678901234567890123456789012123456789012345678901234567890121234567890123456789012345678901212345678901234567890
1
1
234567890123456789012345678901212345678901234567890123456789012123456789012345678901234567890121234567890123456789012345678901212345678901234567890
1
1
234567890123456789012345678901212345678901234567890123456789012123456789012345678901234567890121234567890123456789012345678901212345678901234567890
1
1
234567890123456789012345678901212345678901234567890123456789012123456789012345678901234567890121234567890123456789012345678901212345678901234567890
1
1
234567890123456789012345678901212345678901234567890123456789012123456789012345678901234567890121234567890123456789012345678901212345678901234567890
1
1
234567890123456789012345678901212345678901234567890123456789012123456789012345678901234567890121234567890123456789012345678901212345678901234567890
1
12345678901234567890123456789012123456789012345678901234567890121234567890123456789012345678901212345678901234567890123456789012123456789012345678901
10.
Installation and users instruction
Picture description
Place the bag-in-box in the dispenser and connect it to the
pinchsolenoid-valveand ejector.
Pushingthecentreofthepinchsolenoid valve and sliding
thetubeinfromtheside,fixesthetube.
Cutthetubetocorrectlengthand push it onto the elbow
connectoron the ejector.
Place a cup under the outlet pipe.
Dispense a glass of product by pressing
thepush-button.
Checkthatthebrix-value(mixing ratio) is
okay,if not adjust.
Toadjustthe brix, usetheadjustmentscrewonthe ejector.
The dispenser is now ready to use.
Tabla de contenidos
Otros manuales de Dispensador de Coffee Queen


