Choo Choo Vision CAB-CAM 6 Manual de usuario

www.choochoovision.com 1 Released 11/06/2021
CAB-CAM 6 User Guide

www.choochoovision.com 2 Released 11/06/2021
Contents
Introduction .............................................................................................................................................. 2
Camera Controls ....................................................................................................................................... 3
Initial Setup .............................................................................................................................................. 4
Powering your CCV Camera ..................................................................................................................... 4
Charging your CCV Camera Battery ......................................................................................................... 5
Connecting a Choo Choo Vision Camera to Your Wi-Fi Network for the first time ............................... 6
User Screen Controls and Operation ....................................................................................................... 7
PAN-CAM .................................................................................................................................................. 9
JMRI Throttle ............................................................................................................................................ 9
Remote Viewing over Internet ................................................................................................................ 9
Software Updates ................................................................................................................................... 10
Product Support: .................................................................................................................................... 10
Appendix A: Wi-Fi Screen Controls and Operation ............................................................................. 10
Appendix B: Lenses – Removal and Installation, Heat Shields, and Lens Care .................................. 13
Appendix C: Troubleshooting: .............................................................................................................. 14
Introduction
Congratulations! You have purchased a unique technological advancement for Model Railroading that
immerses you into the world of your layout. Take photos of your layout, live-stream video over the
internet, or host Remote Operations sessions.
The following instructions will introduce you to the camera’s controls, features, initial setup, and use.
www.choochoovision.com 3 Released 11/06/2021
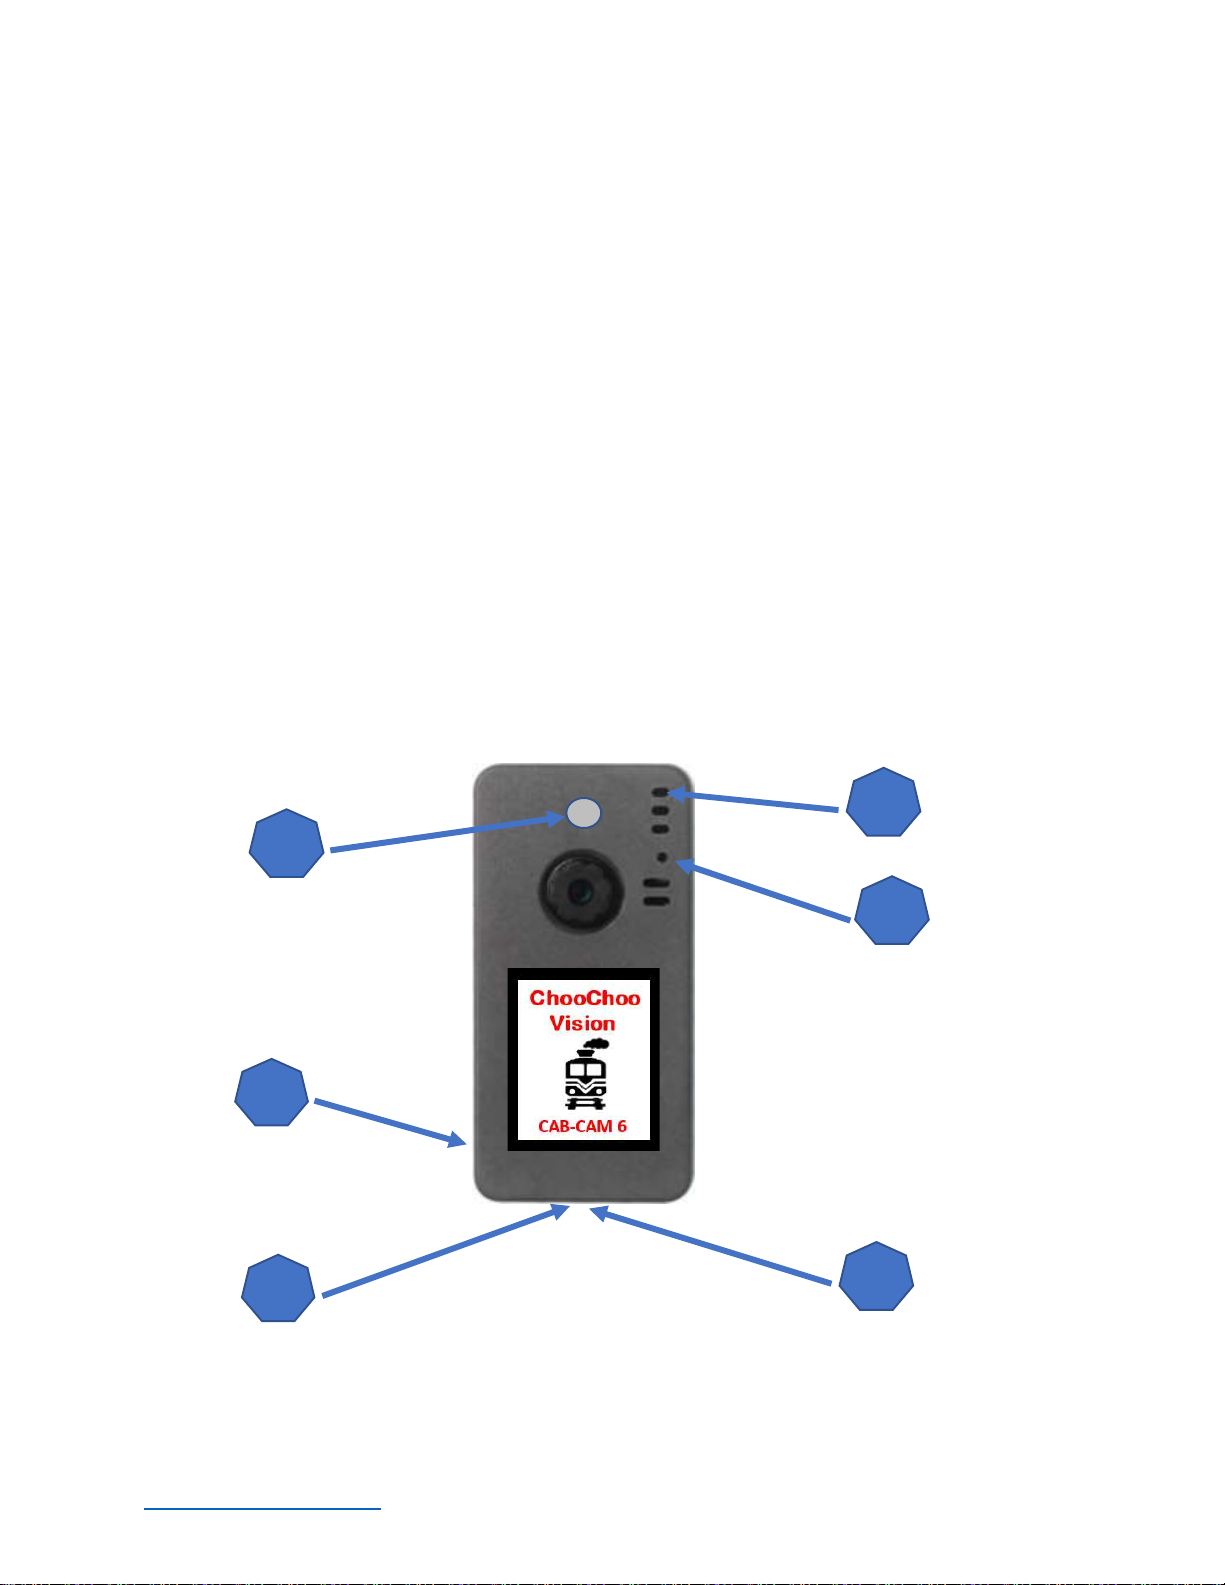
Camera Controls
1. Power ON Button
Press the Power ON button for 2 seconds to turn the camera ON. The camera light will
blink rapidly upon power-up.
2. Power OFF: Magnetic Reed Switch
To turn the camera OFF, swipe a magnet across the area above the camera lens.
3. Status Indicator Light
Fast Blinks for 2 seconds: Camera is starting up
Off after Fast Blinks: Waiting to connect to Wi-Fi
Steady Glow: Camera is running and has connected to WiFi
Off: Camera is OFF
Blink every 3 seconds: Camera is in charging mode.
4. USB Port (external power)
Accepts 5V Power from USB Phone Charger
Accepts Choo Choo Vision DCC Power Converter
5. Aux Port
Accepts secondary auxiliary magnetic switch for powering off the camera
Accepts Pan-Cam interface cable
6. RESET
Resets / Reboots the camera.
1
2
3
4
5
6

www.choochoovision.com 4 Released 11/06/2021
Initial Setup
It is recommended that you complete the initial setup before installing the camera into an engine or
rolling stock. Note: This section is intended to provide a quick overview of the initial start-up steps.
There are additional sections in this guide that provide more detailed explanations.
The basic initial setup steps are:
Charge the Battery: Before using your Choo Choo Vision camera for the first time, ensure the battery is
charged.
Plug the supplied USB cable into the bottom of the camera.
Attach the other end of the USB cable to a standard 5V cell phone charger or USB port.
Turn the camera OFF via the magnetic swipe.
Allow the camera to charge for 2 hrs.
Connect your camera to your local WiFi Network: The Choo Choo Vision camera must be connected to
your local WiFi network. See the section titled “Connecting a Choo Choo Vision Camera to Your Wi-Fi
Network” for detailed instructions.
Open the Camera’s User Screen: After successfully connecting to your local WiFi network, open a web
browser on your computer. Enter the camera’s URL (printed on the back of the camera) into a web
browser. The proper format is http://ChooChooVisionxxxx:xxxx where xxxx is your camera ID. Notice
the colon “:” between the ID numbers.
If your camera ID is 8012, you would enter http://ChooChooVision8012:8012 into the web
browser address. Take notice of the colon “:” between the two camera id values.
Book-mark this screen for future use.
Why does the camera require a port number? Many users have multiple cameras on their layout. Using
the port numbers allows you to access multiple cameras using one external IP address.
Powering your CCV Camera
Your CCV camera can be powered by the internal battery or using an external power source.
Battery: A fully charged battery will typically last for about 1/2 hour of video use or function as a keep-
alive when installed in an engine or rolling stock using the DCC Power Converter. The standard battery
is 140mAh. A larger 400mAh battery that provides approximately 1 hours of run time is available in the
Choo Choo Vision Store. The camera will automatically power OFF if the battery becomes too low.
External Power: The camera can be powered from an external power source such as our DCC Power
Adapter or via the USB cable connected to a 5V cell phone power bank, or computer USB port. External
power is also used to re-charge the internal battery.
Charge the
Battery
Connect
camera to Wi-Fi
Network
Open Web
Browser to the
camera’s URL
Start the video
stream

www.choochoovision.com 5 Released 11/06/2021
Power Modes: The Choo Choo Vision camera has three power modes:
Battery Power: Uses the onboard battery (no external power source is connected)
External Power: Uses an external power source such as our DCC Power Adapter or via the USB
cable connected to a 5V cell phone power bank, or computer USB port. Note: the internal
battery will function as a keep-alive if track power is interrupted.
Charging: The internal battery will charge whenever an external power source is applied. The
battery will charge whether the camera is ON or OFF. Note: You may operate the camera and
charge the battery at the same time.
Power ON/OFF: The method to turn the camera ON/OFF depends on the Power Mode
Battery Power Mode: (no external power source is connected)
Power ON -- Power Button: Press and hold the Power Button for 2 seconds. The status light
will blink rapidly for 2 seconds to indicate that the camera has been powered ON. Note: The
Power ON Button is located on the left side of the camera.
Power OFF – Magnetic Reed Switch: Swipe the magnet (included) across the area above the
lens. The status light will pulse 3 times and then go out, indicating that the camera has been
powered OFF
External Power Mode: (USB or DCC Power Converter connected to the camera)
Power ON: The camera will automatically turn ON if an external power source is applied, by
o Plugging the camera into a USB power source
o Turning track power ON while using DCC power converter
o Swiping the Magnetic Reed Switch
Power OFF: To power OFF the camera, swipe a magnet across the area above the lens. The
status light will pulse 3 times and then go out, indicating that the camera has been powered OFF
Charging your CCV Camera Battery
Your CCV Camera contains an internal battery. The standard battery is designed to be used as a keep-
alive in concert with a DCC Power converter. The optional 400mah battery is designed to power the
camera without an external power source (DCC or similar). The 400maH battery will typically provide
about 45 minutes of continuous video streaming.
Charging Procedure:
Plug the supplied USB cable into the bottom of the camera.
Attach the other end of the USB cable to a standard 5V cell phone charger or USB port.
Turn the camera OFF via the magnetic swipe.
Allow the camera to charge for 2 hrs.
Note: The status light will “blink” every couple of seconds to indicate that the camera is in
charging mode.

www.choochoovision.com 6 Released 11/06/2021
Connecting a Choo Choo Vision Camera to Your Wi-Fi Network for the first time
The Choo Choo Vision Camera is more than just a camera. Contained inside the camera is a web server
that allows you to manage camera settings, view video, stream video over the internet, take still images
of your layout.
To access the camera, you will need to connect it to your local Wi-Fi network.
Note: Once you have enrolled the camera on your network, it will remember the settings.
The following steps will guide you thru the first-time Wi-Fi setup process:
Ensure the battery has been charged, or power the camera via the USB port.
Turn power on by pressing and holding the power button for two seconds. The power button is
located on the left side of the camera. The camera will blink rapidly to indicate that the camera
has powered ON.
Open a web browser on your computer.
Disconnect your computer from your local Wi-Fi network.
Connect your computer’s Wi-Fi to ChooChooVisionXXXX, where XXXX represents the camera’s
ID. Wait about 10 seconds for your computer to connect to the camera’s web server.
Open a browser and enter the address is located on the back of your camera.
The CCV WiFi Setup webpage should be displayed in the browser window.
Select “Configure new AP” from the menu.
Enter the SSID and Password for your router. Press Enter and wait about 30 seconds.
Disconnect your computer’s WiFi from the ChooChooVisionXXX and reconnect to your local Wi-
Fi network.
Using your browser, enter http://ChooChooVisionXXXX:XXXX where XXXX is your camera’s ID
number. The ChooChoo vision webpage will display
Press the “Get Still” button on the user screen to take a picture and confirm that the camera has
been successfully set-up
Change PC’s WiFi
connection back to
your local Wi-Fi
network
Configure new A/P Enter
SSID & Password into the
CCV WiFI screen
Open a Web Browser
on your PC or Mobile
Device
Press Enter and wait 20
seconds for the camera
to connect to your WiFi
Network
Change PC or Mobile’s
WiFi connection to
ChooChooVisionXXXX
Open Web Browser to
the camera’s URL
http://ChooChooVision
XXXX:XXXX
Begin streaming video

www.choochoovision.com 7 Released 11/06/2021
User Screen Controls and Operation
The Choo Choo Vision user screen allows you to view the video feed, take still images, and manage
camera settings. This page also is remotely viewable via the internet (with firewall port forwarding
enabled).
Accessing the Choo Choo Vision User Screen
To access the User Screen:
Turn the camera ON
Open a web browser on a computer or mobile phone. Note: The computer or mobile phone
must be on the same WiFi network as the camera.
Locate the camera’s ID number (printed on the back of the camera).
Enter the camera’s URL into your web browser The proper format is
http://ChooChooVisionxxxx:xxxx where xxxx is your camera ID. Notice the colon “:” between
the ID numbers.
For example, if your camera ID is 8012, you would enter http://ChooChooVision8012:8012 into
the web browser address. Take notice of the colon “:” between the two camera id values.
Book-mark this screen for future use.

www.choochoovision.com 8 Released 11/06/2021
Choo Choo Vision User Screen
Camera User Screen Controls
The Choo Choo Vision user screen contains controls for adjusting camera settings, open a JMRI throttle,
run the PAN-CAM and start/stop the video feed, and take still images.
Adjusting Camera Image Settings
Resolution: Sets the image size for the camera.
Depending upon your internet speed, VGA mode may
perform the best.
Quality: Adjusts the image quality. Depending on your
internet speed, you may need to adjust the Quality level.
Brightness: Adjusts the brightness level of the image
Contrast: Adjusts the contrast level of the image
Saturation: Adjusts the saturation level of the image
Rotate: Rotates the image 90 degrees.
JMRI IP Address: IP Address of your JMRI Server
PORT: Port for your JMRI Server
Loco#: DCC address for the LOCO you wish to control.
Leave blank to display all JMRI Locos.
JMRI Throttle: Launches the JMRI throttle to control
your locomotive. Must have JMRI’s Webserver and
WiThrottle enabled.
Pan Direction: Reverses the direction of the PAN
controls Left/Right to Right/Left
Pan Step Size: Sets the number of degrees the PAN
CAM will move when using the <= or => buttons.
Pan: Pans the camera lens. Moving the Pan slider will
move the Pan-Cam left or right.
Pan ( |<= , 0 , =>| ) buttons: Pans the camera to
preset angles of -90 degrees, 0 degrees, or +90 degrees.
Pan ( <= , => ) buttons: Pans the camera in
increments of 10 or 30 degrees.
Start Video: Starts the video stream.
Photo: Takes a single photo from the camera.
Reset Camera: Remotely reboots the camera module.

www.choochoovision.com 9 Released 11/06/2021
Video Stream URL: Displays the raw video feed without the control panel. Enter the IP address
into a web browser to view the camera control screen and display the video. Note: Only one
web browser at a time can be connected to the camera.
Power Meter: Displays the power available to the camera. Under external power, the Power
Meter will typically read 4.0 to 4.2 volts. Under battery power, the Power Meter will display
the battery voltage. The camera will automatically shut down when the voltage is less than 3.5
volts.
WiFi Meter: Displays the strength of the WiFi signal received by the camera. The WiFi Meter
can help you identify areas on your layout with poor WiFi coverage.
PAN-CAM
The Choo Choo Vision PAN-CAM user guide can be found on our website at
www.ChooChooVision.com/support.
JMRI Throttle
The Choo Choo Vision camera has been designed to work with JMRI. It can launch a JMRI Throttle to
control your locomotive while you view live video from the camera.
To open a JMRI Throttle, … Enable the JMRI WebServer and WiThrottle servers. (See the help section in
JMRI’s documentation for details).
Using the settings on the Choo Choo Vision menu,
Enter the JMRI IP Address, Port, and Loco#.
Press the JMRI Throttle button on the Choo Choo Vision menu to open JMRI’s throttle
Note: Leave the Loco# blank to display a list of all available Locomotives.
Remote Viewing over Internet
Your Choo Choo Vision camera has been designed to stream live-video from your layout to remote
viewers. To enable remote viewing, you will need to establish a static IP address for the camera and
forward 2 ports thru your router’s firewall.
The camera has 2 ports that will require forwarding.
The first port is the ID number of your camera
The second port is the ID number of your camera PLUS 1
For example, if your camera ID is 8014, you will need to forward ports 8014 and 8015 in your fire wall.
Remote users can now access the camera using your external IP address and a web browser.
Remote users would enter <<YourExternalIP>>:8014 into their web browser to access the camera. You
can find out your External IP address by going to https://www.whatismyip.com

www.choochoovision.com 10 Released 11/06/2021
If you have multiple cameras, you can access each camera using the same external IP address and the
port number for the specific camera.
Software Updates
The Choo Choo Vision software is routinely updated to provide additional features and functionality.
Many of the new features are suggested by CCV customers, so send us your suggestions.
The following steps will guide you thru a software update:
Download the software update and save to your computer
Plug the CCV camera into your computer’s USB port using
the provided cable
Open a web browser and enter the URL on the back of your
CCV camera. You can find the current software revision at
the bottom of the HOME page.
From the Menu, select “Update”
Press the “Choose File” button and navigate to the software
update file that you saved to your computer.
Press the green UPDATE button to start the software
update.
When the update is completed, the screen will display
“Successfully updated. Rebooting”
The CCV camera will automatically reboot.
Click on HOME to display the help instructions. The new
software version will be displayed at the bottom of the HOME page.
Product Support:
The support area of the Choo Choo Vision website contains several how-to’s and tips that may answer
your questions.
If you have any question regarding the setup, use, or suggestions, please feel free to contact us.
Email: support@ChooChooVision.com
Website: Send a request via our website www.ChooChooVision.com/contact
Appendix A: Wi-Fi Screen Controls and Operation
Your camera’s Wi-Fi connection settings are managed thru the CCV WiFi setup screens.
Initially, your camera will not recognize your WiFi network (it does not know the SSID and password for
your network). Hence, the camera will become a WiFi access point itself. You can connect to the
camera via your computer or mobile phone. To access the CCV WiFi settings page, change your
computer’s WiFi settings and connect your computer to the ChooChooVisionXXXX WiFi access point.
See “Configure new AP” below for instructions.
Otros manuales para CAB-CAM 6
2
Tabla de contenidos
Manuales populares de Videocámara de otras marcas


Panasonic
Panasonic AG-HMC152EN Manual de usuario

Insignia
Insignia NS-DCC5HB09 - Camcorder - 720p Manual de usuario

MYDLINK
MYDLINK DCS-6100LH Manual de usuario

Sony
Sony video Hi8 Handycam CCD-TR555 Manual de usuario

SECURECOM
SECURECOM V-5014B Manual de usuario

Panasonic
Panasonic HDC-SD100 Manual de usuario


