CHERUBINI DOGE RX Manual de usuario

ISTRUZIONI - INSTRUCTIONS - EINSTELLANLEITUNGEN
INSTRUCTIONS - INSTRUCCIONES
DOGE RX
IT
EN
DE
FR
ES
MOTORE TUBOLARE CON FINECORSA ELETTRONICO
PER VENEZIANE
TUBULAR MOTOR WITH ELECTRONIC LIMIT SWITCH
FOR VENETIAN BLINDS
RAFFSTOREN - ROHRMOTOR MIT
ELEKTRONISCHER ENDLAGENEINSTELLUNG
MOTEUR TUBULAIRE POUR BRISE SOLEIL ORIENTABLE (BSO)
AVEC CONTACT DE FINS DE COURSE ÉLECTRONIQUES
MOTOR TUBULAR PARA VENECIANA DE LAMAS ORIENTABLES
CON FIN DE CARRERA ELECTRÓNICO


21
Table of contents:
How to prepare the motor ...................................................................................... p. 22
Electrical connections ............................................................................................. p. 23
Compatible remote controls ................................................................................... p. 24
Key to symbols ................................................................................................... p. 24-25
Command sequences example ............................................................................... p. 25
Function open/close programming remote control ............................................. p. 26-27
Setting the rst remote control .............................................................................. p. 28
Automatic disabling of the rst remote control setting function ............................ p. 28
Torque control setting ............................................................................................ p. 28
Setting of the limit switches ............................................................................. p. 29
High limit switch setting ........................................................................................ p. 29
Low limit switch setting.......................................................................................... p. 29
Deleting the limit switch positions ................................................................... p. 30
High limit switch deleting ....................................................................................... p. 30
Low limit switch deleting........................................................................................ p. 30
Total deleting of the limit switches ......................................................................... p. 30
Setting a middle position ........................................................................................ p. 31
Deleting the middle position .................................................................................. p. 31
Slat opening control ............................................................................................... p. 32
Setting the slat opening position ........................................................................... p. 32
Setting of additional remote controls ..................................................................... p. 33
Remote control memory clearing............................................................................ p. 33
Total deletion of the remote controls memory ........................................................ p. 34
Special functions
Short-term setting of a remote control ................................................................... p. 35
Operation with wind sensor ................................................................................... p. 36
Compatible anemometers....................................................................................... p. 36
Setting the wind sensor .......................................................................................... p. 37
Deleting the sensor................................................................................................. p. 37
Command management from white wire ............................................................... p. 38
EU Declaration of conformity.................................................................................... p. 93
TRANSLATION OF THE ORIGINAL INSTRUCTIONS
ENGLISH

22
HOW TO PREPARE THE MOTOR
NB: If you use tubes with a round form, the driving pulley must be xed to the tube, and
the installation is to be paid by the person who installs the system. For other tube sections
the tting is optional, but strongly recommended.
1. Insert the adaptor in the stop ring nut
mating the groove with the reference
notch and push till they touch.
2. Fix the driving pulley on the motor pin
until the stop pin clicks.
3. Insert the motor fully in the rolling tube.
STOP RING NUT ADAPTOR
DRIVING PULLEY
STOP RING NUT
1
2
3
ENGLISH
23
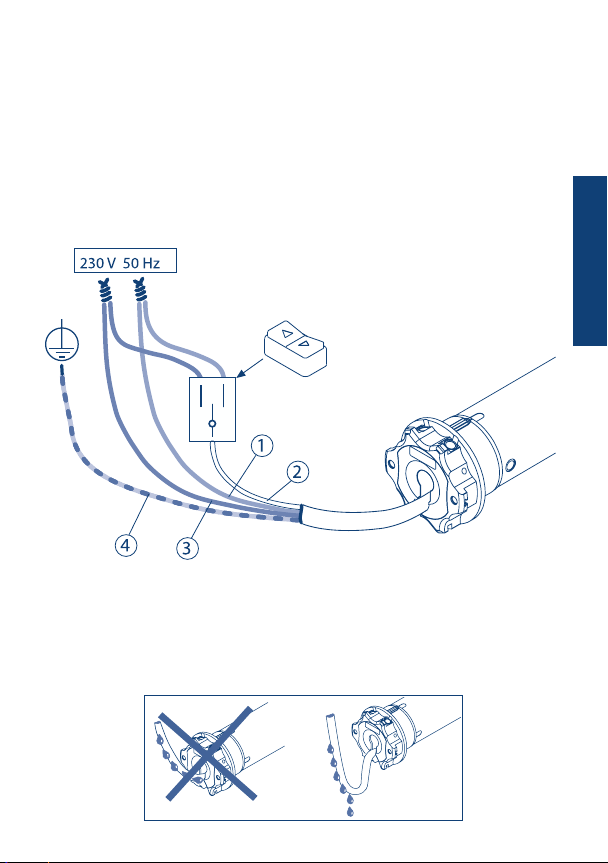
ELECTRICAL CONNECTIONS
- In order to prevent dangerous situations or malfunctioning, the electrical command
elements wired to the motor must be sized according to the motor’s electrical features.
- Means for disconnection must be incorporated in the xed wiring in accordance with
the national installation standards.
- For outdoor use, provide the appliance with a supply cable with designation H05RN-F
containing at least 2% of carbon.
- If not used, the white wire must be insulated. It is dangerous to touch the white wire
when the motor is powered.
Switch with mechanical
or electrical interlocking*
1 - BROWN
2 - WHITE
3 - BLUE
4 - YELLOW-GREEN
WIRE PROGRAMMING
*Installing this button is optional.
Using the switch as described on this page it’s possible to set the motor through the white
wire (wire programming).
To nd out this procedure, require the instruction booklet from your dealer.
ENGLISH

Up
Stop
Down
SEL (POP Lux)
Activating/ Deactivating
the Sun sensor
Up
Stop
Down
SEL (POP P-Lux)
Activating/ Deactivating
the Sun sensor
24
COMPATIBLE REMOTE CONTROLS
KEY TO SYMBOLS
LED DISPLAY
GIRO POP
A
B
C
down
stop
up
Skipper
A
B
C
down
stop
up
A
B
C
ENGLISH
Display -
Activating/ Deactivating the Sun sensor
Channel selector
LED -
Check the specic
instruction book
Skipper
Skipper
Skipper
Skipper
Skipper
Skipper
Skipper
Skipper
Skipper
Skipper
Skipper
Skipper
GIRO GIRO Wall
DISPLAY
Change
channel +
Change
channel -
up
stop
down
A
B
C
UP
DOWN
LED
STOP
GIRO Plus LED DISPLAY
GIRO Lux
Activating the
Sun sensor
Deactivating the Sun sensor
Sun sensor is “ON”
Wind sensor
is “ON”
GIRO P-Lux DISPLAY
Change channel
Activating/ Deactivating the Sun sensor
Wind sensor
is “ON”
Sun sensor is “ON”
POP
POP Lux
Sun/wind sensor
(POP Lux)
POP Plus
POP P-Lux
Sun/wind sensor
(POP P-Lux)

25
I
COMMAND SEQUENCES EXAMPLE
Most of the command sequences have three distinct steps, at the end of which the
motor indicates if the step has been concluded positively or not, by turning in different
ways. This section is provided to demonstrate the motor indications. The buttons must
be pressed as shown in the sequence, without taking more than 4 seconds between one
step and the next. If more than 4 seconds are taken, the command is not accepted and
the sequence must be repeated. Command sequence example:
As we can see from the example, when the sequence ends positively, the motor returns to
its starting position in one long rotation. In fact, two short rotations in the same direction
correspond to one long rotation in the opposite direction.The motor returns to the starting
position even when the sequence is not completed; in this case by performing one or two
short rotations. Example of a wrong sequence:
+
A B B B
Step 1
Step 1
> 4 sec repeat the
sequence
repeat the
sequence
Step 2
> 4 sec
+
A B
+
A B B
Step 1 Step 3Step 2
KEY TO SYMBOLS
Press button A
A
Press buttons A and B
at the same time
+
A B
short motor rotation
in one direction
long motor rotation
in other direction
double short
rotation
DOWN
UP
ENGLISH

26
FUNCTION OPEN/CLOSE PROGRAMMING
REMOTE CONTROL SKIPPER PLUS - SKIPPER LUX - SKIPPER P-LUX
REMOTE CONTROL POP PLUS - POP LUX - POP P-LUX
To prevent accidental changes to the programming of the motor during the daily use of
the remote control, the possibility of programming is disabled automatically 8 hours after
sending the last sequence (A+B or B+C).
CHECKING THE STATUS OF THE FUNCTION
To change the status of the function, see the sequences “ENABLE/DISABLE
PROGRAMMING”.
Proceed with programming as the instructions booklet.
ENABLE PROGRAMMING
DISABLE PROGRAMMING
Open
or after
30 sec.
Remove and replace
a battery
OPTION 2
OPTION 1
or after
30 sec.
Open
programming
Closed
programming
3 sec
or after
30 sec.
3 sec
Closed
3 sec
OPTION 2
+ +
A B C
Tn
+ +
A B C
Tn
+ +
A B C
Tn
B
B
B
C
A
ENGLISH

27
FUNCTION OPEN/CLOSE PROGRAMMING
REMOTE CONTROL SKIPPER - SERIES GIRO - REMOTE CONTROL POP
To prevent accidental changes to the programming of the motor during the daily use of
the remote control, the possibility of programming is disabled automatically 8 hours after
sending the last sequence (A+B or B+C).
CHECKING THE STATUS OF THE FUNCTION
To change the status of the function, see the sequences “ENABLE/DISABLE
PROGRAMMING”.
Proceed with programming as the instructions booklet.
ENABLE PROGRAMMING
DISABLE PROGRAMMING
ON
Open
programming
Closed
programming
....
ON
....
.... Closed
Open
ON
or after
30 sec.
or after
30 sec.
1 2 3
OPTION 1
1 2 3
1 2 3 or after
30 sec.
OPTION 2 OPTION 2
+ +
A B CB
B
C
+ +
A B C
+ +
A B C
A
B
Tn
Tn
Tn
Remove one battery and wait minimum 5 seconds or press any button.
2 sec
B
OPTION 2
ENGLISH

28
SETTING THE FIRST REMOTE CONTROL
This operation can only be performed when the motor is new, or after a total delete of
the memory.
T1: First remote control to be set
During this step, power up only one motor at time!
T1T1 T1 (2 sec)
Every time you connect the power supply to the motor, you have 3 hours to store the
rst remote control. After this time, the ability to store the remote control is disabled.
To reset the timer of the function you have to disconnect and reconnect the power
supply to the motor.
AUTOMATIC DISABLING OF THE FIRST
REMOTE CONTROL SETTING FUNCTION
+
A B B B
TORQUE CONTROL SETTING
70 %
40 %
20 %
The motor is factory set to a closing force of 40% of the
nominal torque (e.g.: 40% of 50 Nm = 20 Nm).
This force can be changed very easily by the remote
control. It can be reduced by 20% or increased up to
70%, depending on the desired result.
2 sec
Tn
+
B C
A A
C
B
ENGLISH
Tabla de contenidos
Otros manuales de Persiana de ventana de CHERUBINI


Manuales populares de Persiana de ventana de otras marcas


Domondo
Domondo PureNight Manual de instrucciones de instalación

rollease acmeda
rollease acmeda Easy Spring Air Guía de configuración

IKEA
IKEA KADRILJ Manual de usuario

Hallis Hudson
Hallis Hudson Rolls Super glide Manual de usuario

Benthin
Benthin P1614 Manual de usuario

MV LINE
MV LINE CLARA 015 Manual de instrucciones


