Century PM-1026AB Manual de usuario

Instruction
Manual
English PM-1026AB 5/99
Do not use this product until
you read and understand
these instructions.
DEDICATED TO QUALITY

IMPORTANT INFORMATION
Need Help?
✔Read and understand stroller instruction manual before
using stroller.
✔Read and understand car seat instruction manual
before using car seat in a vehicle.
✔Use the SmartFit®Base provided with this product
only with a Century Assura™, SmartFit®, SmartFit®Plus,
SmartFit®Elite, SmartFit®EliteV or SmartFit® SupremeV
Infant Car Seat.
✔Never leave child unattended.
✔Use with only one (1) child at a time.
✔Do not use accessories other than those provided
by Century.
NOTE: All warnings and instructions apply whether
stroller is being used with or without arm bar in the
use position.
Car Seat/Stroller Use:
Maximum Weight: 22 lbs. (10 kg)
Maximum Height: 27 inches (69 cm)
Stroller Use:
Maximum Weight: 40 lbs. (18.2 kg)
Maximum Height: 40 inches (101 cm)
Page:
1 Important Information
2 Warnings
3 Assembly
Opening Stroller
Front Wheel Assembly
Locking Footrest
Rear Wheel Assembly
Attaching Cup Holder
5 Car Seat/Stroller Use
Locking Or Unlocking Rear Wheels
Attaching Car Seat
Removing Car Seat
7 Stroller Use
Locking Or Unlocking Rear Wheels
Closing Arm Bar Slot
Canopy Positions
Arm Bar Use
Seat Back Positions
Securing Child With Harness
9 Folding
10 Maintenance
Cleaning Cup Holder
Cleaning Stroller
Dented Wheels
11 Replacement Parts
1
Safety First Checklist
Weight and Height Limits
Table of Contents
Save instruction manual
for future reference.
If you should have any problems with this product, call
toll-free 1-800-837-4044 from anywhere in the U.S. or
Canada or fax at 1-610-286-4555.
Or write us at: Century Products
P.O. Box 100
Elverson, PA. 19520-9974
Attention: Customer Service Department
Please have the following information available. See label
on stroller leg.
Model Number:
Manufacture Date:
Date of Purchase:

Failure to follow all warnings and instructions could result in serious injury or
death.
• Never leave child unattended, even when sleeping.
- Child may become entangled in harness straps and suffocate.
- Stroller may roll away and crash even with brakes engaged.
• Avoid serious injury from falling or sliding out. Always use seat belt.
• DO NOT pull or carry stroller on stairs or escalators with child in it.
• DO NOT lift car seat/stroller unit by car seat handle or car seat shell. Handle may break.
• DO NOT allow child to climb unassisted into stroller, play, hang or pull down on car seat or
stroller handle as stroller may tip over.
• DO NOT hang anything on handle or canopy. Stroller may become unstable and tip over.
• DO NOT jog with stroller. Push stroller at a normal walking speed only. Fast walking, jogging
or running can cause loss of control.
• DO NOT overload basket. Maximum basket weight is 10 lbs. (4.5 kg). Stroller may become
unstable and tip over.
• DO NOT use accessories other than those provided by Century.
WARNINGS
2

1Hold swivel wheel assembly
upright (Tab pointing down).
2Tilt stroller slightly back and
push wheel assembly onto leg
until it locks in place.
Repeat steps 1 and 2 for
opposite leg.
CAUTION: After wheel assembly is complete, pull on
wheels to check that they are locked in place.
1Stand stroller upright and
rotate lever to release latch.
2Spread handle and rear legs
until both Fold Locks “click”
into position.
ASSEMBLY
3
Opening Stroller
Front Wheel Assembly
Tab
Push footrest down so that
Cross Tube is centered between
three (3) Tabs on bottom of
footrest, and it snaps in place.
Locking Footrest
Tabs
1Remove axle protectors from ends of axle and discard.
2With stroller laying face down
on floor, slide brake lever brackets
onto rear legs until you hear a
click.
NOTE: Brake levers must face
rear of stroller.
Rear Wheel Assembly
Fold Locks Cross Tube

4
ASSEMBLY continued
WARNING
Prevent a possible choking hazard, discard
axle protectors and polybag which contained
rear wheel parts.
CAUTION:
• Failure to install retainer cap may cause wheels to come
off of stroller.
• After wheel assembly is complete, pull on wheels to check
that they are locked into place.
Snap one end of cup holder
over stroller frame above
canopy, rotate down to
opposite side and snap in
place.
Attaching Cup Holder
WARNING
• To avoid burns, never put hot liquids in cup
holder.
• Avoid possible tipping, DO NOT place more
than 3 lbs. (1.4 kg) in cup holder.
Hub
Cap Retainer
Cap
Wheel
Retainer Wheel
Axle
3Secure Wheel to Axle as shown:
• Slide Wheel onto end of Axle with brake ribs facing in.
• Slide Wheel Retainer onto end of Axle. Make sure large
end of Wheel Retainer is towards Wheel. Wheel Retainer
should snap into groove on end of Axle.
• Snap wheel Retainer Cap over Wheel Retainer.
• Line up Hub Cap tabs with slots in Wheel and snap Hub
Cap in place.
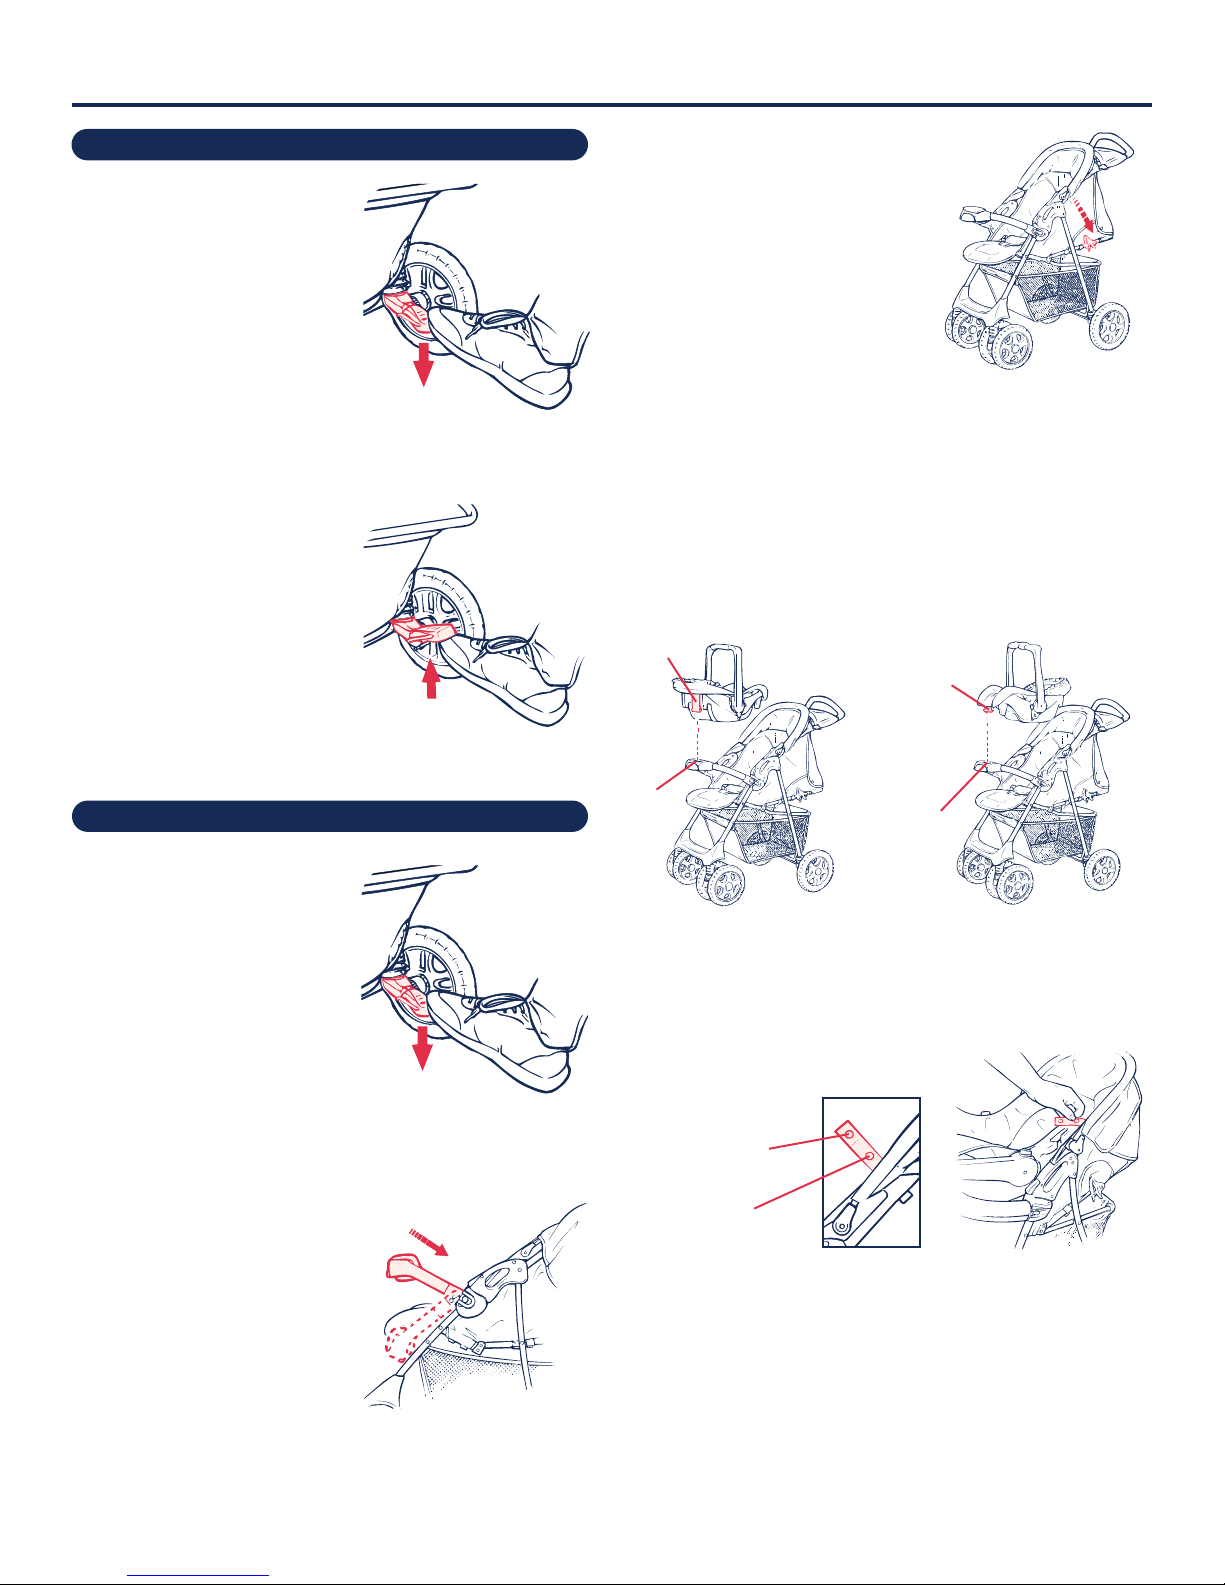
5Attach appropriate snaps to
secure car seat to stroller:
NOTE: Use of proper snaps
provide the snuggest
attachment to stroller frame.
1Set both rear brakes to prevent
stroller from moving.
2Position arm bar in up position:
• Rotate arm bar over lower
edge of seat.
• Push arm bar into slots.
• Pull on arm bar to be sure
it is securely locked.
1LOCKING:
Push down on both brake
levers.
2UNLOCKING:
Push up on both brake levers.
CAR SEAT/STROLLER USE
Locking Or Unlocking Rear Wheels
5
Attaching Car Seat
3Position stroller back support
in reclined position:
Squeeze both levers on sides
of seat back to release.
4With car seat handle in locked carrying position (upright)
insert car seat adapter Tongue into arm bar Slot.
NOTE:
•Before attaching car seat, be sure to remove tongue of
child’s tray pad by pulling out red button and pulling
up on child’s tray pad.
• Car seat may be placed in child’s tray slot either
rear-facing or forward-facing.
Rear-facing Forward-facing
Tongue
Slot
Tongue
Slot
Forward-facing
Snap
Rear-facing
Snap

1Set both rear brakes to prevent
stroller from moving.
2Be sure handle is locked in upright carrying position.
DO NOT lift car seat from arm bar until you have heard a
“click” sound and have checked that handle is locked.
3Pull Red Button on front of arm
bar out and lift car seat.
4After removing car seat, insert
Tongue of arm bar pad into arm
bar Slot.
CAR SEAT/STROLLER USE continued
WARNING
Avoid serious injury from falling or sliding
out:
• Always use waist and tummy pad to
restrain child, even when sleeping.
• Always be sure car seat handle is in locked
upright carrying position when lifting or
carrying child.
• Always make sure car seat is locked into
arm bar before each use.
• Always be sure stroller is fully set up and
fold locks are engaged before using.
• Always be sure brakes are locked when
attaching and removing car seat from
stroller frame.
6
Removing Car Seat
Red Button
Slot
Tongue
6Pull up on car seat to be sure
it is locked in arm bar.
NOTE: Car seat comes with a level indicator which is not
applicable when car seat is used in stroller frame.

WARNING
Prevent serious injury:
• Make sure child is clear of any moving
parts when you adjust stroller.
• DO NOT place parcels on top of canopy.
1LOCKING:
Push down on both brake
levers.
2UNLOCKING:
Push up on both brake
levers.
Stroller may be used with Arm Bar up or down.
1For up position:
• Rotate arm bar over lower
edge of seat.
• Push arm bar into slots.
• Pull on arm bar to be sure
it is securely locked.
2For down position:
• Press arm bar Release Buttons
on sides of fold locks.
• Pull arm bar out until it
stops.
• Allow arm bar to drop
below seat.
Arm Bar Use
Insert Tongue of arm bar pad
into arm bar Slot.
STROLLER USE
Locking Or Unlocking Rear Wheels
7
Closing Arm Bar Slot
Canopy has two (2) positions: opened and closed.
Canopy Positions
Slot
Car seat and stroller can be
used together with both
canopies closed.
Tongue
Release
Button

Seat back has two (2) positions:
upright and reclined.
1For upright position:
Lift seat back forward until
back support pins hook into
seat back latches.
2For reclined position:
Release both levers on sides
of seat back.
STROLLER USE continued
WARNING
Avoid serious injury from falling or sliding
out:
• Always use waist and tummy pad to
restrain child, even when sleeping.
• To prevent child from standing or sliding
out of stroller, be sure waist and tummy
pad are SNUG and do not slip loose.
• Periodically check waist and tummy pad
to be sure they are snug around child.
8
Seat Back Positions
Secure child with harness system:
• Unlock harness system by
pressing Tabs on both
buckles.
• Place waist straps around child’s
waist.
• Place tummy pad between
child’s legs.
• Snap buckle tongues into
buckles on each side of
tummy pad.
• Adjust waist straps to snugly
fit child.
Securing Child With Harness
Tabs

1Set both rear brakes to prevent
stroller from moving.
2Remove car seat from stroller frame (see “To Remove
Car Seat” section).
3Position stroller back support
in reclined position:
Release both levers on sides of
seat back.
4Release quick snap fold locks
on each side by grasping
handle grips and pressing on
both buttons.
9
FOLDING
Folding Stroller
IMPORTANT:
• When folding stroller, turn
stroller front wheels to straddle
frame.
•DO NOT allow front wheels to
rest on frame. Doing so will
cause wheels to warp and
they will not roll correctly.
6Engage latch on side of stroller to
retain stroller in locked position.
5Continue holding buttons in
and lift upward on handles
to fold stroller.
NOTE: This can be done with
arm bar up or down. Arm bar
will drop below seat when
folding.
Este manual sirve para los siguientes modelos
1
Tabla de contenidos
Otros manuales de Paseante de Century

Century
Century 6965 Manual de usuario

Century
Century Travel Solutions Travel SolutionsTM Plus Manual de usuario

Century
Century Swap On Manual de usuario

Century
Century PM-1016AA Manual de usuario

Century
Century 4-in-1 TravelSolutions Manual de usuario

Century
Century Stroll On 3-Wheel Manual de usuario

Century
Century 4 in 1System Pro Sport Plus Manual de usuario

Century
Century Sedona LifeStyle 11-975 Manual de usuario

Century
Century 4-in-1 TravelSolutions Manual de usuario

Century
Century LIFESTYLE SERIER PM-1722AC Manual de usuario


