Celestron 48001 TrekGuide Manual de usuario

INSTRUCTION MANUAL
MODELS #48001 •48002 •48003
TrekGuide
ENGLISH

Features
• DigitalCompassfunctionprovides
degree,northpointingarrowand
cardinalpointreadings.Compass
Range:-0°To359°,1-16
pointers(graphical)
Magneticdeclinationangleadjustable
forregionswithmagneticvariation
• Altitudewithbuilt-inAltimeter:
measuresineithermetersorfeet
• Barometer(air)pressureandsealevel
pressuremeasurementinmbar/hpPa,
mmHGorinHG
• WeatherforecastIcons:Sunny,Slightly
Cloudy,CloudyandRainy
• TimeandDate
• AlarmClock
• Temperaturewithbuilt-inthermometer
readingwithunit°Cor°F
• Backlight
• BubbleLevel
• Waterresistant
• Batteries:2CR2032Lithium(included)
• Lanyardincludedforeasycarrying
speciFications
Temperaturemeasuringrange -20°to+60°Cand-4°to+140°F
Altitudemeasuringrange -400to9000metersand-1312to29,528feet
Barometermeasuringrange 900to1100mbar/hPa,675to825mmHG,and26.58to32.48inHG
PowerSupply Battery:CR2032lithiumx2pcs
Dimensions LxHxW:54x103x15mmor2.1”x4.1”x0.6”
Weight 70gor2.5oz
1.B/▼button Barometersettingmode/
decreasevalues
2.A/▲button Altitudesettingmode/
increasevalues
3.T/MODEbutton Toggledisplaybetweentime,
date,year,andalarm,Mode
usedinvarioussettings
4.Cbutton Compasssettingmodeandexit
anysettingmode
5:Lbutton Turnonthebacklight;Lock/
unlockkeys;Levellocatedin
thecenterofbutton
6.Battery Locatedinthebackoftheunit
Compartment
LcD DispLay, Buttons anD Battery compartment
1
1
5
6
3 4
2

1. Cardinalpointwhenthecompassin
thenorthdirection
2. Directionarrow
3. Temperatureappearswhennotincompassmode
4. Lowbatteryindicator
5. AppearswheninAltimeter(Altitude)mode
6. Indicatesmaximumaltitude
7. IndicatesthedisplayformatofDayandMonth
8. AM/PM
9. Year
10. Keypadislocked
11. Appearswhensealevelpressureisshown
12. AppearswheninBarometer(airpressure)mode
13. Unitsofairpressure
14. Unitsofaltitudeappearinaltitudemode
15. Weatherforecast
16. AppearswheninAlarmmode
17. Appearswhenalarmisactivated
LcD DispLay
2
SeT up
•2PCSCR2032lithiumbatteriesareincluded.Whenbattery
islow,thebatterylowicon( )willbeon.Useasmall
screwdrivertoremovethescrewsofthebatterycover,
removethebatterieswithathinknifeorscrewdriver,place
thepositive(+)sideofthebatteriesupward,andthenreplace
thescrews.
Main FuncTionS and operaTionS
•PresstheMODEkeytoswitchmodebetweenClock,Date,YearandAlarmClock.
•PressA/▲,B/▼,Cbuttonstoswitchbetween:
Altimeter mode BArometer mode CompAss mode
1
2
3
4
5
6
7
8
9
10
11
12
13
14
15
1617

3
time moDe
TiMe SeTTinG
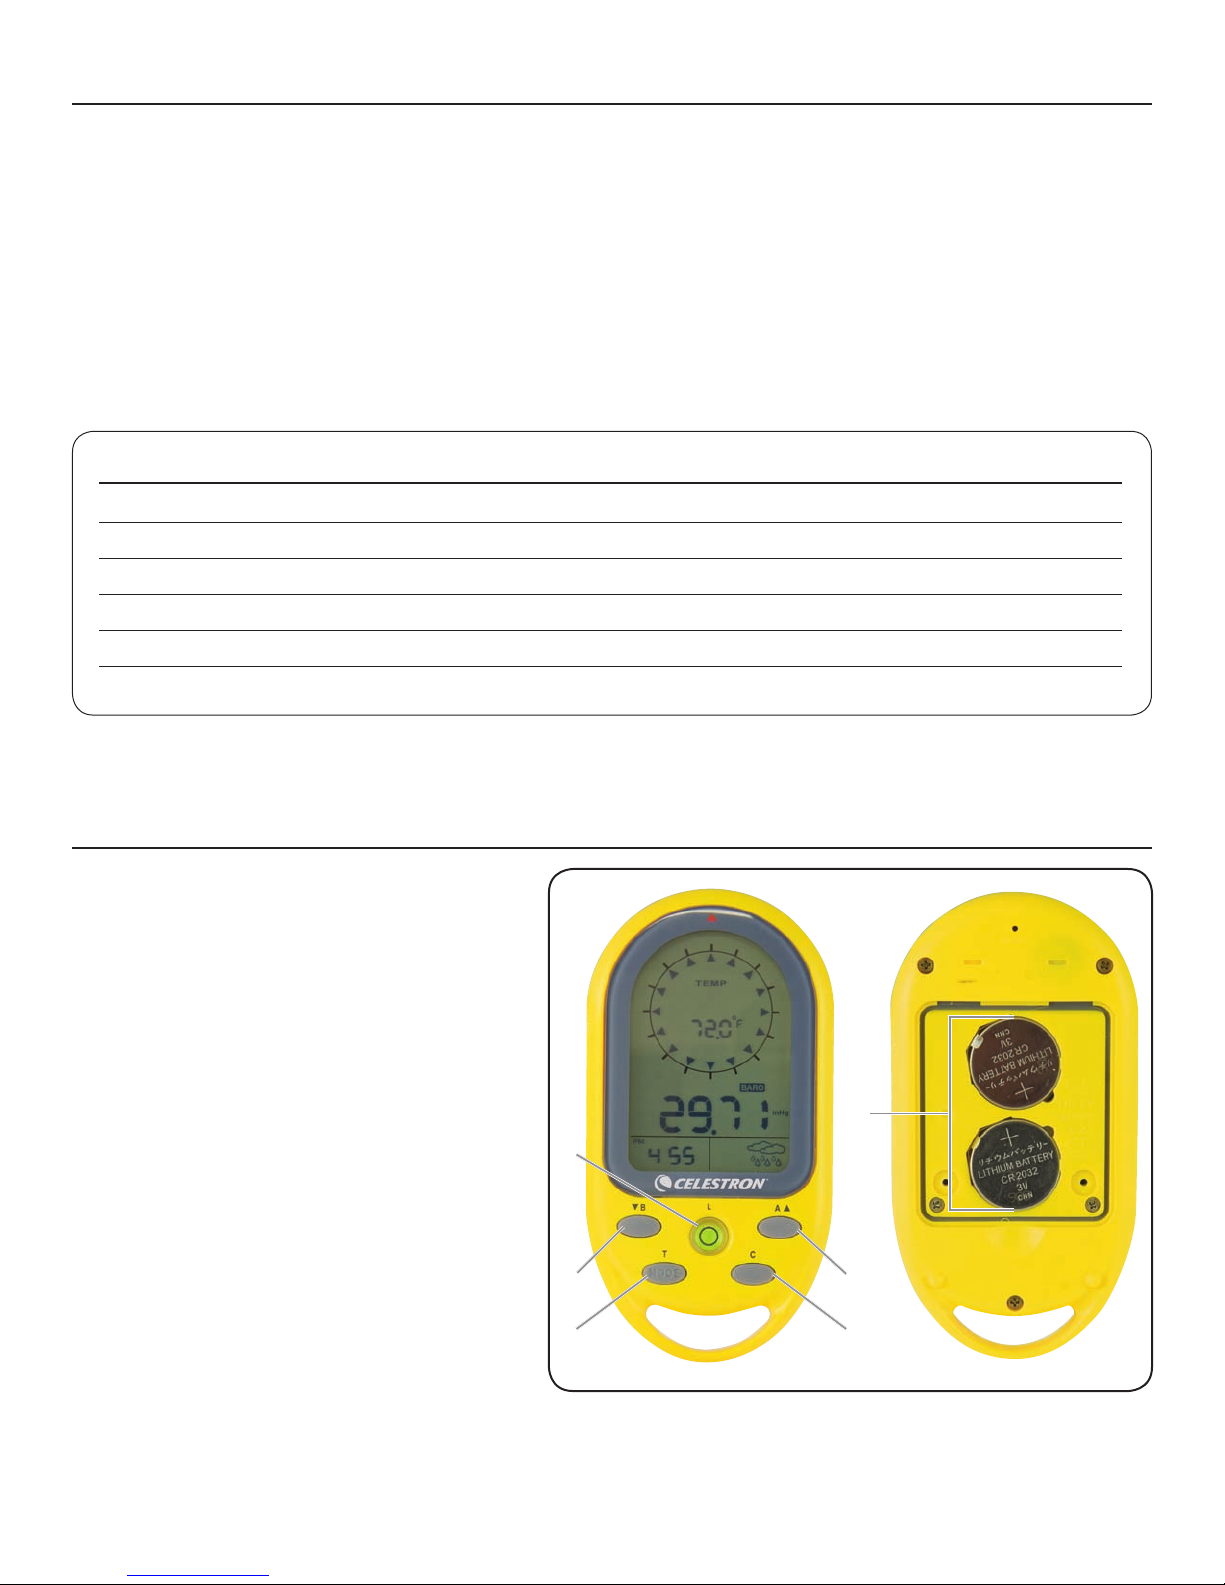
• Pressandhold“MODE”keyfor3secondstoentersettings.
Press“▼”or“▲”tochangesetting,andpress“MODE”
buttontoconrmandmovetonextsetting.
• Settingsequenceisasfollows:12/24hourformat,Hour,
Minute,Second,Year,Month/Daysequence,Month,Day,
Temperatureunit,AirPressureunit,andAltitudeunit.
• Ifnobuttonispressedfor15seconds,thedisplaywillreturn
topreviousmode.
• Press“C”buttontoexittheTimeSettingMode.
alarM SeTTinG
• Press“T”buttontonavigatetoAlarmTimeDisplay
(“AL”icondisplaysontheLCD)Hold“T”buttonfor3
secondstoenteralarmclocksettingmode.Press“▼”or
“▲”tochangesetting,andpress“T”buttontoconrmand
movetonextsetting.
• Thesettingsequenceis:Hour,Minuteand
AlarmON( )/OFF( ).
• Whenthealarmison,thesymbol“ ”appearsandwhenit
isoffthesymbol“ ”disappears.
• Whenalarmgoesoff“ ”willash,pressanybuttonto
stopthealarmandifnobuttonispressedthealarmwill
automaticallystopafter2minutes.
aLtimeter anD Barometer
Whenbatteriesareinserted,thedevicewillautomatically
measurethebarometer(airpressure)readingsaswellasthe
maximumsealevelpressurereading.Youcancheckexact
barometricpressurereadingsforyourlocationonthewebsite.
SeT and reSeT alTiMeTer (For alTiTude):
Altimetermeasuresineithermetersorfeet,range:-400to
9000metersor-1312to29,528feet.Thedeviceprovidesboth
currentaltitudeandmaximumaltitude.
(i)CurrentAltitudedisplay .
(ii)MaximumAltitudedisplay (“MAX”icon
displayontheLCD).
• Press“A”buttontoenteraltimetermode.Press“A”button
againtodisplaythemaximumaltitude.
• WhenLCDdisplayscurrentaltitude,holdthe“A”button
for3secondstoentersetting.Press“▼”or“▲”toadjust
altitude,andpress“MODE”buttontoconrmandquitthe
setting.Press“▼”and“▲”atthesametime,currentaltitude
valuewillberesetto0.
• WhenLCDdisplaysmaximumaltitude,press“▼”and“▲”
atthesametimeandthemaximumaltituderecordwillbe
clearedandresetto0.
SeT and reSeT Sea level preSSure and WeaTher
ForecaST iconS
(i)Currentbarometric(air)pressure .
(ii)CurrentSealevelpressure (“SEA”icon
displayontheLCD).
• Press“B”buttontoenterBarometermode.TheLCDwill
displaythecurrentbarometricpressureandpressthe“B”
buttonagaintodisplaythesealevelpressure.
• IntheSeaLevelpressuredisplay,holdthe“B”buttondown
for3secondstoenterthesetting.Press“▼”or“▲”to
changethesettingandpress“MODE”buttontoconrmand
movetonextsetting.
• Thesettingsequenceisas:sealevelpressure,toggleweather
forecasticons.
→ → →
• Theweatherforecastwillstarttherstforecast6hourslater
afterthecurrentweatherstatusisentered.
Note: Barometric pressure and sea level pressure
measurement in mbar/hPa, mmHG or inHG. When sea
level pressure is changed, the altitude will adjust itself.
compass
ThecompassshowsthebearingindegreesdueNorthtogether
with16cardinalpoints.
• Press“C”button,theunitwillenterCompassmode.Hold
theunithorizontal.Pointthe12o’clockpositionoftheunit
inthedirectionyouwanttomeasure.Asthegraphbelow
shows,thedirectionyouaremeasuringnowisWSW223°.
Thearrow“▲”alwayspointtoNorth.
• WhenthedirectionofcompassispointingNorth(degreefor
-12.5to+12.5),thedirectioniconoutsidewillbeshown.Ifno
keyispressedfor30seconds,theunitwillautomaticallyshut
offthecompassandreturntothetemperaturemode.

4
coMpaSS SenSor calibraTion
ThecompassshouldbecalibratedbeforeuseORwhenthe
batteriesarereplaced.
• InCOMPASSmodeholdthe“C”buttonfor3secondsto
enterthecompasssensorcalibrationmode,andpressthe
“C”buttontostartthecalibration.
• Keeptheunitinalevelpositionorontopofanon-metallic
table/desk.ReferencethearrowshowingintheLCD,rotate
thecompassclockwiseforonefullrotationslowly:
• Whennished,theLCDwilldisplay“OK”ifthecalibrationis
successfulordisplay“Fail”ifitfailedas:
SeT The MaGneTic declinaTion anGle
Theanglebetweenmagneticnorthandthetruenorthdirection
iscalledmagneticdeclination.Theearth’smagneticpoles
uctuateovertime,anditalsovariesfromplacetoplace.Find
themagneticdeclinationonamaporwebsite,andthenset
thedeclinationonthisunittooffsetthedifferencebetween
magneticnorthandtruenorth.Pleasenotethatifyoufailtodo
this,thereadingsyougetfromthecompasscouldbeinerror.
• InCOMPASSmode,holdthe“C”buttonfor3secondsto
enterthecompasssensorcalibrationmode,press“MODE”
buttontoentersettingofthedeclinationangle.Theangle
willashontheLCD.Forexample,belowthe“0°”willash
ontheLCD).
• Press“▼”or“▲”tochangetheanglevalue,rangefrom
-90°to90°,andpress“MODE”buttontoconrmandexit
thesetting.
Note: The compass must be kept in a level position
when in use. Taking a measurement while the unit is not
horizontal (in relation to the horizon) can result in a large
measurement error.
Always take bearings in the open air, because it is easily
affected by disturbing sources of magnetism.
direcTion MeaninG
ENE East-
Northeast
SSE South-
Southeast
WSW West-
Southwest
NNW North-
Northwest
direcTion MeaninG
NE Northeast
SE Southeast
SW Southwest
NW Northwest
direcTion MeaninG
NNE North-
Northeast
ESE East-
Southeast
SSW South-
Southwest
WNW West-
Northwest
direcTion MeaninG
N North
E East
S South
W West
→→
coMpaSS bearinG leGend

5
BackLight/ keypaD Lock
• Pressthe“L”buttontoturnthebacklightonfor5seconds.
• Pressandholdthe“L”buttonfor3secondsandthe
keyboardwillbelockedandtheicon willbeshownin
theLCDdisplay.Holdthe“L”buttondownfor3secondsto
unlockthekeyboard.
LeveL
Inthecenterofthe“L”buttonisabubblelevel.Whenthe
smallbubbleiscenteredonthebuttontheunitislevel.
maintenance & trouBLeshooting
• Donotdisassembleormodifytheunitinanyway.
• Donotuseanyabrasiveorvolatilecleanersontheunit.
• Docleantheunitwithwaterusingasoftcloth.
• Donotpourwateroranytypeofliquidorputfoodon
theunit.
• IfforsomereasontheLCDkeysdonotwork,removethe
batteriesandreinstallthem.
your instrument has atwo year LimiteD warranty.
pLease see the ceLestron weBsite For DetaiLeD inFormation
on aLL ceLestron proDucts at www.ceLestron.com.
temperature
• Whencompassmodeisoff,theLCDdisplaywillprovidethe
temperaturereadingwithunitof°Cor°F.Therangeisfrom
-20°Cto60°Cand-4°Fto140°F.
• Whenthetemperatureislowerthan-20°CtheLCDdisplay
willshowLL.L°C.Whenthetemperatureishigherthan60°C
theLCDdisplaywillshowHH.H°C.


2835ColumbiaStreet•Torrance,CA90503U.S.A.
Telephone:310.328.9560•Fax:310.212.5835
©2011Celestron
Allrightsreserved.•PrintedinChina•01-11
Productdesignandspecicationsaresubjecttochange
withoutpriornotication.
Designedandintendedforthose13yearsofageandolder.
FCCStatement
ThisdevicecomplieswithPart15ofFCCRules.Operationissubjecttothefollowingtwoconditions:
1.Thisdevicemaynotcauseharmfulinterference,and
2.Thisdevicemustacceptanyinterferencereceived,includinginterferencethatmaycauseundesiredoperation.
www.celestron.com

MANUEL D’INSTRUCTION
MODÈLES NO 48001 • 48002 •48003
TrekGuide
FRANÇAIS

caractéristiques
• Laboussolenumériqueafche
lesdegrés,uneèchepointant
lenordetlespointscardinaux.
Éventaildelaboussole:-0°à359°,
1-16indications(graphiques)
Unanglededéclinaisonmagnétique
réglablepourlesrégionsayantdes
déclinaisonsmagnétiques
• Unaltimètreafchantl’altitude:
mesuresindiquéesenmètres
ouenpieds
• Lesmesuresdelapression
barométrique(del’air)etdelapression
auniveaudelamerenmbar/hPa,
mmHgoupoHg
• Desicônespourlesprévisions
météorologiques:ensoleillé,
légèrementnuageux,nuageux
etpluvieux
• L’heureetladate
• Unréveil
• Unthermomètreafchantles
températuresen°Cou°F
• Unrétroéclairage
• Unniveauàbulled’air
• Résistantàl’eau
• Despiles:2pilesaulithium
CR2032(incluses)
• Uncordoncomprispour
untransportfacile
spéciFications
Éventaildesmesuresdelatempérature -20°à+60°Cet-4°à+140°F
Éventaildesmesuresdel’altitude -400à9000mètreset-1312à29528pieds
Éventaildesmesuresdubaromètre 900à1100mbar/hPa,675à825mmHGet26,58à32,48poHG
Alimentationélectrique Piles:2pilesaulithiumCR2032
Dimensions LxHxL:54x103x15mmou2,1x4,1x0,6po
Poids: 70gou2,5oz
1. Bouton B/▼Modederéglagedubaromètre/
diminuelesvaleurs
2. Bouton A/▲Modederéglagedel’altitude/
augmentelesvaleurs
3. Bouton T/MODEAfchel’heure,ladate,l’année
etleréveil,Modeutilisédans
diversréglages
4. Bouton CModederéglagedelaboussole
etquittetoutmodederéglage
5.BoutonLAllumelerétroéclairage;
verrouille/déverrouilleles
touches;niveausituéaucentre
dubouton
6. Compartiment Situéaudosdel’unité
àpiles
écran acL, Boutons et compartiment àpiLes
1
1
5
6
3 4
2
Este manual sirve para los siguientes modelos
2
Tabla de contenidos
Idiomas:
Otros manuales de Brújula de Celestron
Manuales populares de Brújula de otras marcas

Bushnell
Bushnell Digital Navigation 70-0002 Manual de usuario

Dakota Digital
Dakota Digital Odyssey ODY-17-1 Manual de usuario

Brunton
Brunton 16B Braille Manual de usuario

Freestyle
Freestyle TOUCH COMPASS Manual de usuario

True North
True North Revolution Manual de usuario

TECHTRAIL
TECHTRAIL Trailhead Manual de usuario


