CDA CD 200 Instrucciones de operación

Before operating this oven,
please read these instructions carefully
Users Operating Instructions
Electric Fan
Ovens
CD 200
CD 250
Multifunction
Ovens
CD 400
CD 600
CD 800

INSTALLATION
The oven must be installed in accordance with the installation instructions contained in
this booklet. Connection to the electricity supply must be made by a competent
electrician to a suitable 13 amp. switched socket.
Warning this appliance must be earthed.
BEFORE USE
Please ensure that all packing has been removed from the appliance before switching
on.
2
Dear Customer
Thank you for choosing one of our appliances, carefully designed and built by
our specialist staff and thoroughly tested to satisfy your cooking requirements.
We suggest that you read this Instruction Booklet so that you will understand
fully how to operate your appliance.
Please keep the booklet handy. You may wish to refer to it at a later date.
CDA
3
CAUTION:
✓
This appliance must be used only for the task it has explicitly been designed for, that
is for cooking foodstuffs. Any other form of usage is to be considered as
inappropriate and therefore dangerous.
✓
Do NOT place combustible materials or products in this appliance at any time.
✓
Do NOT spray aerosols in the vicinity of this appliance while it is in use.
✓
Important: As a safety measure, before you start cleaning the oven be sure to
disconnect it from the mains supply.
✓
During and after use of the oven, certain parts will become very hot. Do not touch
hot parts.
✓
Keep children well away from the appliance while it is in use.
USING THE OVEN FOR THE FIRST TIME
You are advised to carry out the following operations:
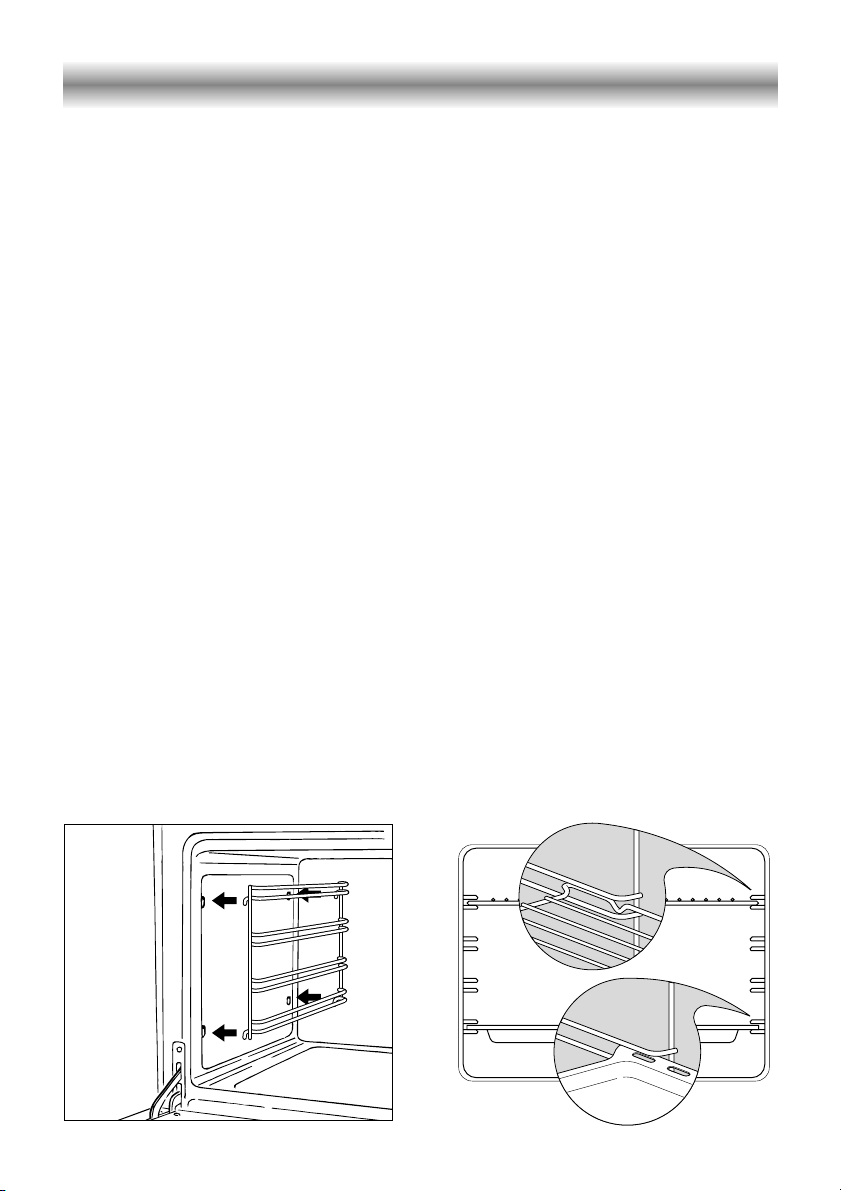
✓
Clean the inside of the oven with a cloth soaked in water and neutral detergent and
dry thoroughly.
✓
Hang the wire racks on the oven sides (Figure 1).
✓
Slide in, on the guides, the shelf and the tray etc. (Figure 2).
✓
To eliminate traces of grease from the heating elements, switch the oven on to the
maximum temperature for 90 minutes.
Figure 1 Figure 2
Use and Care

4
Multifunction oven
A
U
T
O
Temperature
Function
0
°C
0
50
100
125
150
175200
225
75
250
Digital electric programmer Thermostat
Temperature light
Function selector
Figure 3
GENERAL FEATURES
As the name implies, this oven features a number of functions.
4 different thermostatic control functions are available to satisfy all cooking
requirements.
OPERATING PRINCIPLES
Heating and cooking in the 4 functions available are obtained as follows:
a. by natural convection
The heat is produced by the upper and lower heating elements.
b. by forced convection
The heat produced by the lower and upper heating elements is distributed in the
oven by the fan.
Several dishes can be cooked at the same time.
c. by radiation and Fan
The heat radiated by the infrared grill is distributed in the oven by the fan.
d. by radiation
The heat is radiated by the infrared grill.
Models: CD 400, CD 600, CD 800

5
Function selector and thermostat controls
TEMPERATURE SELECTOR KNOB (fig. 5)
To turn on the heating elements of the oven, set the selector knob to the desired
program and the thermostat knob to the desired temperature.
To set the temperature, line the knob indicator up with the desired number (50 - 250 °C).
The elements will turn on or off automatically according to the heat needed, which is
determined by the thermostat.
The operation of the heating elements is signalled by a light on the control panel.
FUNCTION SELECTOR KNOB (fig. 4)
Rotate the knob clockwise to set the oven for one of the following functions.
OVEN LIGHT
By turning the knob onto this setting you light the oven cavity (15 W). The light
remains on while any of the functions are being used.
TRADITIONAL CONVECTION COOKING
The upper and lower heating elements come on.
The heat is dispersed by natural convection and the temperature must be set to
between 50° and 250°C via the thermostat knob. The oven must be preheated before
cooking.
Recommended for:
Food that requires the same degree of cooking both inside and out, for example roasts,
spare pork ribs, meringues etc.
Function
0
Temperature °C
0
50
100
125
150
175200
225
75
250
Figure 4 Figure 5

6
FAN ASSISTED COOKING
The upper and lower heating elements come on and heat is dispersed through the
oven by the fan. The temperature must be set to between 50° and 250°C via the
thermostat knob.
Recommended for:
Large dishes and large quantities which require the same degree of cooking both inside
and out, for example rolled roasts, turkey, roast legs, cakes etc.
TRADITIONAL GRILLING
The infrared grill element comes on. The heat is dispersed by radiation.
Use with the thermostat knob from 50° to 200 °C.
Always grill with the oven door closed.
Recommended for:
Intense grilling, browning, cooking au gratin and toasting etc.
It is recommended that you do not grill for longer than 30 minutes at any
one time.
The oven door becomes very hot during operation. Keep children away.
TURBO GRILL COOKING
The infrared grill and the fan come on. The heat is diffused mainly by radiation and the
fan then distributes it all over the oven.
Use with the door closed. The temperature can be regulated via the thermostat knob
to between 50° and 175° max.
Always grill with the oven door closed.
Recommended for:
Grilling where quick browning on the outside is required to keep the juices in.
For example: veal fillets, chops etc.
It is recommended that you do not grill for longer than 30 minutes at any
one time.
The oven door becomes very hot during operation. Keep children away.

7
COOKING HINTS
Remember to keep children away from the appliance when you use the grill or oven, since
these parts become very hot.
COOKING EXAMPLES
Preheat the oven to the required temperature (the temperature light above the
thermostat knob will go out) and place the food inside.
Remember to use ovenproof dishes and to alter the oven temperature during cooking
if necessary.
STERILIZATION
For sterilization of food for preserving in jars follow the instructions below (jars must be
full and hermetically sealed):
a. Set the switch to
b. Set the thermostat knob to 175°C and preheat the oven.
c. Fill the drip pan with hot water.
d. Arrange the jars in the drip pan ensuring that they do not touch each other and
after wetting the lids with water, close the oven and set the thermostat knob to
130°C.
Once the sterilization process has begun, i.e. when you begin to see bubbles in the
jars, switch the oven off and leave to cool.
WARMING BREAD
Set the function knob to and the thermostat to 150°C.
The bread will regain its fragrance if moistened with a few drops of water and placed in
the oven for approximately 10 minutes.

8
COOKING DIFFERENT DISHES AT THE SAME TIME
With the function selector in position , the ventilated oven allows you to cook
different types of food at the same time. Fish, cakes and meat can be cooked together
without the smells and flavours mixing.
The following precautions are required:
✓
The cooking temperatures must be as close as possible with a maximum difference of
20° - 25°C between the different foods.
✓
Different dishes must be placed in the oven at different times according to the
cooking time required for each one. This type of cooking obviously provides a
considerable saving on time and energy.
GRILLING AND COOKING AU GRATIN
With the function selector in position , the food is grilled on all sides as the hot air
completely envelopes it.
Set the thermostat to 175°C and simply place the food under the grill.
Close the door and leave the oven to run with the thermostat set as required to between
100 and 175°C until grilling is complete.
Add a few curls of butter just before the end to give a golden gratiné effect.
Do not grill for longer than 30 minutes at any one time.
USE OF THE GRILL
Use with the oven door closed and the thermostat knob from 50° to 200 °C.
Introduce the food to be cooked, positioning the rack as close to the grill as possible.
The dripping pan should be placed under the rack to catch the cooking juices and
fats.
Do not grill for longer than 30 minutes at any one time.

9
A
U
T
O
Description of the buttons:
Timer
Cooking time
End of cooking time
Manual position and cancellation
of the inserted cooking program
Advancement of the numbers of
all programs
Turning back of the numbers of all
programs and changing the
frequency of the audible signal.
Description of the lighted symbols:
AUTO -flashing - Programmer in
automatic position but not
programmed
AUTO - constant - Programmer in
automatic position with
program inserted.
Automatic cooking taking place
Timer in operation
and AUTO - flashing - Programme
error.
(The time of day is after the start
time you have set).
Note: Select a function by the
respective button and within 5 seconds,
set the required time with the /
buttons (“one-hand” operation).
A power cut zeroes the clock and
cancels the set programmes.
The electronic programmer is a device that groups together the following functions:
✓
24 hour clock with illuminated display
✓
Timer (up to 23 hours and 59 minutes)
✓
Programme for automatic oven cooking
✓
Programme for semi-automatic oven cooking.
Figure 6 Figure 7
Electronic programmer

10
ELECTRONIC CLOCK (fig. 7)
The programmer is equipped with an
electronic clock with lighted numbers
which indicate hours and minutes.
Upon immediate connection of the
oven or after a blackout, three zeroes
will flash on the programmer panel.
To set the hour it is necessary to push
the button and then the or
button until you have set the exact
hour (fig. 7).
Alternatively, simultaneously push the
two buttons and at the same
time push the or button.
Note: Setting the clock deletes any
programme.
A
U
T
O
ELECTRONIC TIMER
The timer programme consists only of a
buzzer which may be set for a
maximum period of 23 hours and 59
minutes.
If the AUTO is flashing push the
button.
To set the time, push the button
and the or until you obtain the
desired time in the panel (fig. 9).
Having finished the setting, the normal
time will appear on the panel and the
symbol will appear.
The countdown will start immediately
and may be seen at any moment on
the panel by simply pressing the button
.
At the end of the time, the symbol
will be switched off and an intermittent
buzzer will go off; this can be stopped
by pressing any one of the buttons.
ALTERING THE AUDIBLE
SIGNAL
By pressing the button you can
choose from three variations.
NORMAL COOKING
WITHOUT THE USE OF THE
PROGRAMMER
To manually use the oven, that is, without
the aid of the programmer, it is necessary
to cancel the flashing AUTO by pushing
the button (AUTO will be switched off
and the symbol will go on - Fig. 8).
Attention: If the AUTO is not flashing
(which means a cooking program has
already been inserted), by pushing the
button you have cancelled the
programme and switched to manual.
Figure 8 Figure 9
Este manual sirve para los siguientes modelos
4
Tabla de contenidos


