Carrier TruVu ET Display7 Manual de instalación

TruVu™ ET Display (part# EQT3)
Installation and Start-up Guide
©2022 Carrier. All rights reserved. • Catalog No. 11-808-687-01 • 7/5/2022

Verify that you have the most current version of this document from www.hvacpartners.com, the Carrier Partner
Community website, or your local Carrier office.
Important changes are listed in Document revision history at the end of this document.
©2022 Carrier. All rights reserved.

Contents
What is the TruVu™ ET display? ................................................................................................................................. 1
Specifications ........................................................................................................................................................2
Mounting the TruVu™ ET display ................................................................................................................................ 4
Wiring the TruVu™ ET display ..................................................................................................................................... 6
Wiring for power....................................................................................................................................................6
Wiring for Communication - Rnet configuration..............................................................................................7
Wiring for Communication - Ethernet port connection...................................................................................9
Wiring for Communication - USB port connection...........................................................................................9
Interface selection................................................................................................................................................9
Setting up the TruVu™ ET display.............................................................................................................................10
To edit the touchscreen settings ..................................................................................................................... 10
To update the touchscreen .............................................................................................................................. 12
To clear the cache...............................................................................................................................12
To update the device language ....................................................................................................................... 13
Working with files ......................................................................................................................................................14
Capturing screenshots ...................................................................................................................................... 14
Viewing files........................................................................................................................................................ 14
Copying files ....................................................................................................................................................... 15
TruVu™ ET display screens........................................................................................................................................16
Setting timeouts ........................................................................................................................................................32
Viewing alarms ..........................................................................................................................................................33
To view alarms ................................................................................................................................................... 33
Viewing trends ...........................................................................................................................................................35
To view trends .................................................................................................................................................... 35
Creating or viewing schedules..................................................................................................................................36
To set up scheduling functionality .................................................................................................................. 36
To create a schedule......................................................................................................................................... 36
To view schedules.............................................................................................................................................. 39
Forcing values (CCN points only) ..............................................................................................................................41
Compliance ................................................................................................................................................................42
CE Compliance ................................................................................................................................................... 42
FCC Compliance................................................................................................................................................. 42
Document revision history ........................................................................................................................................43

TruVu™ ET Display (part# EQT3) ©2022 Carrier.
Installation and Start-up Guide All rights reserved.
1
The TruVu™ ET display is a touchscreen device that you can attach to all Carrier Open controllers to view or
change its property values, schedule equipment, view trends and alarms, and more, without having to access the
system's server.
Reset Hold for 3 seconds to reboot the TruVu™ ET display device.
Wi-Fi Antenna For future use
Power LED Power indicator
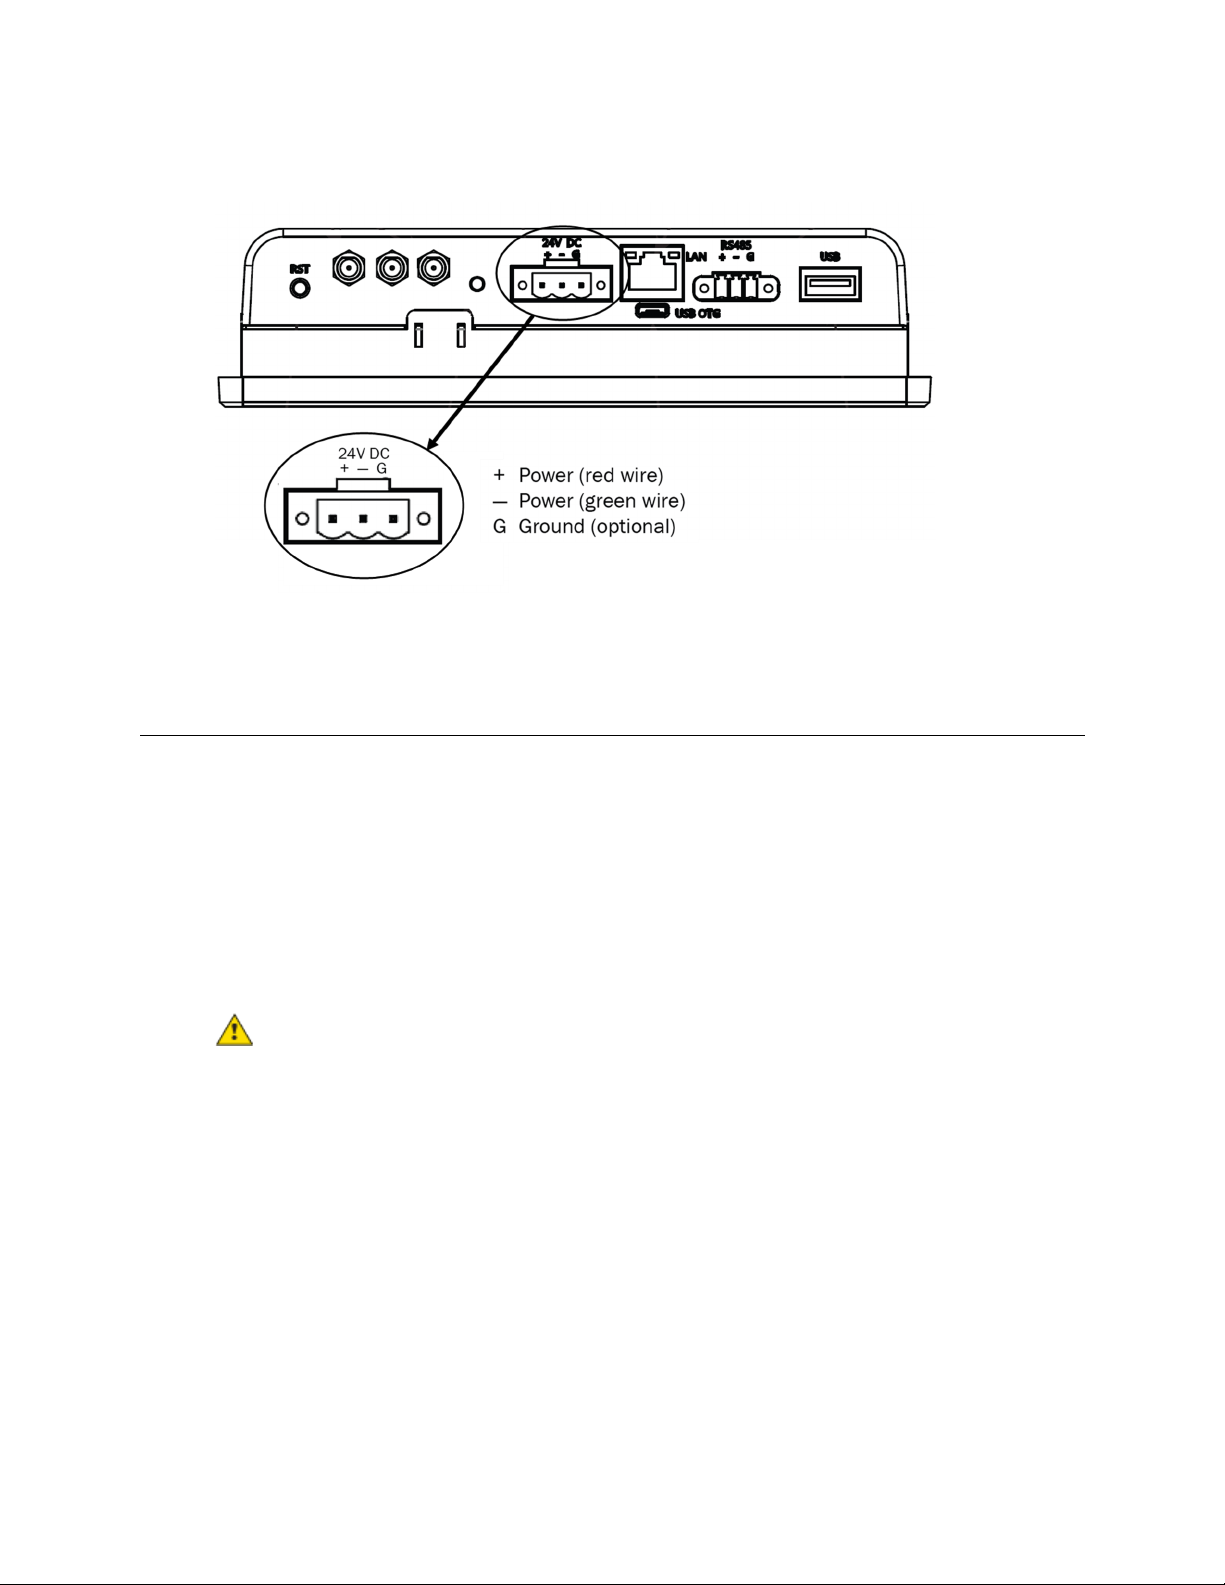
Power Input* Port that connects to the power supply
LAN Port RJ-45 Ethernet connection to Service Port on TruVu™ controllers
Comm Input Port that connects to the controller
USB OTG Port Micro-USB port used for factory programming
Rnet Com EIA-485 based serial port for controller communication to Rnet
USB Port Type A USB port used for capturing screenshots, transferring files, upgrading the
application, and connecting to the controller (page 9) by i-Vu® XT or TruVu™
controllers only
What is the TruVu™ ET display?

What is the TruVu™ ET display?
TruVu™ ET Display (part# EQT3) ©2022 Carrier.
Installation and Start-up Guide All rights reserved.
2
Specifications
TruVu™ ET display7
TruVu™ ET display10
Power
24 VDC (±15%), 1 A, Class 2 24 VDC (±15%), 1 A, Class 2
Display: TFT
Resolution
Brightness
Contrast ratio
Viewing angle
Max colors
Touch
7" TFT (Widescreen)
1024 x 600 pixels (170 ppi)
320 cd/m (typ.)
1000:1 (typ.)
-75~70(H); -75~75(V)
16.7M (8-bit)
Projected Capacitive Multi-Touch (P-CAP)
10.1" TFT (Widescreen)
1280 x 800 pixels (149 ppi)
350 cd/m (typ.)
800:1 (typ.)
-85~85(H); -85~85(V)
16.7M (8-bit)
Projected Capacitive Multi-Touch (P-CAP)
Operating Conditions
-4°F to 122°F (-20°C to 50°C), 10% to 90% RH (non-condensing)
Front IP65 Water and Dust Proof (Rear: IP20); Vibration tested to IEC60068-2-64
Storage
Temperatures
-13°F to 158°F (-25°C to 70°C)
Communication
Comm Input
USB
USB OTG
LAN
2-wire EIA-485 port for connection to the Rnet sensor network (115kbps)
Port for upgrades, screen captures, file transfers, and controller communication for i-Vu® XT
or TruVu™ controllers
Port for factory programming (firmware upgrades)
RJ-45 Ethernet connection to Service Port on TruVu™ controllers
System
Processor
System Memory
Storage
OS: Android 11.0
MT8365 Quad-core Cortex-A53 up to 2.0GHz
3 GB LPDDR4 RAM to store variable data and LCD data.
32 GB onboard eMMC Flash memory to store program code and screen file
Mounting
Wall or panel mounting within the building interior
Wall mounting kit (7” and 10” only)

What is the TruVu™ ET display?
TruVu™ ET Display (part# EQT3) ©2022 Carrier.
Installation and Start-up Guide All rights reserved.
3
Certifications
Europe: Mark, UK:
CE (Class B), FCC (Class B), CSA 62368-1, ANSI/UL 62368-1, IEC 62368-1, Vibration tested to
EN60068-2-6, IP65 rated (front) IP20 rated (rear)
Real-time clock
A 365-day real time clock/calendar chip; the time and date will be maintained for a minimum
of 72 hours after loss of power (at room temperature)
Device identification
The serial number is found on a label on the back of the TruVu™ ET display

Mounting the TruVu™ ET display
TruVu™ ET Display (part# EQT3) ©2022 Carrier.
Installation and Start-up Guide All rights reserved.
4
The TruVu™ ET display must be mounted within the building interior. You can mount the TruVu™ ET display:
•In a panel with the controller or on the panel door
•On a wall within 500 feet (152 meters) from the controller
•Within 100 feet (30 meters) of its power supply
•With a wall mounting kit (7” and 10” only)
You can mount the panel using either of the two options below.
Option 1 - Panel mounting
1 Cut opening in the panel door to size specified in punchout table below.
Part #
Punchout Size, Width x Height
TruVu™ ET display-7 6.9 x 4.646 in. (17.5 x 11.8 cm)
TruVu™ ET display-10 9.607 x 6.26 in. (24.4 x 15.9 cm)
Mounting the TruVu™ ET display

Mounting the TruVu™ ET display
TruVu™ ET Display (part# EQT3) ©2022 Carrier.
Installation and Start-up Guide All rights reserved.
5
2 Mount the TruVu™ ET display securing with the clips provided.
Option 2 - Backplane or VESA mounting
1 Refer to the drawings below to determine the proper mounting holes to use for each size TruVu™ ET display.
2 Use the screws provided to mount the backplate or to the VESA bracket.

Wiring the TruVu™ ET display
TruVu™ ET Display (part# EQT3) ©2022 Carrier.
Installation and Start-up Guide All rights reserved.
6
Wiring for power
Connect the TruVu™ ET display to either a:
•24 VDC power supply using 2-conductor wire 18 AWG.
•24 VAC power supply using a NSA-A/PS24-24V-S low voltage power supply
NOTE Must be within 100 feet (30 meters).
WARNING Do not apply line voltage (main).
CAUTION The TruVu™ ET display can share a power supply with the Carrier controller as long as:
•The power supply is DC power.
•You maintain the same polarity.
•You use the power source only for Carrier controllers.
NOTE Purchase a power supply from a third-party manufacturer.
Wiring the TruVu™ ET display
Wiring the TruVu™ ET display
TruVu™ ET Display (part# EQT3) ©2022 Carrier.
Installation and Start-up Guide All rights reserved.
7
Wiring for Communication - Rnet configuration
You can connect the TruVu™ ET display to a controller's Rnet port using 2-conductor wire 22 AWG. The Rnet can
have one TruVu™ ET display, plus ZS sensors and/or a wireless adapter that communicates with wireless sensors.
NOTE The TruVu™ ET display:
•Cannot share the Rnet with an Equipment Touch.
•Does not get its power from the Rnet; it must be powered by an external 24 Vdc DC power source.
•Must be within 500 feet (152 meters).
CAUTION The TruVu™ ET display can share a power supply with the controller as long as:
•The power source shared by the controller and TruVu ET display is DC power.
•The same polarity is maintained.
Este manual sirve para los siguientes modelos
2
Tabla de contenidos
Otros manuales de Monitor de Carrier


