
Canoe Cove Full Circle Manual de usuario

1 | P a g e
Welcome aboard!
Canoe Cove vessels are made near Sydney, BC, Canada.
The company has built over 780 boats and yachts since 1958. Their clients include the Canadian Coast
Guard, The Royal Canadian Mounted Police, and The Canadian Department of Fisheries & Oceans.
Additionally, they have built passenger ferries, research, rescue, fishing and work boats.
Canoe Cove has been building yachts of all lengths, up to 80’, since 1960. In the last 20 years, they
have only built custom order yachts, Canadian Government boats and other vessels. Full Circle was
one such custom built yacht in 2002.
Full Circle has the following features we hope you will enjoy during your vacation:
Recent Upgrades:
•Two Wallace 40DT forced air heating systems
•Two A/C units
•New Splendide Washer/Dryer
•Imported Italian 5-burner propane cooktop
•2 DC Refrigerators in the galley
•Electric toilets (both heads)
•Towel warmers (both heads)
•New carpet
•New Upholstery
•30-gallon water heater
Other Features:
•Bow & Stern Thrusters
•Autopilot
•12” Chart Plotter
•2 Helm Chairs (both steering stations)
•2 walk around queen staterooms with ensuite heads
•Oversized Shower Stalls in both heads
•Large Freezer on fly bridge
•Tremendous storage (4 deck boxes) on fly bridge
•42” Sony TV
•DVD Player
•Panasonic Stereo (speakers in Salon, pilothouse, and stateroom)
•Sony CD player.
•Rendova 13' center console tender –seats 6 - four stroke EFI 50 hp engine
•Tender mounted on Nick Jackson electric transom davit w/remote control

2 | P a g e
Canoe Cove 50’ General Specifications
Hull Number 1303
L.O.A. (not including tender) 50’ 8”
L.W.L. 49’ 1”
Beam 14’ 6”
Draft 4’ 4”
Displacement 48,000 lbs
Engines twin 6v92 DDEC 625 HP Detroit Diesels
Cruising speed 12 to 16 knots
Maximum speed 25 knots
Water capacity 180 US gallons
Fuel capacity (2 tanks) 600 US Gallons
Holding tank 40 gallons
Water heater 30 gallon
Shore power two 30 amp 125/volt connections
Inverter Magnum MS2812 2800 Watt
Generator Koehler 9 KW
Start batteries four 8D 12V AGM
House batteries four 8D 12V AGM
A.C. Voltage 110 volts / 60Hz
D.C Voltage 12 volts
Full Circle IS A NO SMOKING VESSEL

3 | P a g e
Table of Contents
Safety page 4
Engine Room Inspection page 4
Before Getting Underway page 5
Pilothouse Layout page 5
The Engine Electric Display Module (EDM) page 6
Engine Start-up page 7
Engine Shut Down page 8
Cruising page 8
Autopilot page 8
Fuel Gauge page 9
Boat Electrical Systems pages 10 thru 15
Shore power page 10
Generator page 11
Inverter page 13
Breaker panels pages 14 & 15
Cabin Heating page 16
Air Conditioner page 17
Marine Toilet page 18
Holding Tank page 19
Water Systems pages 20 thru 23
Washer/Dryer page 24
Anchoring page 25
Entertainment Systems page 25
Cooking (propane operation) page 27
Tender Operation page 28
Crabbing & Fishing page 29

4 | P a g e
SAFETY
1. Safety should be paramount in your daily cruising.
2. Lifejackets are in a fly bridge deck box. A few should always be out and ready. We
recommend wearing them whenever working on the decks.
3. Flares are in a fly bridge deck box.
4. 6 Fire extinguishers are located throughout the boat.
5. It is a good idea to discuss what to do in case of an unexpected person in the water…especially
Man Overboard! Man overboard life ring and beacon are on the fly bridge.
Engine Room Inspection
Complete Daily:
1. Engine room is accessed through the cockpit. Electric hatch lift switch is located in the
starboard storage box.
2. Check the bilge and the diapers below the engine for any water, coolant, fuel, or oil. The bilge
and the diapers should look the same as the day before.
3. Use the dipstick for both engines to check the oil level. Each dipstick is located on the center
aisle for easy access.
4. Wipe the dipstick clean first to check the oil level.
5. DO NOT OVERFILL OIL! Only fill if oil levels are below the bottom mark.
6. Check the coolant level by removing radiator cap inserting finger and feel for liquid. If none is
felt, add coolant until it can be felt by your finger.
7. Check the overflow tank on the forward bulkhead.
8. Check the two engine and generator raw sea water strainers for grass or debris. (If necessary,
close the valve to the strainer, open the strainer cover, clean the strainer, and reassemble.
Remember to re-open the seacock!).
9. Key for raw water strainers is in the engine room.
10. Look at the visible hoses, belts, plumbing, and wiring for any potential problems such as
chafing, leaking, cuts, etc.

5 | P a g e
Before Getting Underway
1. Close all portholes to keep spray from entering the boat.
2. Close the forward hatch.
3. Turn on the electronics you need including the depth sounder, Radar (also turns on Chart Plotter),
Auto Pilot, Fly Bridge Electronics, VHF radio, etc.
4. The Furuno Chart Plotter shows the following:
a. Current area
b. Boat location
c. Radar
d. Depth
e. For more info, a quick start pamphlet is in the top chart drawer in the pilothouse.
5. Occasionally, the depth sounder will take a few extra seconds to show depths
6. Turn the shore power breaker off in the pilothouse.
7. Turn the dock breaker off.
8. Disconnect the shore power cord.
9. Assign crew members to their various positions.
10. Prepare the lines for undocking.
Pilothouse Layout
Backup engine controls should the levers
lose their connection to the engines.
The depth sounder transponder
is finicky. Please turn on all
these electronics in this order to
ensure proper operation.
6 | P a g e
The Engine Electric Display Module (EDM)
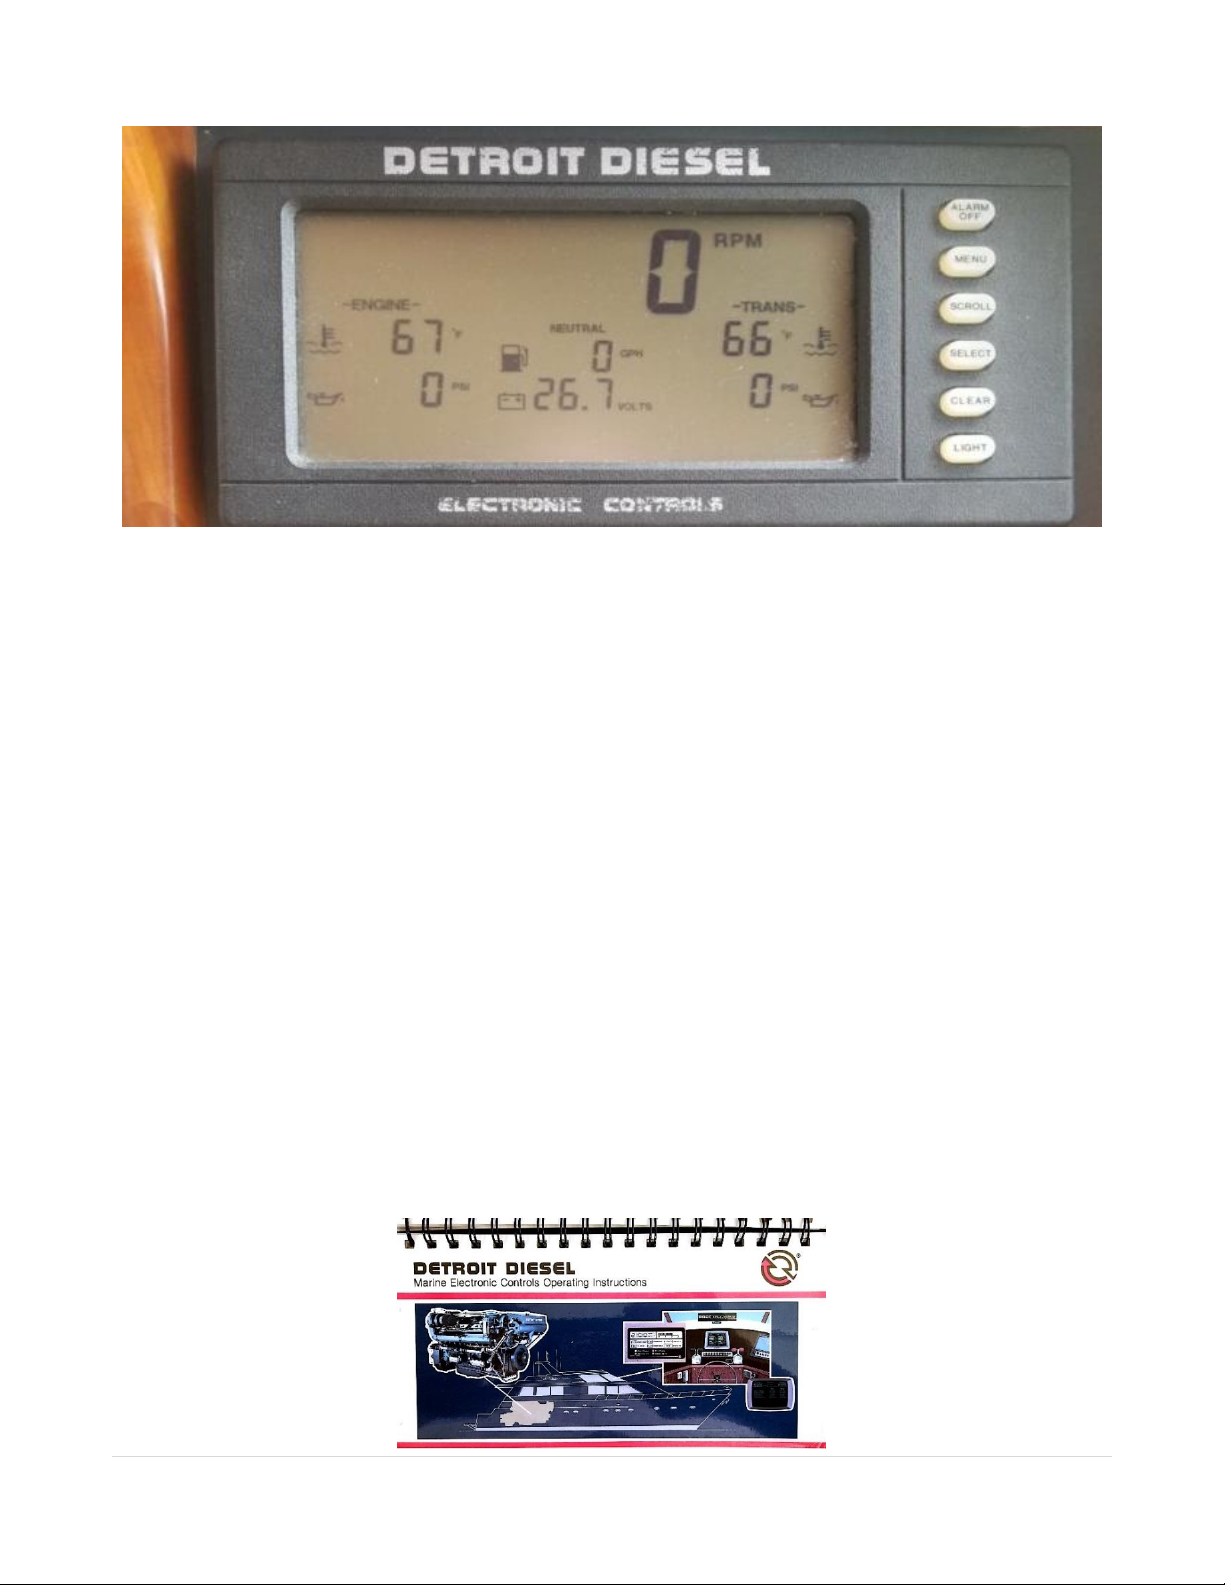
1. The EDM turns on automatically with the engine ignition key. It shows the following:
•RPMs.
•Coolant temperature.
•Oil pressure.
•Fuel consumption rate.
•Battery voltage.
•Transmission oil temperature and pressure.
•Gear direction (ahead –neutral –astern).
2. Key pad menu items
•Alarm off –turns off audible alarm.
•Menu –accesses 4 separate menus.
•Scroll –jumps to next choice in menu.
•Select –use to select topic or option.
•Clear –exit menu item to the next higher menu level.
•Light –turns on backlight –4 intensity levels –push button for the desired intensity.
3. Alarm Conditions
•Audible alarm sounds.
•Upper left corner of EDM displays a “check” item.
•If you see STOP CHECK ENGINE, you must turn off the engines.
•Please call AYC for what to do next.
(See Detroit Diesel Operating Manuel in Pilothouse chart drawer for More Information)

7 | P a g e
Engine Start-up
1. Detroit Diesels only need a 5 to 6-minute warm-up. The LO IDLE feature will not work until
the engines’ temperature reaches 105° +/-. Long idle periods are not good for these engines.
2. Before starting the engine, complete engine inspection outlined above.
3. Make sure that the shift levers are in the neutral position.
4. Use the keys at the helm to start the engines.
5. Check to see cooling water is coming out the exhaust. (If water flow is not visible, turn off the
engine and check to see if the seawater intake seacock is open and the strainer is unclogged.)
6. With the engines running, press the red “STATION ACTIVE” button at the steering station you
will control the vessel from. A red LED will light up indicating the station is active.
7. To get underway, Move the levers to the forward or reverse idle detent position.
8. Normal idle is 700 RPMs and will yield a speed of 6 to 7 knots.
9. Press the LOW IDLE button for 400 RPMs and a speed of 4 knots.
10. Press the low idle button a second time to go to normal idle of 700 RPMs.
11. To avoid damage to the transmission, always pause the lever in idle position before shifting
between reverse and forward.
12. To increase speed, move the lever further forward of back.
13. Press the “SYNC” button to control both engines from the PORT LEVER.
14. To EXIT “SYNC”, put both levers in the IDLE position and then press the “SYNC” button.
15. DO NOT USE THE TROLL FUNCTION.
16. To CHANGE STEERING STATIONS, move the levers to idle. Go to the other station & place
those levers in idle. Now press the red “STATION ACTIVE” button to activate the station.
17. Observe the oil pressure gauges. They will register about 45 PSI. (If oil pressure drops below
15 psi, or if the alarm sounds, shut down engine and check the oil level).
18. Check the engine temperature gauges. It should slowly rise to 170ish degrees. (If water
temperature exceeds 212° F or if the alarm sounds, Move to a safe location, shut down engine
and determine the cause).
19. If you cannot determine the cause for any issue, call AYC for help.
WARNING: Never shift the lever between forward and reverse without first pausing in idle. Failure
to do this could result in damage to the transmission.
Important - put
the levers in
neutral when
changing
stations

8 | P a g e
Engine Shut Down
1. Engine “cool” down is bad for these engines.
2. Turn them off as soon as the boat is secured to the dock, mooring buoy, or anchored.
3. Ensure Lever is in ‘neutral’ position (straight up).
4. Using the key, turn the engines off. Cruising
1. Always cruise at a minimum of 1200 rpms (low rpms are harmful to the engines).
2. Maximum cruising speed is 2000 rpms.
3. Detroit Diesel estimates the following fuel consumption for both engines combined:
•1200 rpms 18 gallons per hour (typically 13 to 14 mph)
•1400 rpms 25 gallons per hour (typically 15 to 16 mph)
4. Use the trim tabs for maximum performance.
5. Make sure you move the trim tabs to the “UP” position before engine shut down.
Autopilot
1. Push STBY/OFF button to power up the autopilot. (It takes about 5 seconds to power up.
You will hear a tone).
2. In safe conditions, push the AUTOPILOT button to steer the current course.
3. ALWAYS KEEP A LOOKOUT FOR BOATS, DEADHEADS, LOGS, ETC.
4. To avoid objects in the water, push and HOLD the DODGE button to steer around object.
5. The DODGE button reacts quickly, practice using it before you need it.
6. Let go of the DODGE button and the autopilot will resume the previous course.
7. The large dial can be used to make slight course adjustments.
8. Please do not adjust or use the other buttons.

9 | P a g e
Fuel Gauge
1. The tank can be monitored from the pilothouse panel….
2. Turn on the gauge breaker in the DC panel.
3. The fuel fill tubes are located near the starboard pilothouse doors.

10 | P a g e
Boat Electrical Systems
Power is delivered to the boat through shore power, generator or the batteries.
Please see pictures of the breaker panel, showing the items reviewed below, at the end of this section.
Shore Power
1. The boat has two (2) 30-amp power cord systems.
2. Shore power is connected at the stern.
3. Each power cord has its own amp & volt monitor located in the pilothouse.
4. All cables and adapters are kept in the fly bridge deck box.
5. The deck box has all the “Y” adapters and pigtail adapters needed for nearly all situations.
6. The boat also has a 50-amp extension cord, if needed in the fly bridge deck box.
7. If the dock has 50 amp power, use the 30 amp to 50 amp ”Y” adapter (located in deck box).
8. Connect power as follows:
•Turn the individual AC breakers off in pilothouse to avoid a surge to the electrical system.
•Turn both main breakers off at the pilothouse.
•Make sure dockside breaker is off, then connect the cord, and turn on breaker.
•Turn main breakers on in the pilothouse.
•Turn on the individual AC breakers as needed.
9. Remember, fewer AC systems can be used if only 30-amp shore power is available.
10. Monitor the amp gauges to determine power usage.
11. Consider using the generator in low power situations.
Light switch.
Tabla de contenidos
Manuales populares de Bote de otras marcas

Raymarine
Raymarine ST70 Instrument Manual de usuario

Pro-Line Boats
Pro-Line Boats Pro Line 19 Sport Manual de usuario

Jeanneau
Jeanneau CAP CAMARAT 8.5 CC Manual de usuario

Tiara Yachts
Tiara Yachts C49 2024 Manual de usuario

Monterey Boats
Monterey Boats Sport Yacht 330 Manual de usuario

J
J 105 Manual de usuario

PURSUIT
PURSUIT OS 335 Manual de usuario

Boston Whaler
Boston Whaler CONQUEST 345 Manual de usuario

Jeanneau
Jeanneau SUN ODYSSEY 41 DS Manual de usuario

Meridian
Meridian 490 Pilothouse Manual de usuario

Advanced Elements
Advanced Elements AdvancedFrame Expedition AE1009 Manual de usuario

Robo Marine Indonesia
Robo Marine Indonesia GEOMAR Manual de usuario


