Caloric CVW206 Manual de usuario
RANGE HOOD / HOTTE DE VENTILATION
MODELS / MODÈLES: CVW206, CVW206B
INSTALLATION GUIDE / USE AND CARE MANUAL
INSTRUCTIONS D’INSTALLATION / GUIDE DE L’USAGER
Installer: Leave this manual with the homeowner.
Homeowner: Keep this guide for future reference
Installateur : Laissez ce manuel au propriétaire.
Propriétaire : Conservez ce guide pour référence ultérieure.
IMPORTANT: Read and save these instructions.
IMPORTANT: Lire et conserver ces instructions.

Contents
Introduction
2
Safety precautions
2 - 3
Installation
4 - 7
Installing the charcoal filer
8
Operation
9
Care and maintenance
10 - 11
Troubleshooting
12
Environmental protection
13
Service & Warranty
14

Introduction
Thank you for choosing this extractor hood.
To ensure that you get the best results from your new extractor, we
strongly suggest that you read this instruction manual thoroughly before
use.If treated with care, your extractor should give you years of trouble-
free use
To register ownership, please ensure you complete and return the
guarantee card supplied with the appliance.
This instruction manual is designed to provide you with all required
informationrelatedto the installation,use and maintenanceof the appliance.
These cooker hoods are designed to extract unpleasant odours from the
kitchen; they are not intended to extract steam.
In order to operate the unit correctly and safety, please read this
instruction manual carefully before installation and use.
The cooker hood uses high quality materials and is made with a
streamlined design. Equipped with an electric motor and centrifugal fan, it
provides strong extraction with low noise. It also features non-stick grease
filters and an easy installation.
Safety precautions
- Never let the children operate the machine.
- The cooker hood is for home use only, not suitable for barbecuing,
restaurants, or other commercial purposes.
- The cooker hood and its filter should be cleaned regularly in order to
keep in good working condition.
- Clean the cooker hood according to the instruction manual to reduce
the risk of fire.
- When using a gas hob, do not leave naked flames under the
extractor.
- Before connecting this appliance check that the power supply cord is
not damaged. A damage supply cord must be replaced by qualified
service personnel only. Please contact the service department.
2

Safety precautions, Continued
- If the room where the hood is to be used contains a fuel burning
appliance such as a central heating boiler then its flue must be of the
sealed or balanced flue type. If other types of flue or appliances are
fitted ensure that there is an adequate supply of air to the room.
- The air must not be discharged into a flue that is used for
exhausting fumes from appliances burning gas or other fuels.
- Regulations concerning the discharge of air must be conformed to.
- This appliance if not intended for use by persons (including children) with
reduced physical, sensory or mental capabilities, or lack of experience
and knowledge, unless they have been given supervision or instruction
concerning use of the appliance by a person slide for their safety.
- Children should be supervised to ensure that they do not play with
the appliance.
- Do not flambé under the cooker hood.
- Never leave frying pans unattended during use as over-heated fats
and oils may catch fire.
- To ensure the best performance, we recommend switching on the
extractor 15 minutes before cooking and leave it running 15 minutes
after. This will ensure that the air in the kitchen is being circulated
before cooking commences and the air is being cleaned after cooking
has finished.
- The performance of your extractor will vary depending on several
factors. These include type of extraction, room volume, length of
ducting, ventilation available and the cleanliness of the filters.
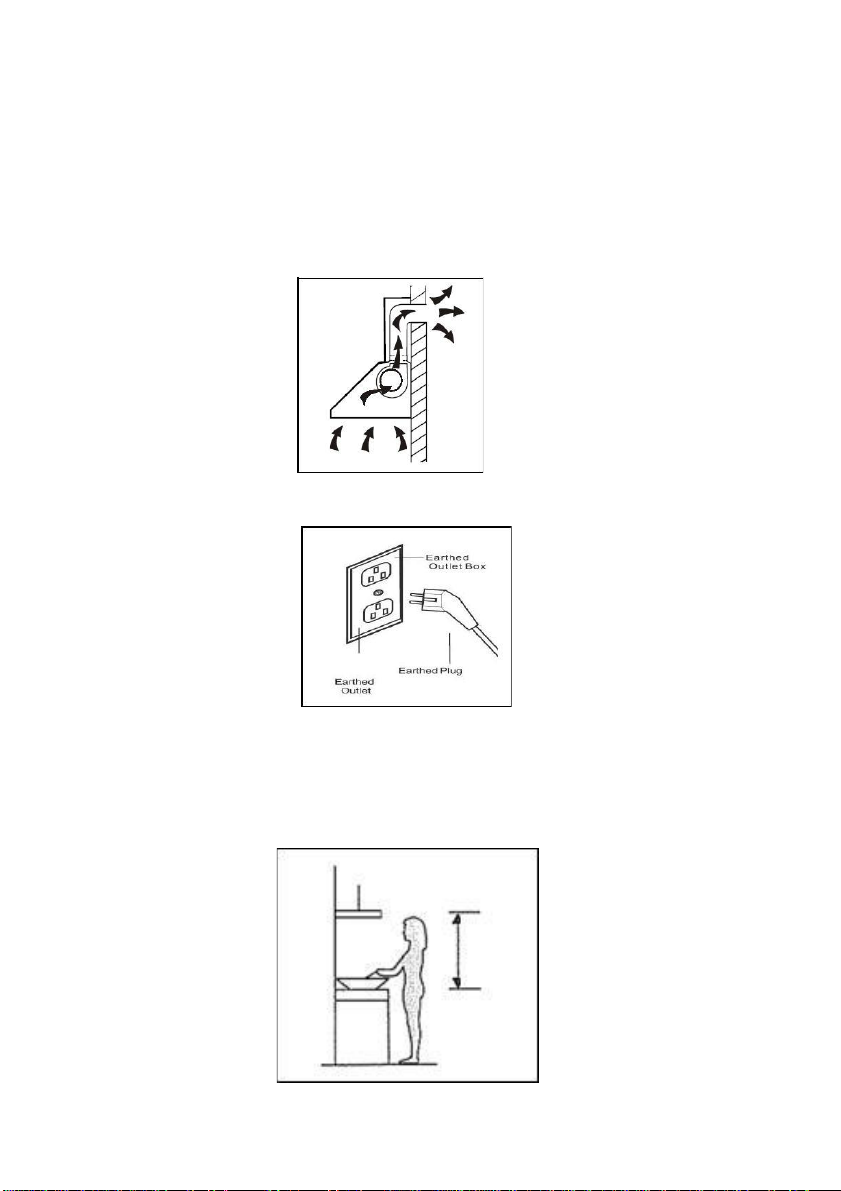
Electrical shock hazard
- Only plug this unit into a properly earthed outlet. If in doubt seek
advice from a suitably qualified engineer.
- Failure to follow these instructions can result in death, fire, or
electrical shock.
3
Installation
Prepare for the installation:
a. If you have an outlet to the outside, your cooker hood can be connected
as per the below picture by means of an extraction duct with an
interior diameter of 150mm.
b. Before installation, turn the unit off and unplug it from the outlet.
c. The cooker hood should be placed at a minimum distance of 65~76cm above
the hob. It is the manufacturer of the hob who determines the clearance
required and the clearance quoted by the hob manufacturer must be followed.
In the absence of any instructions supplied with a gas hob the minimum
distance between the hob and the hood must be at least 760mm.
65cm
- 76cm
4
Installation –ducted
Attention! Observe the warning concerning the operation of the
appliance when air is discharged from the room.
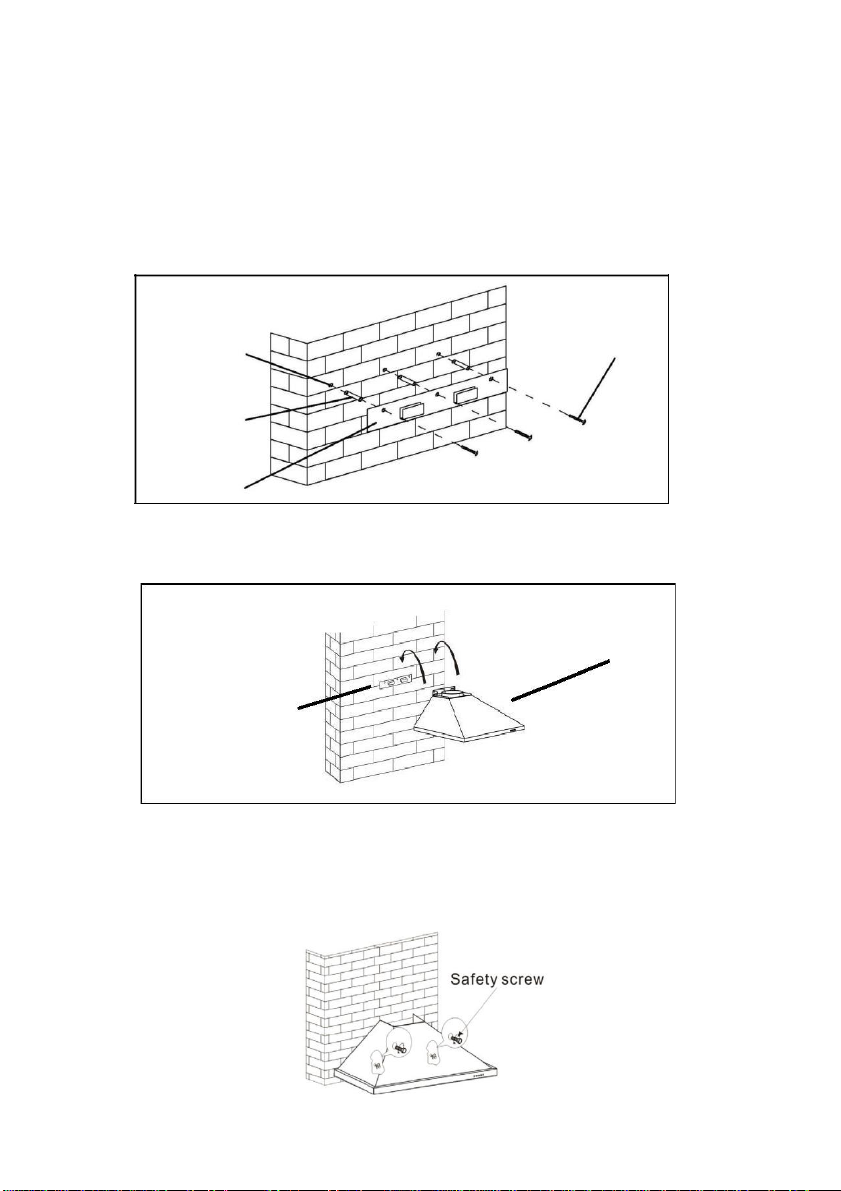
Drill 3 x 8mm holes to accommodate the bracket. Screw and tighten the
bracket onto the wall with the screws and screw plugs provided.
Holes on wall
Screw
(4mm x 30mm)
Screw plug
Wall bracket
Lift up the cooker hood and hang it onto the wall bracket hooks.
Cooker hood
Wall bracket
After hanging the hood on the bracket, remove the Alu Filters or Panel, mark
2 holes inside the hood for safety screws. After marking, remove
the hood ,drill two holes and insert 2 pcs of Wall Plugs and finally
fix the safety screws with 2 screws ST4x30mm
5

Fix the one-way-valve to the air outlet of the cooker hood. Then, attach
the exhaust pipe to the one-way-valve as shown below.
Exhaust pipe
Cooker hood
Chimney installation.
Place the upper chimney into the lower chimney.
Use 2 pcs ST4x8mm screws to attach lower and upper chimney together.
Before attaching the bracket to the chimney, decide the location of lower
chimney bracket fixing holes for fixing the lower chimney bracket in the
later steps.
Do not fasten screws too much, make sure upper chimney can
be telescopically adjusted after assembled.
6

Drill 2 holes to accommodate the plate II. Screw and tighten
the plate II onto the wall with two screws and wall. plugs provided
Slide up the upper chimney and fix the upper chimney with plate
II with 2 screws ST4x8mm
Fix the lower chimney with the hood with 2 screws ST4x8mm
7

Installation –recirculation mode
If you do not have an outlet to the outside, the exhaust pipe is not
required (as shown in the section “Installation - ducted”).
Installing the charcoal filter
An activated charcoal filter can be used to trap odours.
In order to install the charcoal filter, the grease filter should be
detached first. Press the lock and pull it downward.
Fit the activated charcoal filter onto the side of the motor and turn it in
a clockwise direction. Repeat the same on the other side.
NOTE:
- Make sure the filter is securely locked in position. Otherwise, it
may loosen and become dangerous.
- When the charcoal filter is attached, the extraction power may
be slightly reduced.
8

Operation
Touch control
On/Off button
It is used for turning on/off the fan.
Speed plus button
For increasing the speed of the fan
Speed decrease button
For decreasing the speed of the fan.
Light button
Digital display
Fan speed display:"1" for Low speed, "2" for Medium speed,
"3" for High speed.
Quick timer: Press & hold for 1 second, Digital display
will flashing & into 5 minutes count down, after 5 minutes
motor & light will turn off automatic & Buzzer sound for 1
second.
9
Este manual sirve para los siguientes modelos
1
Tabla de contenidos
Otros manuales de Campana de ventilación de Caloric

Caloric
Caloric CVW102 Manual de usuario

Caloric
Caloric CVI28-SS Manual de usuario

Caloric
Caloric CVWSV30Z-SS Especificaciones técnicas

Caloric
Caloric CVU306C-SS Especificaciones técnicas

Caloric
Caloric CVW502 Manual de usuario

Caloric
Caloric CVWSV30F-SS Especificaciones técnicas

Caloric
Caloric CVP1030-SS Manual de usuario

Caloric
Caloric CVU306C-SS Manual de usuario


