Caldertech Uniprep 1 Manual de usuario

Designed and Manufactured in the UK
Uniprep 1 + 2
Rotary Scraping Tools
Operating Instructions
Product Code: 01-02-001, 01-02-002
01-03-001, 01-03-002
Revision: 2

© Copyright Caldervale Technology Ltd.
The copyright for this product and instruction manual is held by Caldervale Technology Ltd.
Any technical specifications, or illustrations part of this manual cannot be reproduced, used
illicitly or distributed in any form for competitive purposes.
Helping you
make the right
connections.

Operating Instructions Uniprep 1 + 2 Rotary Scraping Tools
01
Page
Contents
Contents
01. Introduction 02
02. Safety Instructions 03
03. Operation 04
04. Removal After Completion 06
05. Specifications 07
06. Parts Diagram 08
07. Warranty Information 10
08. Certificate of Conformity 12
09. Service and Repair 13
10. Decommissioning and Disposal 13

Operating Instructions Uniprep 1 + 2 Rotary Scraping Tools
02
01. Introduction
Introduction
General Description
The pipe preparation tool is designed to provide a fusible surface
on any polyethylene pipe material (new, weathered or previously
installed). In accordance with Gas Industry Standards GIS/PL2-5 Part 5
Electrofusion ancillary tools.
Important!
This tool should be used in accordance with the pipe manufacturers’
recommendations and in line with local codes of practice.
This manual outlines the operation of the pipe surface preparation
tooling for the scraping of polyethylene (PE) pipe and forms a part
of the product to which it relates. It should be kept for the life of the
product. Any amendments issued by Caldervale Technology Ltd should
be incorporated in the text. The manual should be passed to any
subsequent holder or user of this product.
Before Using
It is important to ensure all component parts are present and in
serviceable condition. In addition, the condition of the cutting / peeling
tip should be checked for damage or excessive wearing.
01.
These products (Uniprep 1 + 2 Rotary Scraping Tools) have been
manufactured, inspected and tested in accordance with the ISO9001
quality control systems and procedures in place at Caldervale
Technology Ltd, Dewsbury.

Operating Instructions Uniprep 1 + 2 Rotary Scraping Tools
03
02. Safety Instructions
Safety Instructions
1. Read and understand the whole instruction booklet before using the
tool.
2. It is imperative that all possible precautions are made to avoid
unexpected pipe movement when the tool is being used.
3. Never use the tool on pipes that are not within the specified
dimensions.
4. The tool tip holder spring tension is factory set and MUST NOT be
tampered with, without adequate training or instruction.
5. Operatives should wear eye protection, gloves, safety headwear and
footwear when using the equipment.
6. A single scrape / pass cannot be guaranteed to provide 100%
preparation, where this is required users are advised to consider
making 2 scrapes around the pipe.
02.

Operating Instructions Uniprep 1 + 2 Rotary Scraping Tools
04
03. Operation
Operation
03.
2
34
9
5
7
8
10
6
1
Instructions for use
1. Ensure that the pipe end is cut square (No more than 2° out of
square), is free of burrs and the section to be scraped does not have
any deep scores.
2. Mark the pipe outer wall at a point 50% of the length of the coupler
plus 10mm.
3. Release the tool post cartridge by loosening the tool post
adjustment nut (5), position the tool post cartridge (3) to its highest
position and temporarily retighten (5).
4. Lower the underarm (8) by unscrewing the wing nut (11) which will
allow you to push underarm (8) forward against the spring allowing
you to lower the arm (8) down the ladder rack (1).
11

Operating Instructions Uniprep 1 + 2 Rotary Scraping Tools
05
03. Operation
5. Position the scraper onto the pipe with the tool resting on the axle
wheels and with the undercarriage (7) inside the bore of the pipe.
The end of the pipe should touch the pipe stop (9).
6. Fix the tool in its operating position by pushing & lifting the under
arm (8) back up the ladder (1) until the undercarriage wheels are
touching against the inner wall of the pipe, now screw in wing nut
(11) until the wheels on the undercarriage (7) are firmly in contact
with the pipe wall.
7. Slowly rotate the scraper around the pipe 2 or 3 times to ensure that
it is positioned correctly adjusting the underarm clamping screw (11)
to ensure a secure but at the same time ease of rotation.
8. Pull and twist a quarter turn the quick release thumb nut (4) to
allow the tool post carriage to move freely along the feed screw
(10). Remove the protection cap from the cutter (6) and position the
cutter (6) above the mark previously made on the pipe indicating the
length or scrape required, a further quarter turn of the thumb nut (4)
will engage the feed screw-drive nut with the feed screw (10).
9. Pull & twist a quarter turn the cutter lifting thumb nut (2) to lift
the cutter tip up, this also applies pressure via the tool tip spring.
Release the tool post adjustment nut (5) and slide the tool post (3)
down until the cutter is approximately 1mm from the pipe wall
surface, now retighten the tool post adjustment nut (5) to fix the
tool post in its correct operating position.
10. A further quarter turn of the cutter lifting thumb nut (2) will lower the
cutter on to the pipe wall surface and the correct pressure will be
applied to the tip (6) via the tool tip spring.
11. Rotate the scraping tool around the pipe in a steady clockwise
direction. The cutter will travel towards the pipe end removing a
continuous strip of PE the process may be halted from time to time
to remove surplus peel.

Operating Instructions Uniprep 1 + 2 Rotary Scraping Tools
06
04. Removal After Completion
Removal After Completion
1. On completion, the scraped section should be inspected for areas of
un-scraped pipe. If necessary, the pipe can be scraped again.
2. To remove the scraper, loosen the tool post locking screw (5) and
raise the tool post clear of the pipe and retighten (5). Loosen the
underarm pressure screw (11) to release the undercarriage wheels
and remove the scraper from the pipe. Refit the protective cover to
the cutter tip when not in use.
Storage
IMPORTANT! When not in use always:
1. Store the tool in the tool box.
2. Ensure the tool tip tension is released.
3. Ensure the tool is clean and dry before storage.
Routine Maintenance
1. Check for correct movement and operation and lubricate moving
parts at regular intervals before using.
2. It is important to ensure all component parts are present and in
serviceable condition. In addition, the condition of the cutting /
peeling tip should be checked for damage or excessive wearing.
3. The cutter tip can be replaced. Spares are indicated in the parts
diagram.
04.

Operating Instructions Uniprep 1 + 2 Rotary Scraping Tools
07
05. Specifications
Specifications
Materials: Mild Steel EN3A, Stainless Steel,
Aluminum, Brass and Tungsten Carbide
Finish: Natural / Zinc passivate to mild steel
Dimensions: Uniprep 1: L390 x W160 x H260mm
Uniprep 2: L420 x W160 x H270mm
Depth of Cut: 0.3mm
Max Scrape Length:
feed per rotation 4.5mm
Min - Max Pipe Size: Uniprep 1: 90 - 400mm All SDR Ratings
Uniprep 2: 125 - 500mm All SDR Ratings
Weight: Uniprep 1: 3.6kg
Uniprep 2: 3.8kg
Product Codes: Uniprep 1: 01-02-001, 01-02-002
Uniprep 2: 01-03-001, 01-03-002
This unit is design and manufactured to meet the requirements of
National Grid Gas Industry Standards GIS/PL2-5 Part 5 Electrofusion
ancillary tooling.
Caldervale Technology Ltd has a policy of continuous improvement
in product quality and design. Caldervale Technology Ltd therefore
reserves the right to change the specification of its models at any time,
without prior notice.
It is the responsibility of the operator to ensure that the PE pipe
is suitable for pipe preparation if in doubt contact the PE pipe
manufacturer for confirmation.
05.
Uniprep 1: 150mm
Uniprep 2: 175mm
Operating Instructions Uniprep 1 + 2 Rotary Scraping Tools
08
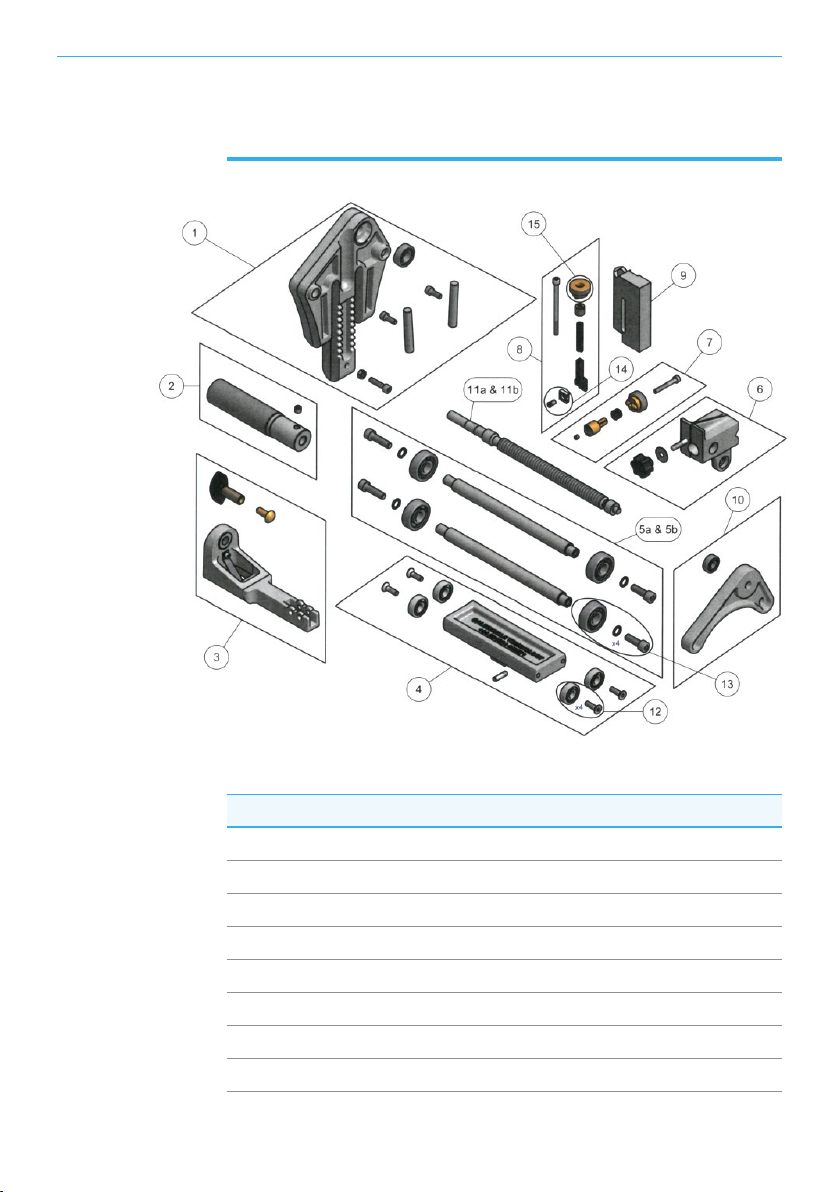
Parts Diagram
06.
Part Product Code Description
1 01-02-071 Body Repair kit
2 01-02-072 Handle Repair Kit
3 01-02-073 Underarm Repair Kit
4 01-02-074 Undercarriage Repair kit
5a 01-02-075 Axel Repair Kit 400 Uniprep 1
5b 01-02-078 Axel Repair Kit 500 Uniprep 2
6 01-02-076 Toolpost Carriage Repair Kit
7 01-02-077 Quick Release Button Repair Kit
06. Parts Diagram
Este manual sirve para los siguientes modelos
1
Tabla de contenidos
Otros manuales de Herramientas de Caldertech


