Cactus V6 II Manual de usuario

Table of Contents
1. Getting to Know the Cactus V6 II
2. Cautions and Warnings
3. Major Specifications
4. Package Contents
5.Nomenclature
6.LCDPanel
7.Compatibility
8. TTL Pass-through
9. Getting Started
10. Camera System: Auto Detect and Learning
11. Flash Profile: Auto Detect and Customization
12. Flash Triggering
13. Remote Manual Power Control
14. High Speed Synchronization
15. Camera Shutter Release
16. Advanced Operations
17. Personalizing the V6
18. Working with Cactus Gear
19. LED Signal Guide
20. USB Connection
21. Optional Accessories
22. Troubleshooting
23.Notices
24.Warranty
1. Getting to Know the Cactus V6 II
Thank you for purchasing the Cactus Wireless Flash Transceiver V6 II. Compared with
its predecessor V6, the Cactus V6 II allows you to command different brands’ flashes
off camera below or above x-sync speed. The freedom to adjust shutter speed equips
you the best flexibility in controlling apertures and power levels – the possibility are
endless!
1.1 Special Features
1. Cross-brand wireless manual power control of Canon, Fujifilm, Nikon, Olympus,
Panasonic, and Pentax flashes;

2. Two cross-brand high-speed sync modes: Normal HSS and Power Sync;
- Normal HSS supports shutter speeds up to 1/8000s;
- Power Sync boosts flash contribution above x-sync shutter;
3. Rear curtain sync and slow sync supported;
4. Multi-master supports up to 16 photographers firing the same set of flashes at
their own power setting;
5. AF-assist LED illuminates focusing blind spot when needed;
6. Flash specific profiles with calibrated power levels for many current and previous
flash models;
7. User calibration of flash profiles to ensure accurate power output;
8. Lo Power mode fires the flash for extremely short lengths of time;
9. Absolute Power mode benchmarks the power output of different flash models to
the same light intensity;
10. TTL pass-through with Canon, Nikon, Fujifilm, Olympus, Panasonic and Pentax via
one single unit;
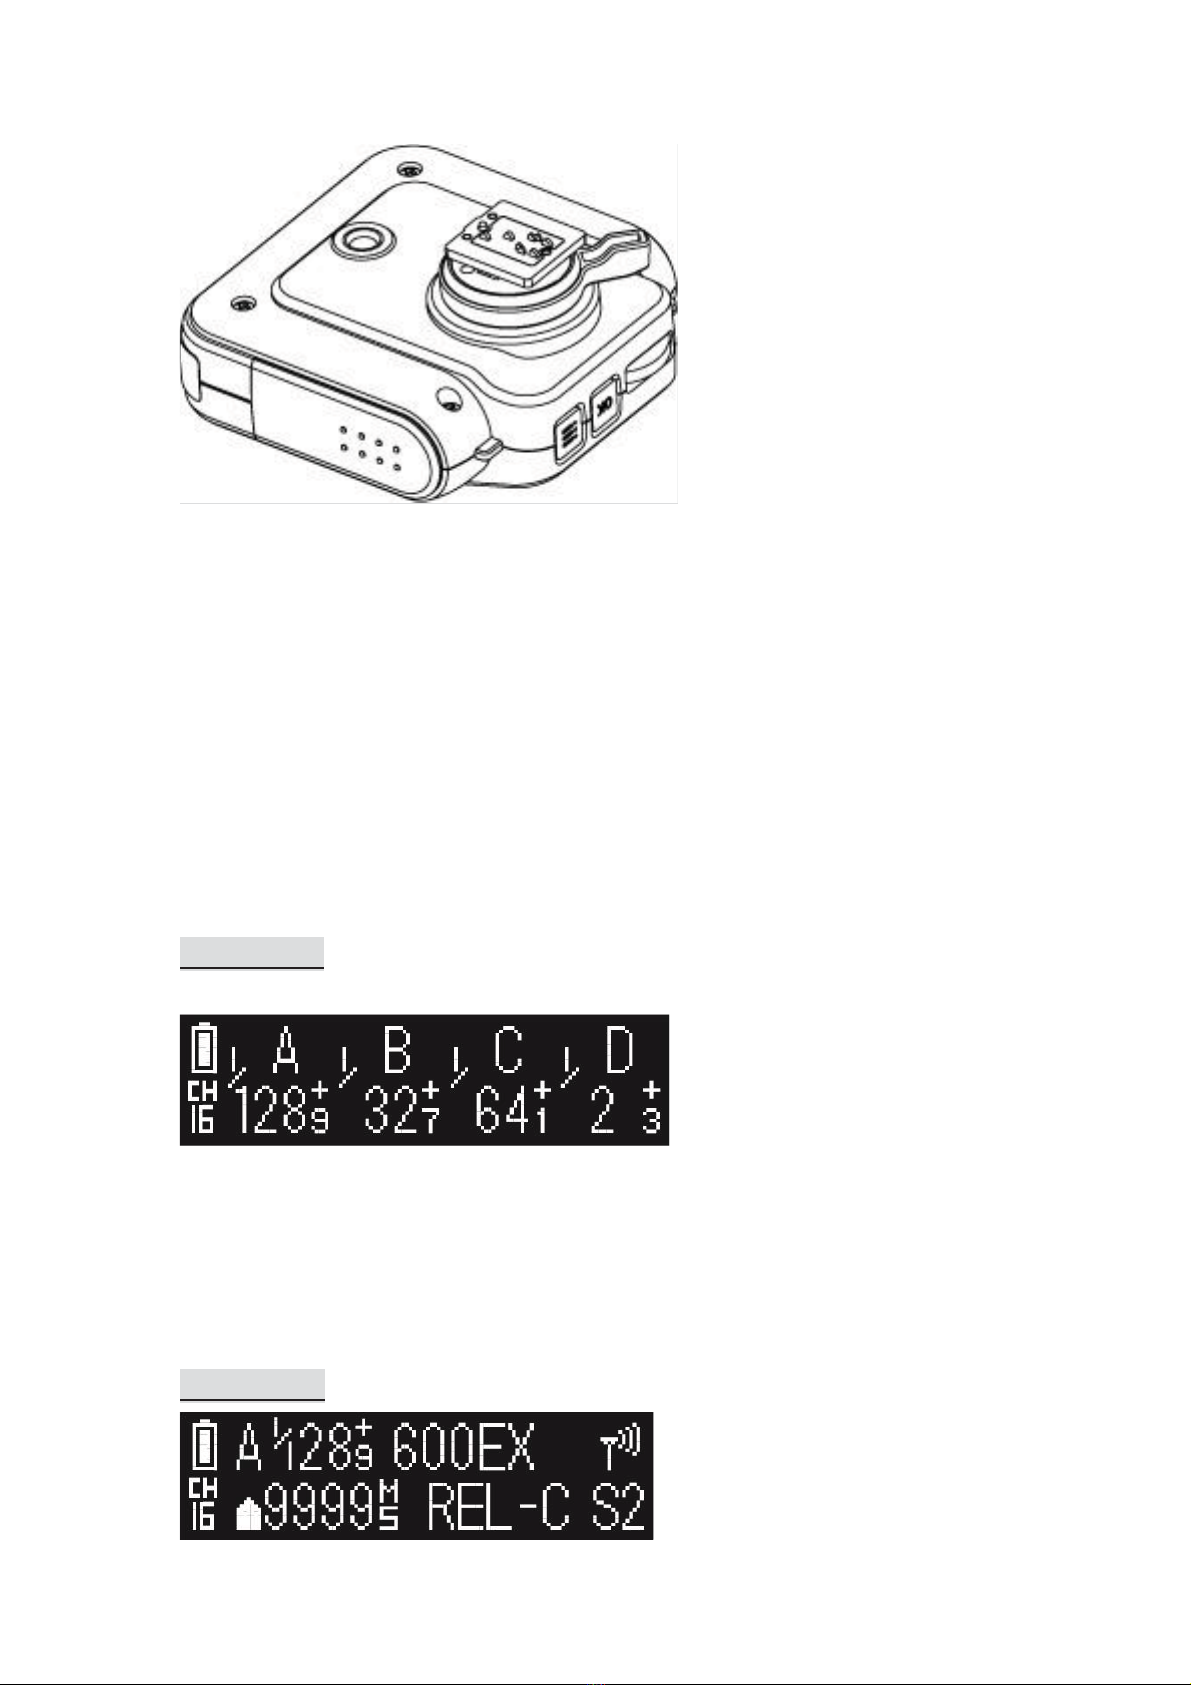
11. Group control allows you to control up to four groups;
12. Relay mode triggers the camera shutter and flash in sync;
13. Delay mode is configurable from 1 millisecond to 999 seconds;
14. Mini-USB port for optional power supply and firmware update;
1.2 HSS and Power Sync Capabilities
Most cameras supports normal flash sync up to its x-synchronization shutter speed
(commonly between 1/160 seconds and 1/250 seconds). Beyond this shutter speed,
the cameras and the system flashes will behave differently. The high-speed sync,
which is also known as the HSS or FP sync, has to be enabled on the system flash in
order to synchronize the flash light with the camera beyond the x-sync shutter.
Cactus V6 II supports cross-brand high-speed sync in two ways:
1. Normal HSS: It supports the HSS or FP sync capabilities of the system flashes.
While it allows user to adjust power levels, the flash exposure is much lower than
the normal flash sync.
2. Power Sync: It syncs with the full power flash pulse without compromises on the
flash exposure. While it does not allow power level adjustment, the flash
exposure is much higher than the normal HSS mode.
1.3 Auto and Model-Specific Flash Profiles

Each flash model has its individual power level characteristics. In V6 II, we have
profiled them in two ways:
1. System-specific Auto Flash Profiles: The V6 II can auto detect the camera system
of the connected flash and activate the ‘Auto’ profile that will work with all flash
models of the same camera system;
2. Model-specific Profiles: For more accurate power output, users can choose from
the V6 II menu the flash profile that would work perfectly with the specific flash
model.
We have profiled more than 40 popular flash models across a wide range of brands
so that the V6 II can precisely control their output levels. With this unique feature,
photographers can remotely control the flash power of various flash models, even of
different brands!
For flash models that have not been included in the profile list, the V6 II can still work
with it by the auto flash profiles. Users could further calibrate the flash profiles in the
Cactus Firmware Updater to produce more accurate power outputs.
Whether built-in or calibrated from the firmware updater software, the flash profile
stored in the V6 II can virtually command the flash to produce ANY power level
within the maximum output, and even exceeds what the flash menu allows you to
do:
1. Finer increment scales: The V6 can adjust the power level of flash to 1/10 EV
step, a much finer increment level than the flash menu itself allows (see Section
12.3 for setting up the EV step).
2. Extremely short firing time: In Lo Power mode, the V6 can f ire flashes for very
short lengths of time at extremely low power levels (roughly equal to 1/256),
which is beyond the standard flash power range (see Section 12.4 for enabling
the Lo Power output).
3. Unified power level scale for different flash models: The V6 benchmarks the light
intensity output of different flash models in your set up and commands them to
fire at the same power scale (see Section 12.2 for adjusting absolute power).
Ready to go? Let’s get on board and see what the V6 II can do!

2. Cautions and Warnings
Before using your V6, read the following safety precautions to ensure correct and
safe use:
1. Turn OFF all your equipment (e.g., Cactus units, flash units, cameras, etc.) before
changing batteries or making connections. Observe the correct polarity when
changing batteries. There is a danger of explosion if the batteries are installed
incorrectly.
2. Switch off the transceiver and remove batteries during storage.
3. Do not permanently store the product in a high temperature environment (i.e.,
under strong direct sunlight, near cooking stoves/oven).
4. The Cactus V6 II should never be submerged in liquid or exposed to heavy rain
unless it is properly protected.
5. Do not operate the device in the presence of flammable gases or fumes.
6. Do not dissemble.
7. Do not crush and do not expose the V6 II to any shock or force such as
hammering, dropping, or stepping on it.
3. Major Specifications
yWorking radio frequency:2445.80-2480.99MHz
yNumber of channels: 16
yNumber of groups: 4
ySupport sync speed up to 1/8,000 second
yHigh-speed sync modes: Normal HSS, Power Sync
yMaximum effective distance: 100 meters
yOperating temperature: -20°C to +50°C
yCamera voltage handling: up to 6V
yFlash voltage handling: up to 300V
yDimensions: 72mm (L) x 72mm (W) x 42 mm (H)
yWeight: 68g
yPower input: 2 x AA battery, 3V, 50mA, 0.15W; mini USB 2.0, DC input 5V,
500mA~1A
yEstimated battery life in hours (with LCD backlight on):
Alkaline AA Batteries
1000mAh
Rechargeable NiMH AA
Batteries 2500mAh
TX
RX
TX
RX

55
31
61
34
4. Package Contents
(image) V6 II Transceiver
(image) Flash Stand FS-2
(image) Album & User Manual
5. Nomenclature
TEST BUTTON/ SHUTTER RELEASE BUTTON
MULTI-SYSTEM SHOE (FEMALE)
LCD DISPLAY
LANYARD LOOP
X-SYNC PORT
MINI USB PORT
MODE SWITCH
GROUP BUTTONS
AF ASSIST LIGHT

TRIPOD MOUNT
MULTI-SYSTEM SHOE (MALE)
HOT SHOE LOCK LEVER
SELECTION DIAL
OK BUTTON
MENU BUTTON
LED STATUS INDICATOR
BATTERY DOOR
6. LCD Panel
6.1 TX Mode
BATTERY INDICATOR
GROUP
CHANNEL
POWER LEVEL
POWER LEVEL INCREMENT
6.2 RX Mode

BATTERY INDICATOR
GROUP
POWER LEVEL
POWER LEVEL INCREMENT
SELECTED FLASH PROFILE
WIRELESS SENSITIVITY
CHANNEL
DELAY TIMER
RELAY MODE INDICATOR
SLAVE MODE INDICATOR
7. Compatibility
The Cactus V6 II is both a wireless flash trigger and wireless remote control. While it
triggers both portable flashes and studio strobe lights, it also supports remote
control features with selected flash models.
7.1 Flash & Studio Strobes
7.1.1 Cactus RF60x / RF60
With the built-in Cactus V6 module, the Cactus RF60 series can be remotely
commanded and triggered by V6 II TX (see Section 16.1.1).
7.1.2 Flash Models with Digital TTL Mode:
zCanon e-TTL
zFujifilm TTL
zNikon i-TTL
zOlympus / Panasonic TTL
zPentax TTL
7.1.3 Other Flash Models and Studio Strobes
The Cactus V6 II triggers all other flash models via the hot shoe, and studio strobes
with the PC sync male port, 3.5mm or 6.35mm port via optional cables (see Section
19). This includes high trigger voltage portable flash models, and all strobe models
with a trigger voltage of 300V or under. The Cactus V6 II does not provide remote
power control of these flashes and strobes.

For studio flashes to work with high-speed sync, they have to maintain a flash
duration of 1/100 second or longer.
Caution:
Flashes or strobes with reversed polarity connectors DO NOT WORK with the Cactus
V6 series.
7.2 Cameras
The Cactus V6 II works with practically all cameras that come with either (1) a
standard ISO hot shoe, or (2) a female sync port connection.
For the high-speed sync and the AF assist capabilities, the V6 II would support
cameras from Canon, Nikon, Olympus, Panasonic and Pentax that (1) comes with
their specific system hot shoes, and (2) equipped with the same features with their
system flashes. The V6 II supports HSS adaptation
To use the V6 II as a wireless shutter release, specific shutter cables are required. For
the list of optional accessories, see Section 19.
7.3 Flash Triggers
7.3.1 Cactus V6
The Cactus V6 II is compatible with the Wireless Flash Transceiver V6, V5 and Laser
Trigger LV5. See Section 16.2 for details.
7.3.2 Other Flash Triggers
The Cactus V6 II is NOT compatible with any other flash trigger model, including the
Cactus V2, Cactus V2s, and Cactus V4.
8. TTL Pass-through

The V6 II transceiver comes with a multi-system shoe that supports TTL pass-
through.
While the V6 II does not command slave flashes to fire TTL exposures wirelessly, it is
designed to pass TTL signal from camera to flash via the transmitter (TX) and vice
versa.
The multi-system shoe supports TTL pass-through of Canon, Fujifilm, Nikon,
Olympus, Panasonic, and Pentax systems. Make sure that camera and flash unit
belong to the same TTL system.
With TTL pass-through, the TTL flashes behave as they would when directly
connected to the camera hot shoe. The V6 II will work as a wireless flash commander
while supporting all the automatic features (e.g., automatic flash output via TTL
metering, AF assist light, second curtain sync, high speed sync/FP shutter) provided
by the TTL flash system.
To enable TTL pass-through in the V6 TX II, press and hold for 2 seconds. The LCD
will show the TTL pass-through indicator at the left bottom corner where the channel
indicator used to be.
(image)
In TTL pass-through mode, the V6 II TX cannot control the power level of the flash
attached.
To disable the TTL pass-through mode, press and hold for 2 seconds. The TTL
pass-through indicator will be replaced by the channel indicator on the LCD.

9. Getting Started
9.1 Installing the Batteries
Open the battery door by pushing it backward. Flip open the latch and insert two AA
batteries using the correct polarities. Then close the battery door by pushing it to the
front.
9.2 Attaching to and Detaching from the Camera
To mount the V6 II on a camera’s hot shoe mount:
1. Turn the lock lever of the V6 II to the left to unlock the multi-system shoe (male).
2. Slide the V6 II into the camera’s hot shoe.
3. Turn the lock lever of the V6 II to the right to lock the multi-system shoe (male).
4. When detaching the V6 II from the camera’s hot shoe, turn the lock lever to the
left to unlock the multi-system shoe (male). Otherwise, the multi-system shoe
(male) may be damaged.
Note: Attach your flash to the V6 II as you would to the camera’s hot shoe. If your
Otros manuales para V6 II
1
Tabla de contenidos
Otros manuales de Transceptor de Cactus

Cactus
Cactus V6 IIs Manual de usuario

Cactus
Cactus V6 IIs Manual de usuario

Cactus
Cactus V6 IIs Manual de usuario

Cactus
Cactus V5 Manual de usuario

Cactus
Cactus Wireless Flash Transceiver V6 Manual de usuario

Cactus
Cactus V5 Manual de usuario

Cactus
Cactus V5 Manual de usuario

Cactus
Cactus V6 IIs Manual de usuario


