Buffalo APB CC190-A Manual de usuario

Water Boiler
Instruction manual
Model APB:
CC190-A/CC191-A/CC192-A/CC193-A

1
Safety Tips
• Position on a flat, stable surface.
• A service agent/qualified technician should carry out installation and any repairs if required. Do not
remove any components on this product.
• Consult Local and National Standards to comply with the following:
• Health and Safety at Work Legislation
• BS EN Codes of Practice
• Fire Precautions
• IEE Wiring Regulations
• Building Regulations
• Ensure the location for the appliance can support its weight when full.
• DO NOT immerse the appliance in water.
• DO NOT leave the machine unattended during operation.
• DO NOT operate this appliance when less than one third full.
• DO NOT touch the outer surfaces of the appliance. They become hot during use.
• Suitable for indoor use only.
• Always switch off and disconnect the power supply to the appliance when not in use.
• Keep all packaging away from children. Dispose of the packaging in accordance to the regulations of
local authorities.
• If the power cord is damaged, it must be replaced by an BUFFALO agent or a recommended qualified
technician in order to avoid a hazard.
•Please ensure that the tap is screwed fully on before use.
Product Description
•CC190-A - 10 litre Stainless Steel Water Boiler
•CC191-A - 20 litre Stainless Steel Water Boiler
•CC192-A - 30 litre Stainless Steel Water Boiler
•CC193-A - 40 litre Stainless Steel Water Boiler
Introduction
Please take a few moments to carefully read through this manual. Correct maintenance and operation of
this machine will provide the best possible performance from your BUFFALO product.
Pack Contents
The following is included:
•BUFFALOWaterBoiler
• Instruction manual
BUFFALO prides itself on quality and service, ensuring that at the time of packaging the contents are
supplied fully functional and free of damage.
Should you find any damage as a result of transit, please contact your BUFFALO dealer immediately.

2
Operation
1. Remove the appliance from the
packaging. Make sure that all protective
plastic film and plastic coatings are
thoroughly removed from all surfaces.
2. Ensure the Temperature Control knob is
set to ‘0’ and tthe power switch is ‘Off’.
3. Remove the lid and fill the appliance to
at least half of its capacity.
4. Replace the lid.
5. Connect to the mains power supply and
turn the power switch On. The Power
Indicator light illuminates.
6. Set the Temperature Control knob to
the required temperature. The Heat
Indicator illuminates and the appliance
heats the water.
7. When the water has reached the set temperature the Heat Indicator light turns Off.
Serving
1. Place a suitable vessel beneath the tap.
2. Pull the tap towards you to begin pouring.
3. Raise the tap handle to close the tap.
Emptying the Appliance
Drain the appliance by using the tap to empty.
Note: Before using for the first
time, clean the interior of the
appliance and all parts in
warm soapy water, then rinse
thoroughly.
WARNING: Reduce the set temperature if the the water begins to boil. DO NOT allow
the water to boil constantly.
Note: Once the water temperature drops 5-10ºC then the appliance will reheat the
water.
WARNING: If the Temperature Control Knob is set to or close to ‘100’ then the appliance
will constantly heat the water until the power switch is turned Off or the temperature
is reduced.
Lid
Handle
Tap
Temperature
Control knob
On/Off switch
Power Indicator light

3
Cleaning, Care & Maintenance
• Always turn off and disconnect the appliance from the power supply before cleaning.
• Use soapy water and a damp cloth to clean the exterior of the appliance.
•Drythoroughlyafter cleaning.
Descaling
In hard water areas lime scale can build up within the appliance after prolonged use. To descale the
appliance:
1. Pour a solution of descaler and water into the appliance.
2. Brush the interior gently with a soft bristled brush.
3. Discard the solution collected in the jug.
4. Fill the appliance with clean water and turn back On to flush out the system.
Flush out the system thoroughly to remove any descaler residue.
5. The appliance is now ready for use.
Tro u b l e s h o o t i n g
Note: Use a suitable descaler and always follow the instructions on the container.
BUFFALO recommend that this appliance is descaled every 3 months or more frequently
in hard water areas.
Fault Probable Cause Action
The unit is not
working
The unit is not switched on Check the unit is plugged in correctly and
switched on
Plug and lead are damaged Call BUFFALO agent or qualified technician
Fuse in the plug has blown Replace the plug fuse
Power supply Check power supply
Internal wiring fault Call BUFFALO agent or qualified technician
Power light
comes on but
water does not
reach
temperature
Thermostat fault Call BUFFALO agent or qualified technician
The tap is
leaking
The tap has become loose Tighten the tap handle
4
Technical Specifications
Electrical Wiring
The plug is to be connected to a suitable mains socket.
This appliance is wired as follows:
• Live wire (coloured brown) to terminal marked L
• Neutral wire (coloured blue) to terminal marked N
• Earth wire (coloured green/yellow) to terminal marked E
This appliance must be earthed, using a dedicated earthing circuit.
If in doubt consult a qualified electrician.
Electrical isolation points must be kept clear of any obstructions. In the event of any emergency
disconnection being required they must be readily accessible.
Compliance
The WEEE logo on this product or its documentation indicates that the product must not be
disposed of as household waste. To help prevent possible harm to human health and/or the
environment, the product must be disposed of in an approved and environmentally safe
recycling process. For further information on how to dispose of this product correctly, contact
the product supplier, or the local authority responsible for waste disposal in your area.
BUFFALO parts have undergone strict product testing in order to comply with regulatory
standards and specifications set by international, independent, and federal authorities.
BUFFALO products have been approved to carry the following symbol:
All rights reserved. No part of these instructions may be produced or transmitted in any form or by
any means, electronic, mechanical, photocopying, recording or otherwise, without the prior written permission of
BUFFALO.
Every effort is made to ensure all details are correct at the time of going to press, however, BUFFALO reserve the
right to change specifications without notice.
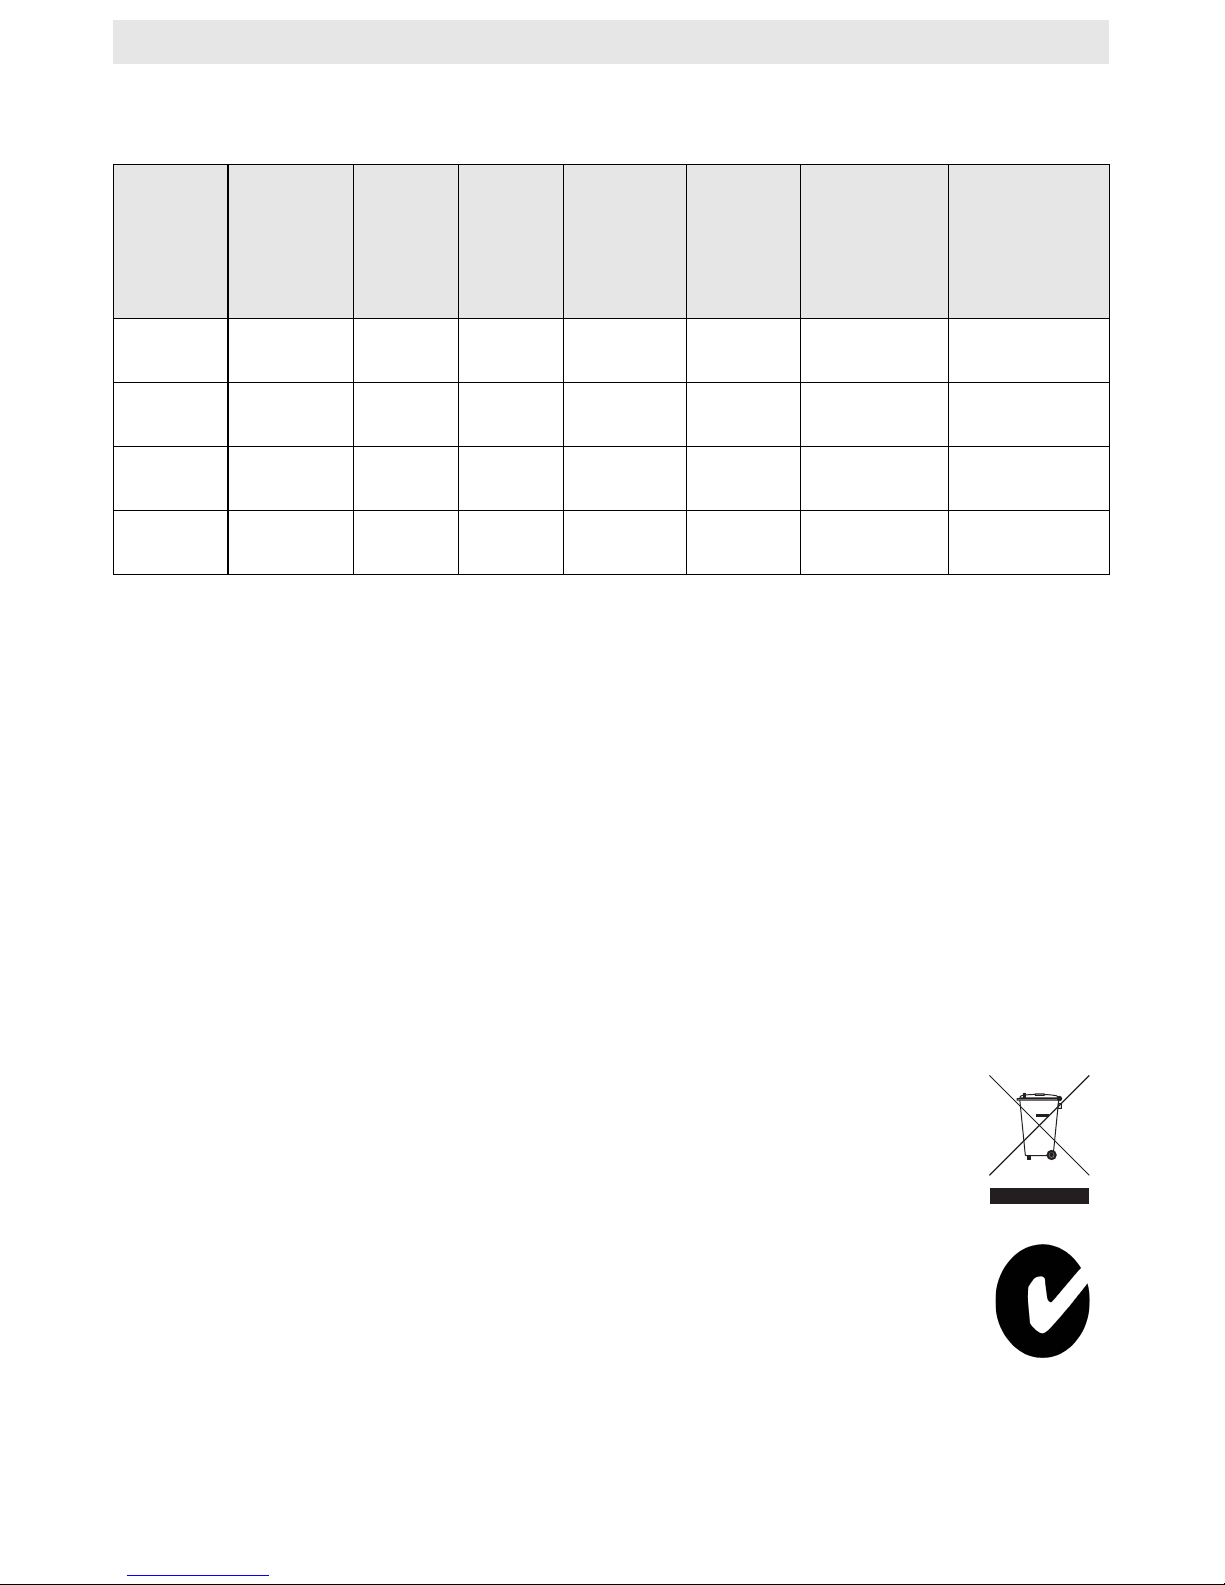
Model Voltage Power Current Capacity Weight
(full)
Approx.
Heating
Time (Max.
Temp. when
full)
Dimensions
h x w d mm
CC190-A 220-240V
50Hz
2400W 10A 10 litres 12.9kgs 25 minutes 480x280x280
CC191-A 220-240V
50Hz
2400W 10A 20 litres 24kgs 35 minutes 580x320x320
CC192-A 220-240V
50Hz
2400W 10A 30 litres 36.10kgs 60 minutes 490x435x435
CC193-A 220-240V
50Hz
2400W 10A 40 litres 46.9kgs 70 minutes 580x435x435

DECLARATION OF CONFORMITY
Equipment Type
Water Boiler
Model CC190-A/CC191-A/CC192-A/CC193-A
Serial Number
Year of Manufacture
Application of Council Directives(s) C-TICK
AS/NZ 3820 Essential Safety Requirements for Low
Voltage Electrical Equipment
Standards
Producers Name
BUFFALO
Producers Address
I, the undersigned, hereby declare that the equipment specified above conforms to the above Directive(s) and Standard(s).
Date 17/2/2011
Signature
Full Name Richard Cromwell
Position Marketing Director
Nisbets Australia PTY Ltd
Unit 2, 34/38 Anzac Ave
Smeaton Grange
NSW 2567
Australia
EN 55014-1:2000/A1:2001, EN 61000-3-2:2000,
EN61000-3-3:2095/A1:2001,
EN 55014-2:2097/A1:2001
AS/NZ 60335.2:2005+A1

• Notes

CC190_3_-A_A5_v2
Este manual sirve para los siguientes modelos
3
Tabla de contenidos
Otros manuales de Caldera de Buffalo


