Brookstone iConvert USB Turntable Manual de usuario

USB Turntable
THE EASIEST WAY TO CONVERT RECORDS TO DIGITAL FILES
iConvert®

1
TABLE OF CONTENTS
CautionsandWarnings..................................................2-3
LocationofControls.....................................................4-6
Operation.................................................................7
EZAudioConverterSoftware...........................................8-11
AudacitySoftware....................................................12-33
Troubleshooting.......................................................34-37
Compatibility.............................................................38
Specifications........................................................39-40
Warranty.............................................................41-42

2
CAUTION
TO REDUCE THE RISK OF ELECTRIC SHOCK, DO NOT REMOVE COVER.
THERE ARE NO SERVICEABLE PARTS INSIDE.
TO REDUCE THE RISK OF FIRE OR ELECTRIC SHOCK, DO NOT EXPOSE
THIS UNIT TO RAIN OR MOISTURE.
The lightning flash with arrow-head symbol within an equilateral triangle
is intended to alert the user to the presence of uninsulated “dangerous
voltage” within the unit’s enclosure that may be of sufficient magnitude
to constitute a risk of electric shock.
The exclamation point within an equilateral triangle is intended to alert
the user to the presence of important operating and maintenance
(servicing) instructions in the literature accompanying the unit.
IMPORTANT SAFETY INSTRUCTIONS
All the safety and operating instructions should be read, adhered to and followed
before the unit is operated.
•
•

DANGER
To reduce the risk of electric shock, burns, fire or injury:
Always unplug the unit from the electrical outlet immediately after using.
Do not use while bathing or in a shower.
Do not place or store unit where it can fall or be pulled into a tub or sink.
Do not place in or drop into water or other liquid.
Do not reach for a unit that has fallen into water. Unplug it immediately.
Care should be taken so that objects do not fall and liquids are not
spilled onto the unit.
Use only the included attachments or accessories. Other attachments
or accessories are not recommended by the manufacturer and may
damage the unit.
Connect the unit only to a power source as described in this manual.
Do not disassemble the unit. There are no serviceable parts.
Do not place the unit near heat sources such as radiators, heating
vents or direct sunlight.
Do not place the unit where there is moisture, rain, vibration, shock
or excessive dust.
Keep the unit dry.
1.
2.
3.
4.
5.
6.
7.
8.
9.
10.
11.
12.
3

LOCATION OF CONTROLS
Adapter
Platter
Tonearm Set
1.
2.
3.
Arm Lift Lever
Tonearm Lock
4.
5.
4
2
4
5
1
3

5
LOCATION OF CONTROLS
Dust Cover
Power Cord
USB Port
Signal Connectors
1.
2.
3.
4.
3 24
1

6
LOCATION OF CONTROLS
Foot (4)
Speed Indicators
Stop Button
1.
2.
3.
2
1 3

OPERATION
Select the speed for the record to be played by setting the SPEED
SELECT BUTTON.
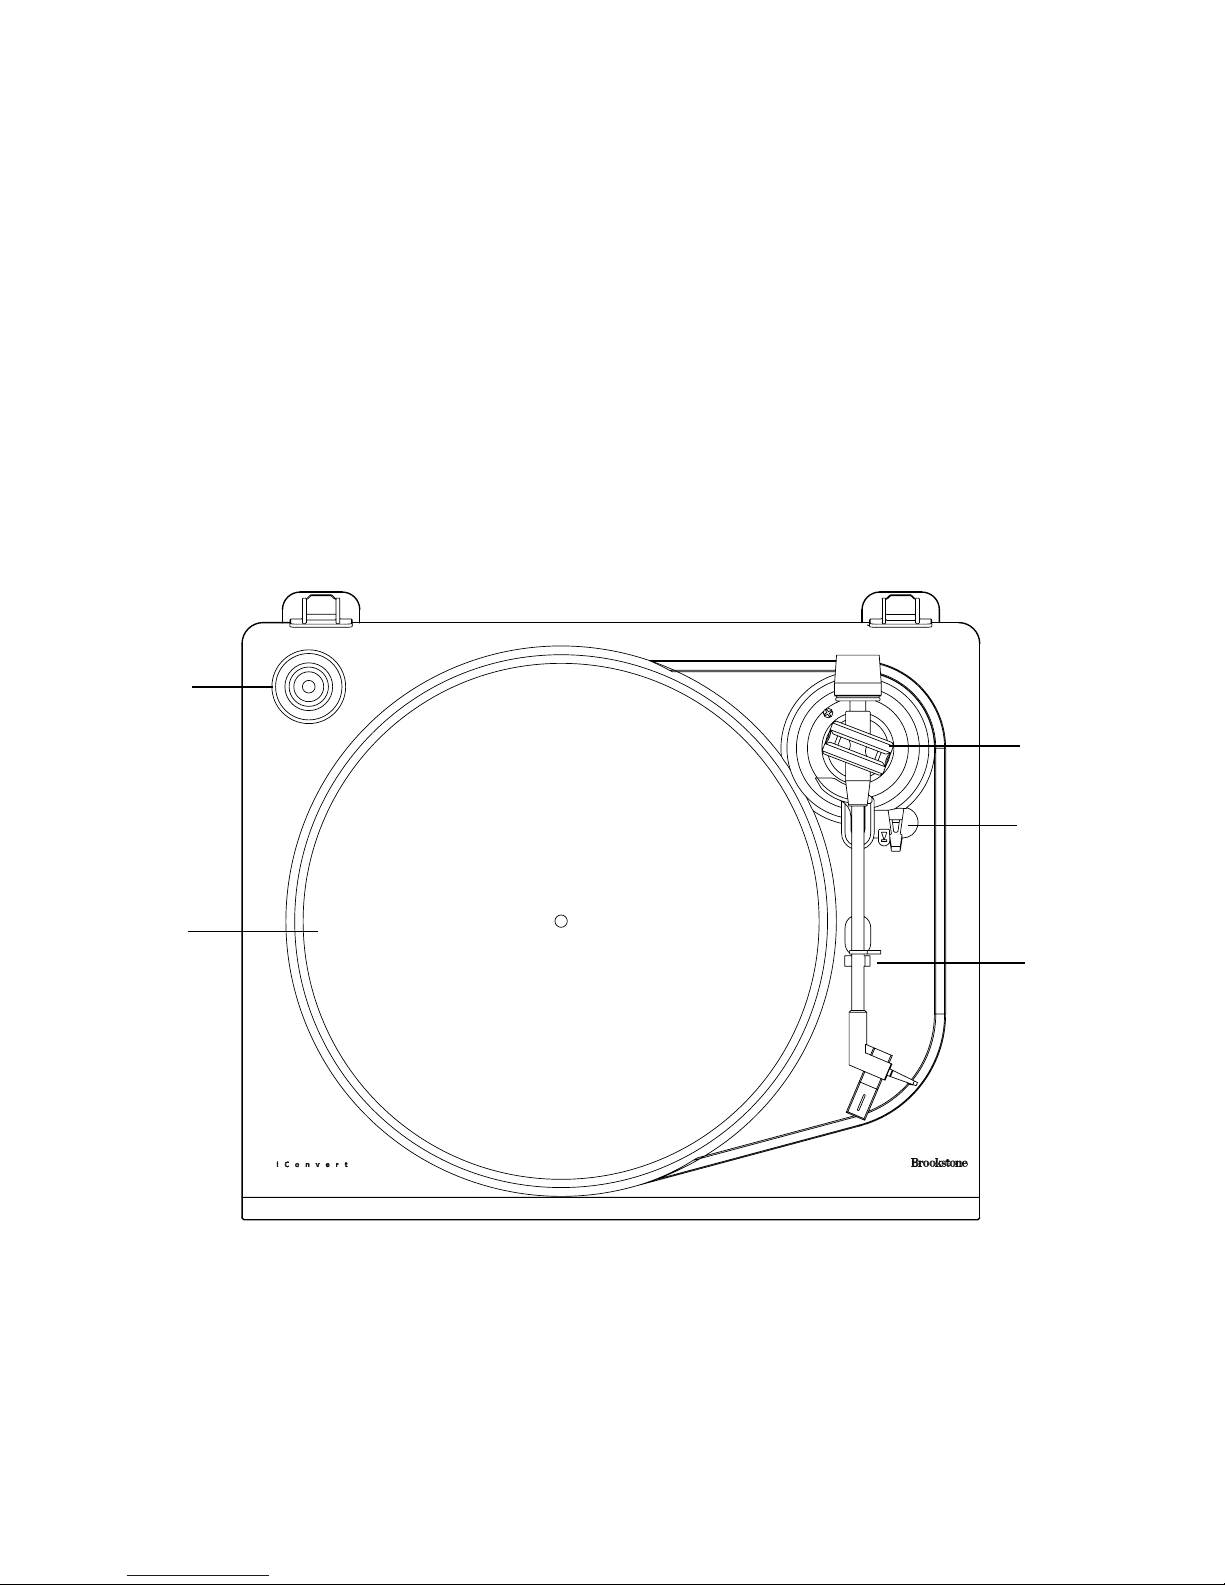
Place a record on the turntable PLATTER. Use the 45 rpm record ADAPTER
on the turntable shaft when playing a 45 rpm, which has a large center hole.
Remove the stylus protector cover and release the tonearm clip.
Move the cueing lever to the “UP” position, then move the tonearm toward
the record. The turntable will start revolving.
Position the tonearm above the first groove of the record and move the
cueing lever to the “DOWN” position, the tonearm will automatically and
gently come down onto the record’s surface.
At the end of the record, the tonearm will rise and return to the arm rest
and switch off the entire unit automatically.
If you want to stop the record while it is playing, press the STOP button.
The tonearm will rise slowly and return automatically to the arm rest.
CAUTION: Do not touch the tonearm during the reject cycle.
USING MANUAL CUEING
The cueing lever is used when you want to momentarily interrupt the tonearm.
Slowly move the lever to the “UP” position to interrupt playing.
Slowly move the lever to the “DOWN” position to resume playing.
Keep the cueing lever in the “DOWN” position when the turntable
is not in use.
1.
2.
3.
4.
5.
6.
7.
1.
2.
3.
7

EZ AUDIO CONVERTER SOFTWARE
The EZ Audio Software is the easiest way to transfer your vinyl and tape
recordings to your computer. To take advantage of advanced audio editing
features, you may wish to also install the optional Audacity Software
(see pages 12-33).
INSTALLING EZ AUDIO CONVERTER ON A PC
Insert the included CD into your computer’s CD drive.
A pop-up screen should appear automatically. Select “English” or “French.”
Click on the EZ AUDIO CONVERTER button to begin the
installation process.
Follow the on-screen instructions to install the EZ Audio Converter.
Once the EZ Audio Converter has been successfully installed,
click on the iTunes button to install iTunes.
Please note: The EZ Audio Converter uses iTunes to import your recordings.
iTunes needs to be installed on your computer before starting the EZ Audio
Converter software.
6. Follow the on-screen instructions to install iTunes.
7. Once the iTunes installation has successfully completed, click the EXIT button
to quit.
8. EZ Audio Converter and iTunes are now successfully installed on your computer.
1.
2.
3.
4.
5.
8

INSTALLING EZ AUDIO CONVERTER ON A MAC®
Insert the included CD into your computer’s CD drive.
Open the CD contents and double-click on the EZ Audio
Converter.Installer.pkg file to begin the installation process.
Follow the on-screen instructions to install the EZ Audio Converter.
4. Once the installation process has completed, you can find the EZ Audio
Converter application in your Applications folder.
TRANSFERRING MUSIC WITH EZ AUDIO CONVERTER
Once you have installed the EZ Audio Converter software, you can start recording!
Open EZ Audio Converter by going to Start > All Programs > MixMeister >
EZ Audio Converter—or, open EZ Audio Converter by accessing your
Applications menu.
When you open the software you will see the “Step 1 Get Connected”
screen. Connect the iConvert USB Turntable to the computer with the
included USB cable.
Once the USB is connected, click NEXT on the “Step 1 Get
Connected” screen.
The “Step 2 Get the Music Ready to Play” screen will appear.
Locate the beginning of the section you would like to record.
Note: We recommend checking your levels before you begin recording
and adjusting the gain level control on your device accordingly.
1.
2.
3.
1.
2.
3.
4.
5.
9
Este manual sirve para los siguientes modelos
1
Tabla de contenidos


