BRITAX RÖMER MAX-SAFE PRO Manual de usuario


Contents
1 Symbol explanation........................... 3
2 Safety................................................... 4
2.1 User Guide......................................................... 4
2.2 Intended use....................................................... 4
2.3 Misuse................................................................. 4
2.4 Safety informations........................................... 4
3 Settings............................................... 6
3.1 Adjust headrest.................................................. 6
3.2 Fasten spacer.................................................... 6
3.3 Use the seat insert............................................ 6
3.4 SICT..................................................................... 7
4 Use in the vehicle.............................. 9
4.1 Select seat.......................................................... 9
4.2 Prepare eyes...................................................... 9
4.3 Secure child seat............................................... 12
4.4 Loosen child seat.............................................. 16
5 Buckling in and unbuckling.............. 17
5.1 Buckle child in................................................... 17
5.2 Check before every use.................................... 18
5.3 Unbuckle child................................................... 18
6 Cleaning and maintenance................ 19
6.1 Harness buckle.................................................. 19
6.2 Cover................................................................... 19
6.3 Shoulder pads.................................................... 20
6.4 Change battery................................................... 20
6.5 Troubleshooting................................................. 21
7 Storage and disposal......................... 22
7.1 Storage................................................................ 22
7.2 Disposal.............................................................. 22
8 Contact................................................ 23
IP10204 | 1.2 | 2000038517 MAX-SAFE PRO | BRITAX RÖMER 2

1 Symbol explanation
Warning signs
Warning signs are used in this user guide in order to ad-
vise of potential danger situations. The warning signs in-
form you about the following items:
–Level of danger,
–Type and source of danger,
–Consequences if disregarded,
–Measures to prevent danger.
Warning signs are shown as follows:
WARNING
Type and source of danger
Consequences if disregarded
uMeasures to prevent danger
Level of dan-
ger
Meaning
DANGER! Highlights dangerous situations which,
if not avoided, lead to serious injuries
or death.
WARNING! Indicates a dangerous situation which,
if not avoided, can lead to serious in-
juries or death.
CAUTION! Indicates a dangerous situation which,
if not avoided, can lead to slight to
moderate injuries.
NOTE Indicates actions that can lead to
damage.
Signs and symbols
Highlights important information for you.
Specific actions
u...
Action
1. Demands action from you.
2. Defined sequence of actions.
3. ...
Result of action
PThere is where you will find the result of a sequence of
actions.
IP10204 | 1.2 | 2000038517 MAX-SAFE PRO | BRITAX RÖMER 3

2 Safety
2.1 User Guide
This user guide is a component of the product and con-
tributes to its safe use. Non-compliance may lead to seri-
ous or even fatal injuries. If there are uncertainties, do not
use the product and immediately contact your retailer.
uRead the operating instructions.
2.2 Intended use
This product has been designed, tested and approved cor-
responding to the requirements of UN R129/03.
This product is designed for securing a child in a vehicle. It
is approved for the following details:
Designation Value
Body height 61 – 125 cm
Use the seat insert if the child
is between 61 and 87 cm.
Body weight ≤ 36 kg
Use the product on forward-facing car seats.
This approval is invalidated if you make any modifications
to this product. Changes may only be made by the man-
ufacturer. The stickers on the product are an important
component of the product.
uDo not make any changes to the product.
uDo not remove any stickers from the product.
2.3 Misuse
uDo not use the product as a toy.
uDo not use the product as a chair outside the vehicle,
not even to test.
uOnly secure the child seat with fastening points de-
scribed in these operating instructions.
uNever secure the product with a 2-point seat belt.
uEnsure that the product is not trapped between hard
objects (car door, seat rails, etc.).
uKeep product away from moisture, wet conditions, liq-
uids, dust and salt spray.
uDo not lean heavy objects on the product.
uNever lubricate or oil parts of the product.
uSensitive car seat covers may be damaged. Use the
Britax Römer child seat base. These are available sep-
arately.
2.4 Safety informations
WARNING
Risk of injury from damaged child seat
In the event of an accident, the child seat may be dam-
aged without the damage being immediately visible. Se-
rious injuries may result from another accident.
uNever use a damaged product.
uReplace the product after an accident.
uHave a damaged product inspected by Britax Römer
(even if it has fallen onto the ground).
uRegularly check all the important parts for damage.
uEnsure that all mechanical components work proper-
ly.
WARNING
Risk of burns from hot components
Components of the product may become hot in direct
sunlight. Children's skin is sensitive and maybe harmed
as a result.
uProtect the product against intensive direct sunlight
when not in use.
WARNING
Danger to life due to the effects of heat or cold.
If children are exposed to the effects of heat or cold for
a longer period, there is a risk of injury or even death.
uNever leave children unsupervised in the vehicle.
WARNING
Risk of injury when boarding and exit
It can be dangerous to stand on the road-side of the ve-
hicle.
uSecure and remove the child seat from the foot-
path-side.
uSecure and remove the child from the footpath-side.
IP10204 | 1.2 | 2000038517 MAX-SAFE PRO | BRITAX RÖMER 4

WARNING
Risk of injury from unsecured objects
In case of an emergency stop or accident, unsecured
objects or people may cause injury to other occupants
in the vehicle.
uFasten the product as described in the user guide.
uSecure backrests of the car seat (e.g. engage fold-
able rear).
uFasten or remove all heavy or sharp-edged objects
in the vehicle.
uEnsure that everyone in the vehicle has their seat-
belts fastened.
uEnsure that the product is always secured when it is
in the vehicle, even if no child is being transported.
IP10204 | 1.2 | 2000038517 MAX-SAFE PRO | BRITAX RÖMER 5

3 Settings
3.1 Adjust headrest
1
1Headrest
1. Check that the headrest 1 is adjusted correctly.
If the shoulder straps are at or slightly below the
shoulder height of the child, the headrest is posi-
tioned correctly.
uIf the headrest is not positioned correctly, per-
form the following steps.
2
1
2
3
4
5
1
1Headrest 4Shoulder straps
2Harness buckle 5Release lever
3Adjustment button
2. Open the harness buckle 2 by pressing the red button.
3. To loosen the belt, press the adjustment button 3 and
pull both shoulder straps 4 forwards at the same time.
The shoulder pads are not connected to the shoul-
der straps. If you pull on the shoulder pads, the
belt is not loosened. Only pull on the shoulder
straps.
4. Open the release lever 5.
PThe headrest is unlocked.
5. Slide the headrest 1 to the correct shoulder height.
6. Let go of the release lever 5.
7. Check that the headrest 1 is locked correctly in place
by pushing the headrest 1 down.
PHeadrest 1 is adjusted correctly.
PHeadrest 1 is locked in place.
3.2 Fasten spacer
The spacer is included in the extent of delivery.
The spacer provides additional space legroom for
your child. Use of the space depends on the space
available in the vehicle.
11
1Spacer
1. Clamp the spacer 1 to the child seat.
2. Continue with the chapter “Positioning the child seat”.
3.3 Use the seat insert
Use the seat insert if the child is between 61 and
87 cm.
IP10204 | 1.2 | 2000038517 MAX-SAFE PRO | BRITAX RÖMER 6

3.3.1 Attach seat insert
2
1
4
5
3
1Harness buckle 4Padded crotch
2Seat insert 5Recess
3Shoulder strap
1. Open the harness buckle 1 by pressing the red button.
2. Place the seat insert 2 into the child seat.
Note the orientation of the seat insert. You can use
the wash label as a guide. The wash label is on the
back of the seat insert and should face the child
seat.
3. Pass the harness buckle 1 and the padded crotch 4
through the recess 5 on the lower section of the
seat insert 2.
4. Place both shoulder straps 3 over the seat insert 2.
3.3.2 Remove seat insert
1
2
1
1Seat insert 2Harness buckle
1. Open the harness buckle 1 by pressing the red button.
2. Remove the seat insert 2.
3.4 SICT
The SICT (Side Impact Cushion Technology) reduces
the forces affecting the child in the event of a side
impact. The protective effect of the SICT element is
greater, the closer it is to the car door.
The SICT element is independent of the type of fas-
tening. For simplicity, the following illustrations show
fastening type A.
3.4.1 Secure SICT element
1
1
2
1SICT element 2Car door
1. Place the SICT element 1 to the side of the child seat.
Select the side of the child seat closest to the car
door.
The sign symbol with number 1 on the SICT ele-
ment faces the sign symbol of the SICT fastening
point on the child seat.
2. Slide the SICT element 1 onto the SICT fastening point.
3. Check the distance between the SICT element 1 and
the car door 2.
ADVICE
Material damage as a result of SICT element
In rare cases, the space between the car seat and
the car door is so small that the SICT element touch-
es the car door. The car door may be scratched
when it is closed.
–Carefully close the car door.
–Make sure that the SICT element does not touch
the car door.
–Do not close the car door fully if the SICT ele-
ment is touching the car door.
4. If the SICT element 1 is touching the car door 2, reduce
the distance of the SICT element 1 (See "Reduce dis-
tance", Page 8).
If the SICT element is not touching the car door,
no further steps are necessary.
IP10204 | 1.2 | 2000038517 MAX-SAFE PRO | BRITAX RÖMER 7

3.4.2 Reduce distance
1
1
2
1SICT element 2Car door
1. Slide the SICT element 1 from the SICT fastening
point.
You need a relatively large amount of force to re-
move the SICT element from the child seat. Place
the SICT element close to the child seat.
2. Place the SICT element 1 to the side of the child seat.
The sign symbol with number 2 on the SICT ele-
ment faces the sign symbol of the SICT fastening
point on the child seat.
3. Slide the SICT element 1 onto the SICT fastening point.
4. Check the distance between the SICT element 1 and
the car door 2.
ADVICE
Material damage as a result of SICT element
In rare cases, the space between the car seat and
the car door is so small that the SICT element touch-
es the car door. The car door may be scratched
when it is closed.
–Carefully close the car door.
–Make sure that the SICT element does not touch
the car door.
–Do not close the car door fully if the SICT ele-
ment is touching the car door.
5. If the SICT element 1 is still touching the car door 2, re-
move the SICT element (See "Remove SICT element",
Page 8).
If the SICT element is not touching the car door,
no further steps are necessary.
3.4.3 Remove SICT element
1
1SICT element
1. Do not use the SICT element 1 on the selected car
seat.
2. Slide the SICT element 1 from the SICT fastening
point.
You need a relatively large amount of force to re-
move the SICT element from the child seat. Place
the SICT element close to the child seat.
3. Stow the SICT element 1.
4. Note the storage instructions (See "Storage",
Page 22).
IP10204 | 1.2 | 2000038517 MAX-SAFE PRO | BRITAX RÖMER 8

4 Use in the vehicle
4.1 Select seat
1. Note and observe the vehicle handbook.
Only car seats arranged in the direction of travel
are approved for use.
2. Select a suitable seat.
Car seats, which have been tested and approved
by us, are suitable. You can find these in our model
list. You can find the model list at:
https://manuals.britax.com/product/p1049-1
The list of vehicle models has been created in ac-
cordance with the requirements of Standard UN
R129 and contains the vehicle models, in which
the product has been tested as at the date of pub-
lication according to the instructions contained in
the user guide. However, the information about a
specific vehicle model is not a guarantee that the
product can be installed in the stated vehicle and
customers are advised that they should consult
the user guide about the correct installation of the
product.
If the desired vehicle is not included in the model
list, please feel free to contact us (See "Contact",
Page 23).
3. We recommend positioning the car seats as follows.
When using on the front seat:
–Slide the front seat as far back as possible.
When using on the rear seat:
–Slide the back seat as far back as possible.
–Slide the front seat as far forwards as possible.
4.2 Prepare eyes
The carabiner on the lower strap must be hooked into
suitable eyes. These eyes may already be present in
the vehicle. If the vehicle does not have suitable eyes,
the retaining straps have to be fastened. The retaining
straps provide eyes for fastening the lower strap.
1. Check that the selected car seat has one of the follow-
ing fastening variants.
TIP You can find more information in the vehicle's man-
ual
–Vehicle eye
2
11
1
1Vehicle eye 2Carabiner
–Strap on rail (rails with space to the vehicle floor)
1
1
2
1
2
1Strap 2Rail
–Strap on seat joint (car seat with seat fold)
1
1
1
2
1Strap 2Carabiner
2. Choose a fastening option available in the vehicle.
IP10204 | 1.2 | 2000038517 MAX-SAFE PRO | BRITAX RÖMER 9
4.2.1 Use vehicle eyes.
If there are already eyes for the selected car seat, a
strap does not have to be fastened. The carabiners
are hooked directly to the eyes. The fastening of the
carabiners depends on the selected car seat place.
We distinguish between the following car seat places.
uSingle seat
uMiddle seat of a bench seat
uOuter seat of a bench seat
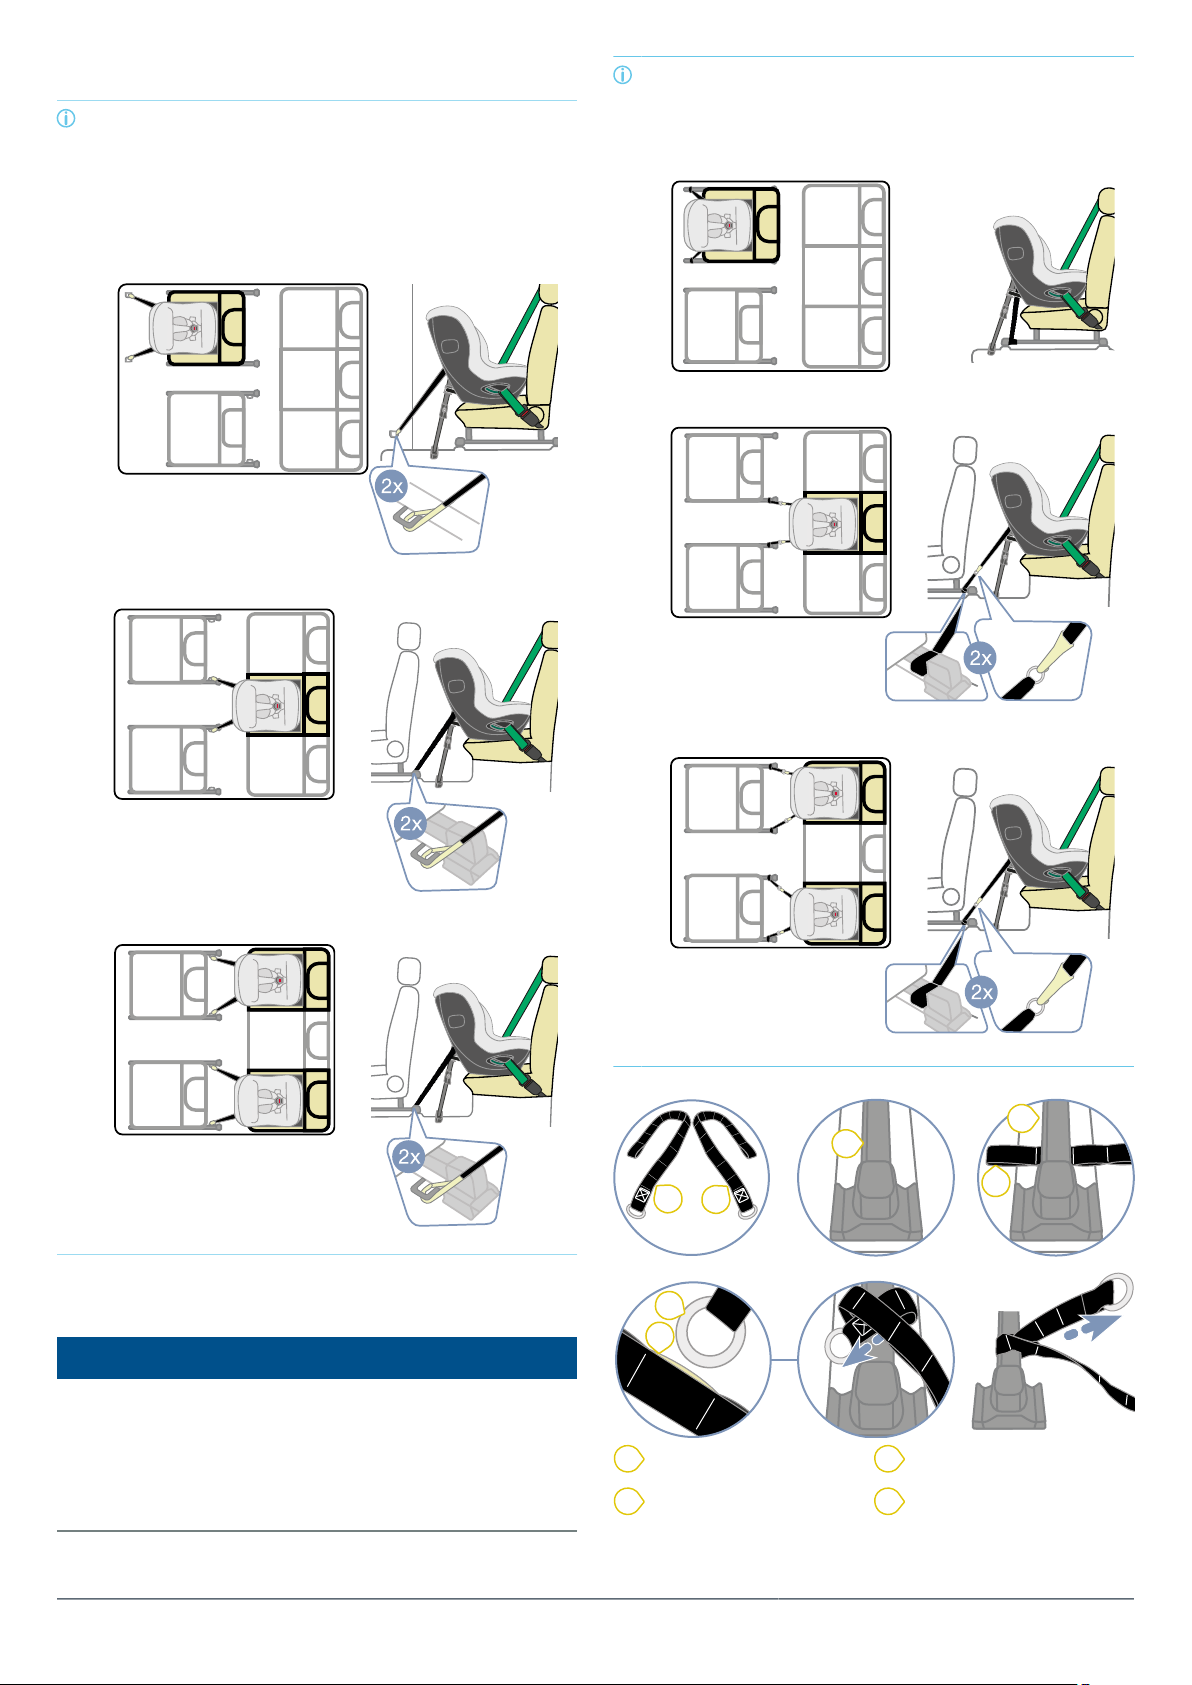
4.2.2 Fasten strap to the rail
ADVICE
Material damage as a result of strap
If the strap is passed over plastic parts or electrical
components of the vehicle, these may be damaged.
uMake sure that the strap is not passed over plastic
parts or electrical components of the vehicle.
The fastening of the straps depends on the selected
car seat place. We distinguish between the following
car seat places.
–Single seat
–Middle seat of a bench seat
–Outer seat of a bench seat
1
1
2
2
1
3
4
1Strap 3Metal ring
2Rail 4Loop
IP10204 | 1.2 | 2000038517 MAX-SAFE PRO | BRITAX RÖMER 10
Tabla de contenidos
Otros manuales de Asiento de coche de BRITAX RÖMER

BRITAX RÖMER
BRITAX RÖMER JOCKEY Relax Manual de usuario

BRITAX RÖMER
BRITAX RÖMER KID Manual de usuario

BRITAX RÖMER
BRITAX RÖMER DUALFIX M i-SIZE Manual de usuario

BRITAX RÖMER
BRITAX RÖMER BABY-SAFE plus Manual de usuario

BRITAX RÖMER
BRITAX RÖMER DUALFIX PRO Manual de usuario

BRITAX RÖMER
BRITAX RÖMER ADVANSAFIX IV Manual de usuario

BRITAX RÖMER
BRITAX RÖMER SAFE-WAY M Manual de usuario

BRITAX RÖMER
BRITAX RÖMER ADVENTURE PLUS Manual de usuario


