Bresser 49-14911 Manual de usuario
DE
BEDIENUNGSANLEITUNG
GB
INSTRUCTION MANUAL
FR
MODE D’EMPLOI
NL
HANDLEIDING
IT
ISTRUZIONI PER L’USO
ES
INSTRUCCIONES DE USO
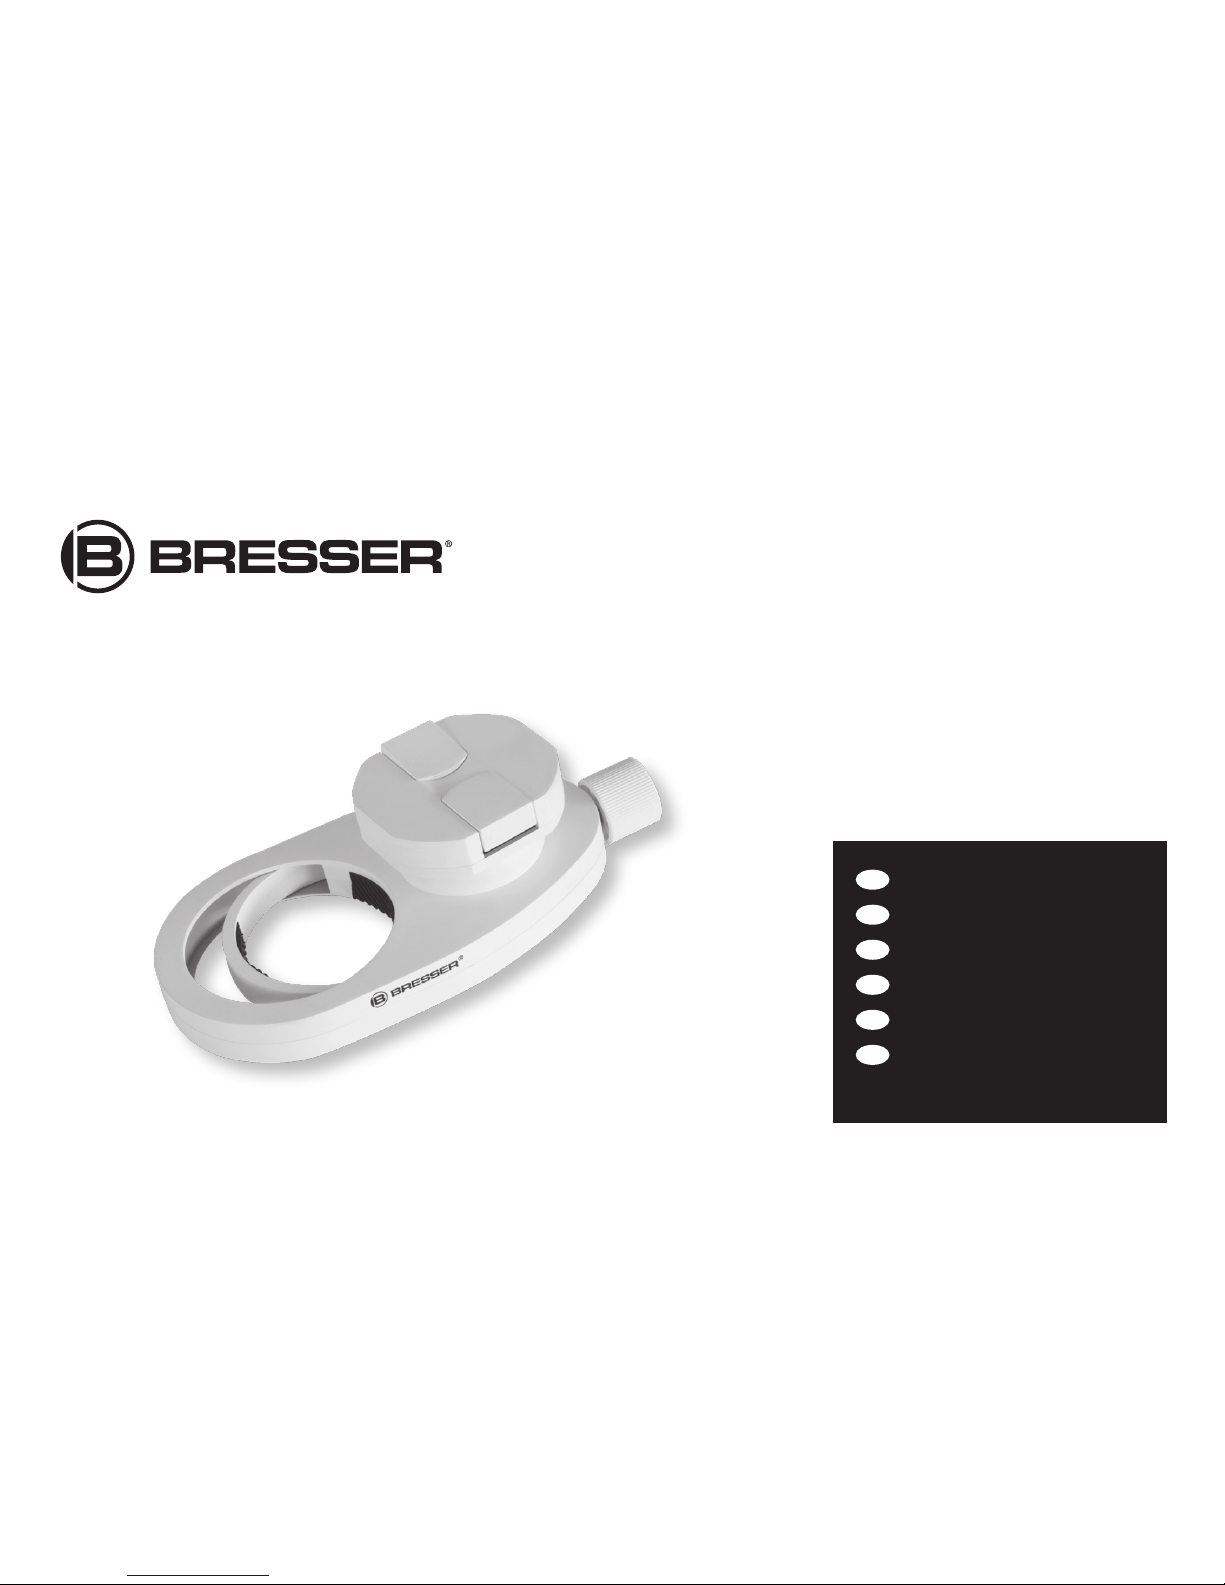
Universal smartphone adapter Art. No. 49-14911

2
DE
BEDIENUNGSANLEITUNG ................................4
GB
INSTRUCTION MANUAL ..................................7
FR
MODE D’EMPLOI ..........................................10
NL
HANDLEIDING ...............................................14
IT
ISTRUZIONI PER L’USO .................................17
ES
INSTRUCCIONES DE USO ..............................20
GARANTIE & SERVICE / WARRANTY & SERVICE
GARANTIE ET SERVICE / GARANTÍA Y SERVICIO
GARANZIA E ASSISTENZA ........................ 26
A
A1
A2
B
C

3

4
Allgemeine Informationen
Zu dieser Anleitung
Diese Bedienungsanleitung ist als Teil des Gerätes zu
betrachten. Lesen Sie vor der Benutzung des Geräts
aufmerksam die Sicherheitshinweise und die Bedienungsan-
leitung. Bewahren Sie diese Bedienungsanleitung für die er-
neute Verwendung zu einem späteren Zeitpunkt auf. Bei
Verkauf oder Weitergabe des Gerätes ist die Bedienungsan-
leitung an jeden nachfolgenden Besitzer/Benutzer des Pro-
dukts weiterzugeben.
Allgemeine Warnhinweise
GEFAHR von Körperschäden!
Kinder dürfen das Gerät nur unter Aufsicht benutzen. Ver-
packungsmaterialien (Plastiktüten, Gummibänder, etc.) von
Kindern fernhalten! Es besteht ERSTICKUNGSGEFAHR!
BRAND-/EXPLOSIONSGEFAHR!
Setzen Sie das mit dem Adapter verwendete Smartphone
keiner direkten Sonneneinstrahlung durch die Beobachtungs-
optik (z.B. Teleskop oder Spektiv) aus! Die Lichtbündelung
bewirkt eine Hitzeentwicklung, die zum Brand oder zur Ex-
plosion des Smartphone führen kann. Irreparable Beschädi-
gungen am Smartphone sind die Folge.
GEFAHR von Sachschäden!
Bauen Sie das Gerät nicht auseinander! Wenden Sie sich im
Falle eines Defekts an Ihren Fachhändler. Er nimmt mit dem
Service-Center Kontakt auf und kann das Gerät ggf. zwecks
Reparatur einschicken.

5
Die BRESSER GmbH übernimmt keine Haftung für durch un-
sachgemäße Handhabung entstandene Schäden, am Gerät
selbst, oder an alternativen Geräten (Optiken, Telefone, usw.)
Verwendungszweck
Dieses Produkt dient ausschließlich der privaten Nutzung. Es
wurde entwickelt zur vergrößerten Darstellung von Objekten
in der Natur oder astronomischen Objekten, unter Zuhilfe-
nahme einer Beobachtungsoptik (Teleskop, Spektiv, o.ä.)
und einem Smartphone.
Mit Hilfe dieses Adapters, können Sie mit Ihrem Smartphone
Bilder und Videos direkt durch eine Optik (Teleskop, Spektiv,
o.ä.) aufnehmen und speichern.
Lieferumfang
Universeller Smartphone Adapter, Bedienungsanleitung
Aufbau des Gerätes
A: Aufnahmeplatte mit Federklemmung (A1) und Haltela-
sche (A2) zur Fixierung Ihres Smartphones
B: Okularklemmung mit universeller Größeneinstellung
C: Stufenlose Verstellung der Okularklemmung
Bedienung
Bitte achten Sie während der Installation darauf, die Klemmun-
gen gut zu befestigen, um ein Herunterfallen Ihres Telefons zu
vermeiden. Richten Sie die Federklemmung und Haltelasche
(A1 und A2) auf, sodass diese nach oben zeigen. Ziehen Sie
die mit einem kleinen Pfeil markierte Lasche nach außen in
Richtung des Pfeils und halten Sie sie in dieser Position. Nun
legen Sie Ihr Smartphone mit der Kamera in Richtung der
Okularklemmung ein. Lassen Sie die Federklemmung wieder
langsam los. Diese arretiert das Telefon selbstständig.
DE
GB
FR
NL
IT
ES
Garantie / Warranty

6
Bitte achten Sie auf korrekten Sitz innerhalb der Klemmvor-
richtung. Eventuell muss der Anpressdruck manuell ein klein
wenig erhöht werden, um das Telefon korrekt zu sichern.
Stellen Sie die Öffnung der Okularklemmung (B) mit Hilfe des
Einstellrades (C) so ein, dass sich der Adapter mühelos über
das Okular der verwendeten Optik bewegen lässt. Schieben
Sie es soweit darüber, bis sich die Kamera Ihres Telefons
knapp über der Okularlinse befindet. Fixieren Sie nun den
Adapter mittels des kleinen Drehrades (C) bis sich der Kranz
der Okularklemmung (B) gut Handfest angezogen am Okular
festklemmt. Bitte achten Sie auch hier auf einen korrekten
festen Sitz des Okulares und des Adapters am Okular. Das
komplette Set sollte nun Spielfrei mit der verwendeten Optik
verbunden sein.
Lösen Sie nun noch einmal vorsichtig die Federklemmung
(A1), um das Telefon mit der Kamera mittig über der Linse des
Okulares zu platzieren. Wenn die optimale Position erreicht ist
fixieren Sie das Telefon wieder mit leichtem Druck auf beide
Klappen (A1 und A2) der Federklemmung gleichzeitig.
Die Kamera Ihres Smartphones sollte eingeschaltet sein und
nun kann mittels der Fokussiervorrichtung, Ihrer verwen-
deten Optik, eine Scharfstellung des Bildes vorgenommen
werden.
Möglicherweise muss der Adapter nun noch einmal mittels
des Drehrades (C) leicht gelöst werden, um die optimale Ent-
fernung zum Okular einzustellen und das volle Sehfeld nut-
zen zu können. Eventuell ist es nötig durch zoomen an Ihrem
Smartphone das Bild displayfüllend darzustellen.

7
Entsorgung
Entsorgen Sie die Verpackungsmaterialien sortenrein.
Informationen zur ordnungsgemäßen Entsorgung er-
halten Sie beim kommunalen Entsorgungsdienstleister oder
Umweltamt.
General Information
About this Instruction Manual
These operating instructions are to be considered a
component of the device. Please read the safety
instructions and the operating instructions carefully before
use. Keep these instructions for renewed use at a later date.
When the device is sold or given to someone else, the
instruction manual must be provided to the new owner/user
of the product.
General Warnings
RISK of bodily injury!
Children should only use the device under adult supervision.
Keep packaging material, like plastic bags and rubber bands,
DE
GB
FR
NL
IT
ES
Garantie / Warranty

8
out of the reach of children, as these materials pose a
choking hazard.
RISK OF FIRE/EXPLOSION!
Do not allow the Smartphone used with the adapter to be
exposed to direct sunlight through the observation optic (e.g.
telescope or spotting scope)! The light concentration causes
a build up of heat that can result in fire or explosion of the
Smartphone. Irreparable damages to the Smartphone are the
consequence.
RISK of property damage!
Do not disassemble the device. In the event of a defect,
please contact your dealer. The dealer will contact the
Service Centre and can send the device in to be repaired,
if necessary.
BRESSER GmbH assumes no liability for damages resulting
from improper handling of the device itself or of other
alternative devices (optics, phones, etc.)
Intended Use
This product is intended only for private use. It was
developed for the increased display of objects in nature or
astronomical objects, with the aid of an observation optic
(telescope, spotting scope, etc.) and a Smartphone.
By using this adapter, you are able to capture and save
images and videos directly thorough an optic (telescope,
spotting scope, or the like) using your Smartphone.
Scope of delivery
Universal Smartphone adapter, user manual

9
Design of the device
A: Retaining plate with spring clamp (A1) and retaining
bracket (A2) to fix your Smartphone
B: Eyepiece clamp with universal size adjustment
C: Stepless adjustment of the eyepiece clamp
Operation
Please make sure that the clamps are able to fasten well
during the installation so that there is no risk of your phone
falling. Erect the spring clamp and retaining brackets (A1 and
A2), so that they are in an upright position. Pull the bracket
fitting, which is marked with a small arrow, outward in the
direction of the arrow and retain it in its position. Now insert
your Smartphone with the camera in the direction of the
eyepiece clamp. Slowly let go of the spring clamp once again.
This locks the phone independently. Please ensure proper
fitting within the clamping device. The contact pressure may
have to be manually raised a little bit in order to correctly
secure the phone.
Configure the opening of the eyepiece clamp (B) using
the adjustment wheel (C), so that the adapter can move
effortlessly over the eyepiece of the optic employed. Slide
it so far over, until your phone‘s camera is placed just over
the eyepiece lens. Now fix the adapter by means of the small
rotational wheel (C) until the rim of the eyepiece clamp (B) is
firmly clamped on the eyepiece, well hand-tightened. Please
also ensure the proper secure fitting of the eyepiece and the
adapter on the eyepiece here. The complete set should now
be connected to the optic employed, free of play.
Once again carefully release the spring clamp (A1), in order to
place the phone with the camera centrally over the lens of the
DE
GB
FR
NL
IT
ES
Garantie / Warranty
10
eyepiece. If the optimum position is reached, simultaneously
re-fix the phone to both flaps (A1 and A2) of the spring clamp
using light pressure. Your Smartphone‘s camera should
be switched on and can now focus on an image using the
focusing device, the optic you are using. It could be the case
that the adapter now has to be slightly released once again
using the rotational wheel (C), in order to set the optimum
distance to the eyepiece and to use the full field of vision. It
may be necessary to fully make use of the image display by
zooming on your Smartphone.
Disposal
Dispose of the packaging materials properly,
according to their type, such as paper or cardboard.
Contact your local waste-disposal service or environmental
authority for information on the proper disposal.
Informations générales
A propos de ce manuel
Le présent mode d‘emploi doit être considéré comme
faisant partie intégrante de l’appareil. Avant d’utiliser
l’appareil, veuillez lire attentivement les consignes de
sécurité et le mode d’emploi. Conservez celui-ci afin de
pouvoir le réutiliser ultérieurement le cas échéant. En cas de
revente ou de cession de l’appareil, le mode d’emploi doit
être remis à tout propriétaire ou utilisateur suivant du produit.
Consignes générales de sécurité
RISQUE de dommages corporels !
Les enfants ne doivent utiliser cet appareil que sous
surveillance. Maintenez les enfants éloignés des matériaux
Tabla de contenidos
Idiomas:


