Bravox BVX-D930 Manual de usuario


2
ENGLISH
Operating Instructions ............................................................................................................................................... pg 3 ~ 40
PORTUGUÊS
Manual de Instruções.............................................................................................................................................. pg 41 ~ 80
ESPAÑOL
Manual de Instrucciones .........................................................................................................................................pg 81 ~119

3
CONTENTS
CONTENTS .............................................................................................................................................................................. 3
ACCESSORIES ........................................................................................................................................................................ 4
PRECAUTION .......................................................................................................................................................................... 5
INSTALLATION (installation/removal)....................................................................................................................................... 7
ATTACHING & REMOVING THE FRONT PANEL ................................................................................................................... 8
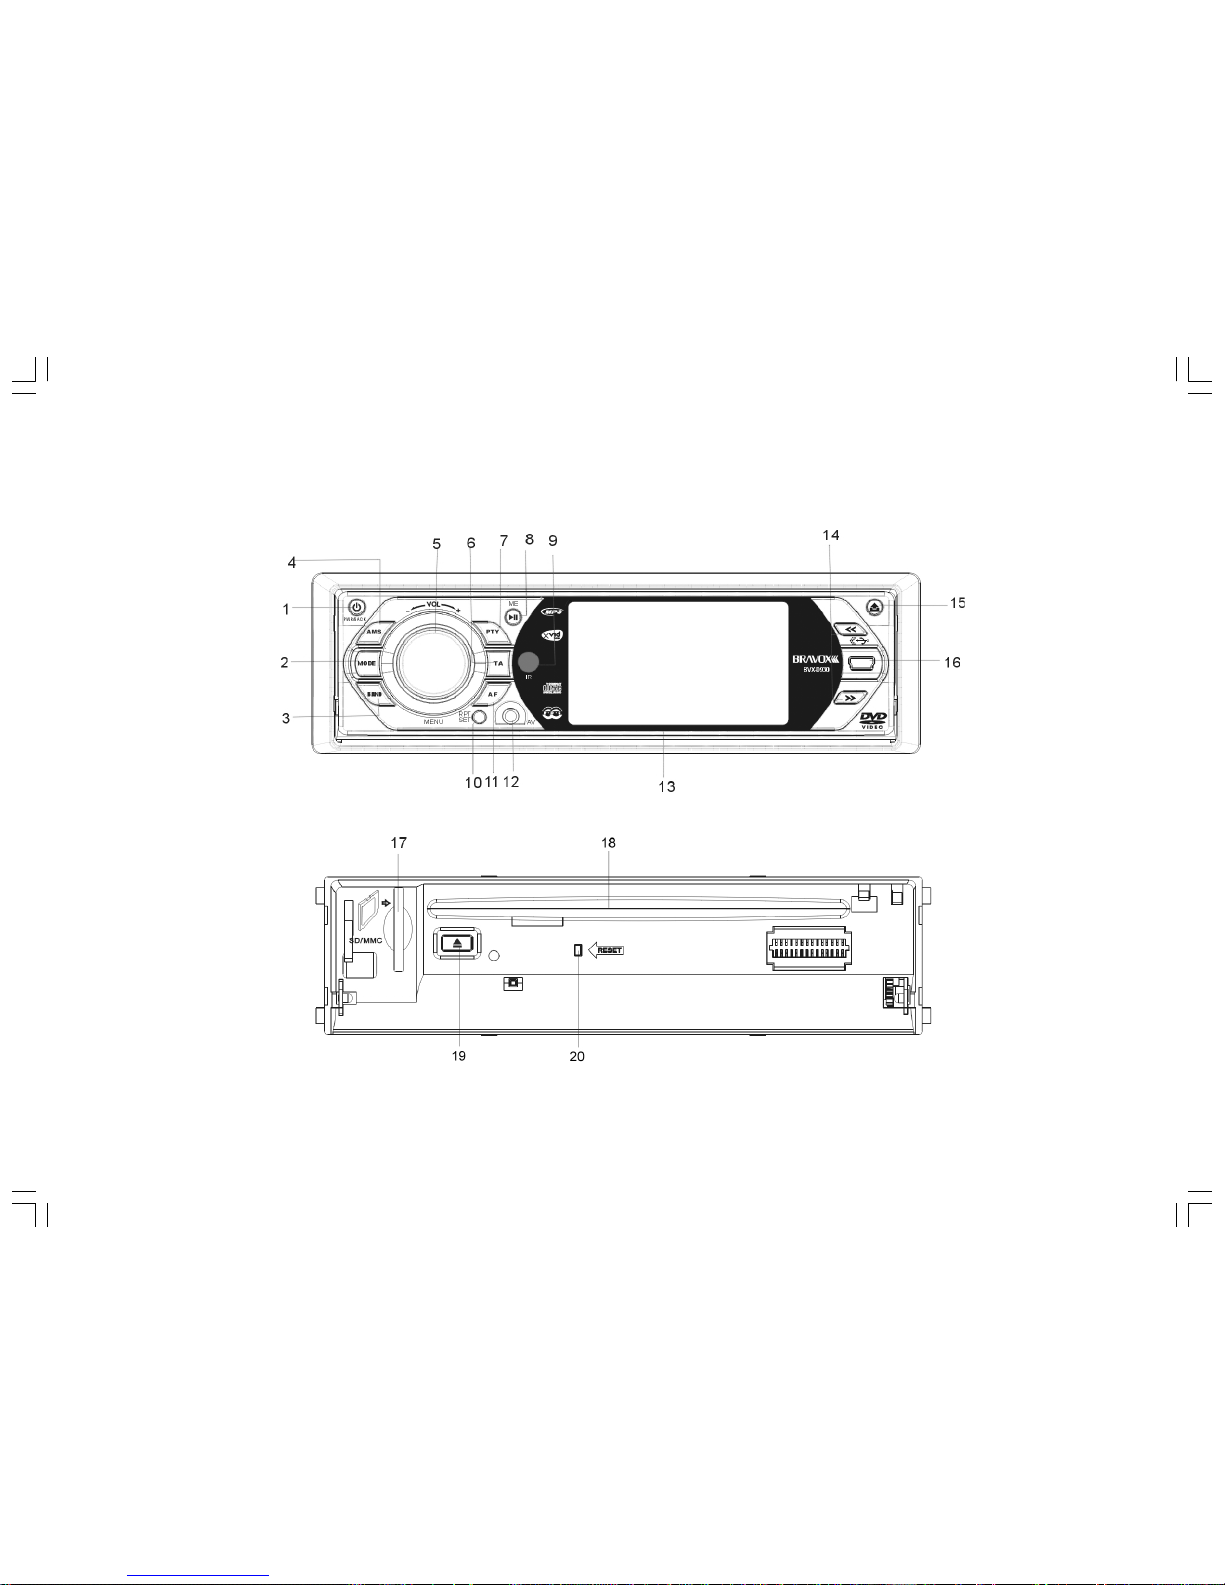
FRONT PANEL ......................................................................................................................................................................... 9
BASIC OPERATION ................................................................................................................................................................. 10
REMOTE CONTROL ................................................................................................................................................................ 13
RADIO OPERATION ................................................................................................................................................................. 17
DVD/VCD/CD/MP3/MP4/XVID OPERATION ........................................................................................................................... 20
SYSTEM SETUP ...................................................................................................................................................................... 30
ELECTRICAL CONNECTION................................................................................................................................................... 36
TECHNICAL SPECIFICATIONS ............................................................................................................................................... 37
TROUBLESHOOTING .............................................................................................................................................................. 39

4
ACCESSORIES
Mounting Bracket X1 Removable Trim Ring X1 Small metal strip X1 Washer X1 Nut X1
Rubber X1 Remote Control X1 Release key X2 Protective case X1 AV in Cable X1
ISO Wire connector X1 Removable control panel X1 User manual X1 USB cable X1

5
PRECAUTION
This unit is designed and manufactured with the user’s safety in mind, however any improper use or operation may result in certain
dangers. It is therefore highly recommended to read this manual thoroughly and adhere to the following precautions.
SAFETY PRECAUTIONS
• To prevent an electrical shock, do not open the housing of the unit. In any case of malfunctioning, only have the unit serviced by
an approved and qualified service centre.
• Do not expose to any water or to a very humid environment. Do not operate the unit when your hands are wet as this may cause
a short circuit.
• For safe driving, keep the volume low in order to concentrate on traffic conditions.
• Do not clean the unit with alcohol, only clean with a soft dry cloth.
• If the unit has been kept at a high temperature or in a high humidity environment, cool down the car interior before turning on the
unit.
• Do not use the unit for a long time without running the vehicle engine, it may drain the battery and the engine s vehicle may not
be able to start.
• Before final installation in the dashboard opening, connect the wiring and make sure the unit is working properly.
• Only use parts provided with the unit to ensure proper installation.
• Do not route wiring in places that the heat may melt the wiring insulation.
• When replacing the fuse, ensure that the new fuse has the capacity recommended by the manufacturer.

6
PRECAUTION
OPERATION PRECAUTIONS
• Do not operate the player with scratched, bent or broken discs. When a disc is not loaded properly, do not force it into the disc
loader.
• Never insert any other objects into the disc loader like a coin or pin, etc as this may cause damage or a short circuit.
• Do not use different disc formats other than 8 cm or 12cm round discs.
• Please dispose of used batteries according to the regulations in your country.
• If the unit is disconnected to the battery, it will lose memorized data.
• If the source disc has poor sound quality due to scratches, dirt or a bad recording, the playback sound quality may be poor.
Remote control:
• Do not let the remote control fall onto the floor, where it may become jammed under the brake or accelerator pedals.
• Do not short-circuit, disassemble or heat the battery.
• Do not dispose of the battery in a fire.
• Dispose of used batteries properly.

7
INSTALLATION (installation/removal)
Note:
Unit should be installed horizontally at an angle of less than 30°
DIN FRONT-MOUNT (A)
Installation of the unit
1. Metal Sleeve
Install the metal sleeve in the dashboard.
For optimal performance of the CD player, the metal sleeve should be positioned horizontally
(between 10° and 30°). Fix metal sleeve into place by pressing the metal tags outwards
using screwdriver.
2. Front Mounting
Slide the radio into the metal sleeve until the springs at either side of the radio snap into the
openings of the sleeve.

8
3. Removing Radio
Insert the levers supplied with the unit into the grooves at both sides of the unit until they lock. Pull the levers toward you makes it
possible to remove the unit from the dashboard.
JIN REAR-MOUNT (B) (Option)
Installation using the screw holes on the sides of the unit.
Remove the outer rim around the front panel and the side springs. Select a position
where the screw holes of the mounting bracket and the screw holes of the radio
become aligned and tighten the screws at 2 places on each side.
ATTACHING & REMOVING THE FRONT PANEL
Removing the Front Panel
• Press the RELEASE button to open the front panel.
• Push the front panel to right and pull the left side of the front panel away from
the unit, as shown in the figure below.
(It is highly recommended to keep the front panel in the protective case provided)
Attaching the Front Panel
• First Insert the right side of the front panel as shown in the figure below and
gently push the left side of the front panel onto the unit until you hear a click
sound, which confirms that the front panel is firmly attached.

9
FRONT PANEL

10
BASIC OPERATION
1. PWR/BACK
Press the button to turn on the unit, press and hold the button for 1 second to turn off the unit. In menu mode, when you want to
return to the previous menu, you can press the button.
2. MODE
Press this button to select one of the following sources: RADIO/DVD/USB/SD/AV.
3. BAND
Press this button to select the band in the following sequence: FM1/FM2/FM3/AM1/AM2.
4. AMS
Hold down the AMS button for a few moments to automatically store stations with a good reception. Press this button briefly to scan
through the preset stations.
5. VOL/MENU
Adjust the volume by turning the knob clockwise or counterclockwise. Press this button briefly to display the menu. You can choose
one of the following sub-menus: AUDIO/PICTURE/SETUP. Press the cursor to select a sub-menu and then press it to access the
selected sub-menu. Rotate the button to adjust to the desired setting. When you want to return to the previous menu, you can
press the PWR/BACK button.
In the AUDIO sub-menu, you can adjust the following options: VOLUME/BASS/TREBLE/BALANCE FADER/EQ (equalizer) /LOUD
(loudness) /SUB.W. (sub woofer).
In the PICTURE sub-menu, you can adjust the status for one of the following options by rotating the VOL button: BRIGHTNESS/
CONTRAST/COLOR/TINT/DISP.M 16:9/DEFAULT.
In the SETUP sub-menu, you can adjust the following options: SYSTEM and CLOCK.
• In the SYSTEM sub-menu, you can select TIME to switch the time display on or off and TIME.M to select a 24-hour or 12-hour
display.
• The CLOCK sub-menu allows you to set the hours and minutes.
You can select DEFAULT to restore the default settings.
6. TA
In radio mode, press briefly to turn the TA function on/off. Hold down the button to select STEREO or MONO mode.
Tabla de contenidos
Idiomas: