
Black Box FaxReceiver MC200A Manual de usuario

Copyright 2006 Black Box User Manual
MAY 2007
MC200A
Version 3
FaxReceiver MC200A ®
1000 Park Drive • Lawrence, PA 15055-1018 • 724-746-5500 • Fax 724-746-0746
© Copyright 2006. Black Box Corporation. All rights reserve .

Copyright 2006 Black Box Page 2
22
2 of
of of
of 49
4949
49
Table of Contents
Table of Contents 2
Introduction 4
Easy Configuration 4
Features 4
System Architecture 4
Menu Map 5
Important Information
Connections 7
Reset Button 11
Configuration 12
TELNET 20
The FaxViewer 32
Troubleshooting 35
Glossary 39
Technical Specifications 41
Trademark Recognition 41
Legal Notices 42
Technical Support 48
The Process 6
FAX CONFIGURATION UTILITY 12
General Settings 13
TCP/IP Settings 14
e-mail Settings 16
FAX Settings 17
TelNet Settings 19
Benefits of using Telnet: 20
UNIT IP SETTINGS 23
UNIT EMAIL SETTINGS 25
UNIT FAX SETTINGS 28

Copyright 2006 Black Box Page 3
33
3 of
of of
of 49
4949
49
COPYRIGHT
© Copyright 2006 Black Box. All rights reserve . No part of this publication may be
repro uce , transmitte , transcribe , store in a retrieval system, or translate into any
language or any computer language, in any form or by any thir party, without prior
permission of Black Box.
DISCLAIMER
Black Box reserves the right to revise this publication an to make changes from time to
time to the contents hereof without obligation to notify any person or organization of
such revision or changes. Black Box has en eavore to ensure that the information in
this publication is correct, but will not accept liability for any error or omission.
TRADEMARKS
All tra emarks are hereby acknowle ge .
VERSIONS
This manual is for FaxReceivers with co e version A9.50 an higher, with FaxConfig up to
version 1.08 or higher. The FaxViewer is version 1.05 or higher.
CODE CHANGES
Version a9.50 Uses DNS to etermine the SMTP IP A ress from it's URL.
Version b9.50 A s a final confirmation message in the bo y of the email.
Version c9.50 allows you to set whether to notify the sen ing fax of an error (so that it
will resen ). Also states at the en of the email that the remote fax was or was not
notifie in the event of an error in transmission.
9.50 Increase the ring elay timeout. It was 5 secon s, increase it to 15 secon s.

Copyright 2006 Black Box Page 4
44
4 of
of of
of 49
4949
49
Introduction
The Black Box FaxReceiver MC200A is esigne to receive a fax an convert it into
an email to allow istribution that is more convenient an unwante faxes can be
electronically elete . The Black Box Fax-Receiver receives the fax an puts it into a
mail-server mailbox. From there, you or an a ministrator can rea an re- istribute
the fax to the appropriate email recipient on the network or print it if necessary.
This re uces paper waste, spee s up the communication an istribution of
information, allows automatic backup of receive faxes an eliminates the nee to
maintain a fax machine solely for the purpose of receiving faxes.
Easy Configuration
The setup is one using Telnet, which allows configuration in any network
environment like Win ows, Unix or Apple. Any Workstation or PC with Telnet
capabilities an access to the network can be use to configure the unit.
Features
External all voltage power supply (100-240 Volts, 50-60 Hz)
Extremely low power consumption of less than 5 watts.
Remote management from any PC
Retains its setup in Flash memory.
Powers up in less than 10 secon s.
Three login types, CRAM-MD5, LOGIN (AUTH=LOGIN) an non-authenticate .
System Architecture
The FaxReceiver MC200A uses a PCMCIA car to connect to the Fax Line; this allows the
FaxReceiver MC200A to be use in any country in the worl for which there is a PCMCIA
fax/mo em car available that fulfills the local stan ar s.
The FaxReceiver MC200A connects irectly to an Ethernet 10/100baseTx network via fixe IP
or DHCP. Before operating the evice a number of parameters have to be set up in the
FaxReceiver MC200A to allow log on to your company or Internet provi er's mail server.
3 ifferent login types, CRAM-MD5, LOGIN (AUTH=LOGIN) an non-authenticate . It will try
CRAM-MD5, first. If that fails, it falls back to insecure authentication (same as
Outlook Express uses), an it will fall back further to non-authenticate login if that
fails.
Setting up is achieve using the Telnet protocol an a telnet application is available for any
operating system. Check your PC, Apple or Unix operator manual.
Since the evice only relies on TCP/IP an SMTP it will work in any common network
environment.

Copyright 2006 Black Box Page 5
55
5 of
of of
of 49
4949
49
Menu Map
The menu riven setup allows the following parameters to be set up:
MENU ITEM # CHARS
DEFAULT FORMAT REQD?
1) Setup IP 1
2) Setup SMTP Mailserver 2
3) Setup Fax 3
4) Reboot after quitting (Disabled) toggle
5) Change Telnet port 4 23 23 Y
6) Change Telnet session time-
out
2 2 (0 to 50 minutes) N
P) Change Telnet password 253 N
!) Redirect debug to this screen toggle
Unit IP settings
1) Unit IP address 16 11.22.33.44 xxx.xxx.xxx.xxx Y
2) Subnet Mask 16 255.255.255.0 xxx.xxx.xxx.xxx Y
3) DNS Address 1 16 0.0.0.0 xxx.xxx.xxx.xxx N
4) DNS Address 2 16 0.0.0.0 xxx.xxx.xxx.xxx N
5) Unit Gateway address 16 0.0.0.0 xxx.xxx.xxx.xxx Y
6) DHCP/RARP Disabled toggle N
7) Timeserver 1 address 16 192.043.244.018
xxx.xxx.xxx.xxx Y
8) Timeserver 2 address 16 000.000.000.000
xxx.xxx.xxx.xxx N
9) Timeserver 3 address 16 000.000.000.000
xxx.xxx.xxx.xxx N
Unit Email settings
1) Mailserver SMTP address 58 0.0.0.0 xxx.xxx.xxx.xxx
or
URL.
Y
2) Mailserver SMTP IP port 4 25 ### Y
3) Mailserver login name 58 name@company.com
Y
4) Mailserver login password 58 password99 Y
5) Destination Email address 80 *1 fax@null name2@company.com
Y
6) Reply email address 58 fax@null name@company.com
7) Reply Name 58 Fax Any text up to 58 char
6) Check Mailserver connection
Unit Fax settings
1) Fax reply I.D. 20 Black Box (R) Fax
Black Box (R) Fax N
2) Fax number 20 <phone number>
724-746-0746
N
3) Fax location 28 <location>
Lawrence, PA
N
4) Company Name 28 <company> Black Box N
5) Scaling Percentage 3 100 (10-150 in incs of 5) Y
6) Number of rings before answer
2 1 1-30 Y
7) Signal Transmission Errors Yes Toggle N
8) Time Zone Offset 3 +0 (+/-0 to 13 hours) Y
9) Daylight Saving (Off) toggle N
*1 For FaxConfig enter each a ress on a separate line. For Telnet, separate with commas or
semicolons.

Copyright 2006 ingdale User Manual, 62-15820000 Page 6
66
6 of
of of
of 49
4949
49
Requirements
AC power outlet within 10 feet.
Telephone wall jack an cable to reach the FaxReceiver
An Ethernet cable for the connection from the FaxReceiver to an Ethernet hub
or switch connection that will connect to the mail server.
Important Information
NOTE: The device is desi ned to operate in a typical office environment. Choose a location
that is:
Well-ventilated and away from sources of heat including direct sunlight.
Away from sources of vibration or physical shock.
Isolated from strong electromagnetic fields produced by electrical devices.
Provided with a properly grounded wall outlet.
The modem/card can be installed in either the top or bottom slot.
WARNING NOTES:
o not attempt to modify or use the supplied AC power cord if it is not the
exact type required.
Whenever the chassis cover is to be removed, ensure that the system is
disconnected from its power source and from all telecommunications links,
networks, or modem lines.
o not operate the system with the cover removed.
T H E P R O C E S S
A fax is receive , a connection with the mail server is establishe , the fax is eco e an sent
to the mail server as a GIF file for each page embe e in the email.
If you are private in ivi ual use your email account an passwor as you use for your existing
mail client on your computer, this is all you nee .
If you are a corporate user we recommen to set up a e icate email account for
the FaxReceiver i.e. fax1@my omain.com an then copy the people to be informe
of incoming faxes from this account. This allows you to keep a copy of every receive
fax in this account for recor ing purposes. It is up to you if you want to give each
FaxReceiver its own mail account or if you want to use the Location Name to
istinguish which evice actually receive the fax.
Copyright 2006 ingdale User Manual, 62-15820000 Page 7
77
7 of
of of
of 49
4949
49
Installation
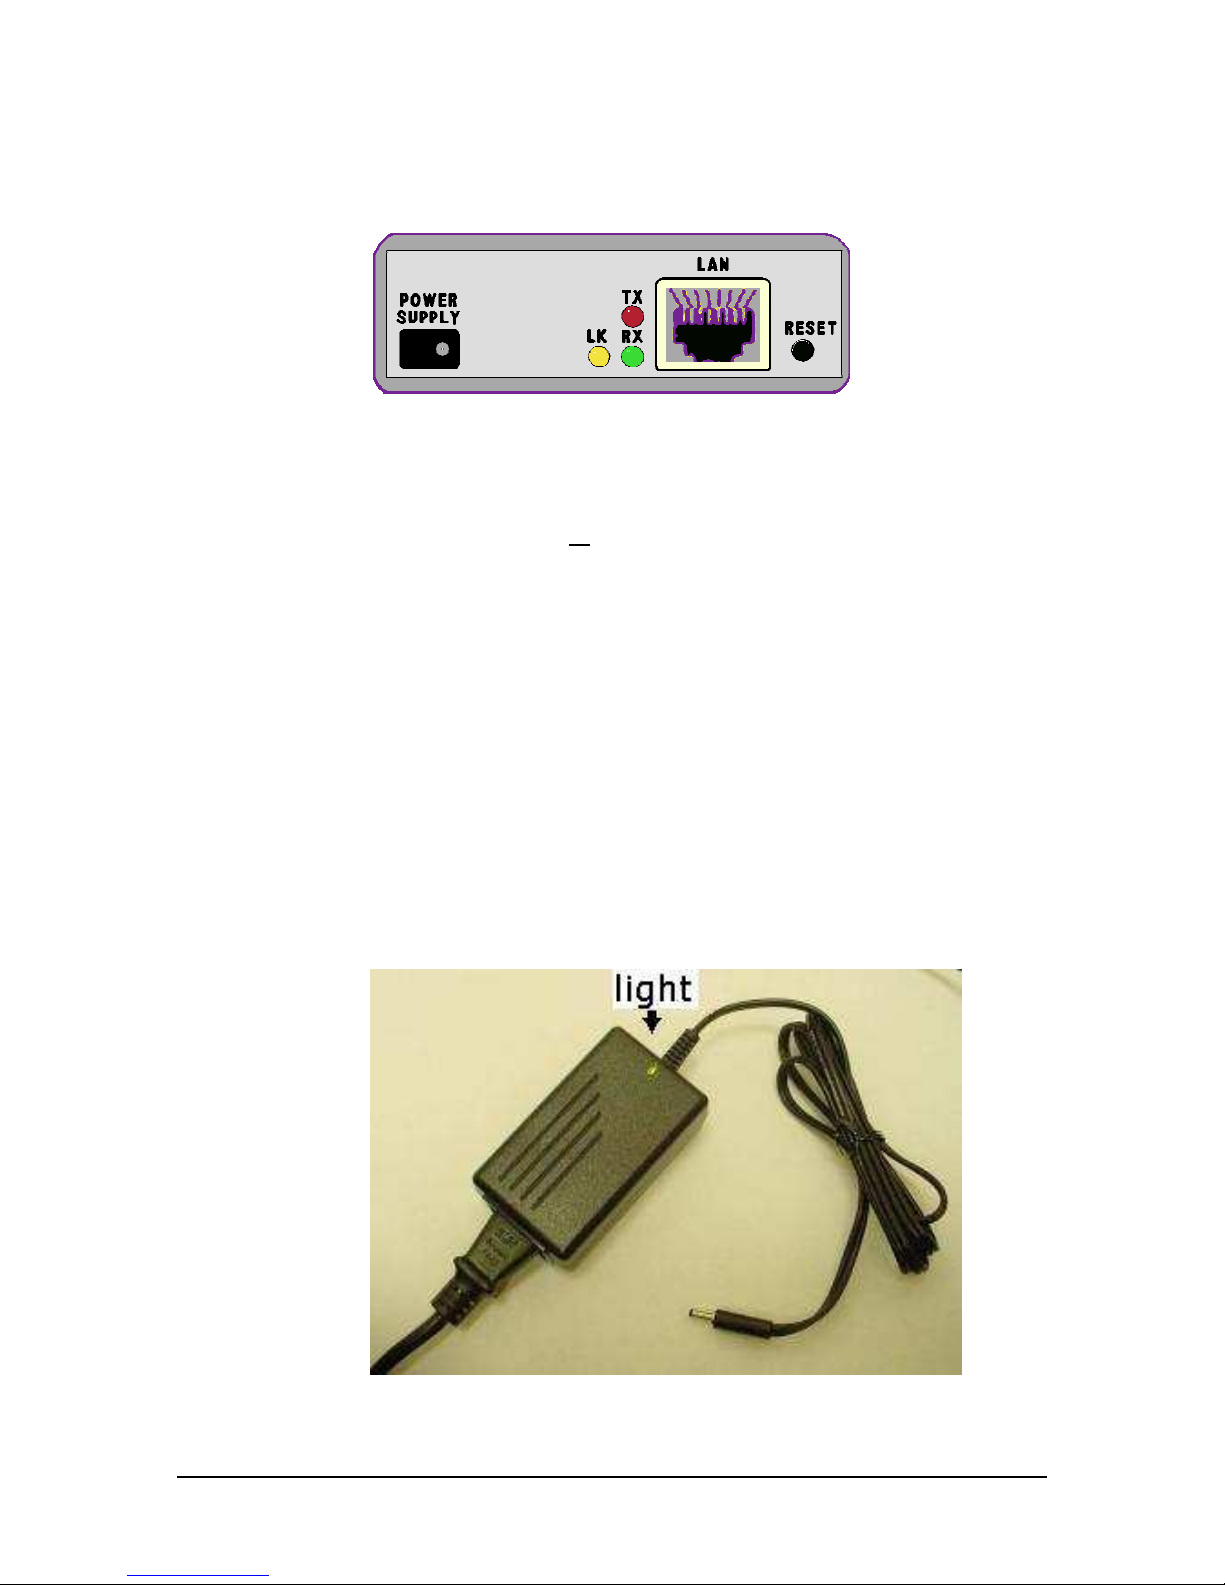
The illustration shows the setup of the ports an the iagnostic LEDs.
Connections
See the rawings on page 7 for installation examples.
Plug the PCMCIA mo em car into the top or bottom slot.
Insert your Ethernet RJ45 connection into the LAN jack on the front.
NOTE: If you o not have your Ethernet connection plugge in, there will be no lights on
power up.
The Mo em’s RJ11 phone line cable an a apter will plug into the mo em car at the rear of
the unit, with the other en into the RJ11 phone jack on the wall. Alternatively you may
plug the FaxReceiver into a phone splitter.
NOTE: If you aisy chain from an outgoing fax machine, it shoul be set to either
on't answer or answer after 4 rings or more so that the FaxReceiver will pickup
first.
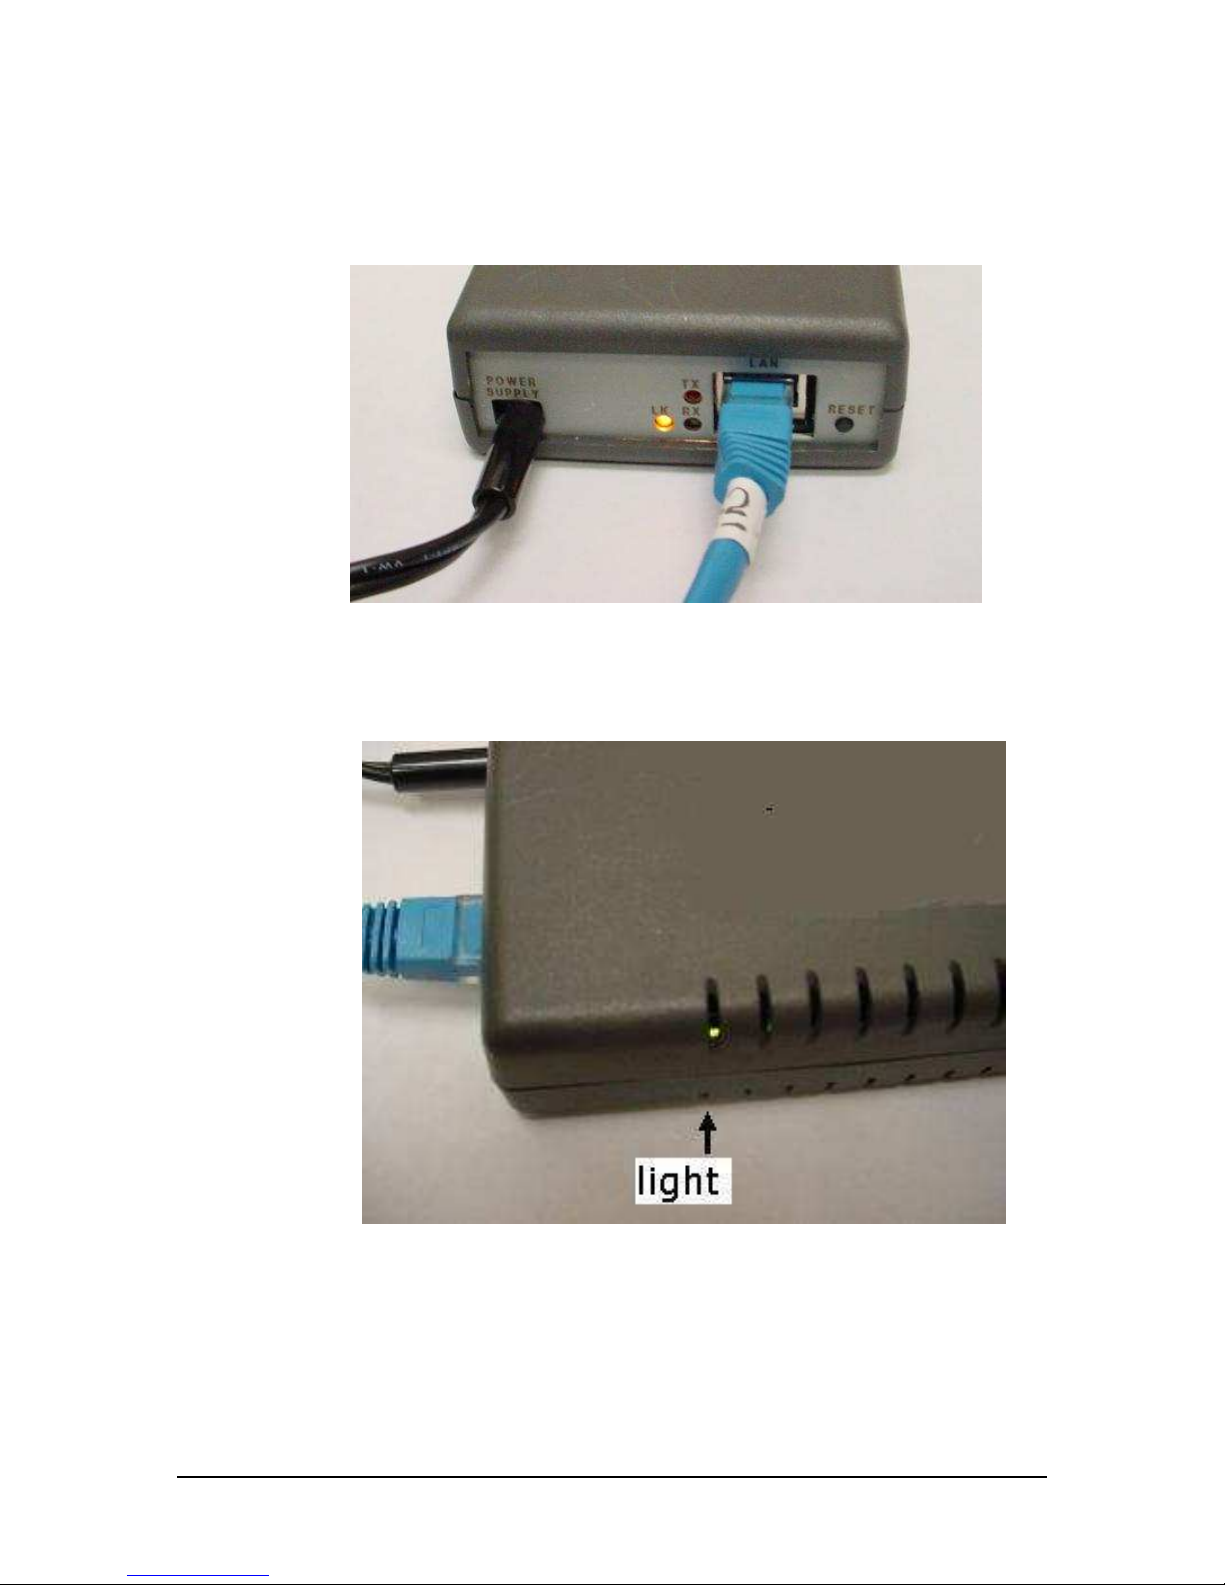
Connect the power cor to the Switch Mo e Power Supply unit socket.
Plug the AC cor from the Switch Mo e Power Supply into the 110V wall socket. There is a
green light on the power brick that will come on.
Plug the DC wires from the Switch Mo e Power Supply unit into the FaxReceiver.
Copyright 2006 ingdale User Manual, 62-15820000 Page 8
88
8 of
of of
of 49
4949
49
NOTE: It will take about 10 secon s for the FaxReceiver to be rea y to accept a fax
or telnet connection.
When your Ethernet cable is connecte to a network, the link light will be on.
NOTE:
There is a green light insi e the unit that can be seen. See the picture
below.
Copyright 2006 ingdale User Manual, 62-15820000 Page 9
99
9 of
of of
of 49
4949
49
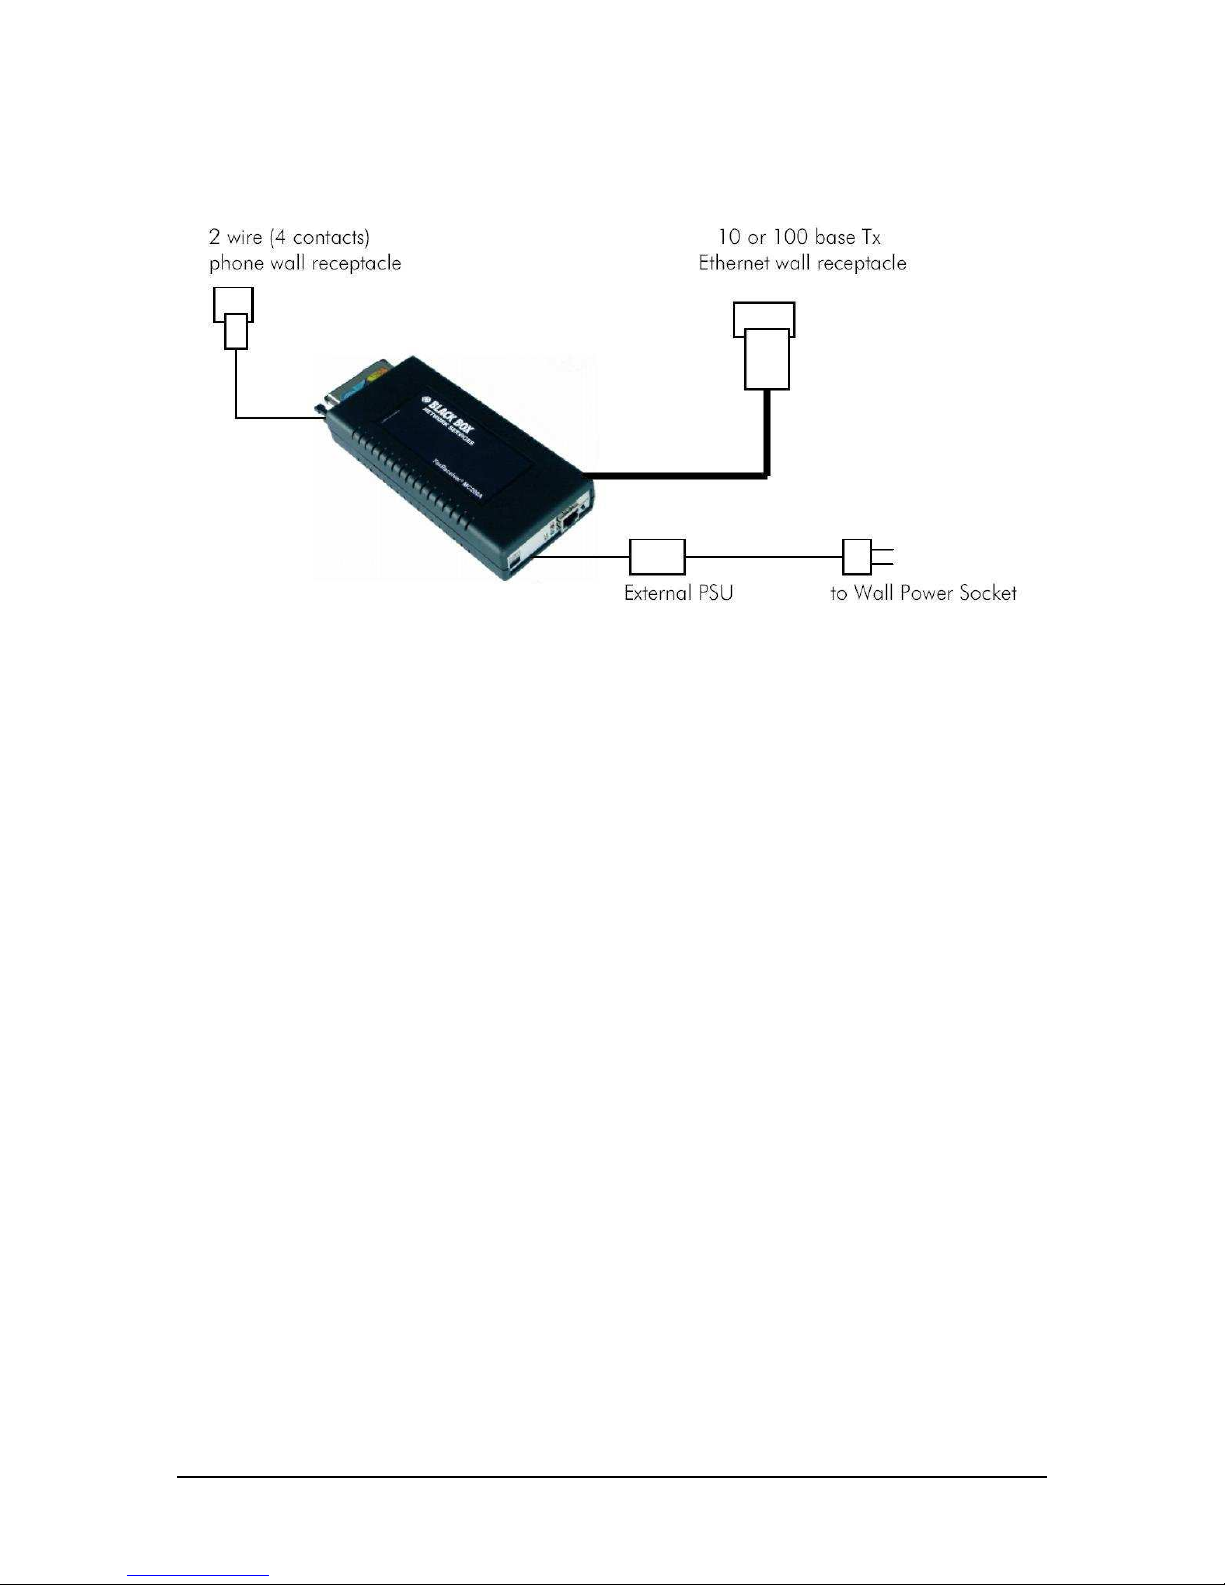
Typical installation replacing an incoming fax machine:
Copyright 2006 ingdale User Manual, 62-15820000 Page 10
1010
10 of
of of
of 49
4949
49
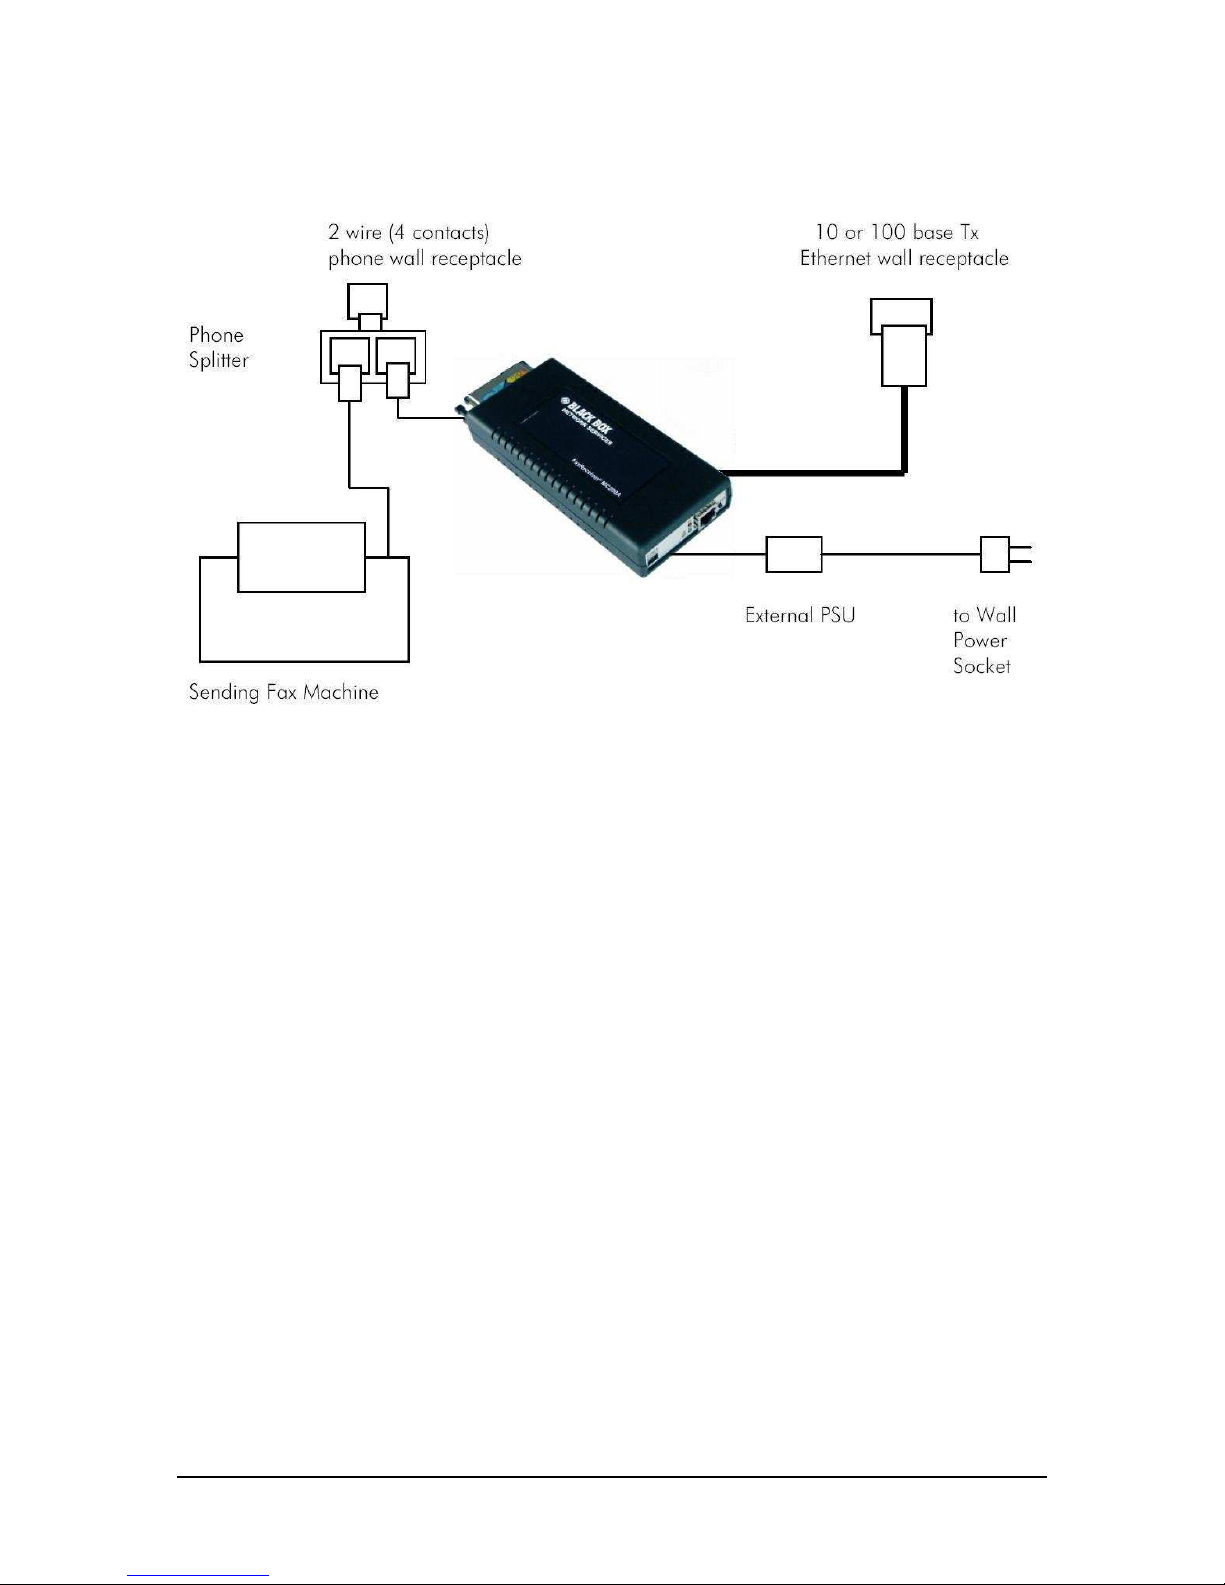
Installation where an outgoing fax machine is require on incoming line:
NOTE: If you aisy chain from an outgoing fax machine, it shoul be set to either
not auto answer or answer after 4 rings or more so that the FaxReceiver will pickup
first.
NOTE: You shoul also set the fax machine to tone ialing an not pulse ialing.
Pulse ialing causes voltage spikes on the line that can be mistaken for an incoming
ring, an the FaxReceiver will attempt to answer.
Otros manuales para FaxReceiver MC200A
3
Otros manuales de Máquina de fax de Black Box


