BIOS BIOS Sprint 8.0 Manual

Owner’s Manual
and Instructions
Personal Mobility Scooter

16975 Leslie Street Newmarket, ON L3Y 9A1 PHONE: 905.952.3731 • www.biosliving.com
TABLE OF CONTENTS
I. Introduction...............................................................2
II. Assembly..................................................................5
III. Safety First................................................................ 11
IV. Electromagnetic Interference and Warning....................18
VI. Parts Introduction.......................................................22
V. Operation................................................................. 23
VII. Care and Maintenance ..............................................36
VIII. Maintenance Schedule............................................... 38
X. Basic Troubleshooting ................................................39
IX. Specifications............................................................41
X. BIOS Scooter Warranty..............................................42
XI. Buyer’s Registration Form............................................43
1

INTRODUCTION
Thank you for purchasing the BIOS Sprint 8.0 Personal Mobility
Scooter (PM Scooter). The Scooter you have purchased, has
features exclusive to our BIOS Scooter and was designed to
provide you with comfort and safety.
WARNING: Carefully read this owner’s manual before using
the vehicle. This manual contains important information
concerning the safe operation and proper maintenance of your PM
Scooter.
Improper use of the vehicle could result in harm, injury or accidents.
Before using your Scooter, make sure all components are present
and no damage has occurred during shipping. If you do not
receive a complete scooter or damage has occurred during
shipping - please contact Thermor Ltd.
This owner’s manual includes operating instructions for every
aspect of the Scooter and its assembly. With proper care and
maintenance, you should enjoy many years of dependable service
from your vehicle.
This manual includes a repair/maintenance record chart and
warranty information. Your scooter should receive regular
maintenance according to the schedule outlined in this manual
and/or the recommendation from an authorized Thermor service
representative.
Please keep the manual in a safe place or with the BIOS PM
Scooter.
2

16975 Leslie Street Newmarket, ON L3Y 9A1 PHONE: 905.952.3731 • www.biosliving.com
Purchaser’s Agreement
By accepting purchase of this product, you agree that you will not
alter, modify or change this product or remove or disconnect or
render inoperable any guards, shields or other safety features of
this product.
Failure to follow the instructions, warnings and information
provided in this manual and/or those located on the BIOS
Scooter can result in personal injury or product damage and will
void the BIOS Scooter product warranty.
Design changes may not be reflected in some illustrations/
pictures and the manual may not correspond to the vehicle that
you purchased. The manufacturer reserves the rights of final
interpretation of the manual.
3
www.BIOSliving.com
TH3132_071612

BIOS SCOOTER
4

16975 Leslie Street Newmarket, ON L3Y 9A1 PHONE: 905.952.3731 • www.biosliving.com
ASSEMBLY
The scooter is heavy, assembly and disassembly will require
assistance of one or more persons. Do not attempt to lift the
scooter beyond your physical capability and/or without assistance.
• Always assemble or disassemble the scooter on a level, dry
surface
• Ensure you have sufcient room to work and move around while
assembling or disassembling the scooter (1.83 meter circle or
6 feet is recommended)
Fully Assembled Scooters
your scooter may come fully assembled, BATTERIES ARE NOT
ATTACHED on fully assembled scooters. Please follow the below
steps to attach the battery to the scooter.
The scooter’s parts can be heavy and difficult to maneuver, it is
always best to have assistance during the removal of the seat or
contact an authorized Thermor service center representative.
1. Ensure the tiller is in the most upright position.
2. Locate the seat rotation lever.
5
Seat rotation
lever

3. While gently pulling forward on the seat rotation lever, lift the
seat upwards.
4. Remove rear shroud on the scooter
5. Connect the shroud connectors.
6. Replace the rear shroud, ensure rear shroud are securely in
place.Check that the wheels do not rub on the shroud frame.
7. install seat see section ‘seat installation’
6

16975 Leslie Street Newmarket, ON L3Y 9A1 PHONE: 905.952.3731 • www.biosliving.com
Assembly
The scooter comes disassembled in 6 parts + 1 battery charger. No
tools are required to assemble the scooter. Remove all scooter parts
from the carton and insure all parts are present.
Arm rest x 2 Battery pack x 2 Basket x 1
Seat x 1
Mirrors x 2 Scooter body x 1 Battery Charger x1
(For indoor use only)
Battery Installation
1. Remove the rear shroud on the scooter.
7

2. Disconnect the shroud connectors.
3. Place the new batteries into the battery wells, with the terminals
facing towards the front of the scooter.
4. Connect the red cable to the positive (+) battery terminal (red to
red).
5. Connect the black cable to the negative (-) battery terminal
(black to black).
6. Reconnect and tighten all screws that hold the battery terminals.
7. Ensure that the battery terminal boots are covering the battery
terminals.
8
16975 Leslie Street Newmarket, ON L3Y 9A1 PHONE: 905.952.3731 • www.biosliving.com
8. Secure Velcro®straps over batteries and attach to scooter frame.
9. Replace the rear shroud, ensure rear shroud are securely in
place.
Check that the wheels do not rub on the shroud frame.
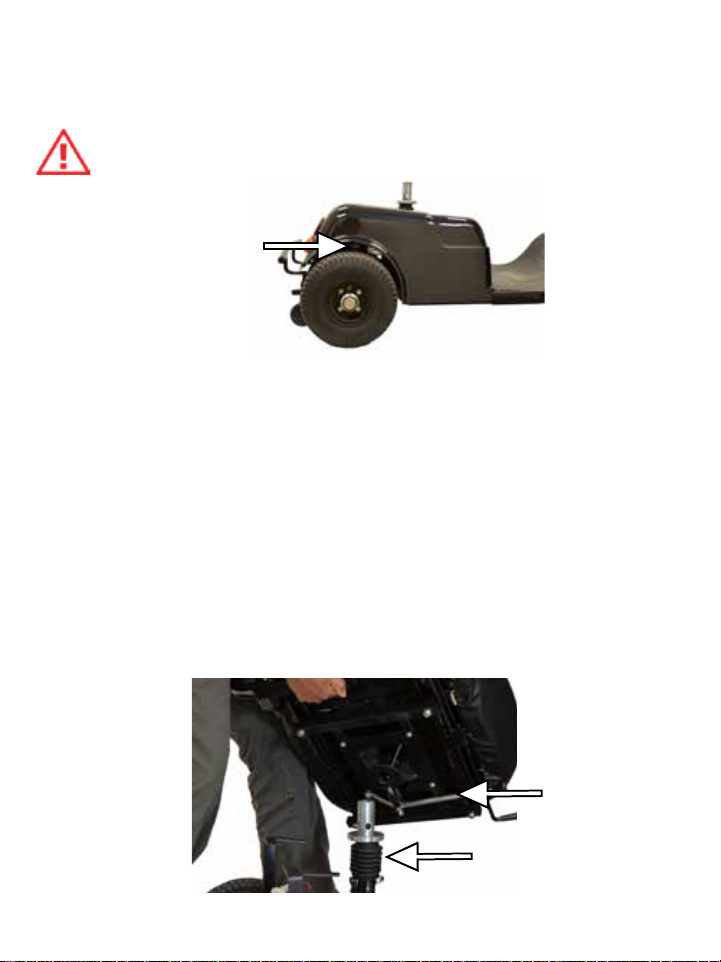
Seat Installation
1. Ensure the tiller is in the most up-right position.
2. With the rear shroud securely in place attach the seat by sliding
the seat over the seat post.
3. With the seat resting on the post (must be held in place) pull
forward on the seat rotation lever.
4. Move the chair slightly; in a side-to-side motion, until the seat
drops in-place and locks.
5. If the seat locks on an angle, pull forward on the seat rotation
lever and rotate the seat into the desired position.
9
Seat rotation
lever
Seat post
Este manual sirve para los siguientes modelos
2
Tabla de contenidos
Idiomas:


