BIKON 1016 (Standard)
BIKON-Technik GmbH
Hansemannstrasse 11 D-41468 Neuss ●Germany
Tel.
(02131)
71889-0
Fax (02131) 71889-20 ●http://www.bikon.com E-Mail [email protected]
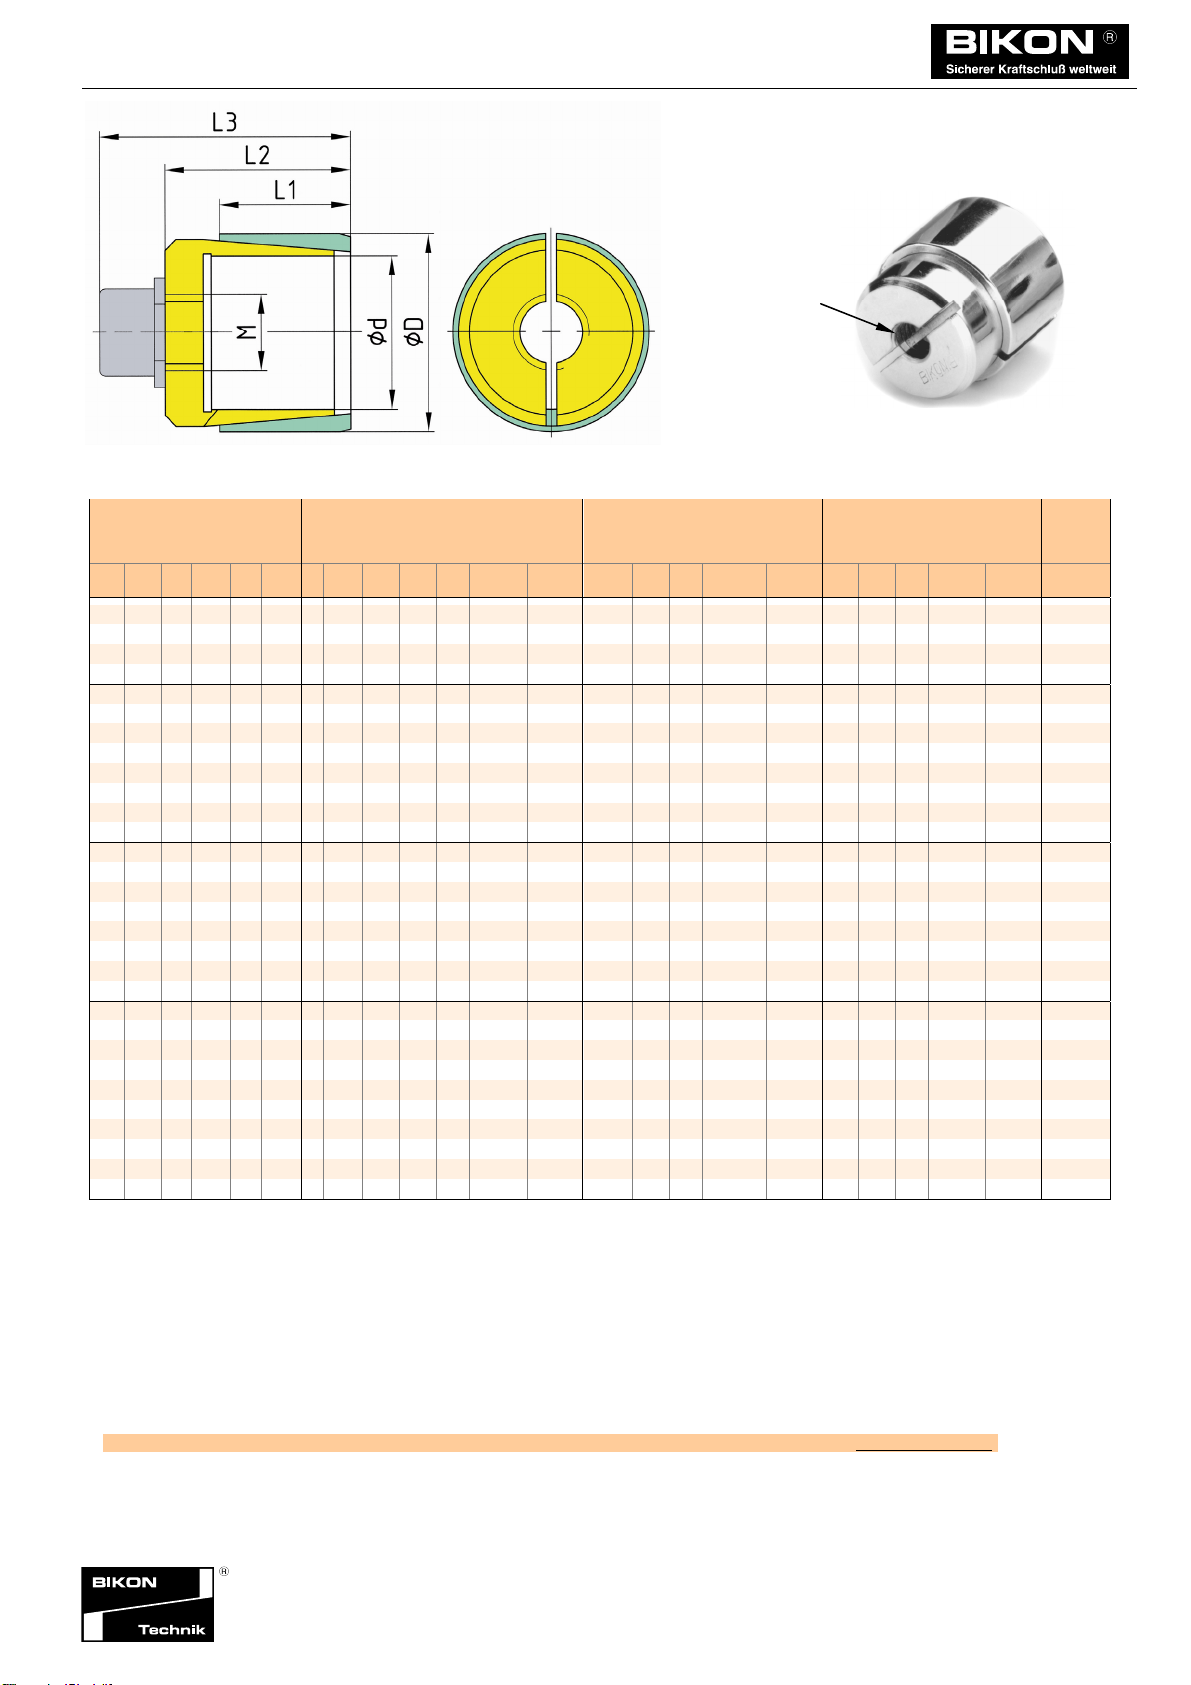
BIKON 1016
wurde 1973 von BIKON-Technik GmbH entwickelt.
Bei der Montage erfolgt kein axiales Verschieben de
Nabe.
BIKON 1016
was developed 1973 by BIKON-Technik GmbH.
With installation the hub does not move in axial
direction.
Einbauraum
Oberflächengüte und Passungen
Space
Surface quality and tolerances
selbstzentrierend self-centering autocentrante
BIKON 1016
è stato sviluppato dalla BIKON-Technik GmbH nel
1973. In fase di montaggio, il mozzo non subisce
spostamenti assiali.
Spazio destinato all'inserimento
Qualità della superficie ed accoppiamenti
Montage
lle BIKON 1016 werden generell mit eine
Schraube verspannt. Die Gewindegröße in der Welle
entnehmen Sie bitte dem Maßblatt.
Die Ringe müssen vor der Montage am Konus locke
aufeinander sitzen - selbsthemmender Kegel.
Spannsatz geölt einsetzen.
Kein Molybden-Disulfid (MoS2) oder Fett verwenden !
Schraube (Teil 3) in die Welle einschrauben. Bitte
darauf achten, daß die Schraubengüte dem
Wellenmaterial entspricht.
Schraube mittels Drehmomentschlüssel anziehen.
Kontrolle
nzugsmoment TAder Schraube (3) prüfen. De
nzug der Schraube und die Montage ist beendet,
wenn sich die Schraube nicht mehr anziehen lässt.
Spannsatz vor Verschmutzung schützen !
Installation
ll BIKON 1016 are installed with one screw. Please
take dimensions for the thread in the shaft from the
data sheet.
The rings must sit before assembly on the cones
loosen to each other - self locking cones.
Lubricate locking assembly with oil.
Don't use molybdenum-disulfide (MoS2) or grease !
Insert the screws (3) in the shaft.
Please take notice to the fact that the class o
screws corresponds to the shaft material.
Tighten screws with a torque wrench.
Verification
Verify maximum tightening torque TAon screw (3).
Tightening and installation are completed, if the
screw cannot be tighten any more.
Protect the locking assembly against soiling !
Montaggio
Tutti gli elementi BIKON 1016 vengono generalmente
bloccati con 1 vite. I dati tecnici per i filetti nei mozzi,
sono indicati nella scheda tecnica dimensionale.
Prima del montaggio gli anelli devono essere inseriti
liberamente sul cono – cono autobloccante.
Lubrificare il dispositivo di bloccaggio con olio
prima di inserirlo.
Non utilizzare né bisolfuro di molibdeno (MoS2) né
grasso!
vvitare le viti (part. 3) sull'albero. Verificare che la
qualità delle viti sia adatta al materiale dell'albero.
vvitare la vite con una chiave dinamometrica.
Controllo
Verificare la coppia di serraggio TAdella vite (3). Il
lavoro di serraggio e di montaggio sarà terminato
quando la vite sarà stata serrata.
Proteggere il dispositivo di bloccaggio dalla sporcizia!
Demontage
Die Schraube (3) lösen und herausschrauben.
Flansch aufsetzen und die Schraube (4) in die
Spannhülse (Teil 1) einschrauben.
Lösen der Verbindung durch Anziehen der Schraube
(4).
Removal
Release and remove the screw (3).
Put on the flange and the screw (4) in the inner-ring
(1).
The assembly will be loosen by tightening the scre
(4).
Smontaggio
llentare e svitare la vite (3).
Inserire la flangia ed avvitare la vite (4) nella bussola
di serraggio (part. 1).
llentare la connessione avvitando la vite (4).
Nabenberechnung
siehe Seite 53
oder kontaktieren Sie unsere technische Abteilung
Calculation of hub
see page 53
or contact our technical department
Calcolo del mozzo
vedere pagina 53
oppure contattate il nostro ufficio tecnico.
Rund- und Planlauf
Generelle Angaben zu Rund- und Planlauf sind nicht möglich.
Diese sind von den Anwendungen abhängig.
Kontaktieren Sie bitte unsere technische Abteilung.
Concentricity and run-out tolerance
General information concerning concentricity and run-out
tolerance are not possible. These depend on the application.
Contact please our technical department.
Concentricità e planarità
Non sono disponibili dati relativi alla concentricità ed alla
planarità, essendo questi dipendenti dal tipo di applicazione.
Vogliate contattare il nostro ufficio tecnico.
29