BakerStone Original Series Manual de usuario

Original Series
Outdoor Multi-function
Cooking Center
Product Guide
Model # BSO4500-EBK-OOO-000
Important, Retain for Future Reference: Read Carefully
WARNING: This product guide contains important information
necessary for the proper assembly and safe use of the appliance.
Read and follow all warnings and instructions before assembling
and using the appliance.
Follow all leak-check procedures in the Product Guide before
using the appliance.
This appliance is for outdoor use only.
If you smell gas:
Extinguish any open flame.
Open lid.
If odor continues, keep away from the appliance and
immediately call your gas supplier or your fire department.
Do not store or use gasoline or other flammable liquids or
vapors in the vicinity of this or any other appliance.
An LP cylinder not connected for use shall not be stored in the
vicinity of this or any other appliance.
Failure to follow these instructions could result in fire or explosion
which could cause property damage, personal injury or death.
DANGER
WARNING
www.bakerstonebox.com - (855) 657 OVEN (6836)

WARNINGS
Failure to follow these instructions could result in fire or explosion which could cause
property damage, personal injury or death.
The installation must conform with local codes or, in the absence of local
codes, with either the National Fuel Gas Code, ANSI Z223.1/NFPA 54, or the Natural
Gas and Propane Installation Code, CSA B149.1, or the Propane Storage and Handling
Code,CSA B149.2, or the Standard for Recreational Vehicles, ANSI A119.2/NFPA 1192, and
CSA Z240 RV Series, Recreational Vehicle Code, as applicable.
This appliance shall be used only outdoors, and shall not be used inside a building,
garage or any other enclosed area.
This appliance is not intended to be used in or on a recreational vehicle or boat.
While using this appliance maintain a minimum clearance from sides and back of at
least 36in (0.9m) between appliance and any combustible material or contruction. Do
not use this appliance under overhead combustible suaces.
Clean and inspect the supply hose and regulator before each use of the appliance.
If there is evidence of abrasion, wear, cuts, or leaks, the hose must be replaced prior
to using the appliance. Only the included hose or a replacement supplied by the
manufacturer shall be used with the appliance.
The appliance is only to be fueled by a LP (liquid propane) gas cylinder measuring 12”
(30.5cm) diameter and 18” (45.7cm) high with a 20lb. (9.1kg) capacity. The gas cylinder
(tank) must incorperate a Type 1 cylinder valve and an over filling protection device
(OPD).
The LP gas cylinder must be constructed and marked in accordance with the
Specifications for LP gas Cylinders of the U.S. Department of Transportation (D.O.T.) or
the Standard for Cylinders, Spheres and Tubes for Transportation of Dangerous Goods
and Commission, CAN/CSA-B339, as applicable.
Do not unhook or replace the LP Gas Cylinder while the appliance is in use.
Before each use and aer replacing the LP gas cylinder peorm a leak check at all
connections and fittings. Do not use an open flame to check for leaks.
Keep the fuel supply hose away from any heated suace(s).
This appliance is not intended for commercial use.
The use of alcohol, prescription or non-prescription drugs may impair the consumer’s
ability to properly assemble or safely operate the appliance.
In the event of an oil or grease fire do not attempt to extinguish with water. Immediately
call the fire department. A Type BC or ABC fire extinguisher may, in some circumstances
contain and/or extinguish the fire.
Do not leave the appliance unattended. Keep children and pets away from the
appliance at all times.
Do not move the appliance when in use.

WARNINGS - continued
This appliance is not intended for and should never be used as a heater.
This appliance will be hot during and aer use. Use insulated oven mitts or gloves for
protection from hot suaces or splatter from cooking liquids.
Do not touch the appliance until it has completely cooled. The black metal housing
can reach temperatures of 400°F(204°C) during use.
Use only appropriate bake-ware or utensils while baking and cleaning the appliance.
Do not use plastic, silicone or glass.
Do not allow food other than Pizza or Bread Dough to contact the stones. Any foods
that contain fat, oil or butter (meats, items coated with olive oil, cookies, biscuits, etc.)
should not contact the stones directly. These items should be baked in a metal baking
pan, on a metal baking sheet or in a cast-iron skillet as the stones will absorb the fat, oil
and butter which can cause smoking, odors, staining, and can impart rancid flavors to
items that you bake in the future.
Stones are fragile and can break if dropped. The appliance becomes extremely hot, do
not touch the stones or any other part of the appliance while it is in use.
To clean stones, heat the appliance for 15 minutes aer food is cooked and scrape o
any remaining residue. Do not use any cleaning agents or other liquids to clean the
stones.
Do not place gasoline, alcohol, wood products, charcoal or any other combustible
material (unless BakerStone approved) in the baking chamber.
Remove any appliance cover and place at least 10 feet (3 Meters) from appliance
before use.
Do not alter or change the gas valve orifices.
This appliace requires regular cleaning of major components and more detailed
cleaning of burner system aer prolonged period of storage. Insects and/or insect
nests may prevent safe usage and proper peormance of the appliance
Only use the presure regulator and hose included with this appliance.
Do not alter or install as a built in appliance.
The use of alcohol, prescription, or non-prescription drugs may impair the consumer’s
ability to properly assemble or safely operate the appliance.
Chant HK Development Limited
Suite 706, Rightful Centre, 11-12 Tak Hing Street, Jordan, Kowloon, Hong Kong

Product Assembly Diagram
Figure 1.2
Figure1.1
Figure 1.3

What’s in the package
Assembly of the Grill
LP Gas Cylinder Requirements
LP Gas Cylinder Placement
LP Gas Cylinder Connection
LP Gas Leak Test
Pre-Use Safety Checks
Lighting Instructions
How to Use The Pizza Oven Box
Routine Care & Cleaning
Periodic Care & Cleaning of Burner System
Customer Service
Customer Service Parts Identifier
Warranty
Frequently Asked Questions
4
6
14
15
16
17
17
18
20
22
24
25
26
28
30
Table of Contents Page
Gridddle Seasonning Instructions 19
Cleaning Your Griddle 23

4
What’s in the package
Before assembly, ensure that all parts below are included. Please note part numbers are not listed
in numerical order. For a complete parts diagram and part list for customer service needs such as
replacement parts please go to page 26.
18 - Cabinet
Base Panel
21 - Cabinet
Middle Panel
25 - Cabinet
Front Panel
Firebox Assembly
47 - Pizza Oven Box
43 - Griddle 46- Griddle Cover Assembly
46.1 - Griddle Cover
46.2 - Griddle Cover Handle
15 - Wheel Axle
16 - Wheel
(x2)
17 - Wheel
Cap (x2)
50 - Match Lighter
20 - Side Frame
Right
19 - Caster
(x2)
13 - Griddle Storage Rack24 - Cabinet Top Panel1 12 - Front Brace
14

5
Tools required for assembly, not included:
Have a question? Please Do Not Return This Product To The Store.
Contact us first! 1-855-657-6836
or email support@bakerstonebox.com
11 - Drip Tray
Support
(x2)
29 - Rear Beam 23- Firebox Support
(x2)
22 - Gas Cylinder
Hook
10 - Folding Table
(x2)
28 - Table
Support Right
(x2)
32 - Griddle
Grease Cup
30 - Grill
Grease Cup
26- Drip Tray
6 - Control Knob
(x6)
Battery
48 - Warming Rack49 - Cooking Grate
(x3)
2 - Flame
Tamer (x4)
AA - M4x12 Pan
Head Screw
(x5)
CC - M5x12 Pan
Head Screw
(x4)
DD - M6x12 Pan
Head Screw
(x40. )
EE - M6x12 Flat
Head Screw
(x12)
FF - M5 Nut
(x4) GG - M10 Nut
(x2) HH - M5 Spring Washer
(x4)
II - Battery
BB - M5x8mm
Shoulder
Screw(x1)
27
6
1418 20
DD
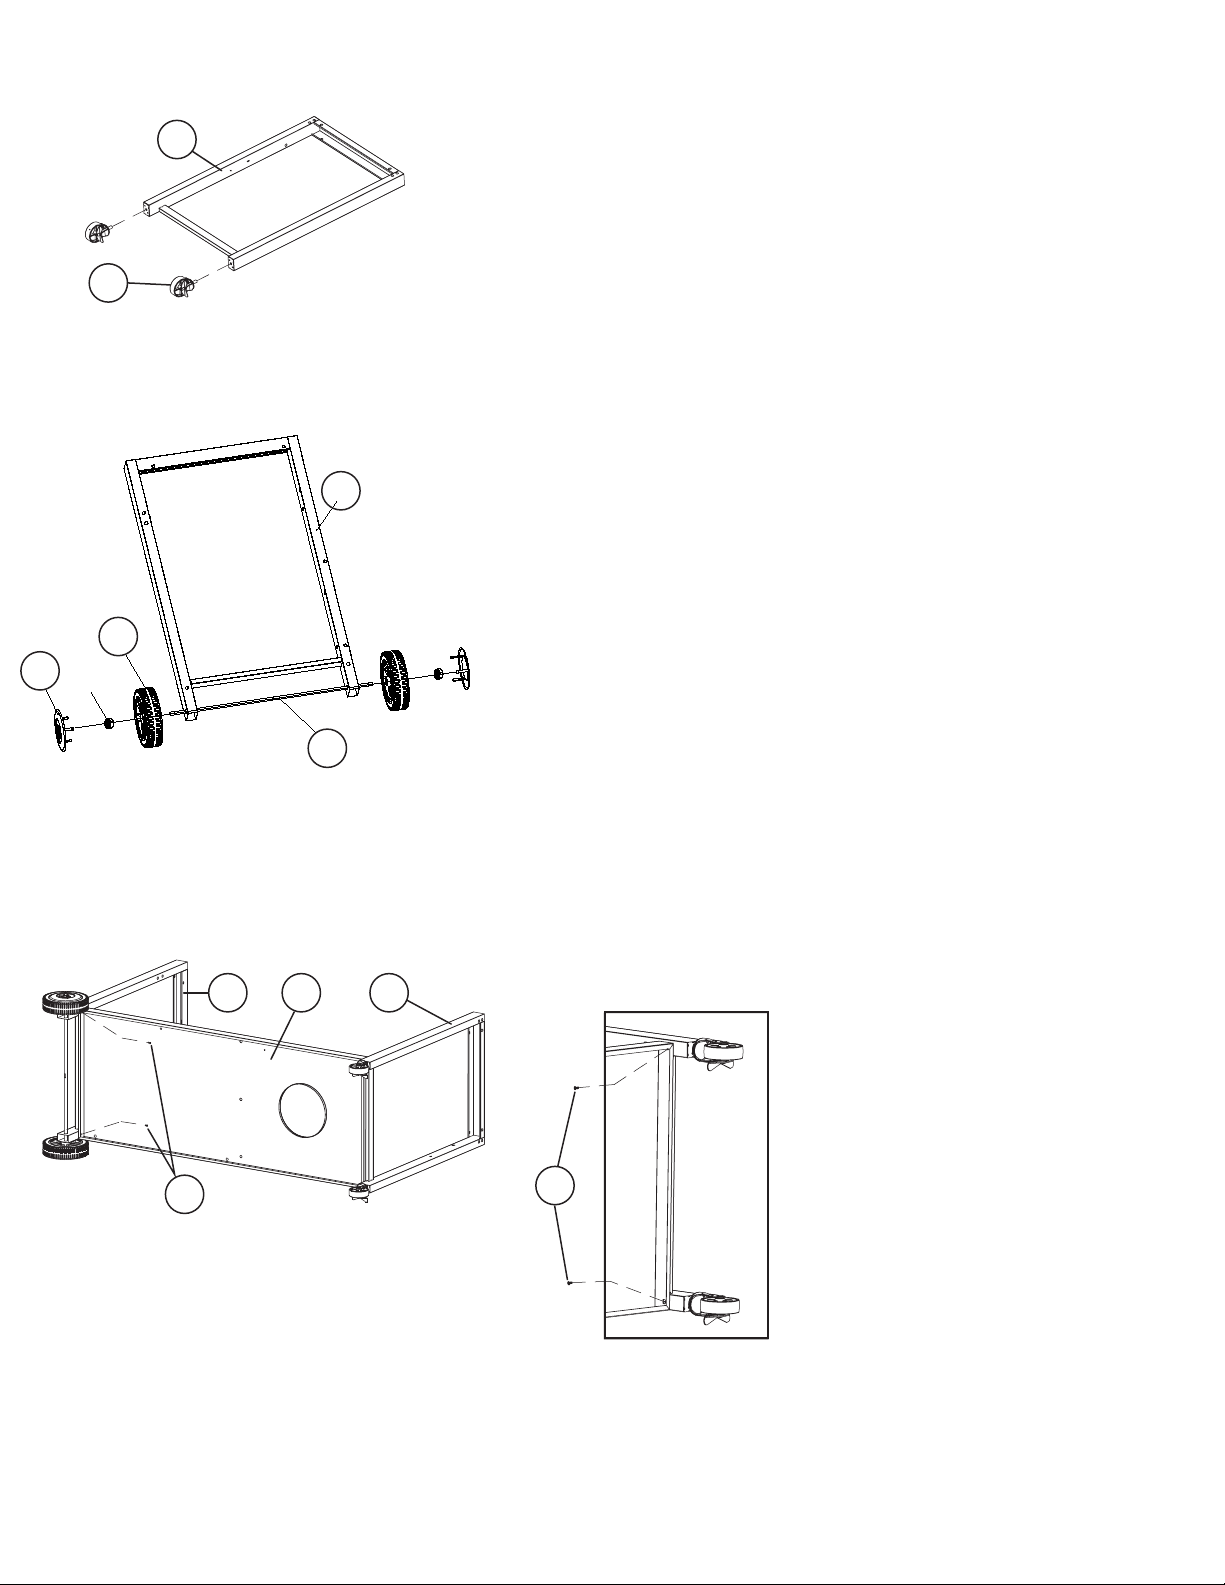
Assembly of the Grill
STEP 1. Attach the CASTERS (19) to the RIGHT SIDE
FRAME (20).
STEP 2. Attach the WHEEL (16), WHEEL AXLE (15) to the LEFT
SIDE FRAME (14) using NUTS (GG). Next place the CAPS (17)
onto the wheels.
STEP 3. Assemble the CABINET BASE PANEL (18) to the SIDE
FRAMES (14 and 20) using SCREWS (DD).
19
DD
20
14
16
GG
15
17
7
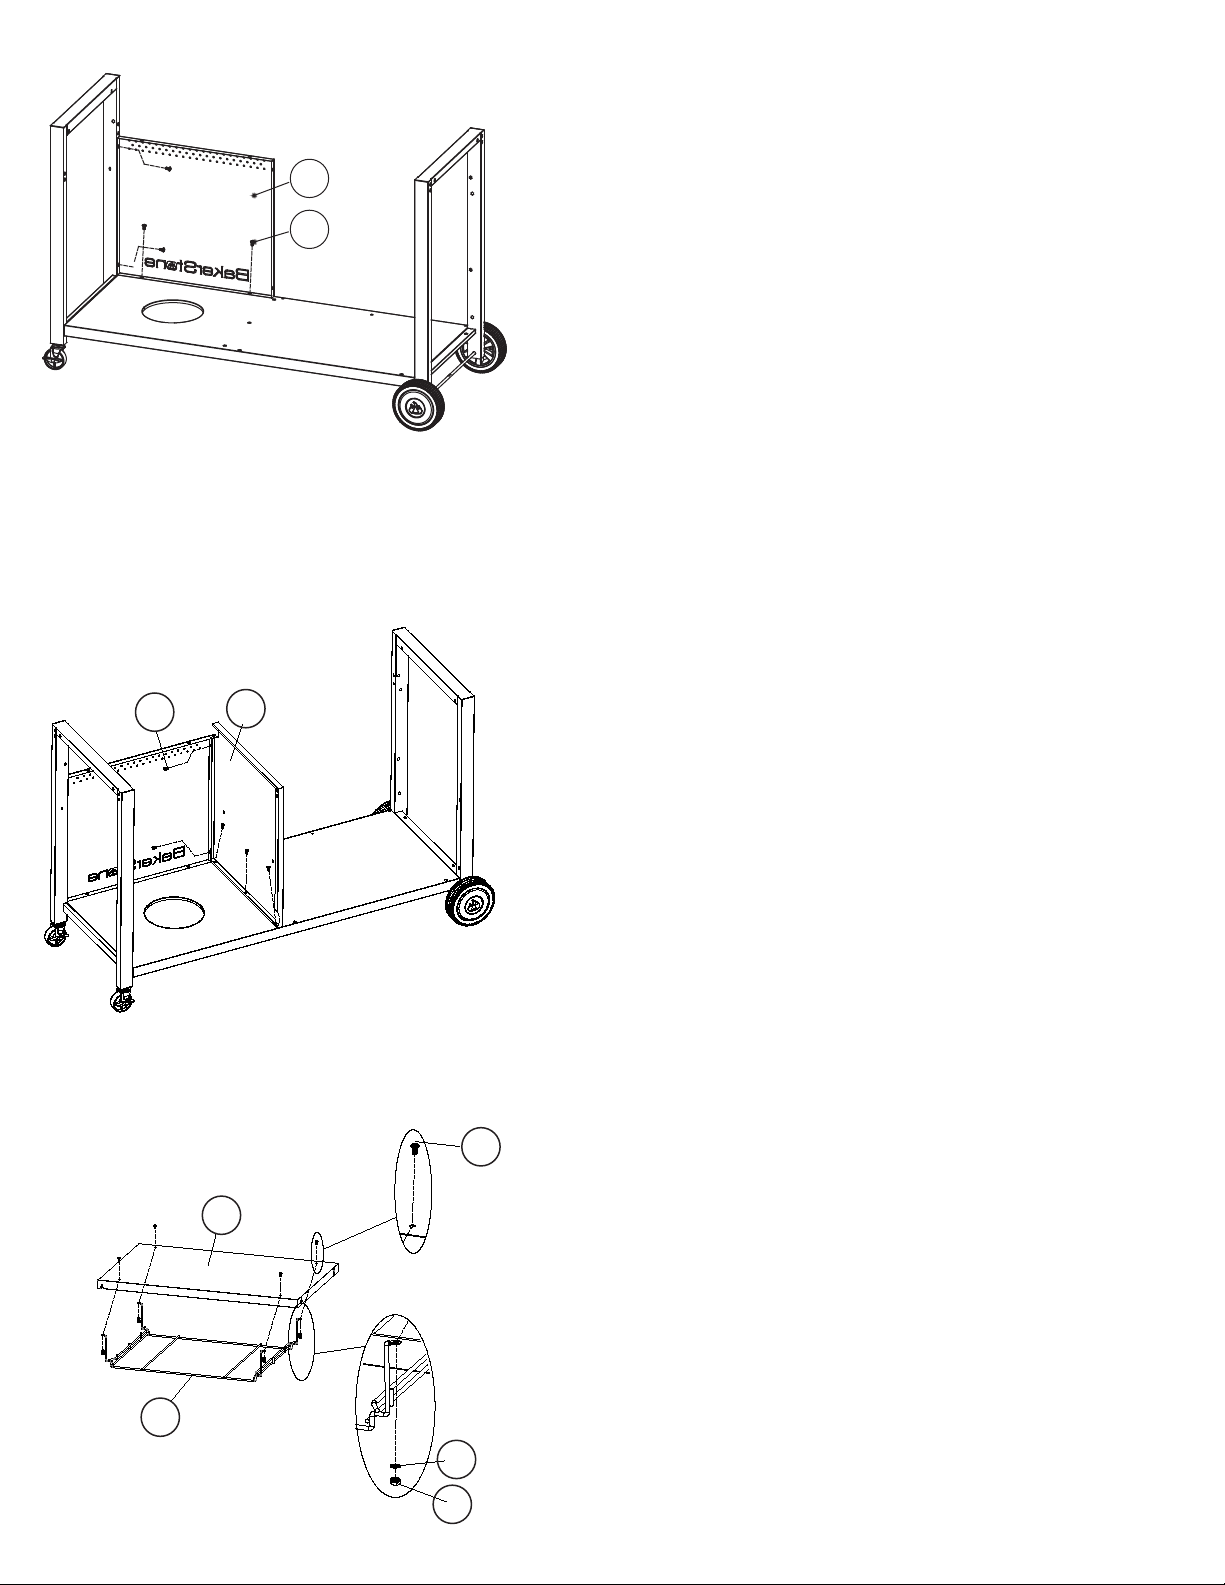
STEP 4.Attach the CABINET FRONT PANEL (25) to the BASE
PANEL (18) and SIDE FRAME (20) using 4 SCREWS (DD).
STEP 5.Attach the CABINET MIDDLE PANEL (21) to the BASE
PANEL (18) and CABINET FRONT PANEL (25) using 3 SCREWS
(DD).
STEP 6. Attach the STORAGE RACK (13) to the CABINET TOP
PANEL (24) using 4 SCREWS (CC), 4 SPRING WASHERS (HH)
and 4 NUTS (FF).
DD 21
CC
FF
HH
24
13
25
DD

8
STEP 7. Pre-install 2 CREWS(DD) on the SIDE FRAME(14)
and CABINET MIDDLE PANEL(21) respectively. First
attached the CABINET TOP PANEL(24) into the CABINET
MIDDLE PANEL(21), then attached the CABINET TOP
PANEL(24) into the SIDE FRAME(14). Then fasten the 4
pre-install screws.
STEP 8.Attach the FRONT BRACE (12) to the SIDE FRAMES
(14 and 20), FRONT CABINET PANEL (25) and CABINET
MIDDLE PANEL (21) using 1 SCREW (AA) and 6 SCREWS (DD)
as shown.
STEP 9. Attach the REAR BEAM (29) using 4 SCREWS (DD).
DD
DD
DD
29
AA DD
12
14
21
24
Otros manuales para Original Series
1
Este manual sirve para los siguientes modelos
1
Tabla de contenidos
Otros manuales de Parrilla de BakerStone


