Avolites Diamond 9 Manual de usuario
Welcome & Care Guide
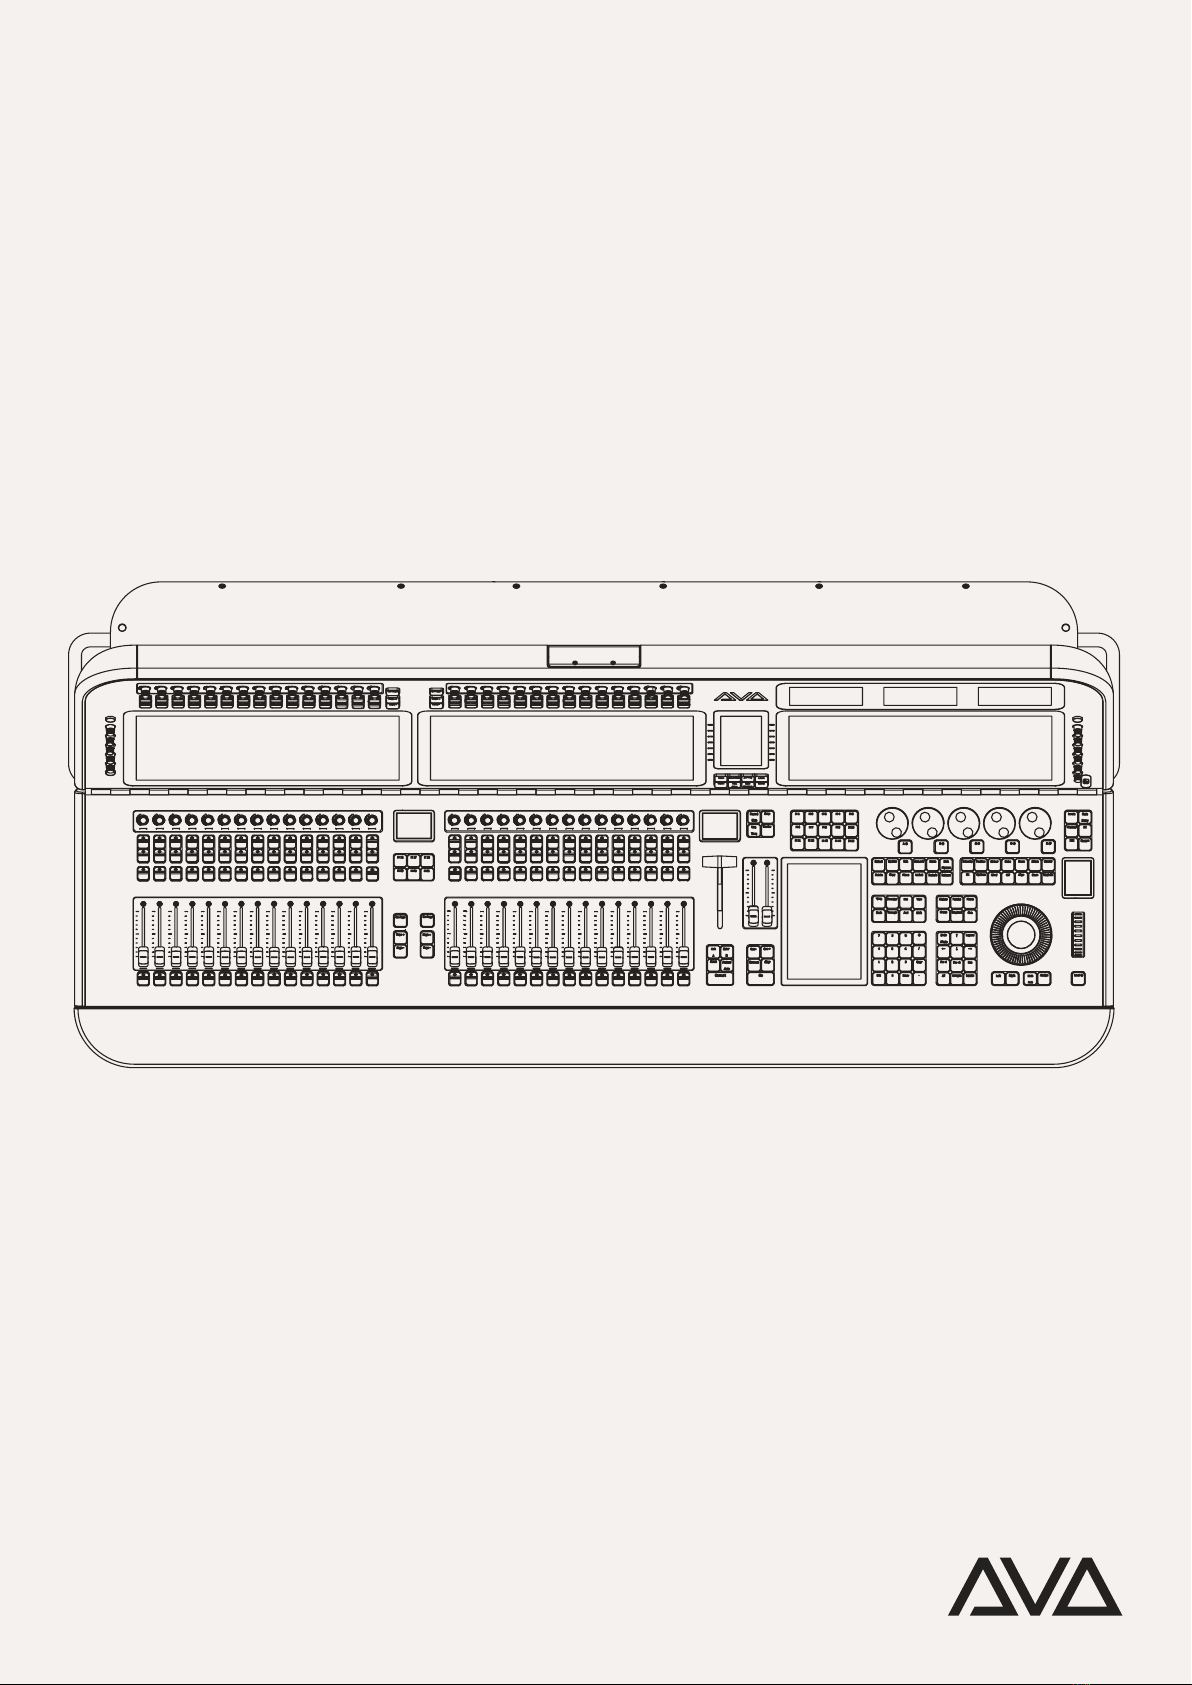
Avolites Diamond 9.

Welcome to Avolites
New Diamond 9
Since Avolites was founded 1976, our team has
always worked closely with the users of our
products. With their input we have redened our
agship Avolites Diamond experience for the next
generation of shows.
Right from its inception, Avolites has always been a
pioneer in the development of the integrated visual
canvas. Now with our new hardware combined with
our powerful software platforms, Titan and Ai, we
are able to control not only lights but also video,
generative content, pyrotechnics and cameras.
Designed from the ground up to power our
proprietary Avolites Synergy software feature set,
every component has been carefully chosen for its
quality and precision to control the most demanding
productions for years and decades to come. We
believe D9 will become the visual canvas console of
its time. Again.
Paul Wong
Avolites Managing Director
We hope you are delighted with our new Avolites
agship console, here are a few tips and hints to get
yourself up and running.

Building on four decades of
experience powering the most
demanding shows, Avolites
D9 is a dramatic evolution in
production control.
DESIGNED TO PIONEER THE NEXT GENERATION OF SHOWS
CHECKLIST OF WHAT IS IN THE FLIGHT CASE
Created in consultation with leading visual
designers, and alongside expert industrial designers,
D9 is ready for the next generation of ultimate shows
and beyond. With vast screen real-estate, all-new
controls, and unique media integration it intuitively
combines control of all visual aspects of the show.
Hand-crafted in London, built upon Avolites’ heritage
of quality and reliability.
– Power Cable (powerCON TRUE1)
– Dust Cover
– 4 Pin RBW LED Desk Lamp x2
– External Monitor stands and clamps x 2 (Optional)
– Documentation
– Spare Parts Kit
– Warranty Registration
3

Transpor t &
Storage
Be careful when moving or lifting your Avolites desk.
To avoid injury, a minimum of two people is required
when handling the desk.
Before transporting, remove all cabling, ensure the
keyboard tray is closed, return the screen back
to home position using the push down latch, then
protect the console using the provided dust cover. It
is strongly recommended to transport the desk using
the provided ight case.
The Avolites console must be protected from
vibration during transportation. The console must be
checked after transportation for damage.
Pay attention to the temperature and humidity during
storage and transportation.
OPERATION
0 up to 40 Degrees (ºC)
(20% up to 90% relative humidity – no condensation)
STORAGE & TRANSPORT
–10 up to 50 Degrees (ºC)
(10% up to 90% relative humidity – no condensation).
Only use the device within its operating limits.
4
TEMPERATURE

5
General Safety
Instructions
Place the console on to a stable and load-bearing
surface only.
Do not place high powered radio devices on top of
the console
Do not support yourself on the console, use the
provided armrest only.
Do not place any heavy objects on top of the
console.
Do not use excessive force on buttons, faders, knobs
and switches.
Switch off the console using the power switch
located on the rear if left unattended for a long
period of time.
Shut down the console using the power button
located under the arm rest, then switch off the
power switch located on the rear and disconnect the
power cable before cleaning the device.
Prevent liquids from entering the console.
Do not cover or block any ventilation holes. These
are essential for the airow within and will protect
the device from overheating.
If the power cable or main plug power is defective,
let a qualied technician replace this immediately.
Unplug the power cable to disconnect the power
supply from electric voltage during thunderstorms.
IF ANY OF THE FOLLOWING OCCUR, PLEASE DISCONNECT THE
MAIN POWER PLUG AND CALL YOUR LOCAL DISTRIBUTOR OR
TECHNICAL SUPPORT TEAM
Ingress of liquids
Console has been exposed to rain or high ambient
humidity
The console fell damaging the housing
The console does not power on and none of the
troubleshooting and quick start steps resolve the
issue.
Support
All Avolites product related manuals are available
online and via the ‘Tools’ menu in the console.
To view the online manual, visit:
https://manual.avolites.com
Avolites offers a whole range of videos on how to
use your product in the best possible way. Get tips
and tricks from our experts on your product via our
YouTube channel. To learn more, visit:
https://www.youtube.com/user/avolitesvis
Share your knowledge and get help from other Titan
users. A community can be stronger and better than
the individual. Be part of the Avo community!
FACEBOOK GROUP
https://www.facebook.com/groups/Avolites/
FORUM
http://forum.avolites.com/
If you have any questions regarding your Avolites
product, please contact your local Avolites
distributor or reseller. If you require further
assistance, please contact
support@avolites.com. This email service is
monitored during regular business hours Monday
through Friday from 9am until 5pm (BST).
In the event of an emergency, please contact Avolites
out of hours support on +44 (0) 77831 178 888.
Please note, this number is strictly for emergency
technical support only.
ONLINE MANUAL
VIDEO TUTORIALS
COMMUNITY
LOCAL & MANUFACTURER SUPPORT
EMERGENCY CONTACT
6

7
I/O Panel The D9 provides exible connectivity so compatible
devices and cables remain in place whatever
vibration and knocks are thrown at them.
8
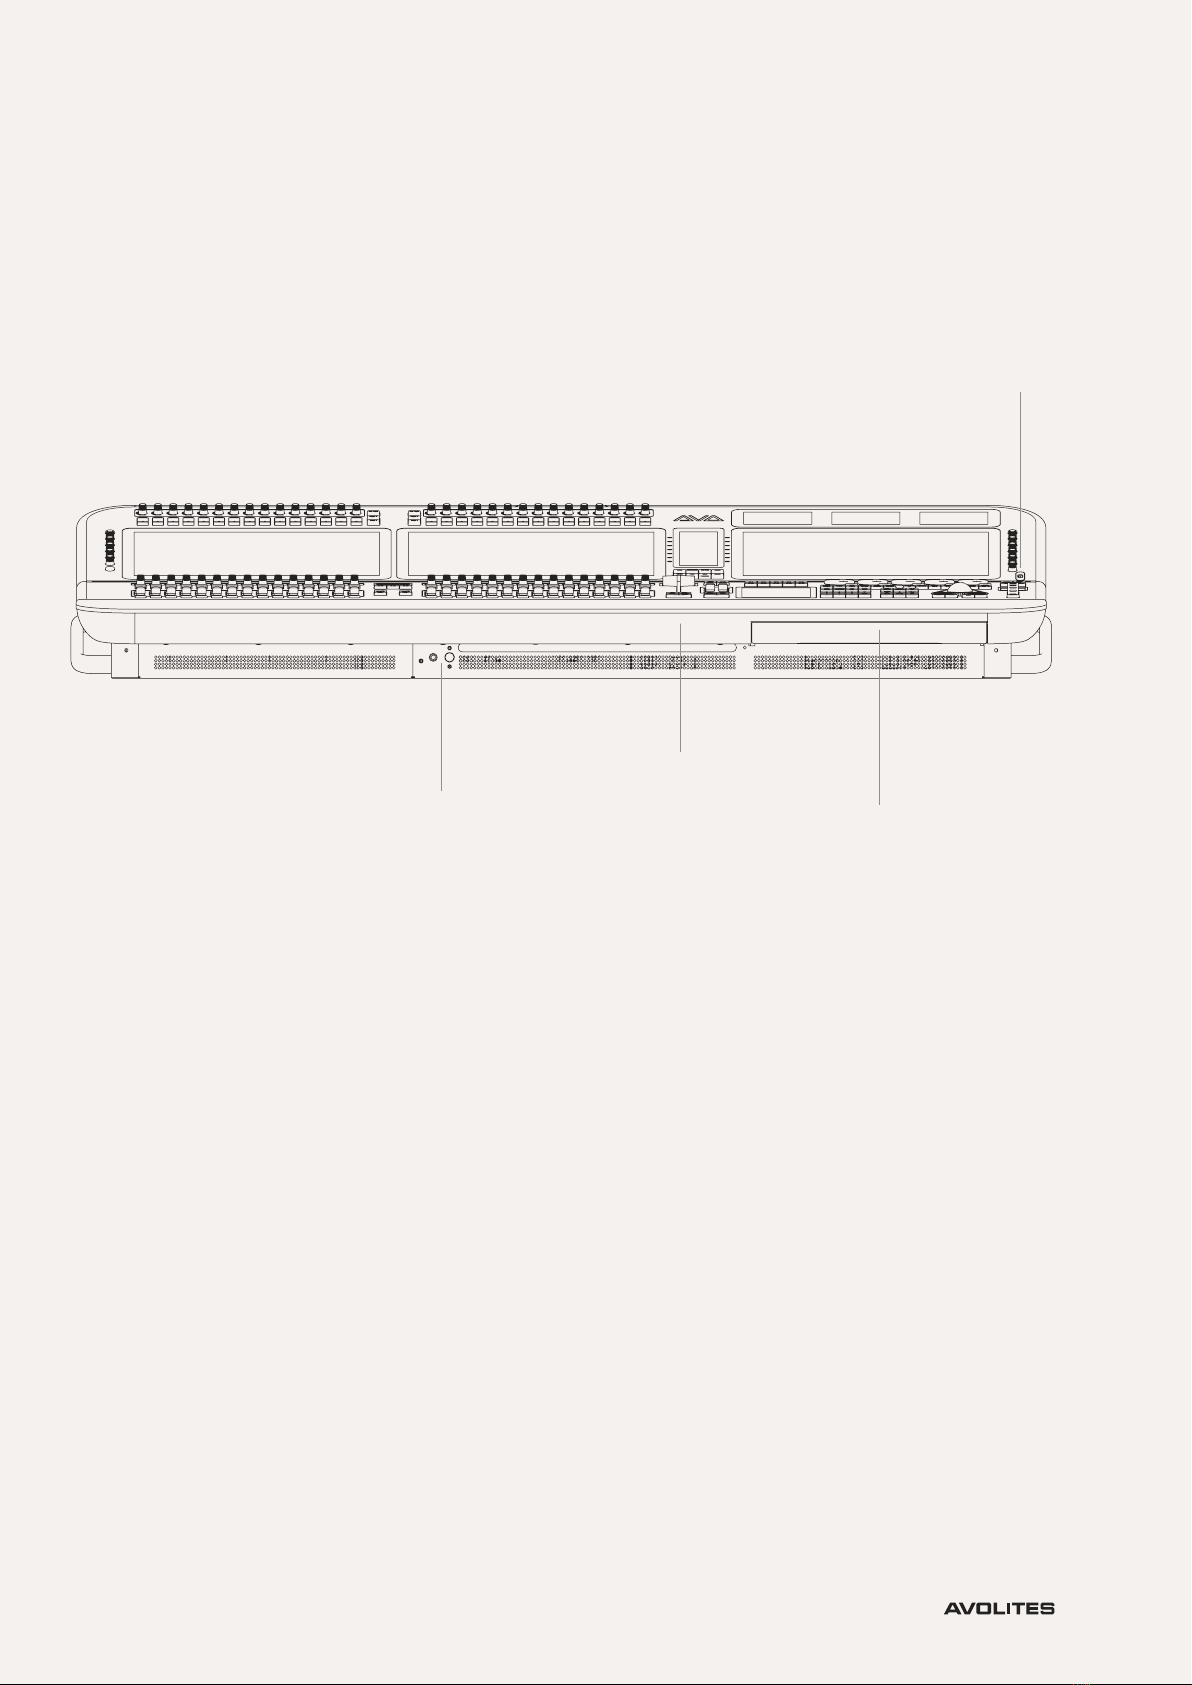
D9 Layout (Front):
1. ON/OFF SWITCH (INSIDE ARMREST)
2. USB 3.0
3. READING LIGHT
4. KEYBOARD TRAY
With backlit keys and responsive Cherry MX Low
Prole key switches, the keyboard is beautifully
concealed, repurposing the legendary Avolites
drawer.
34
2
1
9
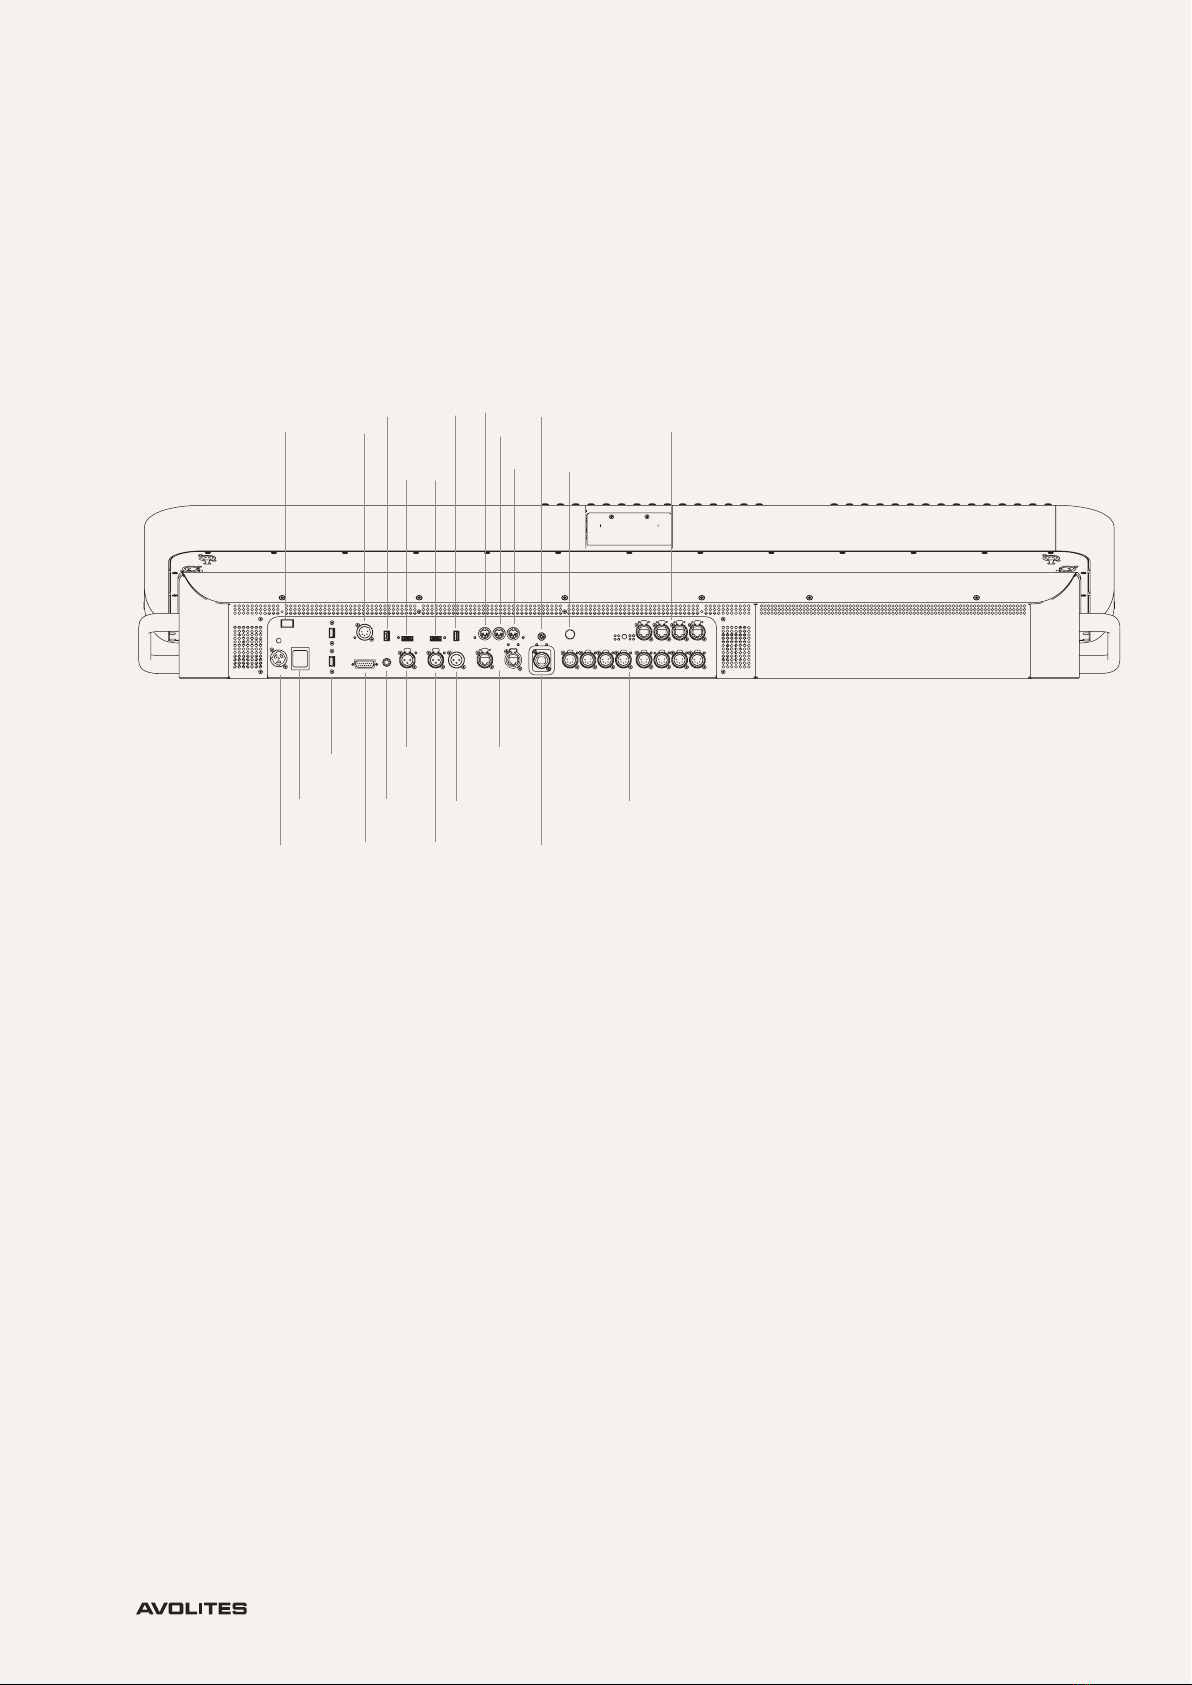
D9 Layout (Rear):
1. POWER INPUT
2. POWER SWITCH
3. UPS BATTERY INTERRUPT SWITCH
4. 2 X USB 3.0
5. GPIO
6. TRIGGER IN
7. AUDIO INPUT
8. LTC INPUT
9. LTC LOOP
10. DMX INPUT
11. 2 X HDMI
12. 2 X EXTERNAL MONITOR USB 2.0
13. MIDI IN
14. MIDI THRU
15. MIDI OUT
16. ETHERNET CONNECTIVITY
17. S/PDIF
18. FIBER CONNECTIVITY
19. WORK LIGHT
20. DMX OUTPUT
21. GIGACORE (LUMINEX) LED POWER & MODE INDICATOR
The onboard Gigacore 10 Luminex switch is validated
against all common protocols in the AV industry
including ArtNet, sACN, QoS and IGMP Snooping.
The integrated switch works awlessly with every
xture and device you connect to the network.
1
2
3
4
5
6
7
8
9
10
13
14
15
17
19
16
18
20
21
12 12
11 11

Quick Start 1. Unpack the console.
2. Remove the dust cover.
3. Place the device along with the bottom half of the
ight case onto a stable surface (recommended).
4. Using the push down latch raise the back panel.
1. Insert powerCON TRUE1 into the corresponding
jack.
2. Fit console lights.
2. Connect the main power plug.
3. Turn on the red power switch located on rear of
the console. Observe that the mains present neon is
lit
4. Press the power switch located under the arm
rest.
5. Once the software has fully launched and
the show le has loaded, you can then begin
programming.
1. Press the power switch located under the arm rest.
2. Switch off the power button located on the
back and remove powerCON TRUE1 from the
corresponding jack when the console has nished
powering down.
3. Return screen to home position using the push
down back panel.
4. Apply dust cover.
TO ENSURE THE CONSOLE IS RUNNING THE LATEST
SOFTWARE VERSION, PLEASE VISIT HTTPS://WWW.AVOLITES.
COM/SOFTWARE.
You can enjoy a complete system mounting option
by using the external monitor brackets to mount
additional displays.
To take advantage of this, securely hand-tighten the
provided brackets to the ight case. Place the VESA
bracket in position on the back of the monitor and
attach using the provided screws. Apply and tighten
the monitor clamps to the brackets.
19 to 24-inch monitors weighing between 2.2kg to
5.5kg.
VESA 100 x 100 mm
10
POWERING UP CONSOLE
POWERING DOWN CONSOLE
CONNECTING EXTERNAL MONITORS
(BRACKETS AND CLAMPS SOLD SEPARATELY)
COMPATIBILITY
Este manual sirve para los siguientes modelos
4
Tabla de contenidos
Otros manuales de Mezclador de música de Avolites

Avolites
Avolites Sapphire 2000 Manual de usuario

Avolites
Avolites Tiger Touch Manual de usuario

Avolites
Avolites Titan v11 Manual de usuario

Avolites
Avolites Tiger Touch Manual de usuario

Avolites
Avolites Titan V9 Guía de inicio rápido

Avolites
Avolites Tiger Touch Manual de usuario

Avolites
Avolites Sapphire Touch Manual de usuario


