Avermedia 500 Manual de usuario

FCC NOTICE
This device has been tested and found to comply with the limits for a Class B digital device, pursuant to Part 15
of the FCC Rules. These limits are designed to provide reasonable protection against harmful interference in a
commercial, industrial or business environment. This equipment can generate, use and radiate radio frequency
energy and, if not installed and used in accordance with the instruction, may cause harmful interference to radio
communications. However, there is no guarantee that interference will not occur in a particular installation. If
this equipment does cause harmful interference to radio or television reception, which can be determined by
turning the equipment off and on, the user is encouraged to try to correct the interference by one or more of the
following measures :
•Reorient or relocate the receiving antenna.
•Increase the separation between the equipment and receiver.
•Connect the equipment into an outlet on a circuit different from that to which the receiver is connected.
•Consult the dealer or an experienced radio/TV technician for help.
This device complies with Part 15 of the FCC Rules. Operation is subject to the following two conditions: (1)
this device may not cause harmful interference, and (2) this device must accept any interference received,
including interference that may cause undesired operation.
CAUTION ON MODIFICATIONS
To comply with the limits for the Class B digital device, pursuant to Part 15 of the FCC Rules, this device must
be installed in computer equipment certified to comply with the Class B limits. All cables used to connect the
computer and peripherals must be shielded and grounded. Operation with non-certified computers or non-
shielded cables may result in interference to radio or television reception.
Any changes or modifications not expressly approved by the grantee of this device could void the user's
authority to operate the equipment.
CE NOTICE
This is a Class B product.
DISCLAIMER
No warranty or representation, either expressed or implied, is made with respect to the contents of this
documentation, its quality, performance, merchantability, or fitness for a particular purpose. Information
presented in this documentation has been carefully checked for reliability; however, no responsibility is assumed
for inaccuracies. The information contained in this documentation is subject to change without notice.
In no event will AVerMedia be liable for direct, indirect, special, incidental, or consequential damages arising
out of the use or inability to use this product or documentation, even if advised of the possibility of such
damages.
TRADEMARKS
AVerMedia and AVerKey are registered trademarks of AVerMedia TECHNOLOGIES, Inc. IBM PC is a
registered trademark of International Business Machines Corporation. Macintosh is a registered trademark of
Apple Computer, Inc. Microsoft and Windows are registered trademarks of Microsoft Corporation. All other
products or corporate names mentioned in this documentation are for identification and explanation purposes
only, and may be trademarks or registered trademarks of their respective owners.
COPYRIGHT
©2001 by AVerMedia TECHNOLOGIES, Inc. All rights reserved. No part of this publication may be
reproduced, transmitted, transcribed, stored in a retrieval system, or translated into any language in any form by
any means without the written permission of AVerMedia TECHNOLOGIES, Inc.
ENG 01

Table of Contents
Chapter 1 Introduction.........................................................................................1
Features .......................................................................................................................... 1
What’s in the Package.................................................................................................... 4
What You Can Do with the AVerKey500 Pro ............................................................... 5
System Requirements..................................................................................................... 5
Chapter 2 Hardware Installation and Setup.......................................................6
The Back Panel .............................................................................................................. 6
Installing AVerKey500 Pro to an IBM PC..................................................................... 8
Connecting a Wired Mouse................................................................................... 9
Installing AVerKey500 Pro to a Macintosh or PowerPC ............................................... 10
Connecting a Wired Mouse................................................................................... 11
Connecting a TV Monitor and Video Source................................................................. 12
Chapter 3 Using the AVerKey500 Pro ................................................................14
The Remote Control Unit............................................................................................... 14
Selecting Your Computer or a Video Source as
the TV Output (Video Switcher Function)..................................................................... 18
Changing the Operating Mode of the Remote................................................................ 18
The Remote Mouse ........................................................................................................ 19
Remote Mouse Buttons ......................................................................................... 19
Presentation Highlight Functions ................................................................................... 21
AVerMedia Spot ................................................................................................... 21
AVerMedia Pointer ............................................................................................... 22
AVerMedia Spylight ............................................................................................. 23
Different Types of Zoom ............................................................................................... 24
Normal Zoom ........................................................................................................ 24
AVerMedia Area Zoom......................................................................................... 24
AVerMedia Spot-Zoom......................................................................................... 25
AVerMedia Pointer-Zoom..................................................................................... 25
Panning and Positioning........................................................................................ 26
Page Saver...................................................................................................................... 26
Touch-Button Panel Control .......................................................................................... 27
The PAN/POS Button ........................................................................................... 27
Panning to Other Parts of the Zoomed Image ....................................................... 28
Adjusting the Image Position ................................................................................ 28
The LED Panel............................................................................................................... 28
Chapter 4 Troubleshooting ..................................................................................30
Appendix Supported Display Modes ...................................................................33

1
Chapter 1
Introduction
Thank you for purchasing the AVerKey500 Pro. We are certain you will find this
product a useful video presentation tool that is highly suitable for your business
and multimedia applications.
This chapter gives you an overview of what the AVerKey500 Pro can do. You
will also find a list of the system requirements needed to use the product.
Features
•Display Computer Images on TV
The AVerKey500 Pro can convert computer images into video format
(Composite, S-video or SCART RGB) and display them on any TV monitor or
large-screen LCD projector. It is compatible with all IBM PCs, Macintosh
computers, NEC 98 PCs, and Laptops. AVerKey500 Pro can support any
application under DOS, Windows 3.x, Windows 95, Windows 98, Windows NT,
and Macintosh OS.
The AVerKey500 Pro provides dual display on both your computer and TV
monitors. (It supports all VGA monitors and MultiScan MAC monitors.)
•True Plug-and-Play
The AVerKey500 Pro is kayaplug-and-play! No software drivers are required.
•Supports Up to 1600 x 1200
With Super-VGA compatibility, your applications can be converted up to 1600
X 1200 (PC), 1024 X 768 (Macintosh) !

AVerMedia AVerKey500 Pro User’s Manual
2
•Remote Mouse and Remote Control in One
The remote control unit allows you to give your presentation from up to 7
meters (23 feet) away. With the built-in remote mouse, you can roam around
the classroom or conference room freely and still be able to control your
presentation.
•Touch-Button Panel Control
Just in case the remote control is lost, you can still operate the AVerKey500 Pro
through the Touch Button Panel Control. All major control functions are available
through touch button on the hardware case.
•Page Saver
While giving presentations to an audience, you may need to return to a certain
page and emphasize again some important ideas. AVerKey500's Page Saver
function allows you to save any page from your presentation. Just press a button
to access and display the last page you saved.
•Easily Highlight Key Points in Your Presentation
By simply using the remote, you can highlight important points in your
presentation. Choose from 3 types of presentation highlight functions :
- AVerMediaPOINTER
Similar to a Laser Pointer, AVerMedia Pointer lets you direct your viewers
attention to key areas on the screen. Choose from an array of vibrant colors.
- AVerMediaSPYLIGHT
Highlight part of your presentation and darken the rest of the screen. You can
darken areas horizontally or vertically.
- AVerMediaSPOT
Create a colored border around your area of interest. You can make a highlight
as large as 1/4th or as small as 1/64th of your presentation screen.
•Zoom into Any Area on the Presentation Screen
Enlarge any area of your presentation screen through one of these special zoom
functions : (You can adjust picture sharpness while you are in any of the zoom
modes.)

Chapter 1 Introduction
3
- Traditional Zoom and Pan
Users can zoom in (200%) the computer screen on TV and pan around freely
to any part of the screen.
- Area Zoom
This function cuts the screen into 9 parts and allows you to select the desired
part through the available buttons on the remote control.
- AVerMediaPOINTER Zoom
You can point to a key area in your presentation using AVerMedia Pointer and
then enlarge that area. (AVerKey500 Pro only supports this function for VGA
resolutions up to 1024 x 768)
- AVerMediaSPOT Zoom
Once you have highlighted a certain area using AVerMedia Spot, you can zoom
in and out of the highlighted area. (AVerKey500 Pro only supports this
function for VGA resolutions up to 1024 x 768)
•Up to 7 Sharpness Selections
The AVerKey500 Pro gives you up to 7 flicker-filter selections which provide
100% flicker-free TV display.
•Video Switcher
Connect the AVerKey500 Pro with a computer and a video source such as a
LaserDisc player or VCR. Select either source to be your final TV output.
•Linear Adjustment, Vertical and Horizontal Scale
Adjust both the screen width and height! This is one very special feature not
found in most video converters. A wide selection of sizes are available.
•Full Screen Underscan/Overscan
Full Screen Underscan/Overscan prevents your images from being "chopped
out". (Note: Images will not be chopped off for resolutions up to 1600 x 1200.)
•Screen Freeze/Unfreeze
Screen Freeze lets you pause the TV display and make changes to your
presentation without your audience knowing it. You can also prolong the time
of display when you are giving demos.
•Auto Power On
AVerKey500 Pro powers on automatically after you have connected the proper
cables to your TV, PC & AVerKey500 Pro.
AND MORE!
AVerMedia AVerKey500 Pro User’s Manual
4
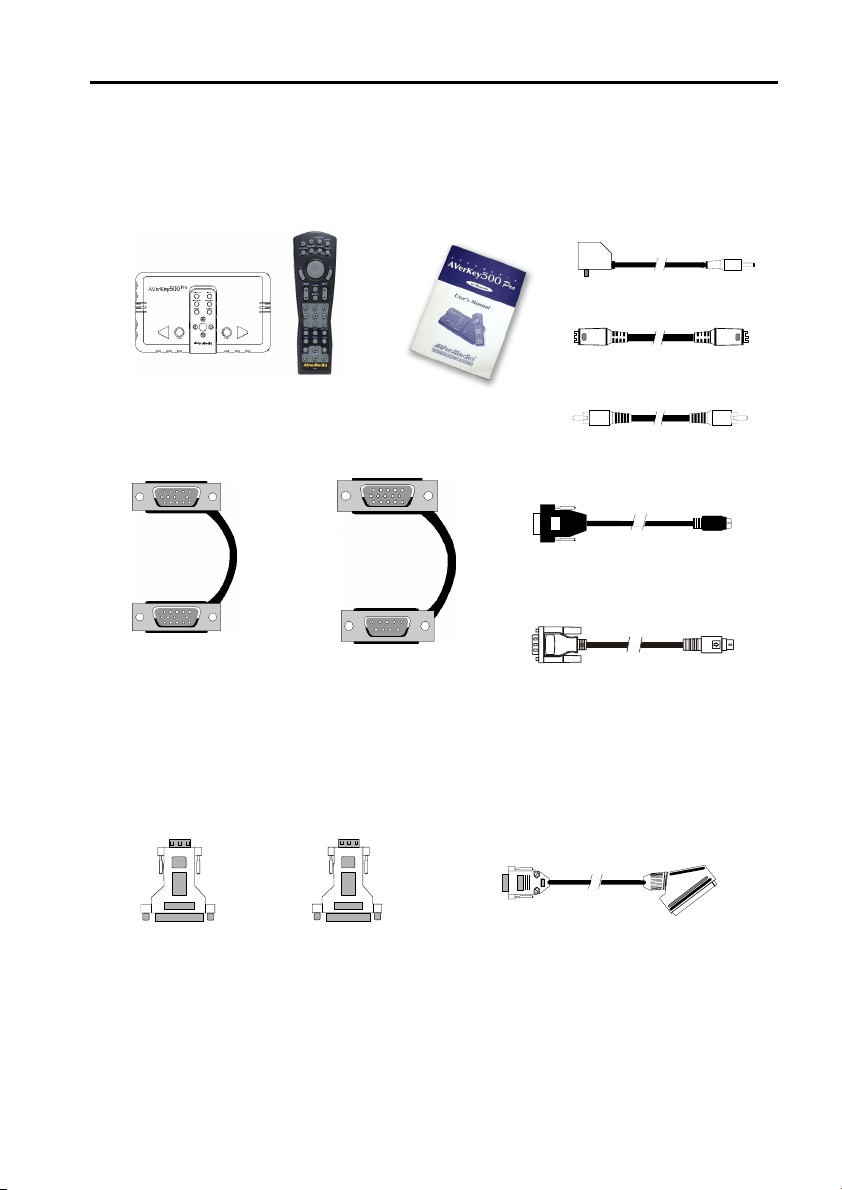
What’s in the Package
Your AVerKey500 Pro package includes the following :
This User’s
Manual
AVerKey500 Pro Scan Converter
and
Remote Control (batteries included)
Computer
Extension Cable
(for IBM PC and
compatibles)
AV Cable
AC Power Adapter Unit
S-Video Cable
Monitor Adapter
(for MAC/NEC)
Computer Adapter
(for MAC/NEC)
SCART Cable (optional on PAL version)
Optional Accessories :
2 RS-232 Cables
(for IBM PC and
compatibles)
2 ADB Cables
(for Macintosh)
2 PS2 Cables
(for IBM PC and
compatibles)

Chapter 1 Introduction
5
What You Can Do with the AVerKey500 Pro
•Business Conference Room Presentation
•Classroom Presentation
•Trade Show Presentation
•Software Training Tape Recording
•Advertisement
•Multimedia and Video Production
And more!!
System Requirements
To use the AVerKey500 Pro, you will need :
•IBMPC or compatibles;
•Any Macintosh supporting standard display modes :
512 x 384 at 24KHz ; 640 x 480 at 31KHz or 35KHz ;
832 x 624 at 48KHz ; up to 1024 x 768 at 60KHz
(MAC systems without the monitor output require a Power-R or Apple
adapter); or
•Any NEC computer from the NEC 98 Series
NOTE: AVerKey500 Pro should in theory support any computer and display
systems with a vertical display frequency range of 50Hz to 100Hz and a
horizontal display frequency of 24KHz to 95KHz. However, due to
different custom hardware configurations and the wide variety of
connectors used on various systems, we cannot guarantee that
AVerKey500 Pro will function properly.
6
Chapter 2
Hardware Installation and Setup
This chapter will show you how to install the AVerKey500 Pro to an IBM
compatible PC, Macintosh computer and NEC 98 PC.
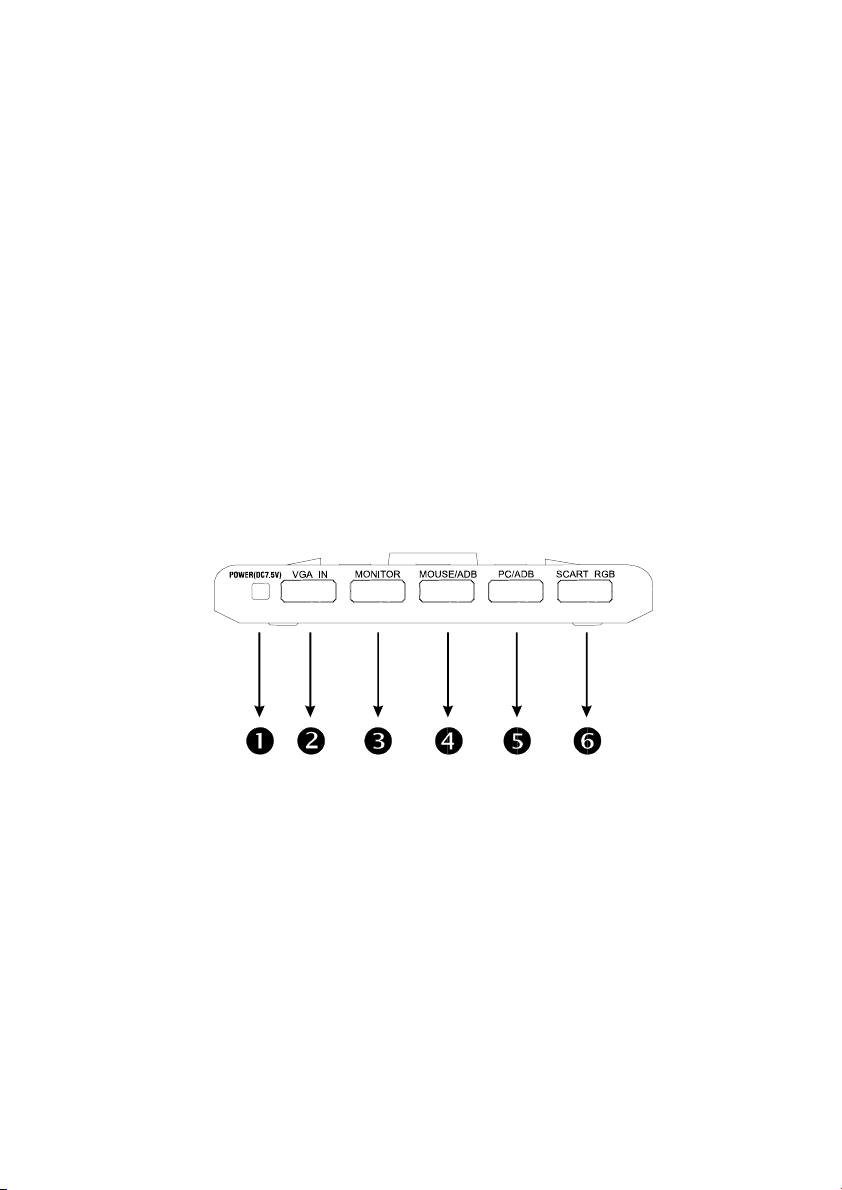
The Back Panel
The ports on the back panel of the AVerKey500 Pro are for connecting the
converter to the computer and graphics display monitor. The figure and
descriptions below specify what device should go into each port.
¬POWER : Plug the AC Power Adapter to this port.
VGA IN : For IBM PC or compatible :
This port connects the AVerKey500 Pro to the IBM
compatible PC’s VGA port via the supplied Computer
Extension Cable.
For Macintosh :
This port connects the AVerKey500 Pro to the Macintosh
PC’s display card via the Computer Adapter and Computer
Extension Cable. (The Computer Adapter is provided as an
optional accessory.)

Chapter 2 Hardware Installation and Setup
7
®MONITOR : Connect the VGA or Macintosh display monitor to this port.
A Monitor Adapter is needed to connect the Macintosh
display monitor. (The Monitor Adapter is provided as an
optional accessory.)
¯MOUSE/ADB : For IBM PC or compatible :
If you need to use your wired mouse, connect the mouse to
this port.
Use the supplied RS-232 Cable to connect a Microsoft
compatible mouse to this port.
For Macintosh :
Connect the ADB devices (e.g. keyboard, mouse, etc.) from
your Macintosh computer to this port.
°PC/ADB : For IBM PC or compatible :
Connect the supplied RS-232 Cable between this port and
the serial port on your PC if you connected a Microsoft
compatible mouse to the AVerKey500 Pro.
For Mac :
Connect the supplied ADB Cable between this port and the
Macintosh computer's ADB port.
±SCART RGB : If you want to use a SCART RGB monitor with your PC
and the AVerKey500 Pro, connect it to this port using the
SCART RGB Cable.
(Note : The SCART RGB Cable is an optional accessory
cable supplied with the AVerKey500 Pro.)
Este manual sirve para los siguientes modelos
1
Tabla de contenidos


