
AVCOM Galaxy Manual de usuario

Galaxy
Seismic Sensor
and Home Automation System
for Residential Applications
System Setup
Installation
& Operation Manual

2
ADVANCED COMMUNICATIONS INC
Introducing the New Galaxy complete whole house protection system. This
sophisticated system provides total security complete with voice notification, and
advanced warning communication anywhere in the world.
•NO MONTHLY FEES
•Simple Installation
•Full Warranty
•Complete Package
•Manufactured in Canada
•Compatible with Control4 Smart Home system
Contact information:
Tel: (604)944-8650

3
Table of Contents
BEFORE YOU BEGIN SET UP: .............................................................................................................................................................. 4
STEP-BY-STEP SETUP INSTRUCTIONS ................................................................................................................................................. 5
VALVES ...................................................................................................................................................................................................... 5
WATER SENSORS ......................................................................................................................................................................................... 6
INSTALLATION ................................................................................................................................................................................... 7
OPERATING VALVES .......................................................................................................................................................................... 8
OPENING AND CLOSING GAS AND WATER VALVES .............................................................................................................................................. 8
VALVE MANUAL OVERRIDE ............................................................................................................................................................................ 9
ADVANCED FUNCTIONS ................................................................................................................................................................... 10
SECURITY LOCKOUT [4321]* ....................................................................................................................................................................... 11
EARTHQUAKE SENSOR ON/OFF [1234] ........................................................................................................................................................ 12
WATER VALVE SHUTOFF DUE TO EARTHQUAKE ON/OFF [1235] ........................................................................................................................ 12
ERASING DEVICES FROM MEMORY [2000] ...................................................................................................................................... 12
CHANGE SENSOR NAME (GAS [7777] OR WATER [8888]) ............................................................................................................................... 13
CHANGE MASTER CODE [9999] ................................................................................................................................................................... 14
NEW GALAXY FEATURES .................................................................................................................................................................. 15
SET UP WIFI CONNECTION ........................................................................................................................................................................... 15
ENTER EMAIL ADDRESS BY KEYPAD ................................................................................................................................................................. 15
SEND A TEST EMAIL BY KEYPAD ..................................................................................................................................................................... 16
ADJUST BEEP VOLUME ................................................................................................................................................................................ 16
CHANGE LANGUAGE BETWEEN ENGLISH AND FRENCH BY KEYPAD ........................................................................................................................ 17
GALAXY SECURITY FEATURES .......................................................................................................................................................... 19
TO ARM THE SECURITY ALARM .................................................................................................................................................................... 19
TO DISARM THE SECURITY ALARM ................................................................................................................................................................ 19
TECHNICAL INFORMATION .............................................................................................................................................................. 20
GALAXY CONTROLLER WITH BUILT-IN GATEWAY ............................................................................................................................................... 20
WATER SENSOR ........................................................................................................................................................................................ 21
GAS AND CARBON MONOXIDE SENSING ......................................................................................................................................................... 22
VALVE ..................................................................................................................................................................................................... 23
TROUBLESHOOTING ........................................................................................................................................................................ 24
CONTROLLER [1] ....................................................................................................................................................................................... 24
SENSORS [4] ............................................................................................................................................................................................. 25
VALVES [2] ............................................................................................................................................................................................... 25
APPROVALS ..................................................................................................................................................................................... 26
TECHNICAL SUPPORT ....................................................................................................................................................................... 26
WARRANTY ..................................................................................................................................................................................... 27
4
Before you begin set up:
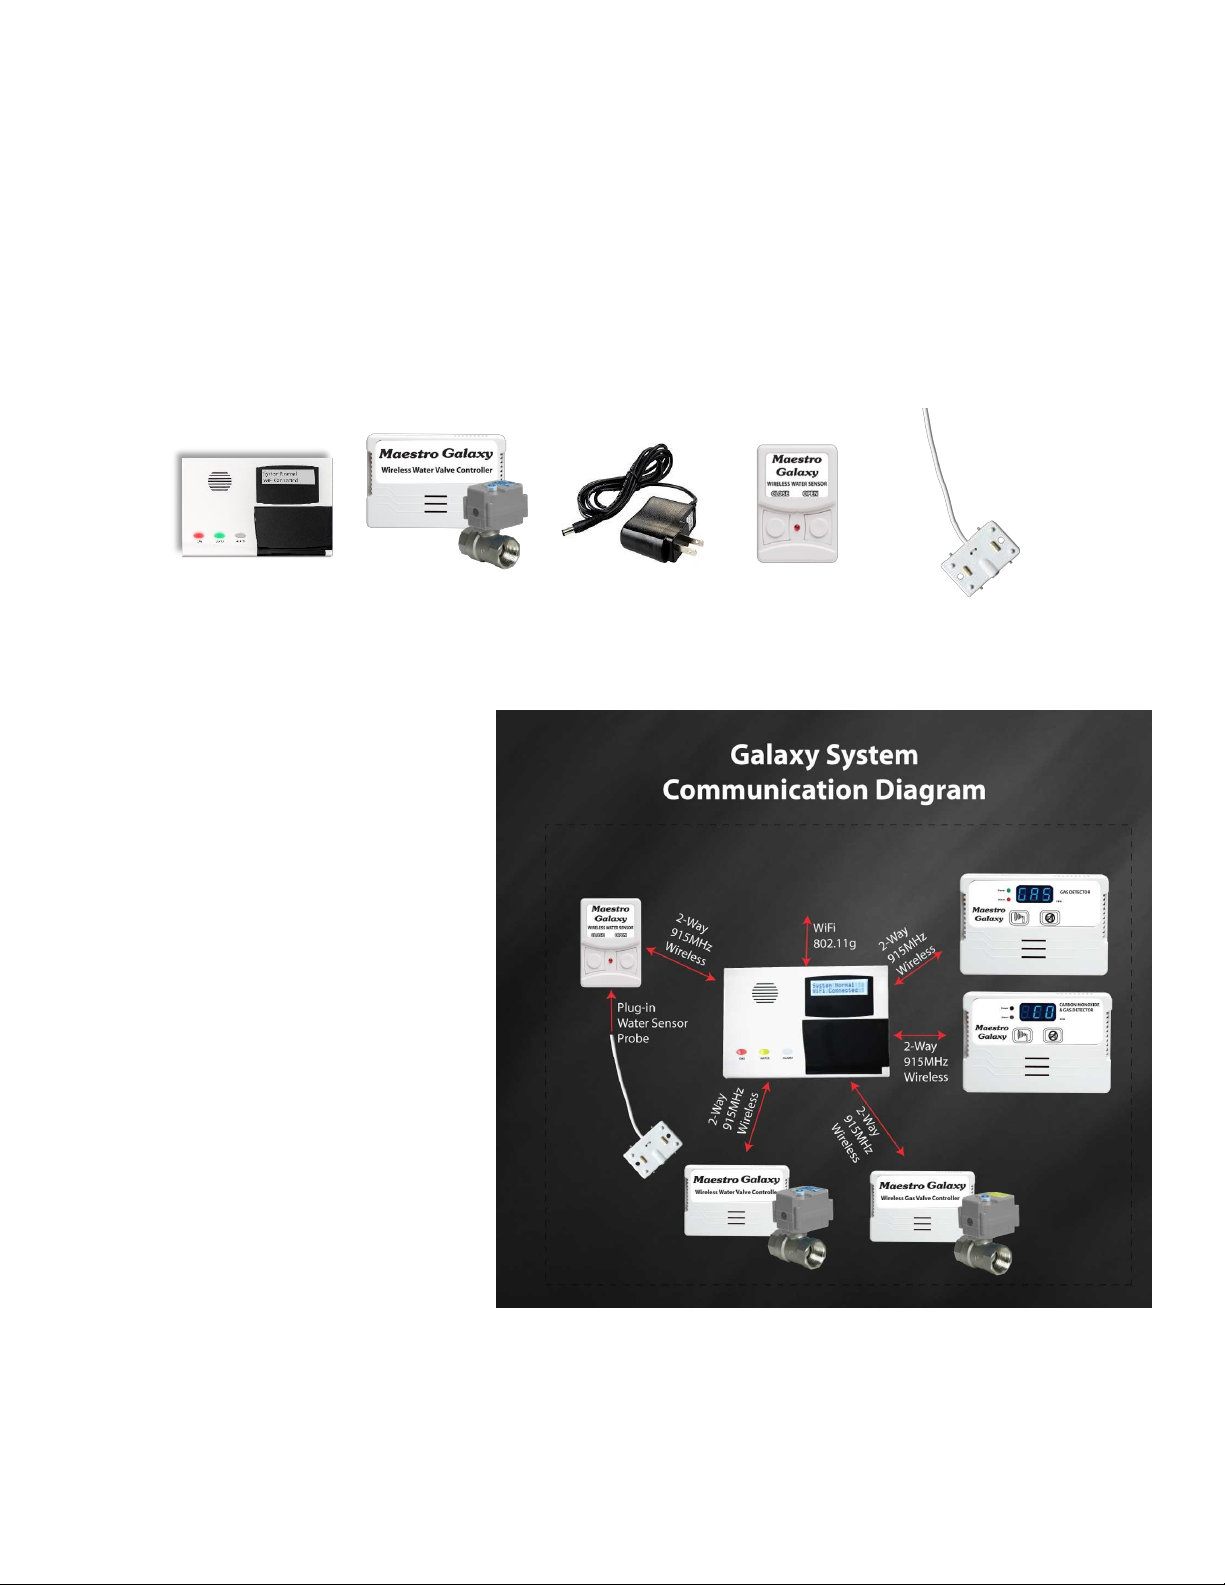
•Please note that each product in your Galaxy system is given a number as
follows. (The following configuration shows the typical “water” Galaxy. Other configurations are
available. You may not have all components listed here, or you may have other devices that are not
listed here. For other types of sensors (or devices) not listed here, see the manual for that device for
instructions on setting it up with the Galaxy controller):
Controller
Valve
DC Power
Adapters
Water
Sensor
Sensor Probe
[1]
[2]
[3]
[4]
[5]
*Products may not appear exactly as
shown.
This quick setup guide
will refer to the numbers
in [ ] for your
convenience
•Please do not install the
valves or sensors until
after completing the
steps in this guide.
You are now ready to proceed
with the step-by-step setup
on the next page.

5
Step-by-step Setup Instructions
Step 1. Plug the DC adapter into the port on the top of the controller. After
several seconds, the display will show “System Normal”
Valves
Step 2. Remove the cover from the
valve controller[2]
Step 3. Plug the DC adapter into the
valve [2] circuit board connector
Step 4. Press the “Sync” button on the
controller [1] keypad. The display will
change to “Waiting to Synchronize”
Step 5. Press the “Sync” button on the
valve [2]. This step must be
completed before the 30-second timer
on the control [1] counts down to 0.
Step 6. The display on the controller [1]
will show “Add New Valve Valve 1”
(Additional valves will show as Valve 2,
Valve 3, etc.) or “Valve Already Synched”
Step 7. Repeat steps 5-9 for any additional valves you are installing with your
system.
Press Sync

6
Water Sensors
Step 8. Open the back of the water sensor [4] and insert 2 AAA-size alkaline
batteries into the battery holder
Step 9. Press the “Sync” button on the controller [1] keypad. The display will
change to “Waiting to Synchronize”.
Step 10. Press BOTH buttons on the
front of the sensor [4] and hold for 2
seconds. This step must be completed
before the 30-second timer on the control
[1] counts down to 0.
Step 11. The display on the controller [1] will show “Add New Sensor
Sensor 1” (Additional sensors will show as Sensor 2, Sensor 3, etc.) or “Valve
Already Synched”
Step 12. Repeat steps 11-14 for any additional water sensors you are
installing with your system.
Congratulations. Your Galaxy devices are now linked and
ready for installation in their final locations

7
Installation
Step 1. Mount the Controller [1] to a wall using the hanger provided.
Step 2. Place the water sensors[4] around the premises
Step 3. Plug the water sensor probe [6] (pad sensor) into the water sensor [4].
Step 4. Place the pad in an area where you would expect to find water if a
water leak occurs.
Step 5. Install the water valve into the main water line where it enters the
building. WARNING: Galaxy valves should only be installed by a licensed
plumber in accordance with all local building codes and ordinances.

8
Operating Valves
Opening and closing Gas
and Water Valves
The Galaxy allows for very simple
operation of attached valves. The
current status of the valves is
indicated by the color of the light
behind its operating button.
Green = Valve is open
Red = Valve is closed
No light = No valve of this type
associated with this controller
Flashing Light (With no error message on LCD) = Valve is in the process of opening
or closing.
Flashing Light (With error message on LCD) = Valve is reporting trouble condition
“No Response” A valve is not responding to the control. Check the battery in the
valve. Try re-synchronizing your valve(s)
“Position Error” A valve is closed when the controller expects it to be open (or
vice-versa). The most common reason is that the manual override has been
activated. To clear this, either press the manual override on the valve again, or
press the button on the controller to operate the valve. After a few seconds the
light should stop flashing and this error will go away and you can leave the valve as
is, or push the button again to open (or close) it.
Gas Valve
Button/Light
Water Valve
Button/Light

9
To Open the valve: If the light is red, push the “water” button to open the water
valve (or “gas” button for gas valve). The light will change to flashing green while
the valve(s) open, then turn to solid green when all valves have finished opening.
To Close the valve: If the light is green, push the “water” button to close the water
valve (or “gas” for gas valve). The light will change to flashing red while the valve(s)
close, then turn to solid red when all valves have finished closing.
The controller will not allow valve operation until the alarm has been reset and the
source of the alarm (water/gas leak) had been corrected. Push any button,
(including the valve control buttons) to mute and reset the alarm, and allow for
continued valve operation.
Valve Manual Override
The valve features a manual override button to
operate the valve independently from the
controller. Pressing this button will close the
valve if it is open and open the valve if it is
closed. Using the manual override will
temporarily disconnect the valve from the
controller. During this period, the controller
display may show “No Response” or “Position
Error” because the valve is either not responding, or is responding with the
unexpected status. This is normal. Pressing the override button again will cancel
the override mode and the valve will begin responding to the controller again.
Manual Override
Button

10
Advanced Functions
The various advanced functions can be accessed by pressing the Function Key “A”
on the keypad. You will be prompted to enter a 4-digit function code from the
table below. Each function is described in detail later in this section.
Function
Description
4-digit Code
Security
Lockout
Locks the keypad, preventing unauthorized use
of system
(4321)* or change to
your own code with
function 9999
Display IP
This function will display its current IP address
1111
Earthquake
Sensor On/Off
Enables or Disables the built-in earthquake
sensor
1234
Water Valve
Shutoff due to
Earthquake
On/Off
Enables or disables automatic shutoff of water
valve when an earthquake is detected
1235
Erase Devices
Erase Valves, or Sensors from Memory
2000
Change Gas
Sensor Name
Allows you to change the sensor name from its
default (e.g. “Sensor 1”) to a name more
descriptive of its location (e.g. Utility Room)
7777
Change Water
Sensor Name
Allows you to change the sensor name from its
default (e.g. “Sensor 1”) to a name more
descriptive of its location (e.g. Main Bathroom)
8888
Change
Master Code
Allows you to change the “Master Security
Code” for the device
9999
Tabla de contenidos


