Aukey CP-T06 Manual de usuario

Four-Section Tripod with Ball Head
User Manual

Contents
English 01 ~ 10
Italiano 41 ~ 50
Deutsch 11 ~ 20
Français 21 ~ 30
Español 31 ~ 40
日本語 51 ~ 60
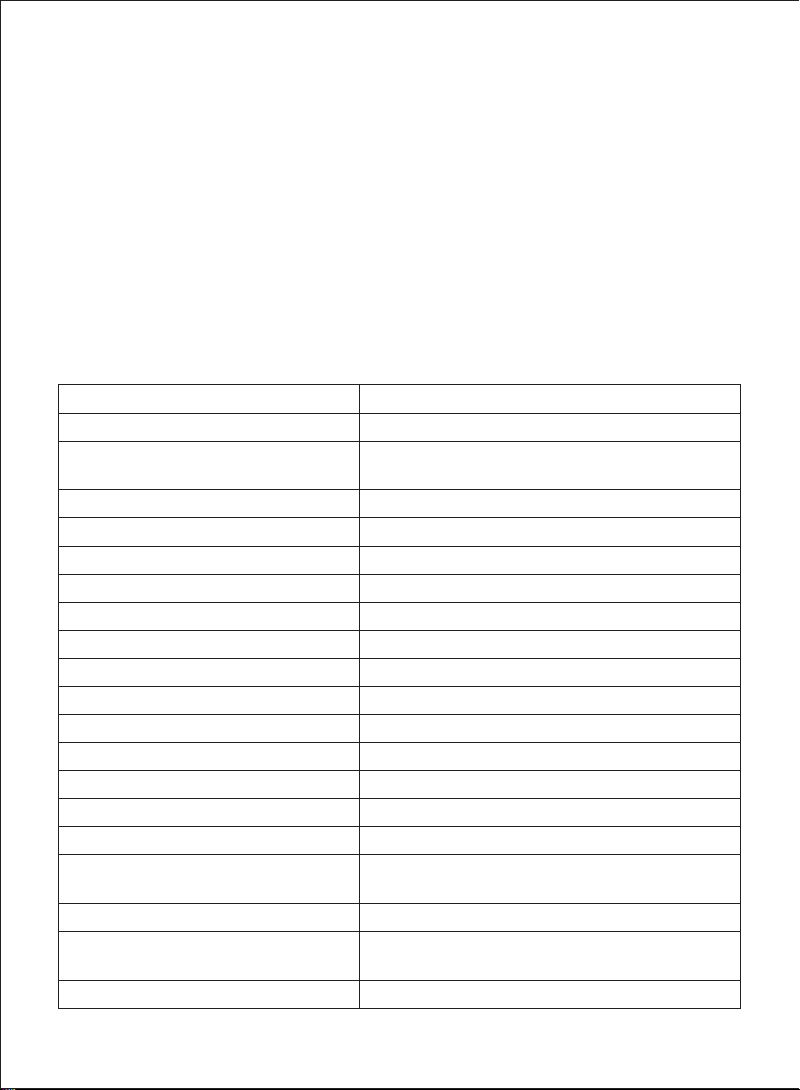
Model
Maximum Height
Maximum Height (excluding
Center Column)
Minimum Height
Maximum Load
Materials
Quick Release Plate Screw Size
Center Column Screw Size
Head Type
Center Column
Bubble Level
Drag Control
Pan Lock
Panning Range
Leg Sections
Leg Lock Type
Leg Diameter
Leg Angles
Storage Length
Weight
- 01 -
Thank you for purchasing the AUKEY CP-T06 Four-Section Tripod with Ball Head. Please read this user
manual carefully and keep it for future reference. If you need any assistance, please contact our
support team with your product model number and Amazon order number.
Package Contents
Four-Section Tripod Ball Head
Short Center Column Two Quick Release Plates
Three Ground Spikes Allen Wrench
Tripod Carrying Bag Ball Head Pouch
Monopod / Tripod Belt Pouch User Manual
Warranty Card
Specifications
CP-T06
1.69m / 5.56’
1.36m / 4.45’
260mm / 0.85’
8kg / 17.64lb
Magnesium aluminum alloy, rubber, EVA foam
1/4″screw
3/8″screw (1/4″on the other end)
Ball Head
Yes
Yes
Yes
Yes
360°
4
Twist Lock
16mm / 0.63”; 19mm / 0.75”;
22mm / 0.87”; 25mm / 0.98”
20°, 50°, 80°
460mm / 1.51’ (legs folded downwards);
430mm / 1.41’ (legs folded upwards)
1.62kg / 3.57lb

- 02 -
Product Diagram
Quick Release Plate
Quick Release Knob
Ball Joint Knob
Drag Control Knob
Center Column
Extension Lock
Leg Angle Lock
Foam Grip
Leg Section Extension Lock
Retractable Weight Hook
Center Column
Screw Plate
Pan Knob
Mounting Platform
Bubble Level
Camera Screw
Rubber Foot

- 03 -
Adjusting Leg Angle
● If the legs are folded down, hold the leg angle lock to enable free movement. Release before
reaching any of the three leg angle locking positions to lock. If the legs are folded up, they will
naturally pass each position (with a slight click sound) but lock when the legs are moved back to
those positions
● To move to a locking position of decreased angle, just push the leg in. For increased angle, push
leg in slightly before pressing and holding the leg angle lock (to avoid it catching) and then pull the
leg out again
● The legs have just over 180° range of motion and can be folded up or down for carry & storage
Note: Don’t use excessive force when locking the legs into position, as this will damage the tripod

- 04 -
Extending Leg Sections
Turn each leg section extension collar to the left (legs pointing down) to release the leg section below
it. Adjust extension as desired (without trying to over-extend) and turn the collar to the right to tighten
(without over-tightening) and fix in position.

- 05 -
Adjusting Center Column Height
While holding the center column firmly, turn the center column extension collar to the right to loosen.
Raise or lower the column to the desired position, and turn the collar to the left to securely fix the
column in place.
Note: Take care when raising or lowering the center column; especially when there is a camera mounted.
Never loosen the collar without holding the center column. Failure to follow these instructions could
result in injury or equipment damage

- 06 -
Reversing the Center Column
For close-up photos or low-angle shooting, the center column can be installed upside down. Don’t
do this while your camera is mounted on the tripod.
1. Unscrew and remove the ball head (if installed) and the bottom end of the center column with the
retractable weight hook
2. Turn the center column extension collar to the right to loosen, and lift the center column out
3. Turn the center column upside down and insert the center column up through the center column
hole from below
4. Adjust to the desired position and tighten the collar so the center column is fixed securely
5. Screw the ball head and end of the column back on again if desired

- 07 -
Using the Short Center Column for Low-Angle Shooting
For low-angle shooting, use the short center column instead of the long one and adjust the tripod legs
to the widest angle (80°) locking position.
1. Unscrew and remove the ball head (if installed) and the bottom end of the center column with the
retractable weight hook
2. Turn the center column extension collar to the right to loosen, and lift the center column out
3. Insert the short center column
4. Adjust to the desired position and tighten the collar so the center column is fixed securely
5. Screw the ball head and end of the column back on again if desired
Using the Ball Head
Ball Joint Knob: The biggest ball head knob releases the ball joint. Turn counterclockwise so the ball
head joint is free to tilt and rotate (when you feel resistance, don’t attempt to unscrew further). The
large notch at the side allows greater downward tilt. Turn the knob clockwise to lock the ball joint
(don’t over-tighten)
Pan Knob: The smallest knob releases the ball head at its base for 360° panning. Slightly turn it
counterclockwise to allow panning. Turn it clockwise to lock again

- 08 -
Camera Mounting Without the Ball Head
1. Remove the ball head to reveal the 3/8” standard screw head in the center column
2. Unscrew the screw plate on the center column, lift the plate and screw off, then remove the screw
and reinsert upside down in the screw plate hole so the 1/4” screw head faces upwards
3. Screw the plate (with screw) back onto the center column
Drag Control Knob: This knob increases and decreases resistance (friction) on the ball joint to more finely
adjust the smoothness and speed of its movement. Slightly turn the ball head knob counterclockwise
to release the ball joint and turn the drag control knob counterclockwise to further loosen it. Use further
small adjustments of the two knobs together in either direction to get the desired resistance and
control with the ball joint
Quick Release Knob: The knob on the side of the mounting platform releases the quick release plate
(and any attached camera). Turn the knob counterclockwise far enough to take the quick release
plate out. Carefully hold your camera while loosening the knob and removing the camera. The
package includes an extra quick release plate for convenient switching between two cameras
Tabla de contenidos
Idiomas:


