Atmark Techno Armadillo-J Guía del usuario

Armadillo-J
Startup Guide ver.2.03
Table of Contents
1. Introduction 1
・・・・・・・・・・・・・・・・・・・・・・・・・・・・・・・・・・・・・・・・・・・・・・・・・・・・・・・・・・・・・・・・・・・・・・・・・・・・
・・・・・・・・・・・・・・・・・・・・・・・・・・・・・・・・・・・・・・・・・・・・・・・・・・・・・・・・・・・・・・・・・・・・・・・・・・・・
・・・・・・・・・・・・・・・・・・・・・・・・・・・・・・・・・・・・・・・・・・・・・・・・・・・・・・・・・・・・・・・・・・
・・・・・・・・・・・・・・・・・・・・・・・・・・・・・・・・・・・・・・・・・・・・・・・・・・・・・・・・・・・・・・
・・・・・・・・・・・・・・・・・・・・・・・・・・・・・・・・・・・・・・・・・・・・・・・・・・・・・・・・・・・・・・・・
・・・・・・・・・・・・・・・・・・・・・・・・・・・・・・・・・・・・・・・・・・・・・・・・・・・・・・・・・・・・・・・・・・・・・・・・
・・・・・・・・・・・・・・・・・・・・・・・・・・・・・・・・・・・・・・・・・・・・・・・・・・・・・・・・・・・・・・・・・・・・・・・・・・・・・・・・・・
・・・・・・・・・・・・・・・・・・・・・・・・・・・・・・・・・・・・・・・・・・・・・・・・・・・・・・・・・・・・・・・・・・
・・・・・・・・・・・・・・・・・・・・・・・・・・・・・・・・・・・・・・・・・・・・・・・・・・・・・・・・・・・・・・・・・・・・・・・・
・・・・・・・・・・・・・・・・・・・・・・・・・・・・・・・・・・・・・・・・・・・・・・・・・・・・・
・・・・・・・・・・・・・・・・・・・・・・・・・・・・・・・・・・・・・・・・・・・・・・・・・・・・・・・・・・・・・・・・・・
・・・・・・・・・・・・・・・・・・・・・・・・・・・・・・・・・・・・・・・・・・・・・・・・・・・・・・・・・・・・・・・・・・・・・・・・・・
・・・・・・・・・・・・・・・・・・・・・・・・・・・・・・・・・・・・・・・・・・・・・・・・・・・・・・・・・・・
・・・・・・・・・・・・・・・・・・・・・・・・・・・・・・・・・・・・・・・・・・・・・・・・・・・・・・・・・・・・・・・・・・・・・・・・
・・・・・・・・・・・・・・・・・・・・・・・・・・・・・・・・・・・・・・・・・・・・・・
・・・・・・・・・・・・・・・・・・・・・・・・・・・・・・・・・・・・・・・・・・・・・・・・・・・・・・・・・
・・・・・・・・・・・・・・・・・・・・・・・・・・・・・・・・・・・・・・・・・・・・・・・・・・・・・・・・・・・
・・・・・・・・・・・・・・・・・・・・・・・・・・・・・・・・・・・・・・・・・・・・・・・・・・
・・・・・・・・・・・・・・・・・・・・・・・・・・・・・・・・・・・・・・・・・・・・・・・・・・・・・・・・・・・・・・・・・・・・・
・・・・・・・・・・・・・・・・・・・・・・・・・・・・・・・・・・・・・・・・・・・・・・・・・・・・・・・
・・・・・・・・・・・・・・・・・・・・・・・・・・・・・・・・・・・・・・・・・・・・・・・・・・・・・・
・・・・・・・・・・・・・・・・・・・・・・・・・・・・・・・・・・・・・・・・・・・・・・・・・・・・・・・・・・・・・・・・・・・・・・・
・・・・・・・・・・・・・・・・・・・・・・・・・・・・・・・・・・・・・・・・・・・・・・・・・・・・・・・・・・・・・・・・・・・・
・・・・・・・・・・・・・・・・・・・・・・・・・・・・・・・・・・・・・・・・・・・・・・・・・・・・・・・・・・・
・・・・・・・・・・・・・・・・・・・・・・・・・・・・・・・・・・・・・・・・・・・・・・・・・・・・・・・・・・・・・・・・・・・・・・・・
・・・・・・・・・・・・・・・・・・・・・・・・・・・・・・・・・・・・・・・・・・・・・・・・・・・・・・・
・・・・・・・・・・・・・・・・・・・・・・・・・・・・
・・・・・・・・・・・・・・・・・・・・・・
・・・・・・・・
・・・・・・・・・・・・・・・・・・・・・・・・・・・・・・・・・・・・・・・・・・・
・・・・・・・・・・・・・・・・・・・・・・・・・・・・・・・・・・・・・・・・・・・・・・・・・・
・・・・・・・・・・・・・・・・・・・・・・・・・・・・・・・・・・・・・・・
・・・・・・・・・・・・・・・・・・・・・・・・・・・・・・・・・・・・・・・・・・・・・・・・・・・・・・・・・・・・・・・
・・・・・・・・・・・・・・・・・・・・・・・・・・・・・・・・・・・・・・・・・・・・・・・・・・・・・・
2. Precautions 2
2.1. Safety Precautions 2
2.2. Operational Precautions 2
2.3. Software Precautions 2
2.4. Trademarks 2
3. Setup 3
3.1. Component Names 3
3.2. Preparations 4
3.3. Setting the Armadillo-J in its Case 4
3.4. Connecting Cables 5
3.5. Power-on 5
3.6. Shutting down the Armadillo-J 5
4. Network Settings 6
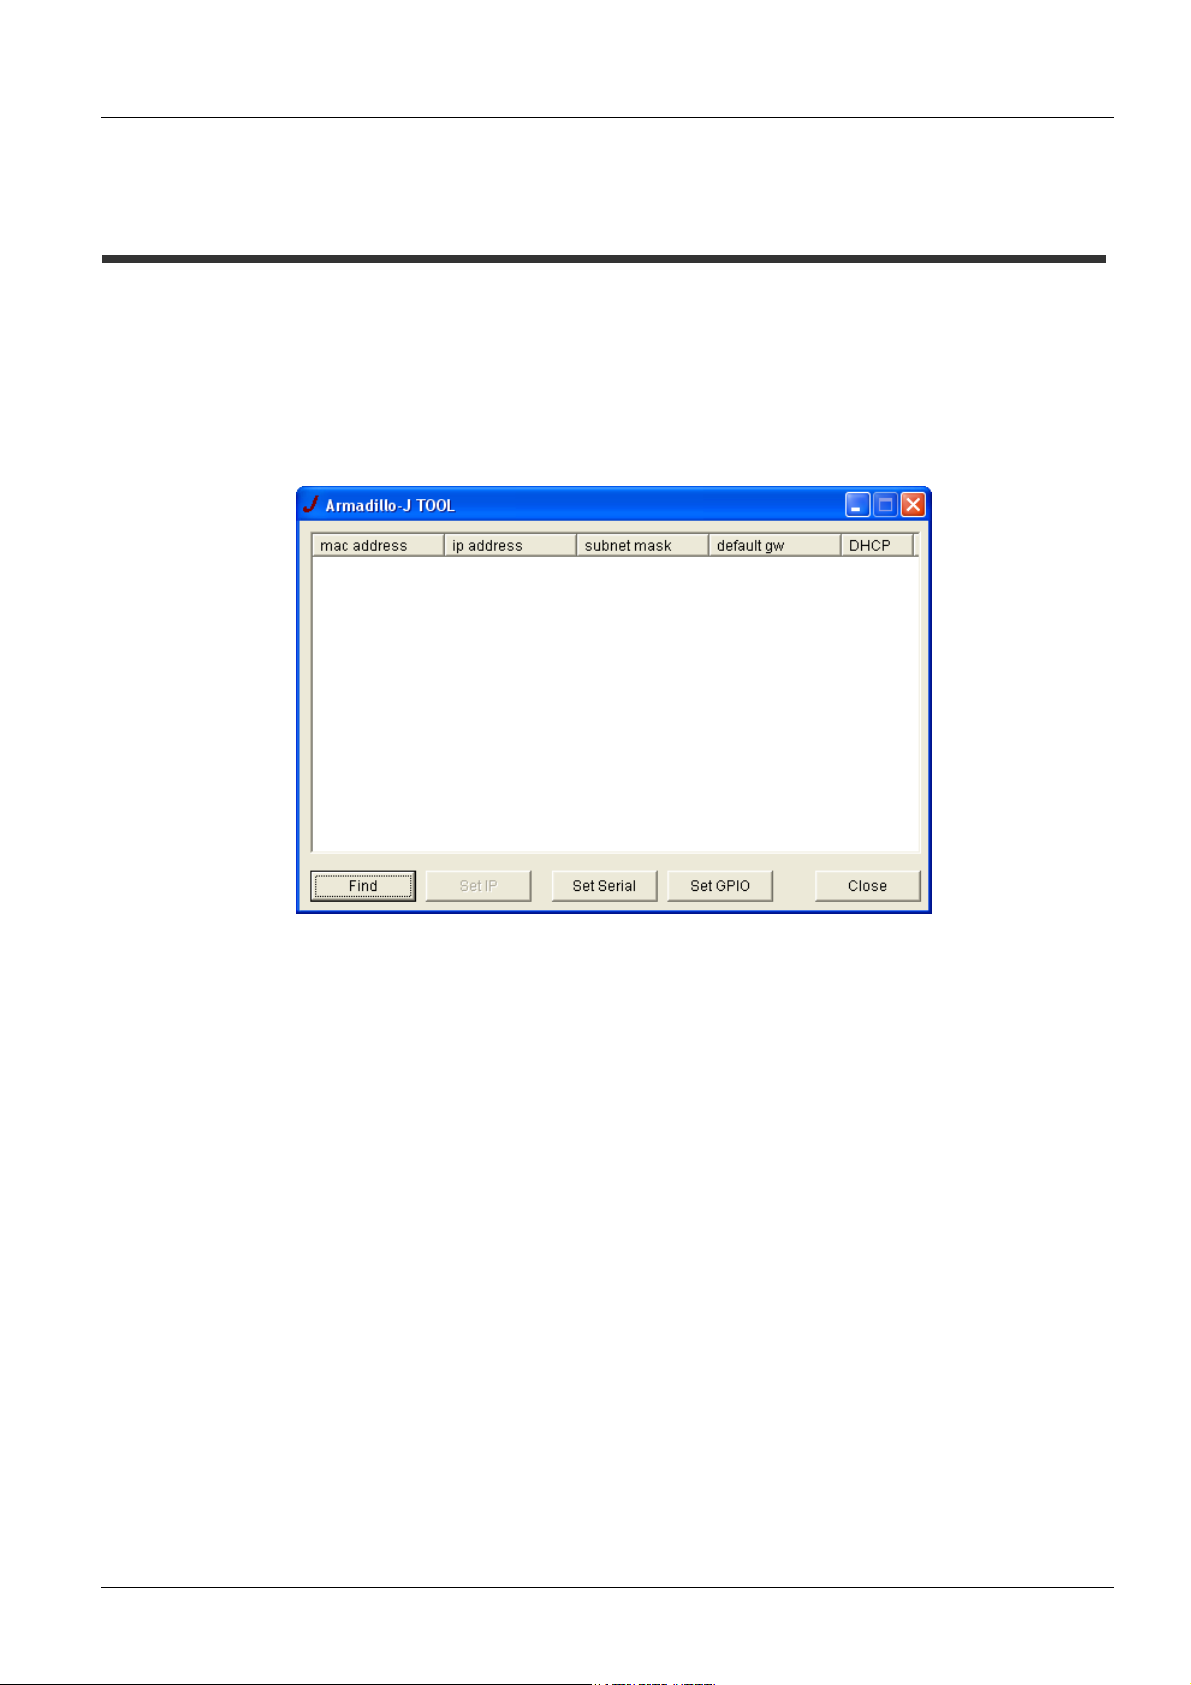
4.1. Starting the Armadillo-J Configuration Tool 6
4.2. Searching for the Armadillo-J 6
4.3. Changing Network Settings 7
4.4. Exiting Armadillo-J Configuration Tool 7
5. Serial Communication 8
5.1. Configuring Serial Communication 9
5.2. Serial Communication Example 10
6. Controlling GPIO 12
6.1. Configuring GPIO 13
6.2. Example of GPIO Utilization 15
7. Troubleshooting 16
7.1. Unable to boot the Armadillo-J 16
7.2. Unable find a Armadillo-J from Armadillo-J Configuration Tool 16
7.3. Unable to configure Serial/GPIO with Armadillo-J Configuration Tool 16
7.4. IP address becomes 0.0.0.0 when DHCP is used with Armadillo-J Configuration Tool 16
7.5. Unable to use serial communication function 16
7.6. Unable to monitor or set GPIO state 16
7.7. Unable to receive GPIO state change notification 16
Appendix.A SNMP Specifications 17
Appendix.B Serial Port Configuration List 18
i

Armadillo-J
Startup Guide ver.2.03
List of Tables
Table 6-1 GPIO Port Mapping 14
・・・・・・・・・・・・・・・・・・・・・・・・・・・・・・・・・・・・・・・・・・・・・・・・・・・・・・・・・・・・・・
・・・・・・・・・・・・・・・・・・・・・・・・・・・・・・・・・・・・・・・・・・・・・・・・・・
・・・・・・・・・・・・・・・・・・・・・・・・・・・・・・・・・・・・・・・・・・・・・・・・・
Table A-1 Armadillo-J SNMP Specifications 17
Table B-1 Armadillo-J Serial Port Setting List 18
List of Illustrations
Figure 3-1 Armadillo-J Interfaces ............................................................................................................ 3
Figure 3-2 Setting Armadillo-J in a Case................................................................................................. 4
Figure 4-1 Armadillo-J Configuration Tool Screen ................................................................................... 6
Figure 4-2 Screen after Searching .......................................................................................................... 7
Figure 4-3 Network Configuration Dialog ................................................................................................ 7
Figure 5-1 Image of Serial Communication ............................................................................................. 8
Figure 5-2 Serial Settings Dialog............................................................................................................. 9
Figure 5-3 Connection Description Screen............................................................................................ 10
Figure 5-4 Connection Configuration .....................................................................................................11
Figure 5-5 Serial Communication Example............................................................................................11
Figure 6-1 Obtaining status of sensor (input port) ................................................................................. 12
Figure 6-2 Setting the Output of a buzzer (output port)......................................................................... 12
Figure 6-3 State change notification of a sensor (input port)................................................................. 12
Figure 6-4 Set GPIO Dialog .................................................................................................................. 13
Figure 6-5 Example of GPIO Settings ................................................................................................... 15
Figure 6-6 Example of Having Received a Trap.................................................................................... 15
ii

Armadillo-J Startup Guide ver.2.03
1. Introduction
Thank you for purchasing the Armadillo-J [AJ010].
The Armadillo-J is an ultra-compact network computer with Ethernet, Serial and GPIO interfaces.
It can be easily used for Serial-Ethernet conversion and external device control via GPIO in its shipped
state.
Additionally, the Armadillo-J comes with “µClinux” as its standard operating system, allowing the user to
utilize Linux’s extensive software resources by rewriting the content of the Flash ROM. The user can also
use GNU assembler and C-compiler to execute his or her own programs.
■
This manual explains how to use the various Armadillo-J functions that are available in its shipped state.
(If you want to customize the Armadillo-J, refer to “User’s Guide”.
The standard Armadillo-J has the following features:
Easily Configurable from Windows
With the Windows-compatible “Armadillo-J Configuration Tools”, you can easily configure the network, serial
communication and general purpose I/O (GPIO).
Serial-Ethernet Conversion
The Armadillo-J allows the user to control serial devices via Ethernet and bridge serial devices to one another
via Ethernet from a PC.
Remote Monitoring/Controlling GPIO
The Armadillo-J allows the user to easily monitor the input status and configure output of GPIO, and send
notification when the input status changes.
It also uses the SNMP network communication protocol to enable automatic remote control of GPIOs using a
simple program.
Note: Firmware with version number 2.00 or earlier does not support the above functions. If the product has
version 2.00 or earlier, please upgrade the firmware using (image/recover.img) contained in the supplied CD
as according to User’s Guide, Chapter 5 “Rewriting the Flash Memory”.
1

Armadillo-J Startup Guide ver.2.03
2. Precautions
2.1. Safety Precautions
Read carefully the following safety precautions to assure correct use of the Armadillo-J.
!
This product uses semiconductor components designed for generic electronics
equipment such as office automation equipment, communications equipment,
measurement equipment and machine tools. Do not incorporate the product
into devices such as medical equipment, traffic control systems, combustion
control systems, safety equipment and so on which can directly threaten
human life or pose a hazard to the human body or property due to a
malfunction or failure. Moreover, products incorporating semiconducto
r
components can be caused to malfunction or fail due to a foreign noise o
r
surge. To avoid injury, death or loss of property in the case of malfunction o
r
failure, be sure to take all possible safety measures.
2.2. Operational Precautions
To avoid permanent damage to the Armadillo-J, the following operational precautions must be observed when
operating the product.
Power-on:
While the Armadillo-J or peripheral circuits are supplied with power, be sure not to connect or disconnect a
GPIO connector.
Static Electricity:
Armadillo-J incorporates CMOS devices. Until the product is used, store it safely in the provided antistatic
package.
Latch-up:
Due to excessive noise or surge from the power supply or I/Os, or rapid voltage fluctuations, the CMOS
devices incorporated in the product can cause a latch-up. Once latch-up occurs, this situation continues
until the power supply is disconnected. As a result, it can damage the device. It is recommended to take
safety measures such as adding a protection circuit into the noise-susceptible I/O lines or not sharing the
power supply with devices that can be the cause of noise.
2.3. Software Precautions
Software contained in this product:
The software and documentation contained in this product are provided “AS IS” without warranty of any kind
including any warranty of merchantability or fitness for a particular purpose, reliability, or accuracy.
Furthermore, Atmark Techno, Inc. does not guarantee any outcomes resulting from the use of this product.
2.4. Trademarks
Armadillo is a registered trademark of Atmark Techno, Inc.
Other company and product names are registered trademarks or trademarks of the respective companies or
organizations.
2

Armadillo-J Startup Guide ver.2.03
3. Setup
3.1. Component Names
Each Armadillo-J component name and their functions are described below.
③
①
②
④
⑦
⑧
⑨
⑤
⑩
⑥
Figure 3-1 Armadillo-J Interfaces
① LANLink LED (Yellow)
Represents link status of LAN.
② LED (Green)
Unused (lights at all times while powered)
③ LAN Connector
A connector used to connect a LAN cable. PoE (Power over Ethernet) is supported.
Note: The Armadillo-J LAN connector is somewhat deep compared to other generic products. We therefore
recommend the use of a long nailed LAN cable.
④ MAC Address
⑤ Jumper Pins
For detailed information on jumper pin setting, refer to Chapter 5 “Interface Specifications” in the Hardware
Manual.
⑥ Serial Connector
A connector used to connect a serial cable.
⑦ Power Connector
A connector used to connect an AC adapter within a range of DC8V to 48V.
⑧ Power LED (Green)
Represents the power status of the Armadillo-J. It lights while power is on.
3

Armadillo-J Startup Guide ver.2.03
⑨ Status LED (Red)
This LED shows the boot status of the Armadillo-J. It lights after boot up completes.
⑩ Extension Connector
This connector is only available on Armadillo-J (AJ010-CB0).
3.2. Preparations
The following components are normally required when using Armadillo-J.
Serial Cable
(Dependent on the type of devices connecting to the Armadillo-J, a cross-cable or straight-cable is used.
For PC connection, a cross-cable is used).
LAN Cable (Category 5 or higher straight-cable)
AC Adapter (8-48V) or PoE (Power Over Ethernet) compatible HUB
3.3. Setting the Armadillo-J in its Case
Set the Armadillo-J in its case and fit it with the supplied screws as shown in Figure 3-2.
Cover
Armadillo-J
Screws Base
Figure 3-2 Setting Armadillo-J in a Case
Caution: Turning the screws too tightly can damage the case.
4

Armadillo-J Startup Guide ver.2.03
3.4. Connecting Cables
Properly connect a serial cable and a LAN cable.
3.5. Power-on
The Armadillo-J supports not only a normal AC adapter but also power supply via PoE.
If an AC adapter is used, connect the adapter to the power connector. While, if PoE is used, connect a LAN
cable to the LAN connector.
Caution: If power is supplied from both the AC adapter and PoE simultaneously, it can cause the system to
accidentally restart.
When the Armadillo-J is powered on, the power LED lights and it automatically starts its boot process. When
the boot process is completed, the status LED turns on. It takes approximately five seconds from power-on to
the completion of the boot process.
3.6. Shutting down the Armadillo-J
Disconnecting the AC adapter causes the Armadillo-J to shut down (if PoE is being used, disconnecting the
LAN cable does the same).
Be careful not to power off the Armadillo-J while it is applying changes to its internal settings, as these settings
may not be saved properly. A subsequent section describes how the Armadillo-J makes changes to its internal
settings.
5

Armadillo-J Startup Guide ver.2.03
4. Network Settings
4.1. Starting the Armadillo-J Configuration Tool
Network configuration is performed using the “Armadillo-J Configuration Tool” (tools/discover.exe)
contained in the supplied CD. This tool works on Windows98, Windows2000 and Windows XP.
After coping Armadillo-J Configuration Tool to an appropriate folder, double-click the icon to start it.
When started, the following screen appears.
Figure 4-1 Armadillo-J Configuration Tool Screen
To uninstall Armadillo-J Configuration Tool, delete the copied file.
4.2. Searching for the Armadillo-J
Click the “Search” button on Armadillo-J Configuration Tool to start searching for the Armadillo-J.
Discoverable Armadillo-Js are limited to those within the area where “broadcast packets” sent from the
PC using Armadillo-J Configuration Tool can reach. (Normally, broadcast packets do not reach the area
exceeding a router).
When Armadillo-J Configuration Tool finds an Armadillo-J, network information concerning the Armadillo-J
is displayed on the screen.
If more than one Armadillo-J is present, multiple information sets are listed. In this case, specify the
desired Armadillo-J by its MAC address. You can find the MAC address on the top of the device. (Refer
to Section 3.1 “Component Names”).
6

Armadillo-J Startup Guide ver.2.03
Figure 4-2 Screen after Searching
4.3. Changing Network Settings
Select from the list the Armadillo-J whose internal settings you want to change and press the “Set IP”
button or double-click it on the list to display the “Set IP Dialog”.
Figure 4-3 Network Configuration Dialog
Set the network parameters in the dialog and then click “OK” to execute the changes.
(For details about setting these values, consult with your network manager).
Note1: Some time is required to complete the changes to the settings after the “OK” button is clicked. Be
careful not to power off the Armadillo-J before it has completed, as the settings may not be saved.
Note2: If DHCP is selected, the previous IP address of the Armadillo-J will still be displayed. This is because
the assignment of the new IP address by the DHCP server has not yet been performed. Wait for
approximately 10 seconds after changing the settings and then try the “Search” button again. The new
IP address will be displayed.
4.4. Exiting Armadillo-J Configuration Tool
Click the “Close” button or ”×” button on the upper right side of the screen to exit Armadillo-J Configuration Tool.
7
Tabla de contenidos


