
ARVA NEO Manual de usuario

2
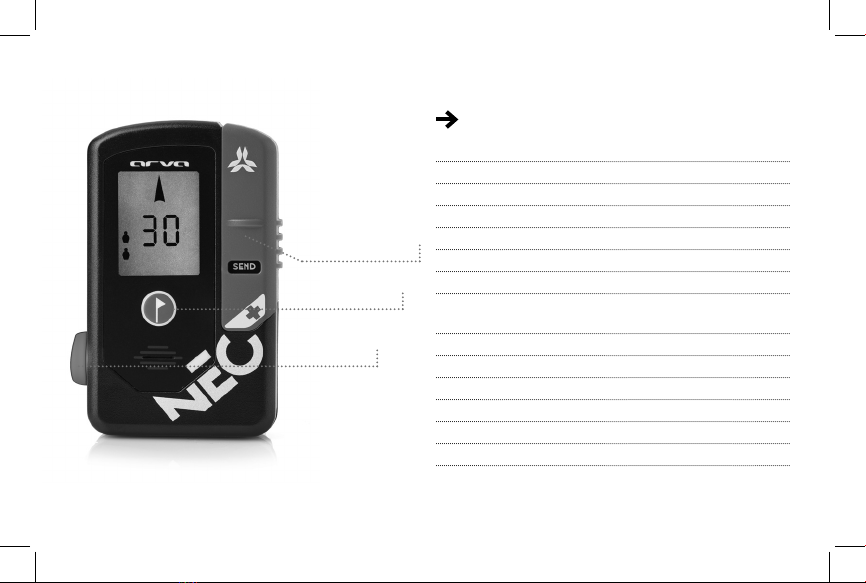
SEARCH /
TRANSMIT BUTTON
MARKED
VICTIM BUTTON
BOUTON
ON/OFF
TECHNICAL SPECIFICATIONS
• 100% digital
• 3 antennas
• User frendly
• Distance and direction indicator
• Marking function for multiple burialssituations
• Multiple victims icon (1, 2 or 3, 4 and more)
• Dynamic interference Management
• Congurable automatic return to transmit mode
with a movement sensor.
• 70 m search band width
• Weight: 250 g
• Battery life: more than 250 Hours (Emitting)
• Requires 3 alkaline batteries AAA/LR03
• Operating temperature range: -20°C to +45°C
• Maximum operational altitude: 5000 m

EN
3
PRACTICE:
Practicing and being well-trained in using your transceiver
is essential in order to conduct a successful search in the
event of an avalanche.
RESPONSABILITY :
Skiing off trail or skiing in the backcountry are activities
that present inherent risks. Wearing a transceiver should
in no way inuence your decision making when in ava-
lanche terrain. Know when to turn around.
STORAGE:
Store your device in a cool and dry place. Remove the
batteries when storing for long periods of time. The
device is no longer under warranty if the batteries leak.
WARRANTY:
Your device has a 5-year warranty. We recommend
sending your transceiver in for maintenance on a regular
basis: once every 3 years for amateurs, and once every
two years for professionals.
BATTERIES:
The ARVA transceiver only operates with 3 standard
Alkaline AAA/LRO3 batteries. Do not use rechargeable or
lithium batteries. The batteries should all be replaced at
the same time. The label in the battery compartment is
important for all servicing procedures, do not remove it.
REGISTRATION AND UPDATES:
Every ARVA transceiver has a unique identication num-
ber. Registering your device on www.arva-equipement.
com allows us to link your contact information your device
to for optimal tracking (maintenance, customer service,
software updates, etc.).
CAUTION: THERE IS A RISK OF EXPLOSION IF THE BAT-
TERY IS THROWN INTO A FIRE OR REPLACED BY THE
WRONG TYPE OF BATTERY. FOLLOW INSTRUCTIONS ON
HOW TO PROPERLY DISPOSE OF USED BATTERIES.
IMPORTANT FOR SWITZERLAND: APPENDIX 4.10 FOR
STANDARD SR 814.013 APPLIES TO BATTERIES
INITIAL START-UP
1- To switch on your device, turn the ON/OFF button 90°.
2- After switching on your device, place it in the holster
with the screen facing out so that the ON/OFF button
ts into the safety notch. This notch locks the ON/OFF
button in place and prevents it from turning the device off
unexpectedly.
3- Place the black strap over your shoulder with the
ARVA logo facing out.
4- Place the red elastic strap around your waist, clip the
red buckle, and adjust as needed.

4
BATTERY CHECK
The holster must always be worn against your inner
layer of clothing (underwear or next to skin). The ARVA
should preferably be covered by a garment to prevent
cold and impacts.
DEVICE CARRYING
After switching on your device, the NEO startup mode
offers a group check. To conduct a group check, press
the center button when “”CH”” appears on the screen.
Check your partners’ beacons by positioning your device
0.5m to 1.5m from theirs.
- If the device being checked works properly, your bea-
con will display the distance between your device and the
device being checked and emit a standard search beep.
- If you are more than 1.6m from the device being
checked, your beacon will display the distance without
emitting a beep.
- If you are less than 0.5m from the device being
checked, your beacon will display the distance and emit
a double beep.
- If the device’s frequency is too weak relative to the
standard, your transceiver will display an “”Er””/””02””
and emit a double beep.
- If the device’s frequency is too strong relative to the
standard, your beacon will display an “”Er””/””03”” and
emit a double beep.
- If you are <0.5m from the device being checked, your
beacon will display an “”Er”” and emit an error beep.
Begin your check again, this time standing between 0.5m
and 1.5m from the other device.
- If you do not detect a signal, verify that your partner’s
beacon is switched on. If it is, then have their device
inspected.
Just after turning on your device, it will indicate the bat-
tery level. We recommend that you replace the batteries
as soon as they drop below 50%.
GROUP CHECK WITH FREQUENCY
CONTROL
SWITCHING TO SEARCH MODE
In avalanche situation, to switch in search
mode, open the holster and take off the device
which will stay attached by the elastic leash
and the black strap. To switch in search mode, push the
side button up.
SEARCH MODE

EN
5
SIGNAL SEARCH
Start searching for a signal based on one
of the two diagrams below.
To maximize the range
of your ARVA :
It is important to point your ARVA in the direction of the
avalanche, parallel to the slope and not pointing upwards
towards the sky.
Slowly rotate back and forth to try to
detect the signal(s).
DURING THE SEARCH, PAY ATTENTION TO VISUAL
CLUES SUCH AS POLES, SKIS, CLOTHING, ETC.
• Point the device in the direc-
tion of the signal
• Search in a calm and focused
manner
• Slow down as you approach
the ne search
• If the displayed distance starts to increase
even though you are moving in the direction
indicated by the arrow, turn around
• In a complex situation with multiple vic-
tims, the device may have trouble analyzing
the signal. In this case, move a few steps
away and then return towards the critical
point by following another direction.
COARSE SEARCH
During the coarse search:
• Carefully follow the distance and direction
indicators on the screen
FINE SEARCH
Once within 3 meters of the victim, your
ARVA no longer indicates a direction and
you must start bracketing (searching in a
cross pattern).
70m
70m 70m
35m 35m

6
1. Lower your device to near snow level
2. Move your device in a cross pattern to
locate the point where the distance reading
is the lowest
It is then much quicker to start probing once
you have dened the probable burial zone
within a less than one-meter range
Marking function: When you are less than 3 meters
from the burial(s), a marking icon blinks in the upper
right-hand corner of the screen. Press the marking
button to mark the victim. The device will start searching
for the next victim without any already marked burial(s)
interfering. When you mark a victim, a ag appears next
to that victim’s icon.
Victims appears on the left part of your screen.
When a victim is marked a ag appears close to
it. The + indicate that there is 4 or more victims.
MULTIPLE VICTIMS INDICATED
MARKING
1st probing
point
Example of ne search
technique
In the event of a secondary avalanche, your device will
automatically switch back into transmit mode. The
default setting for the NEO+ is to revert to transmit mode
after 4 minutes without movement.
After 4 minutes without detecting any movement, an
alarm will sound and you will be asked to press on the
marking button on your device to conrm that you are
not buried. If no action is taken, the device will return to
transmit mode.
AUTOMATIC RETURN TO TRANSMIT MODE
When probing/shoveling, you do not want your beacon to
switch back to transmit mode and interrupt searches for
other buried victims. This is why the new NEO+ holster
allows you to wear your device in search mode when
probing.

EN
7
PROBING Search for the victim by probing
in concentric spirals progressively
away from the minimum distance
point detected by your ARVA. Probe
perpendicular to the slope.
90°
25
cm
25
cm
Statistically, shoveling takes at least as much time as the
ARVA search. It is important to take a methodic approach
to shoveling.
In order to reduce the risk of signal deterioration, we
recommend that you keep your transceiver as far as
possible from sources of electrical and electromagnetic
activity.
IN SEARCH MODE:
Move all metallic and electronic devices at least 50cm
away from your transceiver.
During an active search, we recommended turning off all
devices except:
• Analog radio
• Headlamp without dimmer
• Watch without a radio function
• Backup devices in the event of a secondary avalanche
Means of communication:
We recommend turning off all digital telephones and
radios during the active search phase. All calls should be
made at least 25m away from the individuals conducting
the active search.
IN TRANSMIT MODE:
Move all metallic and electronic devices at least 20cm
away from your transceiver.
Certain electronic devices as well as electrical and elec-
tromagnetic installations can signicantly interfere with
transceiver signals.
These sources are:
• carried: smart phone - analog radio - camera - heart
rate monitors - GPS - etc.
• permanent: relay towers - power lines / electrical
generating equipment - ski lifts, etc.
SHOVELING
INTERFERENCE
The V-shaped conveyor technique
allows you to optimize the excavation
phase of shoveling. As soon as the per-
son is uncovered, it is important to turn
their transceiver off immediately.

8
Beacon users are carrying more and more electronic
devices that can cause interference during the primary
search.
This has been observed in mountain resorts and in rare
cases in backcountry. You can activate in the menu a
specic mode that prevents the device from additional
electronic noise by reducing the search band, depending
on the level of interference there are three selections.
• The search band in normal environment is 70m.
• If the interference is at a minimum level select SR 30=>
device will reduce the search band to 30m.
• If the interference is at a maximum level select SR 15
=> device will reduce the search band to 15 m.
• Pay attention, use good judgment, and adapt your
search scenario to the best option for your needs.
DYNAMIC INTERFERENCE
MANAGEMENT
With the beacon switched off, go into the search mode by
sliding search button up. Turn beacon on while holding
the center button until the batteries status. The only
button used to managethe menu is the central one.
MENU CONFIGURATION
(Experienced users)
short push
auto-revert
(Auto transmit )markinggroup checkinterferenceend
long
push
long
push
long
push
long
push
long
push
short push
short push
short push
short push
Select with a long push, chose
option with shorts pushes
0= No auto-revert
2/4/8= select between
2/4/8 minutes
Select with a long push, chose
option with shorts pushes
3= marking below 3 m of the
victim
5= marking below 5 m of the
victim < 5 m
Select with a long push, chose
option with shorts pushes
0= group check OFF
1= group check ON
Select with a long push, chose
option with shorts pushes
0= Interference mode OFF
1= Interference mode ON
end
long
push
OK
long
push
OK
long
push
OK
long
push
OK
long
push
OK

EN
9
Disposal of electronic instruments by users from private
households in the European Union. This symbol stamped on
the product or its packaging indicates that the product is not al-
lowed to be disposed of with household waste. It is your respon-
sibility to bring your electronics waste to a designated recycling
ofce for proper disposal. Separate disposal and recycling of your
waste will contribute to preserving our natural resources and en-
sure an environmentally-friendly disposal safer for public health.
For more information regarding the closest recycling center to
your residence, contact your local city hall, waste management
company, or the store where you purchased the product.

10
BOUTON
ÉMISSION /
RÉCEPTION
BOUTON
MARQUAGE
BOUTON
ON/OFF
CARACTÉRISTIQUES TECHNIQUES
• 100% numérique
• 3 antennes
• Très facile d’utilisation
• Indicateurs de direction et de distance
• Fonction marquage de victimes
• Indication multi victimes
• Gestion dynamique des interférences
• Retour automatique en émission paramétrable
par détecteur de mouvement
• Largeur de bande de recherche 70 m
• 250 g
• Autonomie + de 250 heures
• Alimentation 3 piles alcalines AAA/LR03
• Plage température d’utilisation : -20°C à +45°C
• Altitude maximum d’utilisation : 5000 m
Otros manuales para NEO
1
Tabla de contenidos
Idiomas:
Otros manuales de Transceptor de ARVA


