Artusi AO651X Manual de usuario

ItalianoEnglishFrançaisDeutschEspañolNederlandsPortuguês ItalianoEnglishDeutschEspañolPortuguêsNederlandsFrançais
IT
TIMER TOUCH CONTROL
GB
TIMER TOUCH CONTROL
DE
TOUCH CONTROL TIMER
ES
TIMER TOUCH CONTROL
PT
TIMER TOUCH CONTROL
NL
TIMER TOUCH CONTROL
FR
MINUTEUR À TOUCHES SENSITIVES

TIMER TOUCH CONTROL
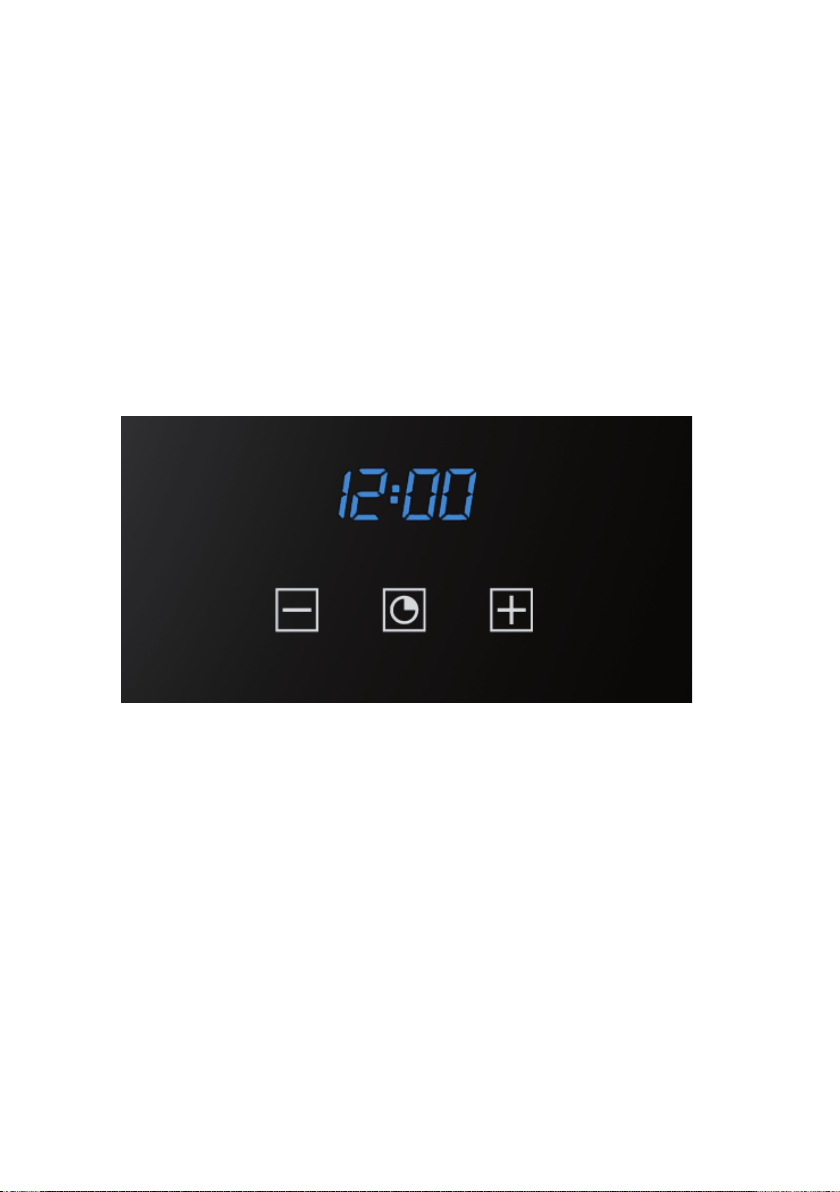
Regolazione dell’orologio
Figura 1
Alla prima accensione appariranno i simboli “Auto” e “0:00” lampeggianti. Per la prima regolazione
dell’orologio, premere il tasto centrale per 3 secondi circa. Quando appare il simbolo
premere il pulsante “+” o “-“ per regolare l’ora desiderata.
Attendere, e un segnale acustico segnaler che l’ora e’ stata impostata (figura 1).
La modifica dell’ora impostata può essere eseguita successivamente tenendo premuti
contemporaneamente i tasti “+” e “-“ per 3 secondi e procedendo quindi alla regolazione dell’ora
come precedentemente spiegato.
Contaminuti
Figura 2
E’ una funzione di contaminati, che non interagisce con il funzionamento del forno, perciò al termine
del conteggio il forno continuer a funzionare.
Per la regolazione premere il tasto centrale per 3 secondi, fino a che appare il simbolo
(figura 2). Con i pulsanti “+” e “-“ impostare il tempo desiderato.
Per una successiva regolazione del contaminati, premere nuovamente il tasto centrale per 3
secondi e procedere alla nuova regolazione.
Un segnale acustico segnaler il termine del conteggio. Per disattivarlo, premere un qualsiasi tasto.
Durata della cottura
Figura 3
E’ la funzione di cottura semi-automatica. Permette di definire i tempi di durata della cottura.
Premere il tasto centrale per 3 secondi, Premere nuovamente il tasto centrale ed apparir la scritta
“dur” (figura 3). Con i pulsanti “+” e “-“ impostare il tempo di cottura desiderato.
Italiano

Fine della cottura
Figura 4
Può essere impostata l’ora nella quale terminer la cottura
Premere il tasto centrale per 3 secondi. Premere nuovamente il tasto centrale due volte consecutive
ed apparir la scritta “End” (figura 4). Con i pulsanti “+” e “-“ impostare il l’ora della fine cottura
desiderata.
Il forno funzioner con la temperatura e la funzione pre-impostate, fino all’ora stabilita.
Programmazione della cottura automatica
Figura 5
Funzione di cottura con programmazione a tempo definito.
Premere il tasto centrale per 3 secondi, Premere nuovamente il tasto centrale ed apparir la scritta
“dur”. Con i pulsanti “+” e “-“ impostare il tempo di cottura desiderato. Attendere alcuni secondi che
la regolazione venga memorizzata.
Premere nuovamente il tasto centrale per 3 secondi. Premere nuovamente il tasto centrale due
volte consecutive ed apparir la scritta “End” (figura 4). Con i pulsanti “+” e “-“ impostare il l’ora della
fine cottura desiderata.
Esempio :
Ora attuale : 12.30
Impostazione durata cottura : 10 minuti
Impostazione fine della cottura : 14.00
Il forno inizier la cottura alle 13.50 (14.00 meno 00.10) con la funzione e la temperatura pre-
impostate e si fermer alle 14.00
Al termine della cottura verr emesso un segnale acustico, che potr essere interrotto premendo un
tasto qualsiasi.
Regolazione dell’intensità della suoneria
Per regolare l’intensit sonora del segnale acustico, premere contemporaneamente i tasti “+” e “-“.
Quindi premere il tasto centrale, ed apparir la scritta “ton1” (tonalit alta) lampeggiante. Premere
quindi ripetutamente il tasto “-“ per selezionare “ton2” (tonalit media) o “ton3” (tonalit bassa).
Premere il tasto centrale per impostare la tonalit selezionata.

TIMER TOUCH CONTROL
Setting the clock
Figure 1
“Auto” and “0:00” will start flashing when the unit is switched on for the first time. To set the clock,
press the central button for about 3 seconds. When appears, press “+” or “-“ to set the correct
time.
Wait until a beep tells you that the clock has been set (figure 1).
To set the time at a later stage, press “+” and “-” together for 3 seconds and then adjust the clock as
described above.
inute counter
Figure 2
As this minute counter does not control the oven, when it finishes counting the oven will continue to
work.
To set, press the central button for 3 seconds until appears (figure 2). Press “+” and “-” to
set the required time.
To set the minute counter at a later stage, press the central button for 3 seconds and adjust as
described above.
The minute counter beeps when it finishes counting. To disable it, press any button.
Cooking time
Figure 3
This is a semi-automatic cooking function. It can be used to set cooking times.
Press the central button for 3 seconds. Then press it again until “dur” appears (figure 3). Press “+”
and “-” to set the required cooking time.
English

End of cooking time
Figure 4
The end of cooking time can also be set.
Press the central button for 3 seconds. Press the central button twice consecutively and wait for
“End” to appear (figure 4). Press “+” and “-” to set the required end of cooking time.
The oven will work in the set mode and at the set temperature until the end of cooking time.
Programming automatic cooking
Figure 5
Cooking function with set times.
Press the central button for 3 seconds. Then press it again until “dur” appears. Press “+” and “-” to
set the required cooking time. Wait a few seconds for the setting to be memorised.
Press the central button for 3 seconds. Press it another two times and wait for “End” to appear
(figure 4). Press “+” and “-” to set the required end of cooking time.
E.g.:
Current time: 12.30
Cooking time: 10 minutes
End of cooking time: 14.00
The oven will start cooking at 13.50 (14.00 less 00.10) at the set temperature and in the set mode
and will stop at 14.00
The oven will beep when it stops cooking. To disable it, press any button.
Adjusting beep volume
To adjust beep volume, press “+” and “-” together. Then press the central button and wait for “ton1”
(high volume) to flash. Press “-” to select “ton2” (medium volume) or “ton3” (low volume).
Press the central button to set the selected volume.

TOUCH CONTROL TIMER
Uhr einstellen
Abbildung 1
Wird die Uhr zum ersten Mal eingeschaltet, blinken die Symbole „Auto“ und „0:00“. Zur ersten
Zeiteinstellung drücken Sie ungefähr drei Sekunden die mittlere Taste. So wie das Symbol
erscheint, drücken Sie auf die „+“ oder „-“ Taste, um die gewünschte Uhrzeit einzustellen.
Warten Sie, bis ein akustisches Signal die eingestellte Zeit bestätigt (Abbildung 1).
Die eingestellte Uhrzeit kann auch anschließend verändert werden, indem man gleichzeitig die
Tasten „+“ oder „-“ drei Sekunden lang gedrückt hält und die Uhrzeit dann wie oben beschrieben
reguliert.
inutenzähler
Abbildung 2
Dieser Minutenzähler funktioniert unabhängig von den anderen Ofenfunktionen. Das heißt, dass der
Ofen, nach Ablauf der Zeit, weiterhin funktioniert.
Um den Minutenzähler einzustellen, drücken Sie drei Sekunden lang die mittlere Taste, bis das
Symbol erscheint (Abbildung 2). Durch Betätigen der „+“ oder „-“ Tasten können Sie nun die
gewünschte Zeit einstellen.
Möchten Sie den Minutenzähler erneut einstellen, drücken Sie abermals drei Sekunden lang die
mittlere Taste und stellen Sie die nun gewünschte Zeit ein.
Ein akustisches Signal ertönt, um das Ablaufen der Zeit anzugeben. Drücken Sie auf eine beliebige
Taste, um es auszuschalten.
Backzeit
Abbildung 3
Diese Funktion bezieht sich auf die halb-automatische Backweise und ermöglicht ein Einstellen der
Backzeit.
Drücken Sie drei Sekunden lang auf die mittlere Taste. Drücken Sie erneut auf die mittlere Taste:
es erscheinen die Buchstaben „dur“ (Abbildung 3). Durch Betätigen der „+“ oder „-“ Tasten stellen
Sie nun die gewünschte Backzeit ein.
Deutsch

Ende der Backzeit
Abbildung 4
Man kann auch das Ende der Backzeit einstellen.
Drücken Sie drei Sekunden lang die mittlere Taste. Drücken Sie erneut zwei Male hintereinander
die mittlere Taste, bis die Schrift „End“ (Abbildung 4) erscheint. Durch Betätigen der Tasten „+“ oder
„-“ können Sie nun das gewünschte Ende der Backzeit einstellen.
Der Ofen bleibt somit bis zur gewünschten Zeit mit den eingestellten Funktionen und Temperatur
eingeschaltet.
Einstellen der automatischen Backzeit
Abbildung 5
Backen mit Zeitangabe.
Drücken Sie drei Sekunden lang auf die mittlere Taste, drücken Sie abermals auf die mittlere Taste,
bis die Schrift „dur“ erscheint. Durch Bedienen der Tasten „+“ oder „-“ stellen Sie die gewünschte
Backzeit ein. Warten Sie einige Sekunden lang, bis die Zeiteinstellung gespeichert wird.
Drücken Sie abermals drei Sekunden lang die mittlere Taste. Drücken Sie nun zwei Mal
hintereinander auf die mittlere Taste, bis die Schrift „End“ (Abbildung 4) erscheint. Durch Bedienen
der „+“ oder „-“ Tasten stellen Sie schließlich das gewünschte Ende der Backzeit ein.
Beispiel:
Aktuelle Zeit : 12.30
Eingestellte Backzeit : 10 Minuten
Eingestelltes Ende der Backzeit: 14.00
Der Ofen schaltet um 13.50 ein (also 14.00 minus 00.10) und führt die angegebenen Funktionen
unter der gewünschten Temperatur aus. Der Ofen schaltet um 14.00 aus.
Am Ende der Backzeit ertönt ein akustisches Warnsignal. Drücken Sie auf eine beliebige Taste, um
es auszuschalten.
Toneinstellung des Warnsignals
Um die Tonstärke des Warnsignal einzustellen, drücken Sie gleichzeitig auf die „+“ und „-“ Tasten.
Drücken Sie dann die mittlere Taste; es erscheint die blinkende Schrift „ton1“ (lauter Ton). Drücken
Sie erneut auf die Taste „-“ wenn Sie „ton2“ wünschen (mittlerer Ton) oder „ton3“ (leise).
Drücken Sie auf die mittlere Taste um den gewünschten Ton zu speichern.

TIMER TOUCH CONTROL
Regulación del reloj
Figura 1
Al encender el reloj por primera vez aparecerán los símbolos “Auto” y “0:00” intermitentes. Para
efectuar la primera regulación del reloj, pulsar la tecla central por unos 3 segundos. Cuando
aparezca el símbolo pulsar el pulsador “+” o “-“ para regular la hora deseada.
Esperar hasta que una señal acústica indique que la hora está programada (figura 1).
La modificación de la hora programada se puede efectuar más tarde, manteniendo pulsadas
simultáneamente las teclas “+” y “-“ por 3 segundos y regulando la hora del modo arriba explicado.
Cuentaminutos
Figura 2
Es una función de cuentaminutos que no interactúa con el funcionamiento del horno y, por lo tanto,
al final de la cuenta el horno continuará funcionando.
Para efectuar la regulación, pulsar la tecla central por 3 segundos, hasta que aparezca el símbolo
(figura 2). Con los pulsadores “+” y “-” programar el tiempo deseado.
Para las regulaciones sucesivas del cuentaminutos, volver a pulsar la tecla central por 3 segundos
y efectuar la nueva regulación.
Una señal acústica indicará que la cuenta ha finalizado. Para desactivarla, pulsar cualquier tecla.
Duración de la cocción
Figura 3
Es la función de cocción semiautomática. Permite definir los tiempos de duración de la cocción.
Pulsar la tecla central por 3 segundos, volver a pulsar la tecla central y aparecerá la inscripción
“dur” (figura 3). Con los pulsadores “+” y “-” programar el tiempo de cocción deseado.
ES
Español

Fin de la cocción
Figura 4
Se puede programar la hora a la cual finalizará la cocción.
Pulsar la tecla central por 3 segundos. Volver a pulsar la tecla central dos veces consecutivas y
aparecerá la inscripción “End” (figura 4). Con los pulsadores “+” y “-” programar la hora de fin de
cocción deseada.
El horno funcionará con la temperatura y la función predefinidas, hasta la hora establecida.
Programación de la cocción automática
Figura 5
Función de cocción con programación por tiempo definido.
Pulsar la tecla central por 3 segundos, volver a pulsar la tecla central y aparecerá la inscripción
“dur”. Con los pulsadores “+” y “-” programar el tiempo de cocción deseado. Esperar algunos
segundos hasta que se memorice la regulación.
Volver a pulsar la tecla central por 3 segundos. Volver a pulsar la tecla central dos veces
consecutivas y aparecerá la inscripción “End” (figura 4). Con los pulsadores “+” y “-” programar la
hora de fin de cocción deseada.
Ejemplo:
Hora actual: 12.30.
Programación duración de la cocción: 10 minutos.
Programación fin de la cocción: 14.00.
El horno iniciará la cocción a las 13.50 horas (14.00 menos 00.10) con la función y la temperatura
predefinidas y se parará a las 14.00 horas.
Al final de la cocción se emitirá una señal acústica, que se podrá interrumpir pulsando cualquier
tecla.
Regulación de la intensidad de la señal acústica
Para regular la intensidad sonora de la señal acústica, pulsar simultáneamente las teclas “+” y “-”.
Luego pulsar la tecla central y aparecerá la inscripción “ton1” (tonalidad alta) intermitente. Pulsar
repetidas veces la tecla “-” para seleccionar “ton2” (tonalidad media) o “ton3” (tonalidad baja).
Pulsar la tecla central para programar la tonalidad seleccionada.
Tabla de contenidos
Idiomas:
Otros manuales de Horno de Artusi

Artusi
Artusi AO650X Manual de usuario

Artusi
Artusi CAO900X Manual de usuario

Artusi
Artusi AO6 Series Manual de usuario

Artusi
Artusi AO676B Manual de usuario

Artusi
Artusi CAFC95X Manual de usuario

Artusi
Artusi CAO610BP Manual de usuario

Artusi
Artusi CAO900 Manual de usuario

Artusi
Artusi AMC34BI Manual de usuario

Artusi
Artusi AO650GG Manual de usuario

Artusi
Artusi AO654XP Manual de usuario

Artusi
Artusi CAMC45B Manual de usuario

Artusi
Artusi AO601 Manual de usuario

Artusi
Artusi AO450X Manual de usuario

Artusi
Artusi AOS652X Manual de usuario

Artusi
Artusi AO654XP Manual de usuario

Artusi
Artusi CAO900X1 Manual de usuario

Artusi
Artusi PAO6 Series Manual de usuario

Artusi
Artusi CAO610XP Manual de usuario


