
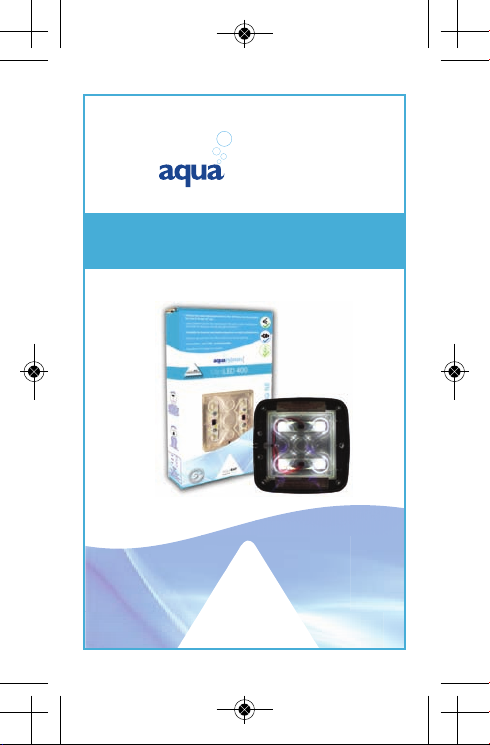
AQUARAY MiniLED 400 Manual de usuario
AQUARAY
SOLID STATE LIGHTING
DESIGNED BY TMC
®
Habitats
AQUARIUM ESSENTIALS
BY TMC
MiniLED 400
MiniLED 400 instructions v1-2011_Layout 1 08/06/2011 12

ENGLISH............................................................. 1
FRANÇAIS......................................................... 8
DEUTSCH.......................................................... 15
NEDERLANDS................................................. 23
ESPAÑOL............................................................ 31
PORTUGUÊS.................................................... 39
ITALIANO........................................................... 47
Русский........................................................... 54
MiniLED 400 instructions v1-2011_Layout 1 08/06/2011 12

1
INSTRUCTIONS FOR
INSTALLATION AND USE
Important Safety Information
- Please Read Carefully
- This MiniLED 400 comprises a lamp unit with a
separate mains power supply unit (PSU) which
supplies a constant DC (low voltage) power
supply to the lamp unit.
Power supply for MiniLED 400 lamp unit:
INPUT-100-240 VAC 50-60Hz 0.15A
OUTPUT-19.5 VDC 0.7A
Caution: Do not use any other power supply unit
with this lamp unit as the lamp unit may not work
and this may cause irreparable damage to the lamp
unit. If the PSU supplied with the unit needs to be
replaced then please obtain an authentic AquaRay
PSU supplied by one of Tropical Marine Centre’s
local stockists.
- Always isolate the PSU from the mains
electricity before installing or carrying out
any maintenance to the lamp unit.
Caution: The power supply unit (PSU) is
not waterproof and therefore must not be
mounted above the aquarium or in any position
where it may accidentally fall into water or be
splashed by water.
Caution: Do not position the PSU in an enclosed
space. Ventilation must be provided to ensure it
does not overheat.
Caution: Do not operate this appliance if any part
of it has a damaged cord or plug, is malfunctioning,
or has been dropped, immersed in water or
damaged in any way. If the external cord of this
unit is damaged, it should be replaced by a cord
exclusively available from the manufacturer
or his service agent.
- This unit is designed to be used indoors
and is not suitable for any outdoor
applications.
Caution: Ensure the lamp unit is securely installed
above the tank before operating.
Caution: The lamp must be installed no less than
25mm from the water surface.
Caution: DO NOT SUBMERGE THE LAMP UNIT.
If the unit is submerged the lamp unit guarantee
will be invalidated.
s
MiniLED 400 instructions v1-2011_Layout 1 08/06/2011 12
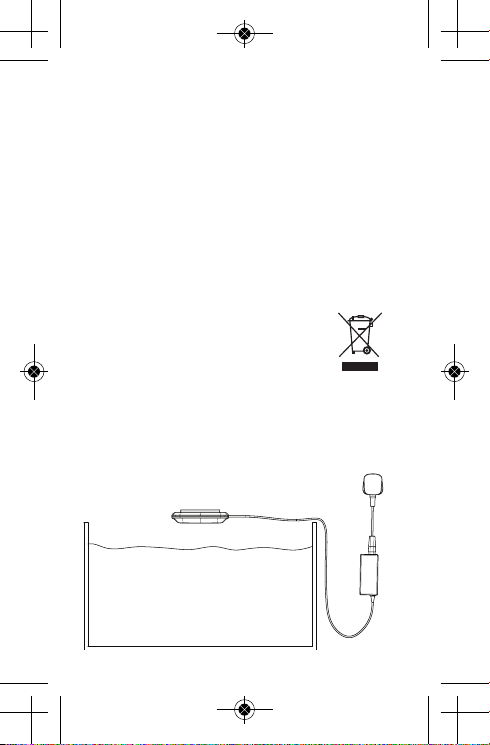
Caution: Always leave a drip-loop in the DC
supply cable to the lamp unit to prevent water
running down the cable and reaching the PSU (see
picture below).
- When in operation, the grooved aluminium heat
sink on the back of the lamp unit will get hot
(± 60°C) to the touch. This is normal and is an
essential feature of protecting the lamp unit from
over-heating.
Caution: Do not cover, or obstruct in any way,
the rear aluminium surface of the lamp unit which
should always have a minimum of 10mm clearance
from the nearest surface to allow free circulation
of air around it.
Caution: Operation of the lamp unit in a confined
or unventilated space, or where there is an
additional heat source, could cause the ambient
operating temperature to rise above
35°C, reducing the useable life of the unit.
- Dispose of this unit responsibly. Check with
your local authority for disposal information.
The MiniLED 400 lamp unit is
mercury free.
PRODUCT INFORMATION
- This unit is manufactured and conforms to:-
Safety: BS EN 60598-1: 2000. BS EN 60598-2-11: 2005
EMC: BS EN 55015: 2006+A2:2009.
BS EN 61000-3-2: 2006+A2:2009.
- This unit is CE approved.
Drip-loop
Aquarium
Typical Installation
2
MiniLED 400 instructions v1-2011_Layout 1 08/06/2011 12

3
PARTS LIST/DIMENSIONS
1. Power supply unit (PSU).
2. Mains power supply cord with UK, European or
USA plug configuration.
3. MiniLED 400 lamp unit with 3m (10ft) cable
complete with matching plug connector to the DC
outlet from the PSU.
4. Fixing brackets - two supplied.
5. Fixing kit.
ASSEMBLY
The MiniLED 400 is fully assembled and ready to use.
INSTALLATION
Please note: This lamp unit is NOT designed to
be operated partially or fully submerged. It must
be SECURELY mounted not less than 25mm
from the maximum water level of the aquarium.
Its versatile, compact and light-weight design allows
the MiniLED 400 lamp unit to be installed above your
aquarium in a variety of ways to suit any application.
The design of the lamp unit means it can be fitted in
close proximity to the surface of the aquarium.
However, mounting further from the surface of the
aquarium will maximise the spread of light from the
MiniLED 400’s unique wide-angled beam.
140 mm
Depth = 140 mm
33 mm
MiniLED 400 instructions v1-2011_Layout 1 08/06/2011 12
4
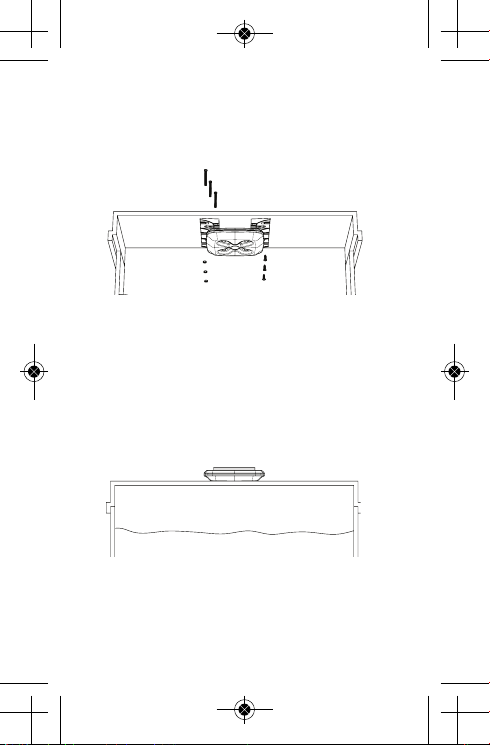
A. Using AquaRay fixing brackets for more
permanent attachment with six screws
(stainless steel self tap, or nylon nut and
bolt – all supplied) to the INSIDE or
UNDERSIDE of a wooden or metal hood
or other enclosure.
Caution: Before the brackets have been attached
to the wooden or metal hood or other enclosure
using all six screws, make sure that they are fully
pushed onto the metal rail of the heat sink.
Caution:To securely attach the bracket to the
wooden or metal hood or other enclosure, all six
screws must be used.
B. Without any fixtures, by resting the
MiniLED 400 lamp unit on the specially
designed front lens face for installation ON
TOP of a transparent cover glass or plastic
condensation tray.
Further mounting options are available. Please
refer to the AquaRay Modular Mounting System
leaflet included with this unit.
For other tips and answers to some
frequently asked questions visit:-
www.tropicalmarinecentre.co.uk
MiniLED 400 instructions v1-2011_Layout 1 08/06/2011 12

5
OPERATION
Once mounted above the aquarium according to
one of the recommended installation methods
detailed above, the lamp unit may be connected to
the power supply unit (PSU) and then the PSU
connected to the mains using the power cord
supplied, and switched on. The lamp unit must not
be connected to, or used with, any PSU other than
that supplied by Tropical Marine Centre.
The PSU may be connected to the mains via a
suitable 24 hour timer device (not supplied) to
regulate when the lamp unit is switched on or off.
The PSU may also be connected to an AquaRay
Control unit (available separately) to simulate
sunrise, sunset and moonlight.
Caution: Do not attempt to control or regulate in
any way the DC supply from the PSU to the
MiniLED 400 lamp unit. Any attempt to do so may
invalidate the 5 year guarantee on your MiniLED 400
lamp unit.
MAINTENANCE
Caution: To avoid possible electric shock, special
care should be taken when using this electrical
appliance near water.
Caution: Always isolate the PSU from mains
electricity before installing or carrying out
any maintenance to the lamp unit.
Caution: Do not attempt to open the
plastic case of the PSU. This will invalidate the 1 year
guarantee on the PSU.
Caution: Do not attempt to open the plastic casing
of your MiniLED 400 lamp unit. This will damage the
waterproof sealing and invalidate the 5 year
guarantee on the lamp unit.
The MiniLED 400 lamp unit and associated power
supply unit (PSU) is a sealed unit and is not a
customer serviceable part. The lamp array inside the
lamp unit is also not a customer serviceable part and
the whole lamp unit is to be disposed of at the end
of its life (>50,000 hours).
MiniLED 400 instructions v1-2011_Layout 1 08/06/2011 12

6
A MiniLED 400 lamp unit should need little or no
maintenance once set up. However due to salt
deposits and the high calcium level in marine
aquariums it is common for deposits to build up on
the body of the unit.
Therefore it is recommended that:-
a. The lens face of the lamp unit is cleaned
periodically with a warm, damp cloth.
b. The heat sink on the rear of the unit is kept free
of large particles of salt and other films or
deposits which might obstruct the free movement
of air around the vanes of the heat sink.
Occasional cleaning with a small brush and/or dry,
lint-free cloth is recommended.
TROUBLE SHOOTING
Problem: The lamp unit does not switch on.
Solution: Check cable connection between lamp unit
and PSU.
Solution: Check power cord is firmly connected to PSU.
Solution: Check (and replace if necessary) the fuse in the
power cord plug (UK only).
If the lamp unit is still not switching on, return the
PSU and lamp unit to your local stockist for further
testing and replacement if necessary.
Problem: The lamp unit starts flashing.
Solution: Return the PSU to your local stockist for
replacement with an authentic Tropical Marine
Centre part.
Problem: One or more lamps in the lamp unit
do not come on or cease to work.
Solution: Return lamp unit to your local stockist for
replacement with an authentic Tropical Marine
Centre part.
MiniLED 400 instructions v1-2011_Layout 1 08/06/2011 12

7
Problem: The lamp unit has been accidentally
immersed.
Solution: Immediately switch off the mains supply to
the PSU and remove the lamp unit from the water
while holding the unit vertically with the cable entry
end uppermost.
Disconnect the lamp unit from the PSU via the
connector located 150mm/6” from the PSU. If
immersed it is normal for some water to be held
around the outside edge of the lamp unit and this can
be removed by gently shaking the unit vertically and
then drying carefully with a lint-free cloth.
When fully dry, check to see if any water or drips
are visible inside the main body of the unit when
observed through the front lens cover. If you are in
any doubt as to whether water has penetrated the
unit then do not reconnect to the PSU and
immediately return the unit to your local stockist for
further inspection by Tropical Marine Centre.
Please Note: Accidental immersion or
partial/fully submerged installation of the
lamp unit will invalidate the guarantee on the
lamp unit.
For further information, please see our
website: www.tropicalmarinecentre.co.uk
MiniLED 400 instructions v1-2011_Layout 1 08/06/2011 12
8
NOTICE D’INSTALLATION ET MODE D’EMPLOI
Notice de sécurité importante – A lire
attentivement
- L’unité MiniLED 400 contient une lampe et un bloc
d’alimentation indépendant qui alimente la lampe en
courant continu (basse tension).
Alimentation d’une lampe MiniLED 400 :
ENTREE-100-240 VCA 50-60 Hz 0,15A
SORTIE-19,5 VCC 0,7A
Attention : Ne pas utiliser la lampe avec d’autres
blocs d’alimentation car il se peut qu’elle ne
fonctionne pas et qu’elle soit endommagée de manière
irréparable. Si le bloc d’alimentation fourni avec l’unité
doit être remplacé, veuillez obtenir un bloc
d’alimentation AquaRay authentique auprès d’un
distributeur de produits Tropical Marine Centre.
- Débranchez toujours le bloc d’alimentation du
courant de secteur avant d’installer la lampe
ou de procéder à un entretien.
Attention : Le bloc d’alimentation n’est pas
étanche et ne doit donc pas être installé au-
dessus de l’aquarium ou à tout autre endroit où il
pourrait accidentellement tomber dans l’eau ou être
éclaboussé.
Attention : Ne pas installer le bloc d’alimentation
dans un endroit enclos. L’espace doit être bien aéré
pour veiller à ce que le bloc d’alimentation
ne surchauffe pas.
Attention : N’utilisez pas cet appareil si l’une de ses
pièces a un cordon
ou une fiche endommagée, s’il ne fonctionne pas
correctement, s’il a subi une chute, s’il a été immergé
dans de l’eau ou endommagé d’une manière
quelconque. Si le cordon externe de cette unité est
endommagé, il doit être remplacé par un cordon
exclusivement disponible auprès du fabricant ou de
son agent de service.
- Cette unité est prévue pour usage dans un
endroit couvert et ne convient pas aux
applications en plein air.
Attention : Veillez à ce que la lampe soit
installée en toute sécurité au-dessus de l’aquarium
avant de l’utiliser.
Attention : la lampe ne doit pas être installée à
moins de 25 mm de la surface de l’eau.
Attention : N’IMMERGEZ PAS LA LAMPE.
L’immersion de la lampe annulera la garantie.
-
-
I
-
-
s
MiniLED 400 instructions v1-2011_Layout 1 08/06/2011 12
Tabla de contenidos
Idiomas:
Otros manuales de Equipo de iluminación de AQUARAY


Manuales populares de Equipo de iluminación de otras marcas


Qazqa
Qazqa Suplux SL 3 Black 103062 Manual de usuario

Commercial Electric
Commercial Electric 54568141 Manual de usuario

CREE LIGHTING
CREE LIGHTING 304 Series Manual de usuario

Goobay
Goobay 49867 Manual de usuario

ECOMAN ITALIA
ECOMAN ITALIA LED T8 Manual de usuario

Alkalite
Alkalite Krypton KT-81 Manual de usuario


