Airlink101 ANAS350 Manual de usuario

Office NAS
3.5” IDE/SATA Network Attached Storage
Model # ANAS350
User’s Manual
Ver. 2.3

2
Table of Contents
1. Introduction................................................................................................................................. 3
1.1 Package Contents.................................................................................................................. 3
1.2 Features................................................................................................................................. 3
1.3 NAS Diagram........................................................................................................................ 4
2. Hard Drive Installation ............................................................................................................... 5
3. Accessing the NAS device Configuration .................................................................................. 9
4. Setup Configuration.................................................................................................................. 13
4.1 Setup – Wizard.................................................................................................................... 13
4.2 Setup – LAN....................................................................................................................... 18
4.3 Setup – System Time.......................................................................................................... 19
5. Storage Configuration............................................................................................................... 20
5.1 Storage Configuration – Disk Utility.................................................................................. 20
5.2 Storage Configuration – File Sharing................................................................................. 21
5.3 Storage Configuration – Access Control ............................................................................ 22
6. Download Assistant.................................................................................................................. 24
6.1 Download Assistant – FTP Configuration.......................................................................... 24
6.2 Download Assistant – HTTP Configuration....................................................................... 25
6.3 Download Assistant – E-mail Alert.................................................................................... 25
7. Administration .......................................................................................................................... 27
7.1 Administration – Management ........................................................................................... 27
7.2 Administration – Firmware Upgrade.................................................................................. 27
7.3 Administration – Backup/Restore....................................................................................... 28
8. Status......................................................................................................................................... 29
8.1 Status – System................................................................................................................... 29
8.2 Status – Local Network....................................................................................................... 30
8.3 Status – Download Job........................................................................................................ 30
8.4 Status – Log ........................................................................................................................ 31
9. Working with Windows............................................................................................................ 32
9.1 Mapping a Network Drive.................................................................................................. 32
9.2 Using the Windows Backup Utility.................................................................................... 34
10. Specifications.......................................................................................................................... 38
Technical Support......................................................................................................................... 39

3
1. Introduction
Thank you for purchasing our Network Attached Storage (NAS) device. This product is
specifically designed for Small Office and Home Office needs, providing a reliable and
centralized data storage solution. With it you will be able to access your shared files
from any desktop or laptop within your network.
1.1 Package Contents
Before you begin the installation, please check the contents of your package. The
package should include the following items:
•Office NAS
•Vertical stand
•Power adapter
•Ethernet Cable
•Quick Installation Guide
•Utility CD (contains Utility and User Manual)
•Screws (4)
•Rubber Pads (4)
If any item is damaged or missing, please contact your local dealer immediately. Also,
keep the box and packaging materials in case you need to ship the unit in the future.
1.2 Features
•Support for a single 3.5” IDE (PATA) or Serial ATA (SATA) hard disk drive
•Accessible via Windows Networking or Samba file sharing systems
•Support for FAT, FAT32, Ext2 and NTFS file systems
•User account support for read/write security
•Real-time clock synchronization for scheduled disk activity
•Firmware Upgradeable
•Web-based Configuration allows for remote management
•Supports Hard Disk Power Saving mode (Standby)
•Built-in FTP server
•UPnP support.
•Supports scheduled downloads via FTP and HTTP
•Aluminum housing allows for better heat transfer keeping the device cool
•Built-in USB 2.0 Host controller (connects up to 2 USB devices)
•Easy Copy feature to automatically copy data from the USB port to the NAS
•Built-in DHCP Server for direct connections (in case you do not have a router)

4
1.3 NAS Diagram
LED Indicators:
LED Light Off Light Solid Blinking
Power No power Device is ON
LAN No network connection
present Linked Network Activity
HDD R/W Not in use HDD read/write
HDD Status No HDD HDD full or error Quickly – Hard Drive
Capacity Low
USB 1 No device attached USB device connected
and ready
USB 2 No device attached USB device connected
and ready
Status/Backup
Steady – Normal
operation
Quickly – Backup in
progress
Buttons:
Buttons Description
Shutdown Press and hold for 4 seconds to shut down the Drive before powering off.
Backup Press and hold for 4 seconds to copy the contents of an attached USB
device to the Hard Drive.
Shutdown + Backup Press and hold both the “Shutdown” and “Backup” buttons
simultaneously for 6 seconds to reset the device to factory default
settings.
On/Off switch(in back) Powers down the device.

5
2. Hard Drive Installation
This section provides instructions on how to properly install a hard drive into the NAS
device.
WARNING:
The Network Storage device is not hot-swappable. Please make sure that it is turned off and not
connected to the power outlet when performing the following assembly procedure.
Step 1 Unfasten two screws at the rear side of device, and pull out the back cover.
Step 2 Pull out the front panel.

6
Step 3 Put the 3.5-inch IDE or SATA hard disk into the slot, and connect the
proper data cable for your hard drive. (The red cable is used for SATA and the gray
one is for IDE).
Step 3a IDE
Step 3b SATA
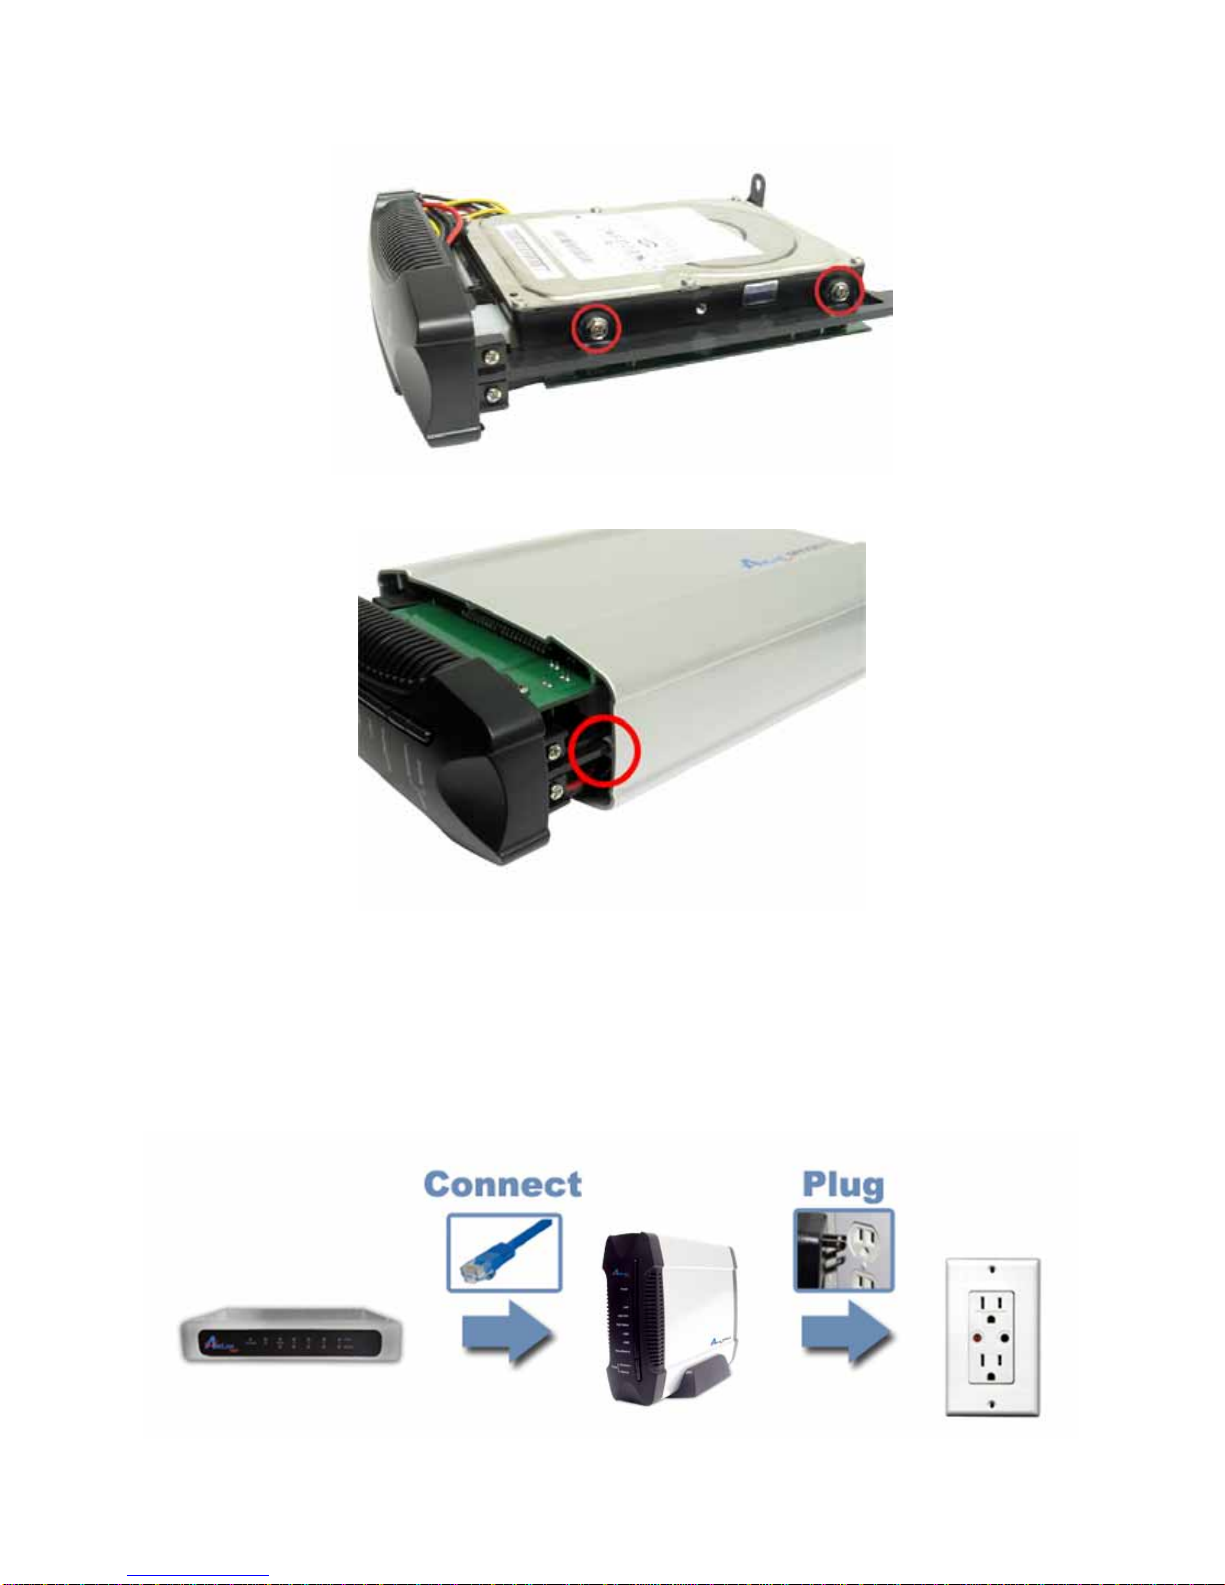
Step 4 Secure the drive to the metal plate on the sides with the provided four screws.
7
Step 5 Re-attach the front panel to the device.
Step 6 Re-attach the back panel to the device and secure it with the two screws
removed in step 1.
Step 7 Connect Office NAS to your router or your computer with the provided Ethernet
cable, and connect the supplied power adapter. Plug the power cord into a power outlet.
(Note: connecting this device to your computer directly is not recommended since many
features will not be able to function.)

8
Step 8 Turn it on by pressing the On switch in the back of the device. Verify the
Power and LAN LEDs are lit.
Congratulations! The hard drive installation is complete!

9
3. Accessing the NAS device Configuration
Before using the NAS device you may need to do some configuration which can be
accessed in a few different ways.
Step1 There are multiple methods to access the NAS configuration.
Method 1: Use the Configuration Utility found on the Utility CD. This is only
available for Windows operating systems. Insert the Utility CD into your CD-ROM drive
and select Install NAS Configuration Utility.
When the setup wizard coming up, follow the screen instructions and click Next to finish
installing the NAS Configuration Utility.

10
To open the NAS Configuration Utility go to Start > (All) Programs > Airlink101 NAS
Configuration Utility > Airlink101 NAS Configuration Utility.
When prompted for login access, type in default username and password admin for
both blanks and click OK button.
Otros manuales para ANAS350
1
Tabla de contenidos
Otros manuales de Hardware de red de Airlink101


Manuales populares de Hardware de red de otras marcas

Matrix Switch Corporation
Matrix Switch Corporation MSC-HD161DEL Manual de usuario

B&B Electronics
B&B Electronics ZXT9-IO-222R2 Manual de usuario

Yudor
Yudor YDS-16 Manual de usuario

D-Link
D-Link ShareCenter DNS-320L Manual de usuario

Samsung
Samsung ES1642dc Instrucciones de uso

Honeywell Home
Honeywell Home LTEM-PV Instrucciones de montaje


