
afx light PROPAR6-HEX Manual de usuario

PROPAR6-HEX CODE: 15-1667
PROPAR12-HEX CODE: 15-1668
PROPAR18-HEX CODE: 15-1669
EXTRA BRIGHT LED PROJECTOR
RGBWA+UV LED
PROJECTEUR PROFESSIONNEL A LED
HAUTE LUMINOSITE RGBWA+UV
EXTRA HELLER LED STRAHLER RGBWA+UV LED
EXTRA HELDER LED PROJECTOR RGBWA+UV LED
PROYECTOR PROFESIONAL DE LED
DE ALTA LUMINOSIDAD RGBWA+UV LED
GB - User Manual - p. 2
F - Manuel d'Utilisation - p. 9
D - Bedienungsanleitung - S. 17
NL - Handleiding - p. 25
E - Manual de Instrucciones - p. 32
Assembled in PRC
Designed by LOTRONIC S.A.
Av. Z. Gramme 9
B - 1480 Saintes

USER MANUAL
1. SAFETY INSTRUCTIONS
Please read the instructions carefully. They contain important information about the installation,
operation and maintenance.
• Please keep this User Manual for future reference. If you sell the unit to another user, be sure that
he also receives this instruction booklet.
• Unpack and check the unit carefully that it has not been damaged during transport before using
the unit.
• Before operating, ensure that the voltage and frequency of power supply match the power requi-
rements of the unit.
• The unit should be connected to a main socket outlet with a protective earth connection
• The unit is for indoor use only in a dry location.
• The unit must be installed in a location with adequate ventilation, at least 0.5m from adjacent
surfaces. Be sure that no ventilation slots are blocked.
• Disconnect mains power before fuse replacement or servicing.
• Replace fuse only with the same type.
• Makesuretherearenoinammablematerialsclosetotheunitduringoperation.
• Usesafetycablewhenxingthisunit.
• In the event of serious operating problem, stop using the unit immediately.
• Never try to repair the unit by yourself. Repair carried out by unskilled people can lead to damage
or malfunction. Please contact the nearest authorized technical assistance center and always use
the same type of spare parts.
• Do not touch any wires during operation as high voltage might be causing electric shock.
• The product is for decorative purposes only and not suitable as a household room illumination.
DISCONNECT DEVICE
Where the MAINS plug or an appliance coupler is used as the disconnect device, the disconnect
device shall remain readily operable.
2. SPECIFICATIONS
PROPAR6-HEX PROPAR12-HEX PROPAR18-HEX
Power supply 110-240V~ 50/60Hz
Consumption 60W 105W 180W
Fuse T1A, 250V T2A, 250V T3.15A, 250V
DMX control channels 6 / 8 / 12 / HSV + HSI
DMX512 Connection 3-pin XLR 3-pin XLR 3- & 5-pin XLR
LED type 12W 6-in-1 RGBWA+UV
Number of LEDs 6 12 18
Beam angle 25°
Max.housingtemp. 65°C 75°C 75°C
Min.distancetoammablesurfaces 0.5m
Min. distance to lighted objects 0.1m
Dimensions 235x215x110mm 280x280x110mm 310x310x110mm
Weight 2.6kg 3.2kg 5.2kg
EN 2© Copyright LOTRONIC 2018

EN3
www.afx-light.com
3. INSTALLATION
Theunitshouldbemountedviaitsscrewholesonthebracket.Alwaysensurethattheunitisrmly
xedtoavoidvibrationandslippingwhileoperating.Alwaysensurethatthestructuretowhichyou
are attaching the unit is secure and able to support a weight of 10 times of the unit’s weight. Also
alwaysuseasafetycablethatcanhold12timestheweightoftheunitwheninstallingthexture.
Theequipmentmustbexedbyprofessionalsataplacewhereisoutofthereachofpeopleand
where nobody can pass by or under it.
CONTROL PANEL DESCRIPTION
Button Function
MENU Select main level menu / Exits from the current menu or
function
UP Navigates upwards through the menu list and increases the
numeric value when in a function
DOWN Navigates downwards through the menu list and decreases
the numeric value when in a function
ENTER Enables the currently displayed menu
CONTROL PANEL MENU TREE
Main Level Menu Level 2 Level 3 Level 4
Static Color STATIC [Solid ]
STATIC [Manual]
SOLID [Colr 1 ~ 63]
MANUAL
[Red]
MANUAL
<R= 000-255>
[Green] <G= 000-255>
[ Blue ] <B = 000-255>
[White ] <W = 000-255>
[Amber ] <A = 000-255>
[Purple ] <P = 000-255>
[Strobe ] <S = 000-255>
(000 –009 no function)
Auto Program Program [Pro 01 ~ Pro 0] AUTOSP (speed) [001 – 100]
DMX Address Address [ 001 ~ 512 ]
DMX Mode DMX Mode
[ 6 CH ]
[ 8 CH ]
[ 12 CH ]
[ HSV ]
[ HSI ]
Slave Mode Slave
[ Slave ]
[ Master ]
White Blance Balance
[ Red ]
[ Green ]
[ Blue ]
Red / Green / Blue
[255 – 000]

EN 4© Copyright LOTRONIC 2019
Dimmer Mode Dimmer Mode
[ OFF ]
[ Curve 1 ]
[ Curve 2]
[ Curve 3 ]
Refresh Rate Refresh
[800HZ ]
[2000HZ]
[4000HZ]
[10 KHZ]
[20 KHZ]
[25 KHZ]
Keys Lock Lock
[No ]
[ Yes ]
CONTROL PANEL OPERATIONS
1. STATIC (User Manual Static Colors Setting)
This mode allows the user to set the intensity of RED, GREEN, BLUE, WHITE, AMBER, PURPLE (UV)
separatelytogetendlesscolormixingfromthecontrolboardwithoutDMXcontroller.
Press MENU to select STATIC mode and press ENTER
“RED:xxx”isdisplayed.PressENTERagain.UsetheUPandDOWNbuttonstoadjustthenumeric
value(000-255),pressENTER,“GREE:xxx"isdisplayed.Repeattheabovesetting.Dothesamefor
BLUE/WHIT/AMBE/PURP and STROBE (Value 000-020)
Press MENU to save the setting and go back.
When you enter this mode, the device will be set automatically as the Master unit.
STATIC (Solid Colors Setting)
This mode offers 63 solid colors.
Press MENU to select Static Color mode. Press ENTER, then use the UP and DOWN buttons to se-
lect the desired solid colors. Your selection will be saved automatically.
In this mode, the device will be set automatically as the Master unit
Mode: Value: Function:
STATIC
[solid]
Color 1 Red
Color 2 Green
Color 3 Blue
Color 4 White
Color 5 Amber
Color 6 Purple
Color 7 Red + Green
Color 8 Red + Blue
Color 9 Red + White
Color 10 Red + Amber
Color 11 Red + Purple
Color 12 Green + Blue

EN5
www.afx-light.com
Color 13 Green + White
Color 14 Green + Amber
Color 15 Green + Purple
Color 16 Blue + White
Color 17 Blue + Amber
Color 18 Blue + Purple
Color 19 White + Amber
Color 20 White + Purple
Color 21 Amber + Purple
Color 22 Red + Green + Blue
Color 23 Red + Green + White
Color 24 Red + Green + Amber
Color 25 Red + Green + Purple
Color 26 Red + Blue + White
Color 27 Red + Blue + Amber
Color 28 Red + Blue + Purple
Color 29 Red + White + Amber
Color 30 Red + White + Purple
Color 31 Red + Amber + Purple
Color 32 Green + Blue + White
Color 33 Green + Blue + Amber
Color 34 Green + Blue + Purple
Color 35 Blue + White + Amber
Color 36 Blue + White + Purple
Color 37 White + Amber + Purple
Color 38 Blue + Amber + Purple
Color 39 Green + White + Amber
Color 40 Green + White + Purple
Color 41 Green + Amber + Purple
Color 42 Red + Green + Blue + White
Color 43 Red + Green + Blue + Amber
Color 44 Red + Green + Blue + Purple
Color 45 Red + Green + White + Amber
Color 46 Red + Green + White + Purple
Color 47 Red + Green + Amber + Purple
Color 48 Red + Green + White + Amber
Color 49 Red + Blue + White + Purple
Color 50 Red + Blue + Amber + Purple
Color 51 Red + White + Amber + Purple
Color 52 Green + Blue + White + Amber
Color 53 Green + Blue + White + Purple
Color 54 Green + Blue + Amber + Purple
Color 55 Green + White + Amber + Purple
Color 56 Blue + White + Amber + Purple
Color 57 Red + Green + Blue + White + Amber

EN 6© Copyright LOTRONIC 2019
Color 58 Red + Green + Blue + White + Purple
Color 59 Red + Green + Blue + Amber + Purple
Color 60 Red + Green + White + Amber + Purple
Color 61 Red + Blue + White + Amber + Purple
Color 62 Green + Blue + White + Amber + Purple
Color 63 Red + Green + Blue + White + Amber + Purple
2. AUTO (AUTO PROGRAMS SETTING)
This mode runs the built-in automatic programs.
Press MENU to select AUTO mode and press ENTER.
Use the UP and DOWN buttons to select the built-in automatic programs.
Built-in auto: Pro 01 ~ Pro 10;
Built-in auto program speed: AUTOSP [ 001 ~ 100 ] (Slow – Fast)
In this mode, the device will be set automatically as the Master unit.
3. ADDRES (DMX ADDRESS SETTING)
Press MENU to select the ADDRES mode, press ENTER. Then use UP and DOWN buttons to set the
desired DMX address (ADDR 001 - 512)
4. DMX MODE (DMX CHANNEL MODE SETTING)
Use this mode to set the device to DMX controller mode with optional DMX channels.
There are 5 DMX channel modes to be selected.
Press MENU to select the DMX MODE, press ENTER. Then use the UP and DOWN buttons to set the
DMX channel modes.
6 Ch
8 Ch
12 Ch
HSV (H = Hue, S = Saturation, V = Brightness)
HSI (H = Hue, S = Saturation, I = Intensity)
Please refer to DMX VALUES chart for the channels detail.
5.SLAVE MODE
You can use this mode to set the unit to run as Master or Slave model
Theunitdefaultsettingis“Slave”
Press MENU to select the Slave Mode, press ENTER. Use UP and DOWN to select the desired set-
ting: Master/ Slave.
6. WHITE BALANCE
Thismodeisforusertosetthecustomcongurablesettingofwhitebalance.
Press MENU to select the White Balance mode, press ENTER.
Use UP and DOWN to select Balance [ Red ] / [Green ] / [ Blue ], press ENTER
Red [ 000 – 255], Green [ 000 – 255], Blue [ 000 – 255] display, use UP and Down to adjust the
numeric value.
Press MENU to save the setting and go back.
7. DIMMER (DIMMER CURVES SETTING)
Press MENU to Select Dimmer Mode, press ENTER, then use UP and DOWN to select the following
dimmer modes:
[ OFF ] (Linear dimmer mode, close dimmer curves, instant dimmer response)
[Curve 1 ] Dimmer curve1, Square Law dimming.
[Curve 2 ] Dimmer curve2, Inverse-square Law dimming.
[Curve 3 ] Dimmer curve3, S-Curves dimming.

EN7
www.afx-light.com
8. REFRESH RATE ( TO SET THE PWM REFRESH RATE OF LED)
This device has optional LED PWM refresh rates for professional camera reqirements.
Press MENU to Select Refresh Rate mode, press ENTER, then use UP and DOWN to select the fol-
lowing refresh modes:
Refresh [ 800 HZ ]
Refresh [ 2000 HZ ]
Refresh [ 4000 HZ ]
Refresh [ 10 KHZ ]
Refresh [ 20 KHZ ]
Refresh [ 25 KHZ ]
9. KEYS LOCK (KEYS LOCK/UNLOCK PASSWORD)
Press MENU to select the Keys Lock, press ENTER. Then use UP and DOWN to set the keys lock
function to Lock [ No ] or [ Yes ].
When select Lock [ Yes ], the keys will be locked after 30 seconds without operating.
Input password UP+DOWN+UP+DOWN, press ENTER to unlock the keys.
When select Lock [ No ], the key lock function is not available.
DMX VALUES
This device has 5 DMX modes: 12CH (Tour), 6CH, 8CH, HSV & HSI
12 CH (TOUR) MODE
Channel DMX Value Function
1 000 - 255 Master Dimmer
2 000 - 255 Red 0 - 100%
3 000 - 255 Green 0 - 100%
4 000 - 255 Blue 0 - 100%
5 000 - 255 White 0 - 100%
6 000 - 255 Amber 0 - 100%
7 000 - 255 Purple (UV) 0 – 100%
8000 - 009 No function
010 - 255 Strobe (1-20Hz)
9
Color Macros & White Balance
000 - 010 No function
011 - 030 Red 100%, Green 0%~100%, Blue 0%
031 - 050 Red 100%~0%, Green 100%, Blue 0%
051 - 070 Red 0%, Green 100%, Blue 0%-100%
071 - 090 Red 0%, Green 100%~0%, Blue 100%
091 - 110 Red 0%~100%, Green 0%, Blue 100%
111 - 130 Red 100%, Green 0%, Blue 100%~0%
131 - 150 Red 100%, Green 0%~100%, Blue 0%~100%
151 - 170 Red 100%~0%, Green 100%~0%, Blue 100%
171 - 200 Red 100%, Green 100%, Blue 100%, White 100%
201 - 205 White 1
206 - 210 White 2
211 - 215 White 3
216 - 220 White 4
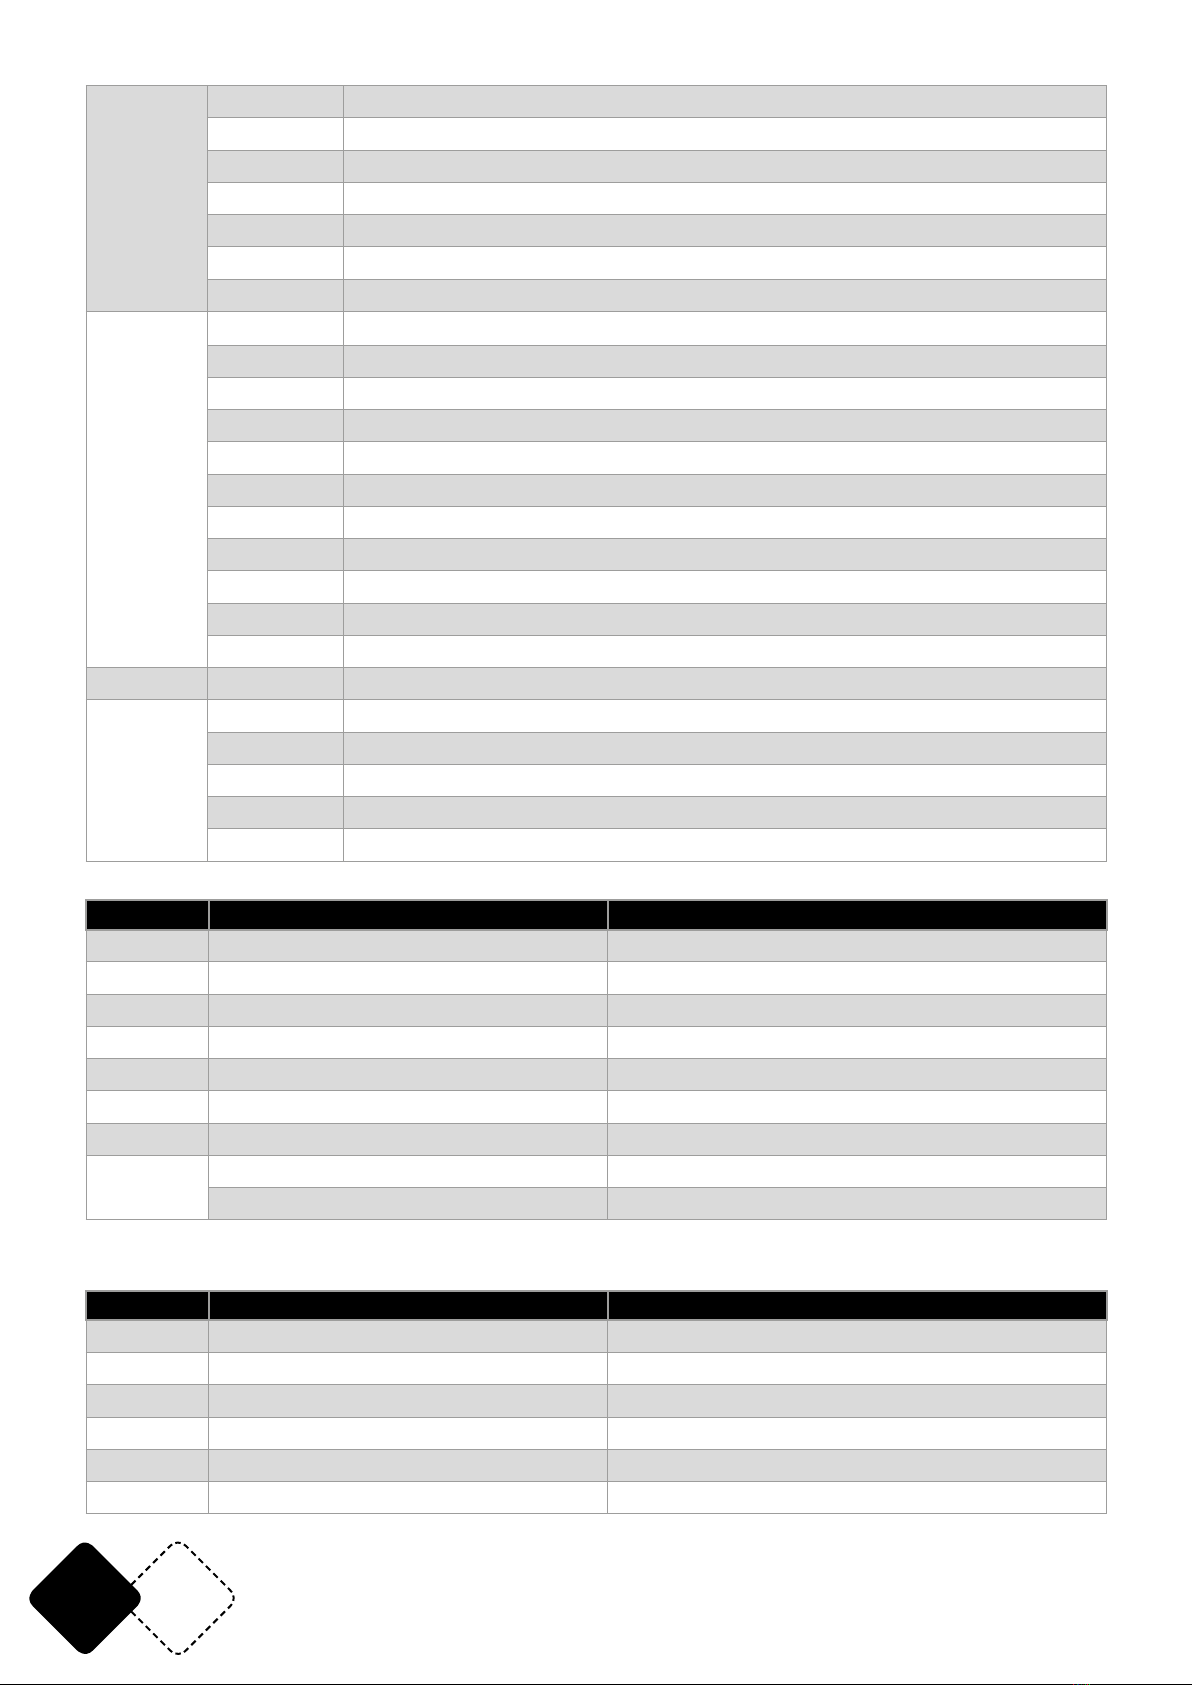
EN 8© Copyright LOTRONIC 2019
9
221 - 225 White 5
226 - 230 White 6
231 - 235 White 7
236 - 240 White 8
241 - 245 White 9
246 - 250 White 10
251 - 255 White 11
10
000 – 015 No function
016 - 039 Auto Pro 01
040 – 063 Auto Pro 02
064 – 087 Auto Pro 03
088 - 111 Auto Pro 04
112 – 135 Auto Pro 05
136 - 159 Auto Pro 06
160 - 183 Auto Pro 07
184 – 207 Auto Pro 08
208 - 231 Auto Pro 09
232 - 255 Auto Pro 10
11 000 - 255 Auto programs speed (slow-fast) for Auto 1 ~ Auto 10
12
000 – 051 Default Dimmer (Use the control panel set dimmer mode)
052 – 101 Dimmer Curves OFF, instant dimmer
102 – 152 Curve 1, Square Law dimming
153 – 203 Curve 2, Inverse-square Law dimming
204- 255 Curve 3, S-curve non-Linear Dimming
8 CH MODE
Channel DMX Value Function
1 000 - 255 Master Dimmer
2 000 - 255 Red 0 - 100%
3 000 - 255 Green 0 - 100%
4 000 - 255 Blue 0 - 100%
5 000 - 255 White 0 - 100%
6 000 - 255 Amber 0 - 100%
7 000 - 255 Purple (UV) 0 – 100%
8000 - 009 No function
010 - 255 Strobe (1~20Hz)
6 CH MODE
Channel DMX Value Function
1 000 - 255 Red 0 - 100%
2 000 - 255 Green 0 - 100%
3 000 - 255 Blue 0 - 100%
4 000 - 255 White 0 - 100%
5 000 - 255 Amber 0 - 100%
6 000 - 255 Purple (UV) 0 – 100%

FR9
www.afx-light.com
HSV CH MODE
Channel DMX Value Function
1 000 - 255 Hue 0 - 100% (H)
2 000 - 255 Saturation 0 - 100% (S)
3 000 - 255 Brightness 0 - 100% (V)
HSI CH MODE
Channel DMX Value Function
1 000 - 255 Hue 0 - 100% (H)
2 000 - 255 Saturation 0 - 100% (S)
3 000 - 255 Intensity 0 - 100% (I)
FIXTURE CLEANING
Thecleaningofinternalandexternalopticallensesand/ormirrorsmustbecarriedoutperiodical-
lytooptimizelightoutput.Cleaningfrequencydependsontheenvironmentinwhichthexture
operates: damp, smoky or particularly dirty surrounding can cause greater accumulation of dirt
on the unit’s optics.
• Cleanwithsoftclothusingnormalglasscleaninguid.
• Always dry the parts carefully.
• Cleantheexternalopticsatleastevery20days.Cleantheinternalopticsatleastevery30/60
days.
IMPORTANT NOTE: Electric products must not be put into household waste. Please bring them to a recycling centre. Ask your local
authorities or your dealer about the way to proceed.
MANUEL D'UTILISATION
1. CONSIGNES DE SÉCURITÉ
• Dèsréceptiondel’appareil,ouvrezlecartonetvériezquelecontenuestcompletetenbonétat.
• Assurez-vous que la tension secteur convient à cet appareil et qu’elle ne dépasse pas la tension
d’alimentation indiquée sur la plaque signalétique de l’appareil.
• Uniquement pour utilisation à l’intérieur à un endroit sec!
• Installez l’appareil à un endroit bien ventilé à une distance minimum de 0,5m de toute surface.
Assurez-vous que les fentes de ventilation ne sont pas bloquées.
• Débranchez l’appareil du secteur avant toute manipulation ou entretien.
• Lorsquevousremplacezlefusible,utilisezuniquementunfusiblequiprésenteexactementles
mêmes caractéristiques que l’ancien.
• Vériezqu’aucunmatériauinammablenesetrouveàproximitédel’effetpendantlefonction-
nement.
• Fixezl’appareilavecuncâbledesécurité.
• En cas de dysfonctionnement, arrêtez immédiatement l’appareil et débranchez-le du secteur.
• N’essayez jamais de réparer l’appareil par vous-même. Une réparation mal faite peut entraîner
des dommages et des dysfonctionnements. Contactez un service technique agréé. Utilisez unique-
mentdespiècesdétachéesidentiquesauxpiècesd’origine.
• Nepastoucherdelsélectriquespendantlefonctionnementcarlestensionsélevéespeuvent
provoquer une électrocution.
• L’appareilfaitpartiedesappareilsélectriquesdeCLASSEIcequisigniequ’ildoitêtrereliéàla

FR 10 © Copyright LOTRONIC 2019
terre. Il faut le brancher sur une prise secteur pourvu d’un contact de terre.
• Leluminairenedoitservirqu’àdesnsdécorativesetneconvientpascommeéclairagedomes-
tique normal.
DISPOSITIF DE COUPURE:Lorsqu’unecheSECTEURouuncoupleursontutiliséspourdéconnecter
l’appareil du secteur, ce dispositif doit rester facilement accessible à tout moment
2. CARACTÉRISTIQUES TECHNIQUES
PROPAR6-HEX PROPAR12-HEX PROPAR18-HEX
Alimentation AC110~240V 50/60Hz
Consommation 60W 105W 180W
Fusible T1A, 250V T2A, 250V T3.15A, 250V
CanauxDMX 6 / 8 / 12 / HSV + HSI
ConnexionDMX512 3-pin XLR 3-pin XLR 3- & 5-pin XLR
Type de LED 12W 6-in-1 RGBWA+UV
Nombre de LEDs 6 12 18
Angle de diffusion 25°
Températuremax.duboîtier 65°C 75°C 75°C
Distance min. des surfaces inam-
mables
0.5m
Distance min. vers des objets éclairés 0.1m
Dimensions 235x215x110mm 280x280x110mm 310x310x110mm
Poids 2.6kg 3.2kg 5,5kg
3. INSTALLATION
Fixezl’appareilsurl’étrieraumoyendestrousdevis.Assurez-vousquel’appareilestsolidement
xéand’éviterdesvibrationsetdesmouvementspendantlefonctionnement.Vériezquelesup-
port sur lequel vous allez installer l’appareil est solide et capable de supporter au moins 10 fois le
poidsdel’appareil.Lorsdel’installationutiliseztoujoursuncâbledesécuritésupplémentairequi
peut porter 12 fois le poids le d’appareil. Cet appareil doit être installé par des professionnels. Il
doit être installé à un endroit où il est hors de portée des personnes et où personne ne peut passer
en-dessous.
Touches de Commande
Touche Fonction
MENU Aller dans le menu principal/Quitter la fonction en cours
UP Monter dans la liste et augmenter une valeur dans une
fonction
DOWN Descendre dans la liste et diminuer la valeur d’une fonc-
tion
ENTER Conrmeleréglageafché
ARBORESCENCE DU MENU
Niveau principal Niveau 2 Niveau 3 Niveau 4
Static Color STATIC [Solid ]
STATIC [Manual]
Este manual sirve para los siguientes modelos
5
Tabla de contenidos
Idiomas:
Otros manuales de Proyector de afx light

afx light
afx light CLUB-ZOOM2810 Manual de usuario

afx light
afx light PARCOB150WH-MKIII Manual de usuario

afx light
afx light FREEPARHEX-BL Manual de usuario

afx light
afx light PARCOB50WH Manual de usuario

afx light
afx light MINIRGB-8 Manual de usuario

afx light
afx light IPAR 518 Manual de usuario

afx light
afx light CLUB-WHITE450 Manual de usuario

afx light
afx light IBOX-H5 Manual de usuario

afx light
afx light laser-text300rgb Manual de usuario

afx light
afx light PARCOB100HEX Manual de usuario


