AEONS Technologies Professional Series Manual de usuario

19” Wall Mounted Equipment Enclosure
Professional Series
Models: 6U, 9U, 12U, 15U, 18U, 22U
Hardware List
M6 Screw (A) M6 Cage Nut (B) M5.5 Self-Tapping (C) M5.5 Conical (D) Wrench (E)
Owner’s Manual
Rev. 2.5
Important Safety Instructions:
This manual contains instructions and warnings that must be followed during the installation and
operation of the product described in this manual. Failure to comply may invalidate the warranty and
cause property damage or personal injury.
Keep the enclosure in a controlled indoor environment, away from moisture, temperature extremes, flammable liquids and gasses,
conductive contaminants, dust and direct sunlight. Leave adequate space at the front and rear of the enclosure for proper ventilation. Do
not block, cover or insert objects into the external ventilation openings of the enclosure.
The enclosure is extremely heavy. Use caution when handling the enclosure. Do not attempt to unpack, move or install it unassisted. Use
a mechanical device such as a forklift or pallet jack to move the enclosure in the shipping container. Inspect the shipping container and the
enclosure for shipping damage. Do not use the enclosure if it is damaged. Leave the enclosure in the shipping container until it has been
moved as close to the final installation location as possible.
Use caution when cutting packing materials. The enclosure could be scratched, causing damage not covered by the warranty. Save all
packing materials for later use. Repacking and shipping the enclosure without the original packing materials may cause product damage
that will void the warranty.
Install the enclosure in a structurally sound area capable of handling the load, or on a level floor that is able to bear the weight of the
enclosure, all equipment that will be installed in the enclosure and any other enclosures and/or equipment that will be installed nearby.
For permanent wall mounting, be sure to securely fasten the enclosure to the building structure before operation. Do not place any object
on the enclosure, especially containers of liquid, and do not attempt to stack the enclosures.
Models: 6U, 9U, 12U, 15U, 18U, 22U
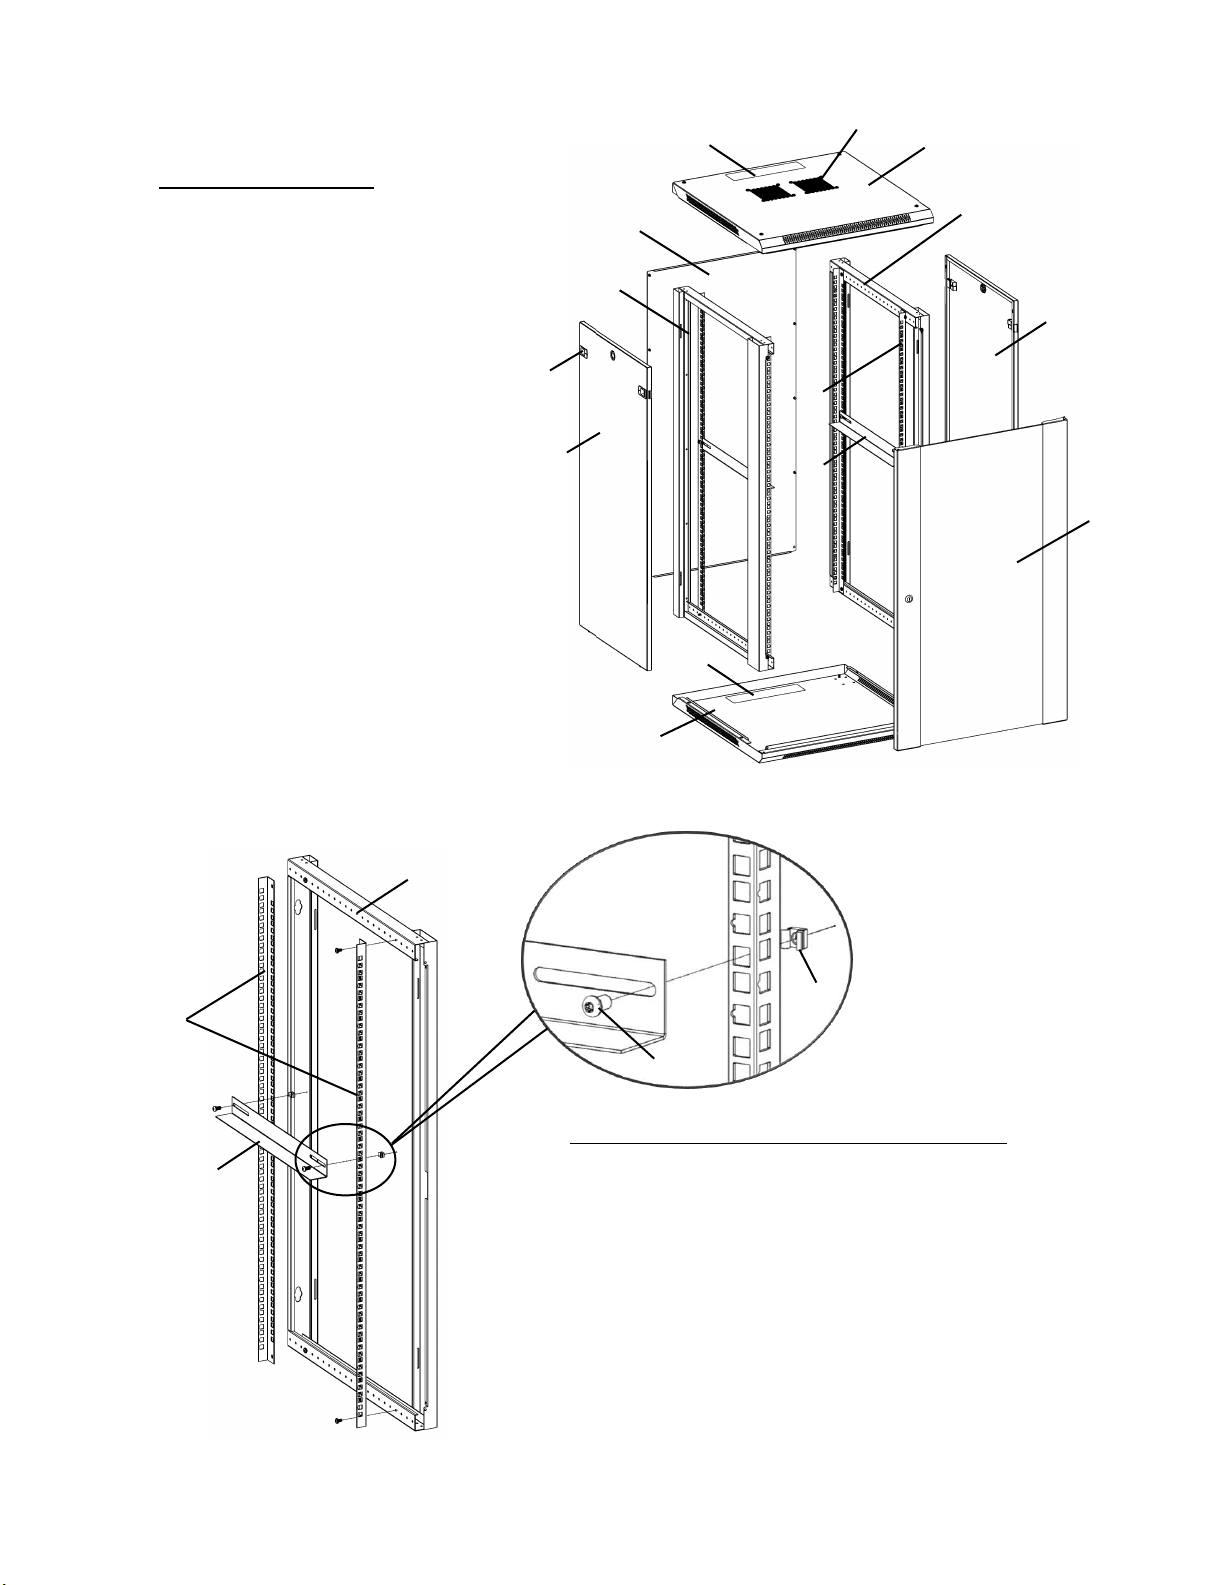
Product Legend:
F. Side Frame
G. L Bracket
H. Mounting Rail
I. Top Cover
J. Bottom
K. Front Door
L. Side Panel
M. Back Panel
N. Vents
O. Cable Access Cover
P. Latch
Q. Cage Nut Kit
○
I
○
L
○
K
○
J
○
L
○
M
○
F
○
F
○
G
○
H
○
O
○
N
○
O
Step 1: Install Mounting Rail and L Bracket
Install the vertical Mounting Rails○
H to the Side
Frame○
F at the desired depth using M5.5 self-tapping
screws○
C provided in the kit. Repeat on other Side
Frame.
Mount the L Bracket○
G to the vertical Mounting
Rail○
H at desired height, using M6 screws○
A and M6
Cage Nuts○
B provided. Repeat on other Side Frame.
○
H
○
F
○
G
○
B
○
A
○
P

Step 2: Install Bottom and Top Cover
Lay Bottom Panel○
J on a flat surface. Insert Side
Frames○
F with large beam oriented to the front and
secure with M5.5 self-tapping screws○
C and ○
D.
Repeat step to secure Top Cover○
I to Side Frames. For
18U and 22U enclosure, please refer to Step 7 for
instruction on installation of wheels.
○
I
○
F
○
F
○
J
Step 3: Install Back Panel
Attach Back Panel○
M to the assembly using
M5.5 self-tapping screws○
C.
○
M
○
D
○
C

Step 4: Install Side Panel
Alight the pins at the bottom of Side Panel○
L
to the slots of cabinet frame. Click the Side
Panels○
L into cabinet frame using the plastic
latches on either side.
○
L
○
L
Step 5: Install Front Door
Insert the fixed pin into door hinge hole at
bottom. Pull down on the spring pin and slide
it into door hinge hole at top and release. The
pin should click into place and secure the
door○
K.
○
K
Spring Pin
○
P
Pins
Fixed Pins

Wall Mounting the Enclosure:
Mount the Enclosure using keyhole cutouts on the frame of the enclosure.
Note: Enclosure must be installed by a qualified technician. Before mounting, use a level and tape measure to
position your mounting area precisely. Use appropriate fasteners (not included) to secure the enclosure to the
wall. A minimum of four fasteners and and appropriately-sized fender washers is recommended.
Install Casters (Optional and only included with 18U and 22U
versions of Wall Mount Cabinets):
Secure Casters to the Bottom Panel ○
J of the cabinet with M5.5 Self-Tapping Screws○
C.
Keyhole
○
C
○
M

Technical Support
Thank you for purchasing Aeons product. We intends this manual to guide you through a smooth installation. Aeons assumes that you are
qualified in the servicing of IT equipment and trained in recognizing any hazards that may occur in the installation of this product. Our
lifetime technical support is an integral part of our commitment to provide industry-leading solutions. If you ever need help with our
product, visit www.aeonstech.com and submit your Technical Support Request online or email your request to support@aeonstech.com.
Limitations of Liability
Different wall materials require different type of anchoring devices. Please contact your local specialist for advice on suitable anchoring
systems. Aeons shall not be liable for errors contained herein or for incidental or consequential damages in connection with the furnishing,
performance, or use of this material.
Aeons assumes no responsibility for the use, application, or reliability of the software or hardware that you install into the product.
It is highly recommended that installation of this product be performed by a qualified and experienced installer. Improper installation of
this product could result in damage to the product, other equipment, or personal injury. Aeons cannot be held responsible for damage to
equipment or personal injury resulting from improper use, installation or the misuse of information presented in this document.
Use of Trademarks and other Protected Names and Symbols
This manual may make reference to trademarks, registered trademarks, and other protected names and/or symbols of third-party
companies not related in any way to Aeons. These references are for illustrative purposes only and do not represent an endorsement of a
product or service by us, or an endorsement of the product(s) to which this manual applies by the third-party company in question.
Regardless of any direct acknowledgement elsewhere in the body of this document, we hereby acknowledges that all trademarks,
registered trademarks, service marks, and other protected names and/or symbols contained in this manual and related documents are the
property of their respective holders.
1644 N Maple St, Corona, CA 92880
www.aeonstech.com
Este manual sirve para los siguientes modelos
6
Tabla de contenidos
Otros manuales de Recinto de AEONS Technologies


 Manual de usuario")


