AEG BR1218B Manual de usuario

BR1218B
Original instructions

2
2
Important!
This appliance is not intended for use by persons (including
children) with reduced physical, sensory or mental capabilities, or
lack of experience and knowledge, unless they have been given
supervision or instruction concerning use of the appliance by a
person responsible for their safety.
Children should be supervised to ensure that they do not play
with the appliance.
1. Touch pad controls
2. Digital display
3. Antenna
4. On / Off button
5. Clock button
6. Battery pack indicator
7. Preset button
8. Mode/EQ button
9. Volume buttons
10. Scan buttons
11. USB charging port
12. Auxiliary jack
13. Keyhole hanger
14. Auxiliary cable
15. Retainer strap
16. 12V Battery port
17. 18V Battery port
18. Battery cover
19. AAA batteries
SEEK
123
11
7
6
8
4
5
13
14
15
16
18
17
12
19
9 10

33
1
2
3
1
1
2
2

4
4
1
2
1
click
2

55
78-100 %
33-54 %
55-77 %
10-32 %
<10 %

6
6
1
2
1
click
2

77
SEEK
1
4 5 6 7
23
FM mode
AM mode
AUX mode
2
3
1
1. On / Off button
2. Battery pack indicator
3. Preset button
4. Clock button
5. Volume buttons
6. Scan buttons
7. Mode/EQ button
1. Auxiliary cable
2. Device (not included)
3. Retainer strap
When using radio, adjust the antenna for best signal reception.

8
8
BATTERY AND CHARGER
Compatible battery pack
(not included)
Compatible charger
(not included)
L1215
L1220
L1230
L1240
L1260
LL1230
L1815R
L1815G
L1820R
L1825R
L1830R
L1840R
L1850R
L1860R
L1860R-X5
AL18G
AL1218G
BL1218
BLK1218
BL18DP-X5
BL18DP2-X5
BL18DPS
Use AEG 12V and 18V battery and charger only
WARNING! Read all safety warnings, instructions, illustrations
and specifications provided with this power tool. Failure to follow
all instructions listed below may result in electric shock, fire and/
or serious injury. Save all warnings and instructions for future
reference.
RADIO SAFETY WARNINGS
Never disassemble or modify this apparatus in any way.
Do not use this apparatus near water.
Clean only with dry cloth. Certain cleaning agents and solvents are
harmful to plastics and other insulated parts.
Keep the apparatus handle clean, dry and free of oil or grease.
Refer all servicing to qualified service personnel.
Do not install near any heat sources.
Do not touch the metal part of the antenna in order to avoid a drop in
signal reception caused by electrostatic discharge.
Do not dispose of used battery packs in the household refuse or
by burning them. AEG Distributors oer to retrieve old batteries to
protect our environment.
Do not store the battery pack together with metal objects (short
circuit risk).
Use only the provided charger for charging the battery pack. Do not
use battery packs from other systems.
No metal parts must be allowed to enter the battery section of the
charger (short circuit risk).
Never break open battery packs and chargers and store only in dry
rooms. Keep dry at all times.
When damaged and under extreme usage and temperature
conditions, batteries may start to leak. If chemicals from the batteries
come in contact with skin, wash quickly with soap and water. If
chemicals from the batteries get into the eyes, flush eyes with clean
water for a minimum of 10 minutes and seek immediate medical
attention.
Always remove the battery pack from the product when you are
assembling parts, cleaning, or when not in use. Removing these
energy sources will prevent accidental starting that could cause
serious personal injury.
The product shall not be exposed to dripping or splashing and that
no objects filled with liquids, such as vases, shall be placed on the
product.
Batteries (battery pack or batteries installed) shall not be exposed to
excessive heat such as sunshine, fire or the like.
Use only power supplies listed in the user instructions.
ADDITIONAL BATTERY SAFETY WARNINGS
WARNING! To reduce the risk of fire, personal injury, and product
damage due to a short circuit, never immerse your tool, battery pack
or charger in fluid or allow a fluid to flow inside them. Corrosive or
conductive fluids, such as seawater, certain industrial chemicals, and
bleach or bleach containing products, etc., can cause a short circuit.
CAUTION! Risk of explosion if the battery is replaced by an
incorrect type.
Ambient temperature range for battery during use is between 0°C
and 40°C.
Ambient temperature range for battery storage is between 0°C and
20°C.
Replacement of a battery with an incorrect type can defeat a
safeguard.
Disposal of a battery into fire or a hot oven, or mechanically crushing
or cutting of a battery, can result in an explosion.
Leaving a battery in an extremely high temperature surrounding
environment can result in an explosion or the leakage of flammable
liquid or gas.
Do not use the product at high altitude due to low air pressure. A
battery subjected to extremely low air pressure may result in an
explosion or the leakage of flammable liquid or gas.
SPECIFIED CONDITIONS OF USE
The radio is suitable for reception of broadcasting and to playback
audio sound of an externally connected CD player, MP3 player or
cassette tape deck.
TECHNICAL DATA Radio BR1218B
Rated voltage 12V / 18V
Rate input 12W
Tuning range FM 87.50 - 108.00 MHz
Tuning range AM 522 - 1620 KHz
USB output 5V / 1A
Weight - not including AUX cable, AC adaptor, AAA batteries and battery pack 1.07 kg
Recommended ambient charging temperature 5 to 40 °C

99
Do not use this product in any other way as stated for normal use.
CAUTION
Danger of explosion if battery is incorrectly replaced. Replace only
with the same or equivalent type.
OPERATION
WARNING
The product is not waterproof. Do not submerge in liquid. Failure
to heed this warning could result in serious personal injury.
WARNING
Always refer to the manual for any device recommended for use
as an attachment or accessory. Proper use of any device, when
attached to the product, is the sole responsibility of the operator.
Improper use may damage the device or the product.
INSTALLING/REMOVING AAA BATTERIES
See page 3.
It is advisable to write down saved channels before replacing the AAA
batteries.
There is a 15-second time frame for replacing the AAA batteries. If
the batteries are not replaced within 15 seconds, the product will
lose all settings previously stored in memory, and they will require
reprogramming.
Always use new alkaline batteries for replacement.
1. Remove the battery pack, if installed.
2. Loosen the screw in the battery cover. Remove the cover and set
aside.
3. Install two new AAA batteries according to polarity indicators
inside the battery compartment.
NOTE: Do not mix old and new batteries. Do not mix alkaline,
standard (carbon-zinc), or rechargeable (nickel-cadmium)
batteries.
4. Replace the battery cover and tighten screw to secure..
INSTALLING/REMOVING BATTERY PACK
The product can be operated by either an AEG 12V or 18V battery
pack.
To install 18V battery pack:
See page 4.
1. Place the battery pack in the product, aligning the ribs on the
battery pack with the grooves in the battery port.
2. Make sure the latches on the battery pack snap into place and
the battery pack is secured to the product before beginning
operation.
3. Depress the latches to remove the battery pack.
NOTE: Always remove the battery pack from radio when not in use.
Leaving the battery pack connected for long periods of time may
drain the battery pack.
To install 12V battery pack:
See page 6.
1. Place the battery pack in the product, aligning the ribs on the
battery pack with the grooves in the battery port.
2. Make sure the latch on the battery pack snap into place and
the battery pack is secured to the product before beginning
operation.
3. Depress the latch to remove the battery pack.
LCD DISPLAY
See page 7.
When a battery pack is installed and the product is in the ON position,
the LCD display will show the channel or time. When the battery pack
is removed while AAA batteries are installed, the LCD display will
show the time.
The backlight of the LCD display will dim after 15 seconds of no user
operation.
NOTE: The illustrations of the LCD display shown in the manual are
only examples of the frequencies you may see on your radio and are
not the exact frequencies that you may choose to listen to.
MENU NAVIGATION BUTTONS
See page 7.
Use the menu navigation buttons to turn the product on and o,
control the volume, change frequencies, toggle between modes and
set the time.
SWITCHING THE PRODUCT ON AND OFF
Hold to switch the product on and o.
NOTE: You may need to keep the button pressed for up to 3 seconds
before the product will start.
NOTE: When the product is on and a battery pack is installed,
will be shown in the LCD display. If the battery charge is low, will
be shown.
To help preserve battery power, the product will automatically enter
sleep mode approximately 1 hour after it is turned o. To exit sleep
mode and restart the product, you must press on the product.
MODE SELECTION
See page 7.
■Press to cycle through available modes.
There are three modes to choose from:
■FM mode
■AM mode
■AUX mode
ADJUSTING THE VOLUME
When the product is switched on, the product will return to the last
volume setting used.
■To increase the volume, press .
■To decrease the volume, press .
NOTE: To change volume quickly, hold or .
CAUTION
Do not use the product at maximum volume for an extended
period of time with the bass and treble at maximum levels. It could
cause damage to the speakers and/or amplifiers in the product.
10
10
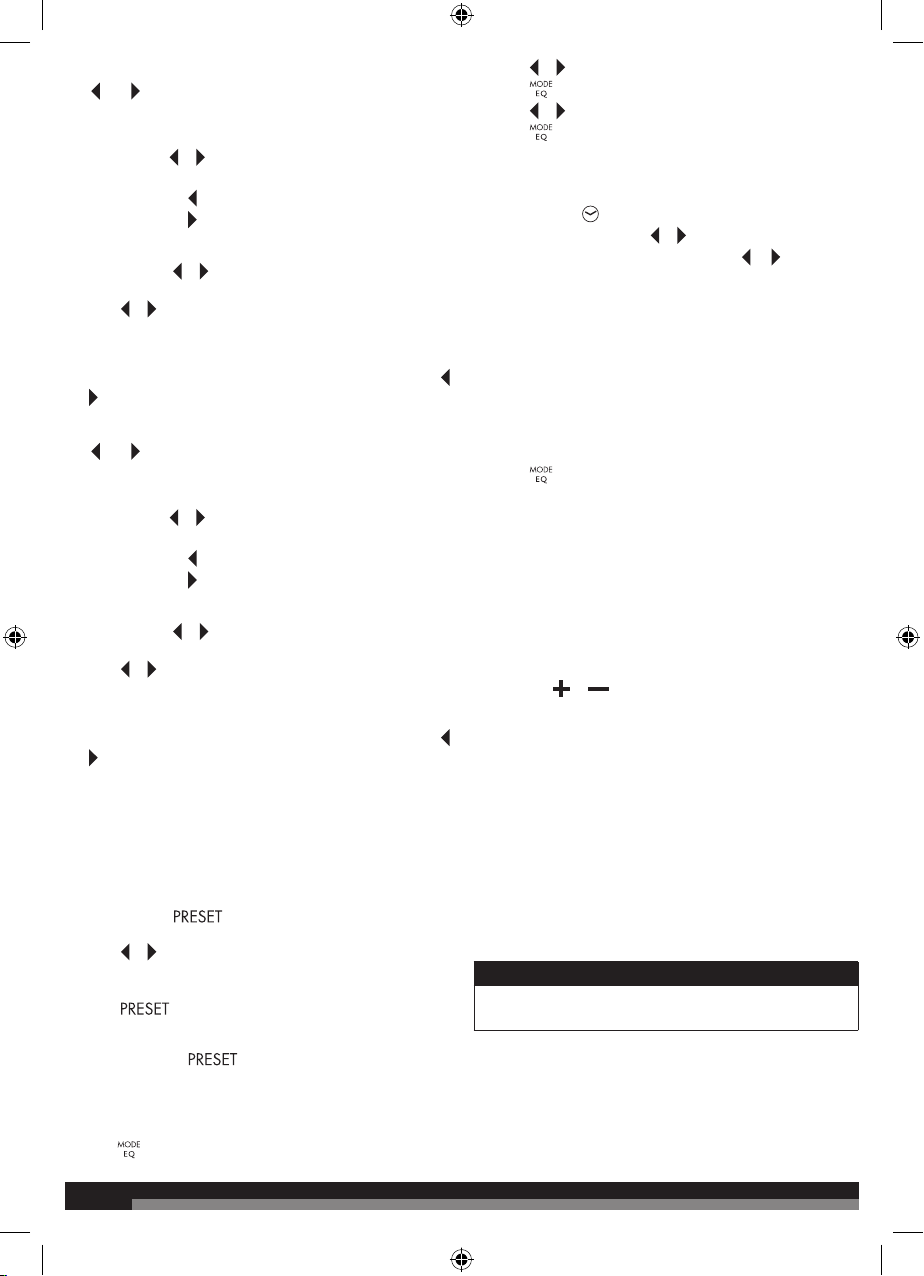
FM TUNING
Use and to tune to the desired radio frequency. The selected
frequency is displayed on the LCD display.
To tune frequency manually:
Briefly push either or (not press and hold) to tune one frequency
step at a time.
1. Press and release to tune to a lower frequency.
2. Press and release to tune to a higher frequency.
To tune frequency automatically:
1. Press and hold or for two to three seconds to tune frequency
automatically.
2. Press or to stop scanning and select a frequency.
To decrease interference or electrical noise, adjust the position of the
antenna or move the product to a higher elevation.
NOTE: Signal reception may drop due to electronic discharge. Press
and , or restart the radio to improve signal reception.
AM TUNING
Use and to tune to the desired radio frequency. The selected
frequency is displayed on the LCD display.
To tune frequency manually:
Briefly push either or (not press and hold) to tune one frequency
step at a time.
1. Press and release to tune to a lower frequency.
2. Press and release to tune to a higher frequency.
To tune frequency automatically:
1. Press and hold or for two to three seconds to tune frequency
automatically.
2. Press or to stop scanning and select a frequency.
To decrease interference or electrical noise, adjust the position of the
antenna or move the product to a higher elevation.
NOTE: Signal reception may drop due to electronic discharge. Press
and , or restart the radio to improve signal reception.
STORING A PRESET IN MEMORY
The memory feature saves up to 20 frequencies as presets in the
product’s memory. You can save up to 10 frequencies each for FM
and AM modes.
To store a frequency in memory:
1. Tune to the desired FM or AM frequency.
2. Press and hold until the preset position number flashes
on the screen.
3. Press or to choose a preset position number.
NOTE: There are 10 preset positions for FM and 10 for AM. Only
one station can be saved in each preset position.
4. Press again to store the frequency.
To tune to presets (FM or AM):
■Press and release to cycle through each preset position
number and its associated frequency.
EQUALIZER FUNCTION
To adjust the bass and/or treble settings:
1. Hold to enter Equalizer setting.
2. Press or to adjust the Bass level.
3. Press to enter the Treble setting.
4. Press or to adjust the Treble level.
5. Press to exit Equalizer setting.
SETTING THE CLOCK
To set the clock:
1. Press and hold to enter clock setting
2. The hour time blinks. Press or to adjust the hour.
3. Press clock. The minute time blinks. Press or to adjust the
minute.
4. Press clock again to confirm the time. The clock is now set.
NOTE: If AAA batteries are removed or lose charge for more than 15
seconds, clock settings will be lost. Settings are not aected by the
removal of the 12V/18V battery.
AUXILIARY MODE
The product can be used as an amplifier for MP3 players, CD players,
smartphones, tablets, and other music devices.
To use the auxiliary mode:
1. Press until AUX mode is displayed.
2. Connect auxiliary cable to the device.
3. Connect the other end of the auxiliary cable to the auxiliary input
port.
NOTE:
–The external device must be on and in play mode for sound
to be heard through the speakers.
–All external device controls can be used normally while
connected to radio.
–Volume for any device connected through the auxiliary cable
can be adjusted using the volume control for that device or by
using or of the product.
–Switching the product off will not switch the external device
off.
–The auxiliary cable does not provide charging function.
4. For complete operating instructions for the connected device,
always refer to the manual that was included with your device.
The device tray and retainer strap may be used to store your external
device.
NOTE: The device tray and retainer strap cannot secure external
devices.
USING THE USB DEDICATED CHARGING PORT
The USB dedicated charging port provides charging power of up to
1 Amp for your cell phone, MP3 player, tablet, or other USB devices.
CAUTION
Attempting to charge devices rated more than 1 Amp could
damage the USB dedicated charging port and/or the device.
1. Connect one end of a USB cable (not provided) to your USB
device.
2. Connect the other end of the USB cable (not provided) to the USB
dedicated charging port to begin charging the device.
NOTE: The USB dedicated charging port provides power only; it
does not provide any data communication capabilities.
Tabla de contenidos
Otros manuales de Radio de AEG

AEG
AEG SR 4358 CD Manual de usuario

AEG
AEG DAB+ 4154 Manual de usuario

AEG
AEG KRC 4344 Manual de usuario

AEG
AEG KRC 4323 CD Manual de usuario

AEG
AEG SR 4322 Manual de usuario

AEG
AEG DR 4135 Manual de usuario

AEG
AEG DAB 4130 Manual de usuario

AEG
AEG DAB 4138 Manual de usuario

AEG
AEG SR 4380 Manual de usuario

AEG
AEG SR 4353 Manual de usuario

AEG
AEG DAB+ 4158 Manual de usuario

AEG
AEG DRR 4107 Manual de usuario

AEG
AEG SR 4374 CD/USB Manual de usuario

AEG
AEG SR 4356 BT Manual de usuario

AEG
AEG IR 4430 Manual de usuario

AEG
AEG BRSP18 Manual de usuario

AEG
AEG BR18C-X4 Manual de usuario

AEG
AEG IR 4468 BT Manual de usuario

AEG
AEG IR 4436 Manual de usuario

AEG
AEG MR 4104 Especificaciones técnicas


