Adam ADI0009 Manual de usuario

ADI0009 V1 170513
USE & CARE MANUAL
WALL HANGING ELECTRIC FIRE
www.adamfires.co.uk

02
SECTION 01
Read ALL the instructions before use.
These instructions are for your safety. Please read through them thoroughly
before use and retain for future reference. Failure to follow them could cause
injury and/or property damage.
Note: This manual applies for a number of different products. Please make
sure you follow the appropriate product guide lines.
CONTENTS
SECTION 01
Cautions 03-04
Introduction 05
Handling 05
Unpacking 05
SECTION 02
Tools required 06
Identification 06
Parts supplied 06
Fixings pack 06
SECTION 03
Installation 07-09
Use 10
Care 10
Specification 11
Trouble shooting 13
Guarantee 16
Contacts 16

03
SECTION 01
CAUTIONS
DO’S
• Read ALL the instructions before using this fire.
• Only use this appliance for its intended use as described in this manual.
• Always install the product in accordance with this guide. If in doubt obtain
expert advice.
• Always check your mains supply is the same as that indicated on the product
before connecting.
• Always make sure the electrical socket is accessible and located adjacent
to, but not above fire.
• Always disconnect the fire from the electrical supply before carrying out
cleaning or maintenance. To disconnect the fire, switch controls to OFF
then remove plug from the outlet.
• Always ensure that the correct tools are used to mount this fire.
• Always make sure the fire is firmly secured to the wall when complete
DON’TS
• Never leave children unsupervised in a room where the fire is ON and
unguarded.
• Never obstruct or cover the fan outlet or force items into fire openings.
• Never install or use the fire anywhere where water is in use, i.e. Bathrooms,
Kitchens, Laundry Rooms, Shower Rooms, Swimming Pools etc.
• Never use aerosols or steam cleaners on or around the fire.
• Never route the supply cord under carpeting and never cover the cord with
throw rugs, runners, etc. Arrange the cord away from traffic areas and where
it will not be tripped over.
• Never install the fire close to curtains or combustible materials. Keep furniture,
bedding, papers, clothes, curtains, etc. at least 0.9m away from the front of
the heater and keep away from the sides and rear
• Never use the fire to dry clothes etc.
• Never sit or stand or put weight on the fire.
• Do not use or store outdoors.

04
SECTION 01
PLEASE DO NOT OBSTRUCT THE AIR VENTS OF THE FIRE’S HEATER UNIT
This appliance has a ‘self resetting’ safety cut out system. To prevent overheating,
ensure the air inlets and outlets are not obstructed. If the safety cut-out operates,
switch off the fire and allow to fully cool down. Remove any obstruction
before re-use.
IMPORTANT ELECTRICAL SAFETY
The plug must always be accessible, after installation, in order to disconnect the fire
from the electrical supply for maintenance cleaning or isolation in an emergency.
If the supply cord is damaged, it must be replaced by the manufacturer or its
service agent or a similarly qualified person in order to avoid a hazard.
This fire must be earthed. The supply cord must be safely routed from the fire to an
electrical socket.
Any new wiring required, must be In accordance with local and national codes and
other applicable regulations in order to reduce the risk of fire, electric shock, or other
injuries. Always use a certified electrician should new circuits or outlets be required.
Avoid the use of an extension cord which may overheat and cause risk of fire.
If an extension cord is necessary, it must be rated above the maximum rated power
of the appliance. Care must be taken to arrange the cord so that it cannot be pulled
or be tripped over.
IMPORTANT!
• This appliance is not intended for use by persons (including children) with
reduced physical, sensory or mental capabilities, or lack of experience and
knowledge, unless they have had supervision or instruction concerning use of
the appliance by a person responsible for their safety.
• Children should be supervised to ensure that they do not play with the
appliance.
• This heater is not equipped with a device to control the room temperature. Do not
use this fire in small rooms when they are occupied by persons not capable of
leaving the room on their own unless constant supervision is provided.
• This heater is hot when in use. To avoid burns, do not touch hot surfaces such as
surfaces around the grille in front of the heater. Never let bare skin touch hot
surfaces.
• Do not spray liquids directly onto any surface of the unit.
Warning: In order to avoid overheating, DO NOT COVER THE HEATER UNIT
Note: When the fire is turned on for the first time or when it has not been
used for some time, it may release a slight, harmless odour. This odour is a normal
occurrence caused by the initial heating of the internal heating elements and
will disappear with use.

05
SECTION 01
INTRODUCTION
Thank you for choosing this wall mounted electric fire. The fire is designed to meet the
most stringent quality, performance and safety requirements. This guide aims to
improve your understanding and appreciation of your new fire by providing simple
and informative assembly instructions.
HANDLING
Before continuing any further with the installation of this fire please read the following:
• When lifting always keep your back straight. Bend your legs and not your back.
• Avoid twisting at the waist; it is better to reposition your feet.
• Avoid upper body / top heavy bending. Always bend from the knees rather than
the waist.
• Do not lean forward or sideways whilst handling the fire.
• Always grip with the palm of the hand; do not use the tips of fingers for support.
• Always keep the product as close to the body as possible; this will prevent
unnecessary and undue strain on the body.
• Use gloves to provide additional grip.
• Always use assistance if required.
UNPACKING
The unit is supplied either in ONE (complete unit) or TWO (fascia and heater separate)
cartons. Carefully unpack the product using the following procedure:
• Carefully lift the complete unit or fascia and heater from their carton and put aside.
• Carefully remove the protective wrapping from the parts.
• Locate the fixing pack and put aside.
• Locate the pebble set (if supplied) and put aside.
• Ensure the supply requirements indicated on the rating label fixed to the side of
the product is compatible with the supply voltage available.

06
SECTION 02
IDENTIFICATION
(Image for illustrative purposes only)
PARTS SUPPLIED
1x Electric fire
1x Fascia (Either supplied fitted to the fire or in a separate box to the electric fire)
1x Pebble set (Only supplied with certain models)
1x Fixing template
1x Fixing pack
FIXING PACK
3x Wall plug
3x Long screw
TOOLS REQUIRED
• Crosshead screw driver (an electric screw driver is recomended).
• Electric drill
• Pencil
• Spirit level
2.
3.
1.
1. Electric fire
2. Fascia*
3. Fuel bed*
*Styles may vary depending on product

07
SECTION 03
INSTALLATION
Important Electrical Safety
The fire must NOT be located immediately below a socket outlet. The socket must
always be accessible in order to disconnect the fire from the electrical supply for
maintenance and cleaning or isolation in an emergency.
NOTE: Please take care when installing the fire as some edges may be sharp.
Before installation, please ensure that secure anchor points can be made to the wall. If
in doubt, please seek advice from a suitably qualified tradesman.
Please ensure that the minimum amount of space is left around the electric fire when it
is installed. See the image below for details.
WARNING: Make sure the appliance’s air inlets are not blocked to allow for ventilation.
WARNING:
Check the wall to ensure there are no wires, pipes etc in the area to be drilled.
Do not plug in the fire before wall mounting.
NOTE: Depending on the fascia style, your product may or may not be packaged with
the fascia already attached.
.
.
HEAT OUT
AIR IN
(CEILING/PICTURE FRAME)
(FLOOR)
Minimum
1000mm)
Minimum
100mm Minimum
300mm
Minimum
300mm
This product
MUST be installed
with the MINIMUM
required distances
at the FOUR SIDES
OF THE FIRE.
!

08
SECTION 03
UNINSTALL
To uninstall, switch the controls to ‘OFF’, unplug the unit from the socket, remove the
lower fixing screw and lift the unit to unhook it from the screws securing it to the wall.
1. Using the template provided and a
spirit level, mark the locations of the 2
upper fixing holes with a pencil.
2. For solid walls, drill the 2 marked holes
using a 6.25mm drill bit, then fit the
supplied wall plugs.
Note: if fitting to plaster board,
propriety wall fixings should be used
(not supplied)
3. Insert the 2 screws, leaving
approximately 5mm proud of the wall.
6mm
4. Hang the fire on the hooks situated
at the back of the fire
5. Mark a third hole when the fire is
mounted. Remove the fire, drill hole
and insert the wall plug.
Replace the fire and insert the third
screw to secure.
6. Place the pebbles on to the
fuelbed.*
Reattach the fascia.
Note: refer to the ‘Attaching and
removing the fascia’ information on
page 9.
*fuelbeds may vary

09
SECTION 03
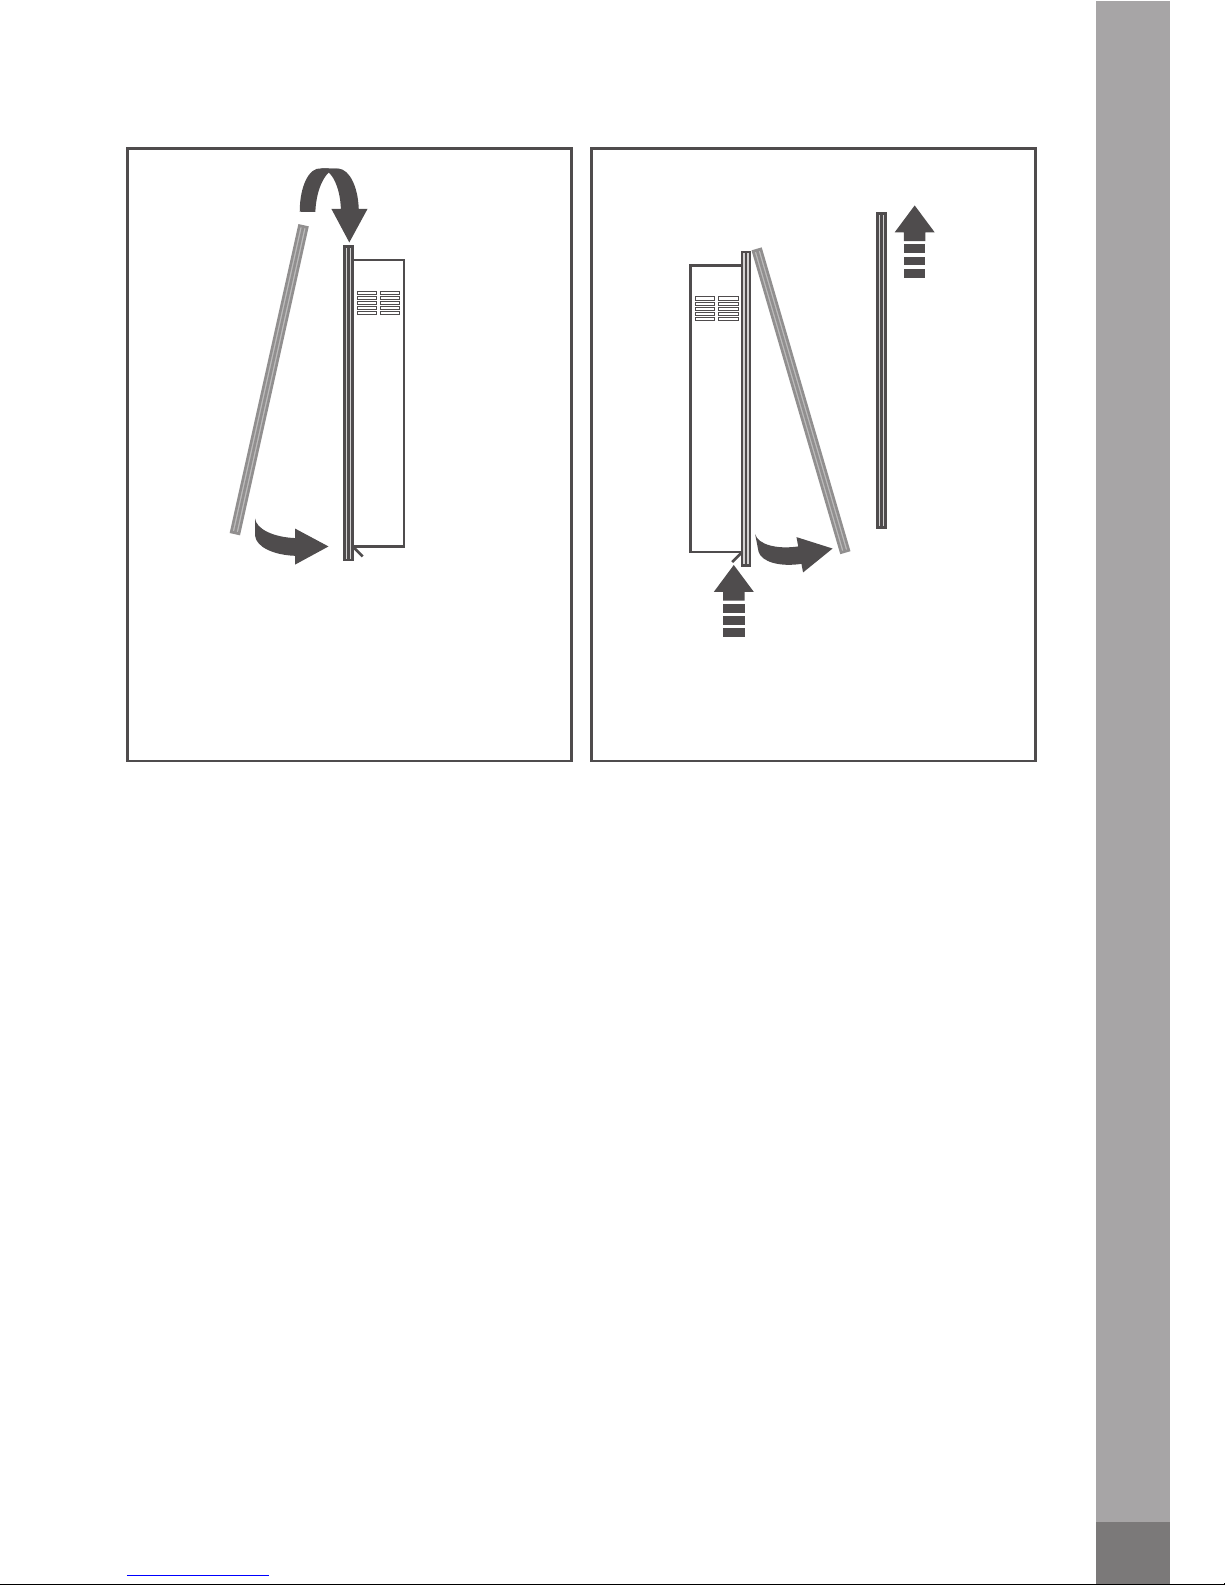
HOOK the fascia on to the fire then
CLICK to secure.
PUSH the tab underneath the fire then
PULL and LIFT the fascia off the fire
1. HOOK
2. CLICK
1. PUSH
2. PULL
3. LIFT
ATTACHING AND REMOVING THE FASCIA

10
SECTION 03
USE
The appliance is controlled using 3 switches, located to the left of the heater unit.
Use the following sequence to operate. The grey represents a ‘pressed switch.’
A switch is in the ON position when the side with the markings on (e.g. I or II) is 'pressed
in’.
On/Off 1kW Heat setting 2kW Heat setting
CARE
• Check the supply cord for damage regularly. Never operate the stove if it has a
damaged cord or plug.
• There are no specific requirements for the care of this unit, other than general
cleaning.
• Switch off and unplug from the power supply before assembling or disassembling
and cleaning.
• Brushed stainless steel, chrome or brass effect features can be cleaned using a
cloth and a non-abrasive propriety cleaner. Other features can be cleaned using a
damp cloth.
• The area around the fire should be kept free from animal hair, lint and other
material that may be drawn into the workings of the appliance which
could affect its performance.
• When transporting or storing the unit and cord, keep in a dry place, free from
excessive vibration.
Controls
Tabla de contenidos
Otros manuales de Chimenea de interior de Adam