ACME IP1101 Manual de usuario

Model: IP1101
Indoor
IP camera


3
4 GB User’s manual
10 LT Vartotojo gidas
16 LV Lietošanas instrukcija
22 EE Kasutusjuhend
28 PL Instrukcja obsługi
34 RU Инструкция пользователя
40 DE Bedienungsanleitung
46 UA Інструкція
52 BG Ръководство за употреба
58 RO Manual de utilizare
64 HU Használati utasítás
70 HR Korisnički priručnik
76 SI Uporabniški priročnik
82 ES Manual de usuario
88 EU Declarations
91 Warranty card
4
GB Indoor IP camera
User manual
Specifications
Video: MP4 (H.264) 1,280 x 720, 25/15 fps with mono sound
Sensor resolution: 2MP
Optics: Aperture - f2.5; 93° lens angle, xed focus
Power: AC/DC USB power adapter; DC 5 V, 1 A
Connections: Wi-Fi, 2.4 GHz, b/g/n
Expandable memory: Micro SD card up to 32 GB (Class 10 speed required)
Video recordings capacity: up to 120 hours
Application: GuardVR for Android 4.4 or higher; iOS 8.0 or higher
Other features: Motion detection: up to 8 meters; infrared night vision: up to
8 meters
Dimensions: 68 (L) x 110 (H) x 68 (D) mm
Weight: 85 g (without cable)
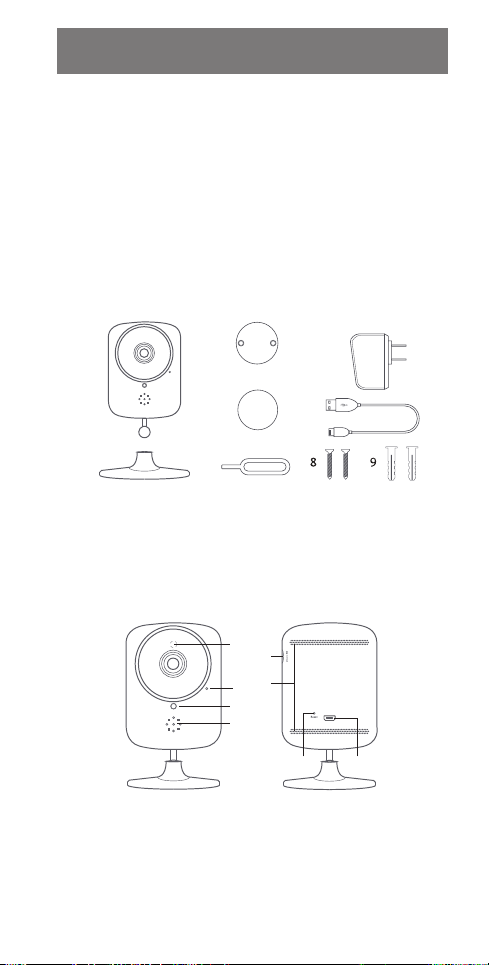
Box contents
1
3
4
5
6
7
2
1. Camera
2. Camera base
3. Metal mount
4. 2-sided foam pad
5. 5V USB adapter
6. Micro USB cable
7. Reset pin
8. Screws (x2)
9. Anchors (x2)
Camera overview
8
6
7
5 4
3
2
1
1. LED indicator
2. Microphone
3. Speaker
4. Micro USB charging port
5. Reset button
6. Micro SD card slot *
7. Heat emission hole
8. Night vision sensor
*This camera supports up to 32 GB
capacity micro SD cards. The camera
must be unplugged when inserting or
ejecting the micro SD cards.
5
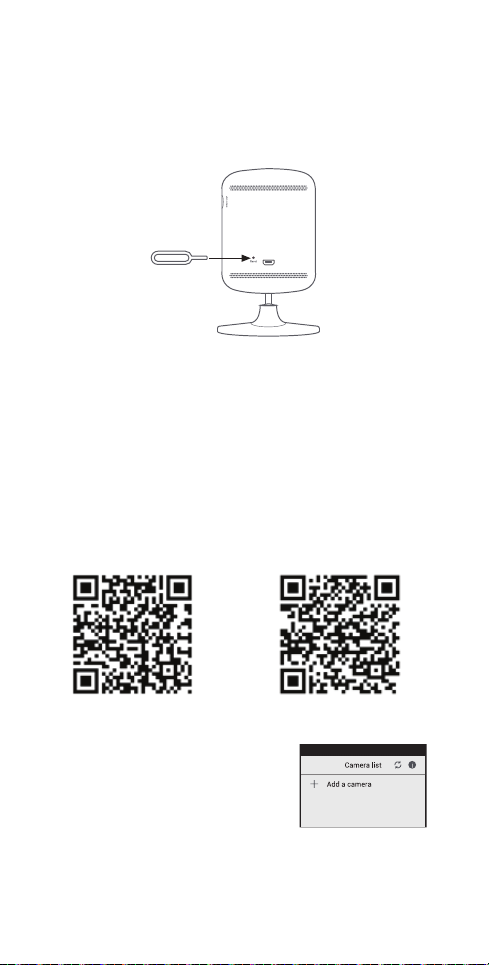
Resetting the camera
The camera must be reset when pairing for the rst time, changing a user
account or a Wi-Fi network.
1. Insert the reset pin into the reset button hole.
2. Press and hold the pin for at least 5 seconds until the indicating voice is
heard.
3. Wait for the camera to reboot and for the blue LED indicator on the front
to start rapidly blinking – the voice from the camera will indicate that the
camera is ready to be paired.
Setting up the camera
1. Plug the micro USB cable to the micro USB port on the back of the camera.
2. Plug the supplied power adapter into a wall outlet.
3. Reset the camera (if required).
4. Wait about 30 seconds for the camera to boot up.
5. The camera is ready to be paired.
Setting up the application and pairing
1. Open App Store (for iOS) or Google Play Store (for Android) on your mobile
device. Search for GuardVR, then download and install it to your device.
Please accept all security requests when installing and launching the
application, otherwise the application may not work properly.
QR codes for quick download:
For iOS devices For Android devices
2. Make sure that the mobile device is
connected to the Wi-Fi network, launch the
application and tap“Add a camera”.

6
3.1
A. Click “Setup camera” if you are setting the
camera for the rst time.
B. Make sure that the camera is ready to
be paired and the blue LED indicator is
rapidly ashing, otherwise perform a reset
operation.
C. The name of the current Wi-Fi network will
be shown. Enter the Wi-Fi password or leave
it blank if there is none, then tap„Next“.
D. Your mobile device will start to emit a sound
signal for the pairing procedure. Adjust
the volume to a medium level and keep
the mobile device near the camera as it is
connecting to the Wi-Fi network.
E. If your camera fails to connect to the Wi-Fi
network, reset the camera and repeat all the
steps.
F. After successful connection, you will be
prompted to create a name and a password
for your camera and select the direction of
the camera lens. The password must have at
least 8 characters and include an uppercase
letter, a lower case letter and a number.
3.2
A. Tap “Reconnect”to connect the camera that
has already been set up. (Make sure that the
camera is connected to the Wi-Fi network –
the LED is solid blue.)
B. Scan the QR code on theWi-Fi cam or search
for it via Wi-Fi.
C. Enter the password that was created during
the rst setup of the camera.
Requirements for the Wi-Fi network
• Makesurethatyourdeviceisconnectedtoa2.4GHzWi-Finetwork.A5GHz
Wi-Fi network is not supported.
• MakesurethatthecameraiswithintherangeoftheWi-Finetworkandhas
a strong signal.
• Makesurethatyourwirelessrouter/accesspointorthenetworkprovideris
not blocking P2P (peer to peer) networking.
Overview of the application
Main screen Camera list
Refresh camera feed, edit list
or remove a camera
Tap the preview screen to
view the live camera stream
i
For iOS users: swipe left to remove the camera and swipe down to
refresh the video stream.

7
Live camera stream
Tap to change
resolution
HD: 1,280 x 720
SD: 640 x 360
Take a snapshot Camera settings
Record the live
camera stream Enable or disable
audio listening
Tap to use the phone
microphone for two way audio
communication
Recording history
This camera has two video recording modes (videos will be saved to the micro
SD card):
A. Video recording on motion detection – recording will start when the camera
senses the movement.
B. Full time video recording – the camera will record the video continuously
until the memory is full. When the memory is full, the oldest recordings will
be overwritten with new video les.
i
Video will be written to the micro SD card even when Wi-Fi connection is
lost.
i
Video recordings from the camera can be transferred by using the
smartphone and GuardVR application or removing the micro SD card
from the camera and using a computer with a micro SD card reader.
Swipe the timeline bar left or
right to see the recordings
history
When the camera has done recording, the video will appear in a section of the
recording timeline, highlighted orange.
Notications
When motion detection is triggered, you will be notied through the app on
your mobile device.
To enable motion detection and alerts, go to “Advanced settings” menu and
turn these functions on.
(You may need to enable notications in app security settings on your mobile
device to receive notications from the application.)

8
Other settings under “Advanced
settings”menu
• Change camera password
• Recording settings
• Camera lens position
• Motion detection settings
• Video settings
• Time settings
• Camera rmware update
• QR code sharing: for adding camera
broadcast to other devices
• Device information
Camera mounting scheme
• The camera base
is magnetic.
• The 2-sided sticky foam
pad is for attaching
the camera to non-
magnetic surfaces.
• The metal mounting
pad can be installed to
a non-magnetic surface,
allowing the camera
base to stick to that.
Metal mount
Screw
Wall
Plastic
anchor
Stick to the base
Magnetic pad
Mount
screws Plastic
anchors
Stick to the base
Two sided foam pad
Metal mount

9
Safety instructions
• Donotdisassembletheproductorremoveanyparts.
• Donotputtheproductintowateroranyliquid.
• Donotputtheproductclosetoheatsource,orexposeittohightempera-
ture.
Waste Electrical and Electronic Equipment (WEEE) Symbol
The use of the WEEE symbol indicates that this product may not be
treated as household waste. By ensuring this product is disposed of
correctly, you will help protect the environment. For more detailed
information about the recycling of this product, please contact your
local authority, your household waste disposal service provider or
the shop where you purchased the product.

10
LT Vidaus patalpoms skirta IP vaizdo kamera
Naudotojo vadovas
Specifikacijos
Vaizdo įrašas: MP4 (H.264) 1280 x 720, 25/15 kadrų/sek. su„mono“ garsu
Jutiklio raiška: 2 MP
Optika: diafragma - f2,5; 93° lęšio kampas, ksuotas fokusavimas
Galia: AC/DC USB maitinimo adapteris; NS 5 V, 1 A
Jungtys: „Wi-Fi“, 2,4 GHz, b/g/n
Išplečiama atmintis: „Micro SD“ kortelė iki 32 GB (reikalaujamas „Class 10“
greitis)
Vaizdo įrašymo talpa: iki 120 val.
Programa: „Android 4.4“,„iOS 8.0“ ar naujesnei versijai skirta„GuardVR“
Kitos ypatybės: Judesio aptikimas: iki 8 metrų, infraraudonųjų spindulių
naktinis matymas: iki 8 metrų
Matmenys: 68 (I) x 110 (A) x 68 (G) mm
Svoris: 85 g (be laido)
Dėžės turinys
1
3
4
5
6
7
2
1. Vaizdo kamera
2. Vaizdo kameros pagrindas
3. Metalinis tvirtinimas
4. Dvipusis putų polistireno
pagrindas
5. 5V USB adapteris
6. „Micro USB“ laidas
7. Atstatymo kaištukas
8. Varžtai (x2)
9. Inkarai (x2)
Vaizdo kameros apžvalga
8
6
7
5 4
3
2
1
1. LED indikatorius
2. Mikrofonas
3. Garsiakalbis
4. „MicroUSB“ įkrovimo lizdas
5. Atstatymo mygtukas
6. „Micro SD“ kortelės lizdas *
7. Šilumos išleidimo anga
8. Naktinio matymo jutiklis
*Šiai vaizdo kamerai tinka iki 32 GB
talpos „micro SD“ kortelės. Išimant
ar įdedant „micro SD“ kortelę vaizdo
kamera turi būti išjungta.
Tabla de contenidos
Idiomas:
Otros manuales de Cámara IP de ACME


