Abode AJCR6001 Manual de usuario

Model No: AJCR6001
Whole Fruit Juicer
User guide
For Customer Services & Spare Parts please call 0345 209 7461
Opening times: Monday - Friday 8am –6pm & Saturday 9am –1pm
Or visit us at www.productcareuk.com
IMPORTANT:
RETAIN FOR FUTURE REFERENCE

For Customer Services & Spare Parts please call 0345 209 7461
Opening times: Monday - Friday 8am –6pm & Saturday 9am –1pm
Or visit us at www.productcareuk.com
Contents
2
Page
Safety instructions
…………………………….………..
3
Juicer feature diagram
………………………………....…..
5
Preparing
your juicer
……………………………….……..
6
Using
your juicer
………………………………………
7
Tips
………………………………………
11
Recipes
………………………………………
12
Cleaning and care
………………………………………
14
Problem solving
………………………………………
15
Guarantee
………………………………………
16
Customer
services
………………………………………
17
Spare parts
………………………………………
18
Connection to the mains supply
………………………………………
19
Thank you for purchasing your Abode Whole Fruit Juicer
To get the best from your new juicer, take a few moments to read these
instructions, and keep them in a safe place for future reference.
Should you require any further assistance, our friendly Product Care team will
be happy to help.

3
Safety instructions
IMPORTANT SAFETY INSTRUCTIONS
READ CAREFULLY AND KEEP FOR FUTURE REFERENCE
WARNING:
• When using electrical appliances, basic safety precautions
should always be observed, including the following:
• Read all instructions.
• Avoid contact with moving parts.
• To protect against electrical shock do not immerse cord, plug,
or appliance in water or other liquid.
• Unplug from the mains outlet when not in use, before putting
on and taking off parts, before cleaning.
• Do not operate any appliance with a damaged cord or plug,
or after the appliance malfunctions or is dropped or damaged
in any manner. The cord supplied cannot be replaced. If the
cord is damaged the appliance should be scrapped.
• The use of accessory attachments not recommended by the
appliance manufacturer may cause fire, electric shock or injury.
Only use the accessories supplied by the manufacturer.
• Do not let the cord hang over the edge of the work top, or
touch hot surfaces.
• Do not operate the juicer for extended periods of time. The
maximum operating time should not exceed 2 minutes at a
time without a rest of at least 2 minutes.
• Never put any objects into the openings on the outer case.

WARNING:
• Never remove parts from the appliance such as screws.
• Never operate the juicer when it is empty and do not remove
the lid before the blades come to a complete stop.
• Do not touch the cutting blades or insert any object, such as
knives, forks, spoons, etc. in to the chute while the juicer is in
operation.
• Do not operate this appliance for anything other than its
intended use.
• This product is intended for household use only. Do not use
outdoors. This product is only intended for preparing food.
• It is hazardous for anyone other than a competent person to
carry out any service or repair operation which involves the
removal of a cover which gives protection against exposure to
electrical parts.
• Children should not use this appliance. Close supervision is
necessary when any appliance is used near children.
• This appliance is not intended for use by persons (including
children) with reduced physical, sensory or mental capabilities,
or lack of experience and knowledge, unless they have been
given supervision or instruction concerning use of the
appliance by a person responsible for their safety. Children
should be supervised to make sure they do not play with the
appliance.
Safety instructions
4

1
Feeding chute
6
Base
feet
2
Lid
7
Food pusher
3
Pulp container
8
Juicing
blade
4
Base unit
9
Locking arm
5
Speed
control dial
10
Plastic jug
11
Cleaning brush
5
Juicer feature diagram
3
2
4
1
5
7
9
10
6
8
11

6
Preparing your juicer
Before using your juicer
Check the juicer after unpacking for any visual damage or missing parts such
as:
•Misaligned or damaged casing.
•Damage to the plug or cable.
•If any parts are missing or there is any damage, please refer to page 17
for Customer Services.
Clean your juicer
Before using the juicer you should clean the removable parts in warm soapy
water with a soft cloth or sponge. Be careful when cleaning the juicing blade,
dip in soapy water and clean using the cleaning brush provided. At no point
should you touch the blade as this could be harmful.
Do not immerse the base unit in any liquid.
If the unit is unplugged, you can clean the body with a damp soft cloth and
mild detergent.
Allow all parts to thoroughly dry before using.
Choose a suitable place for use
Place the juicer on a flat, stable surface with a plug socket close by.
Do not place in close proximity to any source of heat.
If you apply a small amount of downwards pressure, the feet on the base
should secure to the surface. This helps to prevent the unit from moving
around during use.
Once you have cleaned your juicer and prepared a suitable place for use, you
are now ready to begin preparing your food.

7
Using your juicer
Food preparation
Always wash your fruit and vegetables thoroughly before juicing.
It is necessary to remove large seeds, pips or peels before using the
appliance.
It is also necessary to remove large pits (such as plums and apricot stones) to
avoid damaging the appliance.
Fruits with thick peels, such as oranges and lemons must be peeled before
juicing, as even small amounts of peel can affect the taste of the juice.
Large fruits and vegetables should be cut into pieces so that they can fit into
the funnel.
Note: Before using the appliance for the first time or after prolonged storage
without use, wash any parts that come into contact with food.
Assembly/Disassembly –
Always unplug the juicer before attaching/removing parts
Juicer lid
To unlock, securely grip the sides of the locking
arm and, supporting the unit with one hand, push
the arm clockwise to the unlock position. This is
indicated by the unlock symbol. The arm should
unclip from the lid. Repeat this action with the
locking arm on the back of the juicer.
The lid can now be lifted for removal.
To lock the juicer for use, place the lid back onto
the unit and slide the locking arm anticlockwise
clipping back onto the clips of the juicer lid to the
lock symbol. When it ‘clicks’ the unit should be
secure. Repeat to secure both locking arms.
Unlock
Lock

8
Using your juicer
Pulp container
When the lid is unlocked/removed, you can
remove the pulp container from the side of the
base. Grip the handle on the side of the container
and pull away from the unit to remove.
To replace the container onto the unit, use an
upwards scooping action to secure it under the
black clip at the top of the base.
Juicing blade
When the lid is removed, you can remove the
juicing blade from the top of the unit. Note: At no
point should you touch the blade as this could be
harmful. Carefully grip the rim at the top using the
fingertips of both hands and pull upwards to
detach.
To replace the juicing blade, place it back into the
top of the unit, aligning the grooves of the blade
base with the ribs in the driving cog at the top of
the unit. Push down on the rims at the top until it
‘clicks’ into place and secures.
Plastic jug
The plastic jug does not clip into place. Put the lid
onto the jug and make sure the square shaped
space in the lid is under the juice outlet on the
side of the juicer, so that the juice will pour into
the jug.
Food pusher
Remove the food pusher from the chute by lifting
it upwards. To replace, align the groove in the side
of the pusher with the plastic rib on the side of
the chute and lower.
Remove
Insert
Remove
Insert
9
Using your juicer
Now that you understand how to put together your juicer and your
fruit/vegetables are prepared, you are ready for use.
Remove the food pusher from the feeding chute if
it is placed in there. Plug the juicer into a suitable
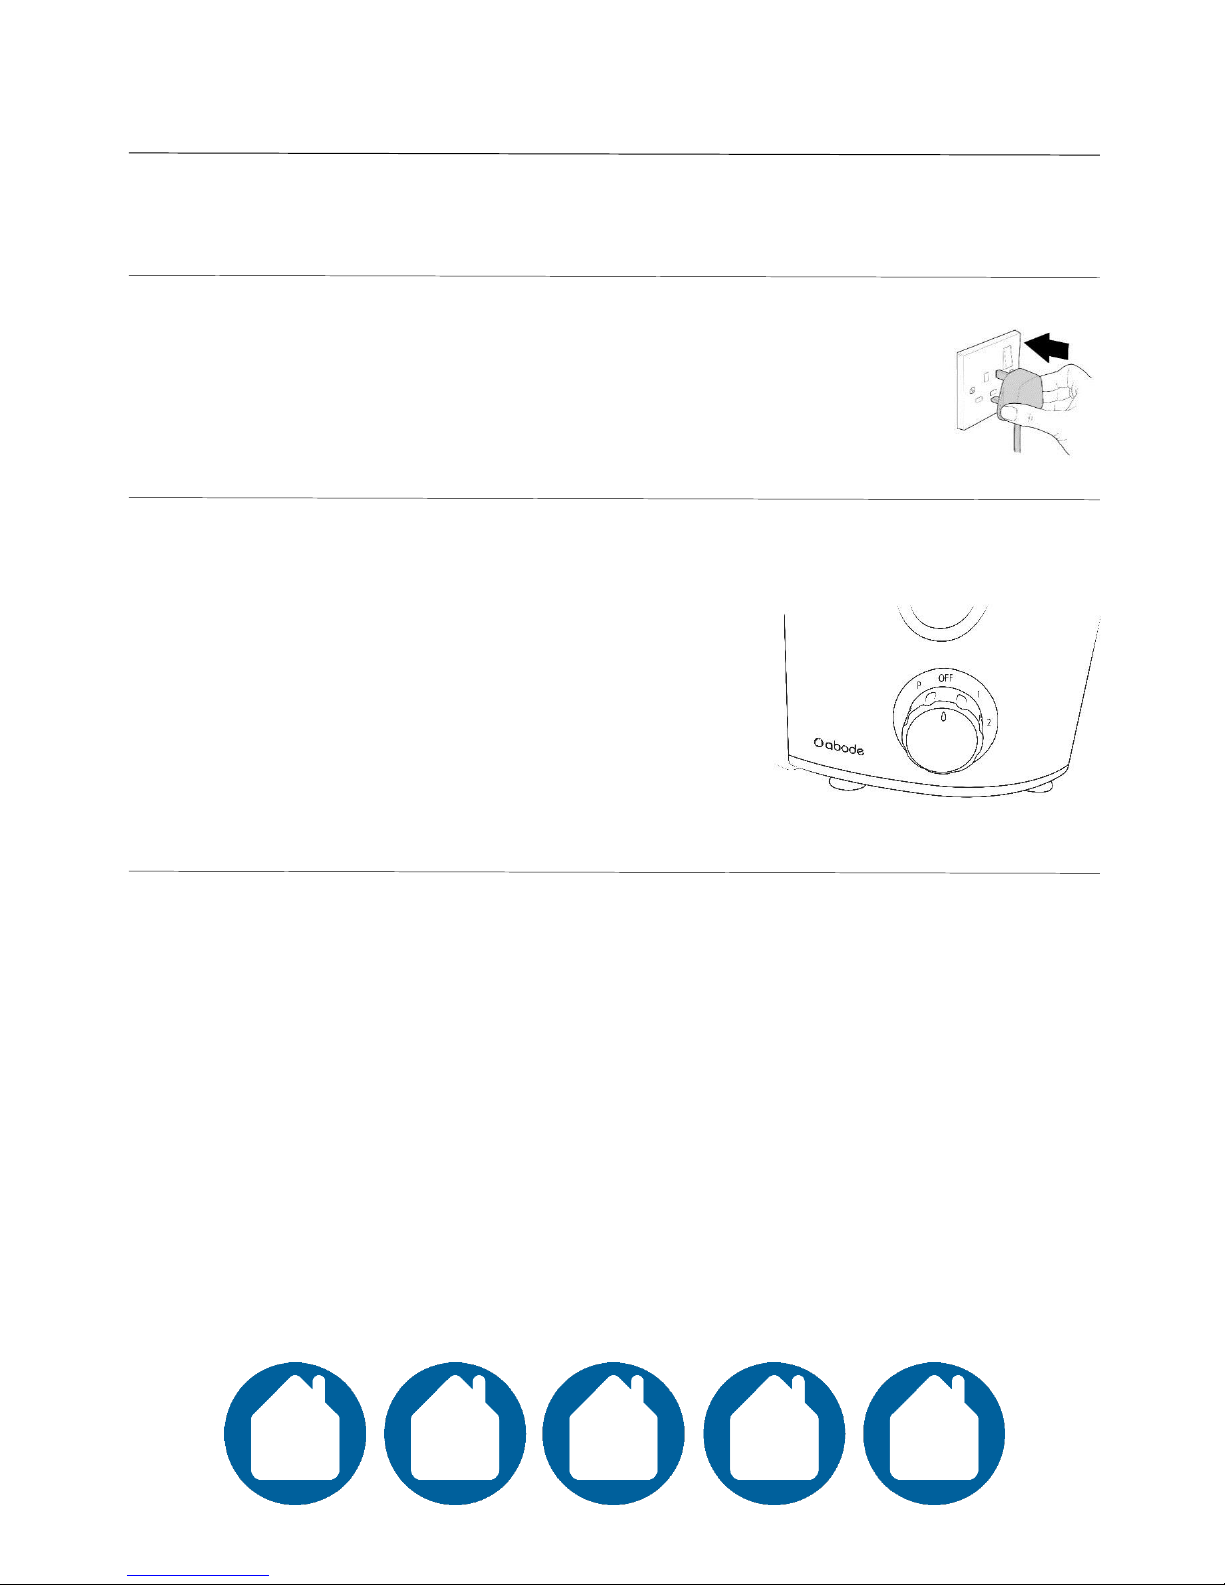
outlet and make sure it switched on.
Ensure that both locking arms are in the lock
position or the unit will not work.
Turn the power control dial to the required speed
setting. Speed ‘2’ will allow the unit to operate
faster than speed ‘1’, and the pulse, ‘P’ setting,
can be used for momentary power to the juicer.
Speed ‘1’ is especially useful for soft fruit and
vegetables, such as watermelons, grapes,
raspberries, cucumbers and tomatoes.
Speed ‘2’ is suitable for all kinds of fruit and
vegetables.
Note: The maximum time of one operating period is 2 minutes on full
power. If you operate for longer than this in one sitting, this could damage
the unit and create a potential hazard. Turn off and allow the unit to cool for
at least 2 minutes before continuing use.

10
Using your juicer
Place the pre-cut food into the feeding chute and
gently guide it to the juicing blade using the food
pusher. Never insert your fingers or other objects
into the feeding chute.
The juicer will filter the pulp into the container
and pump out the extracted juice from the juicer
outlet into the plastic jug. Do not exceed 600ml
juice/1,300ml pulp. When finished, turn the speed
control dial to the ‘OFF’ position and unplug.
Unlock the arms and remove the container as per
previous instructions. Empty contents carefully
into a bin.
Remove the plastic jug with juice in, gently tipping
left and pulling outwards. Pour into a drinking
glass and consume as soon as possible.
You can now refit these for continued use if
necessary.
Bin
Tabla de contenidos


